

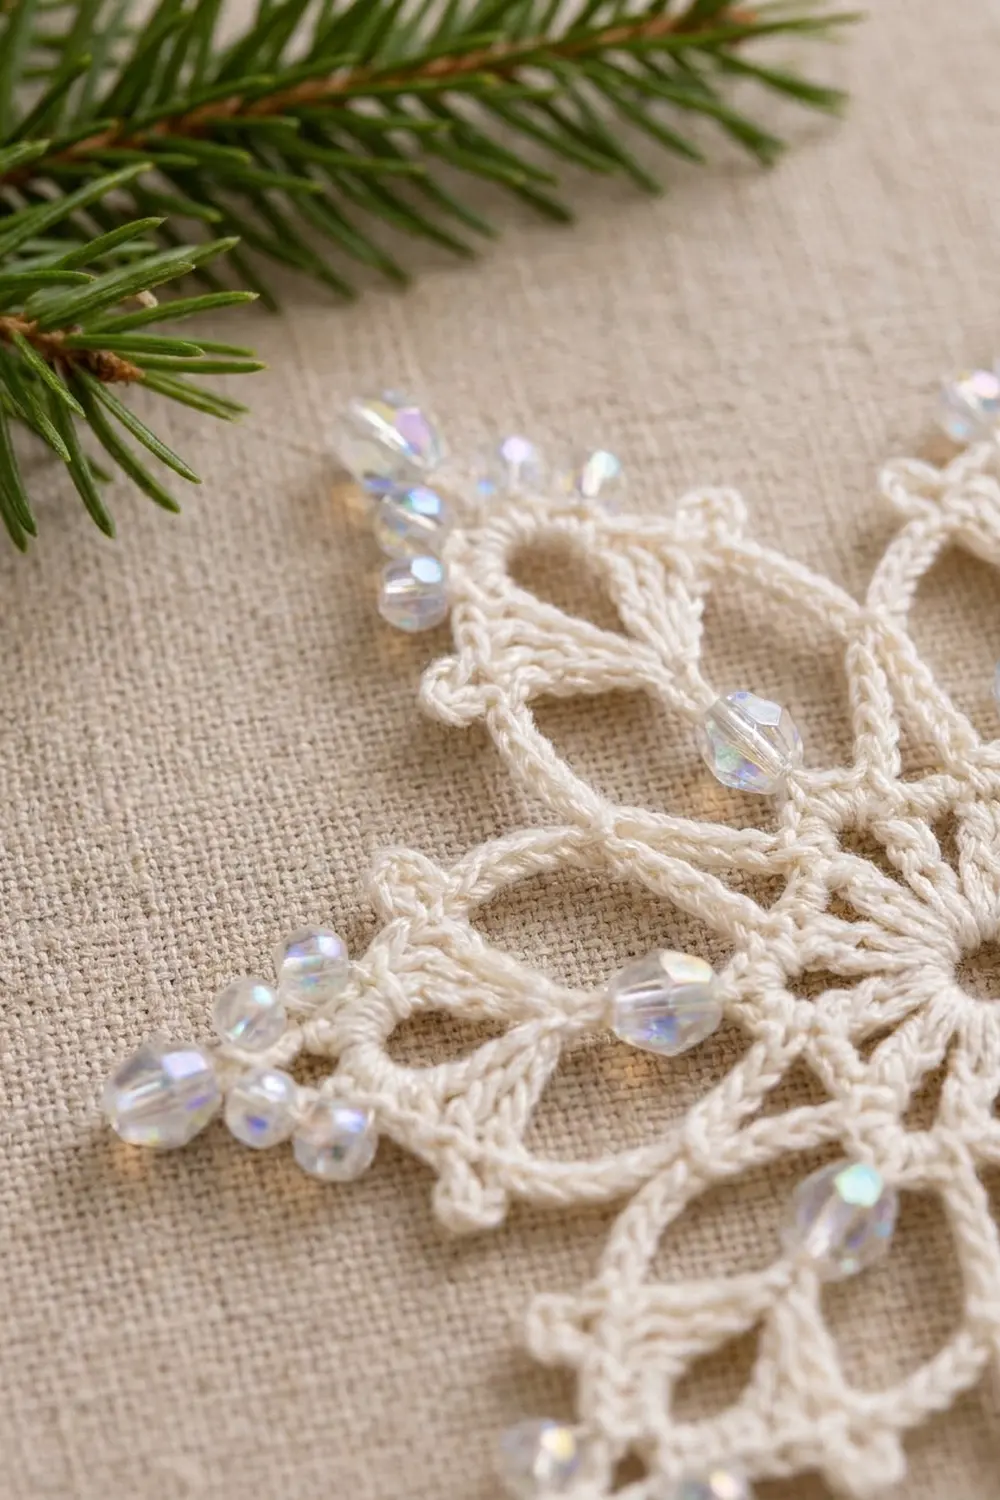
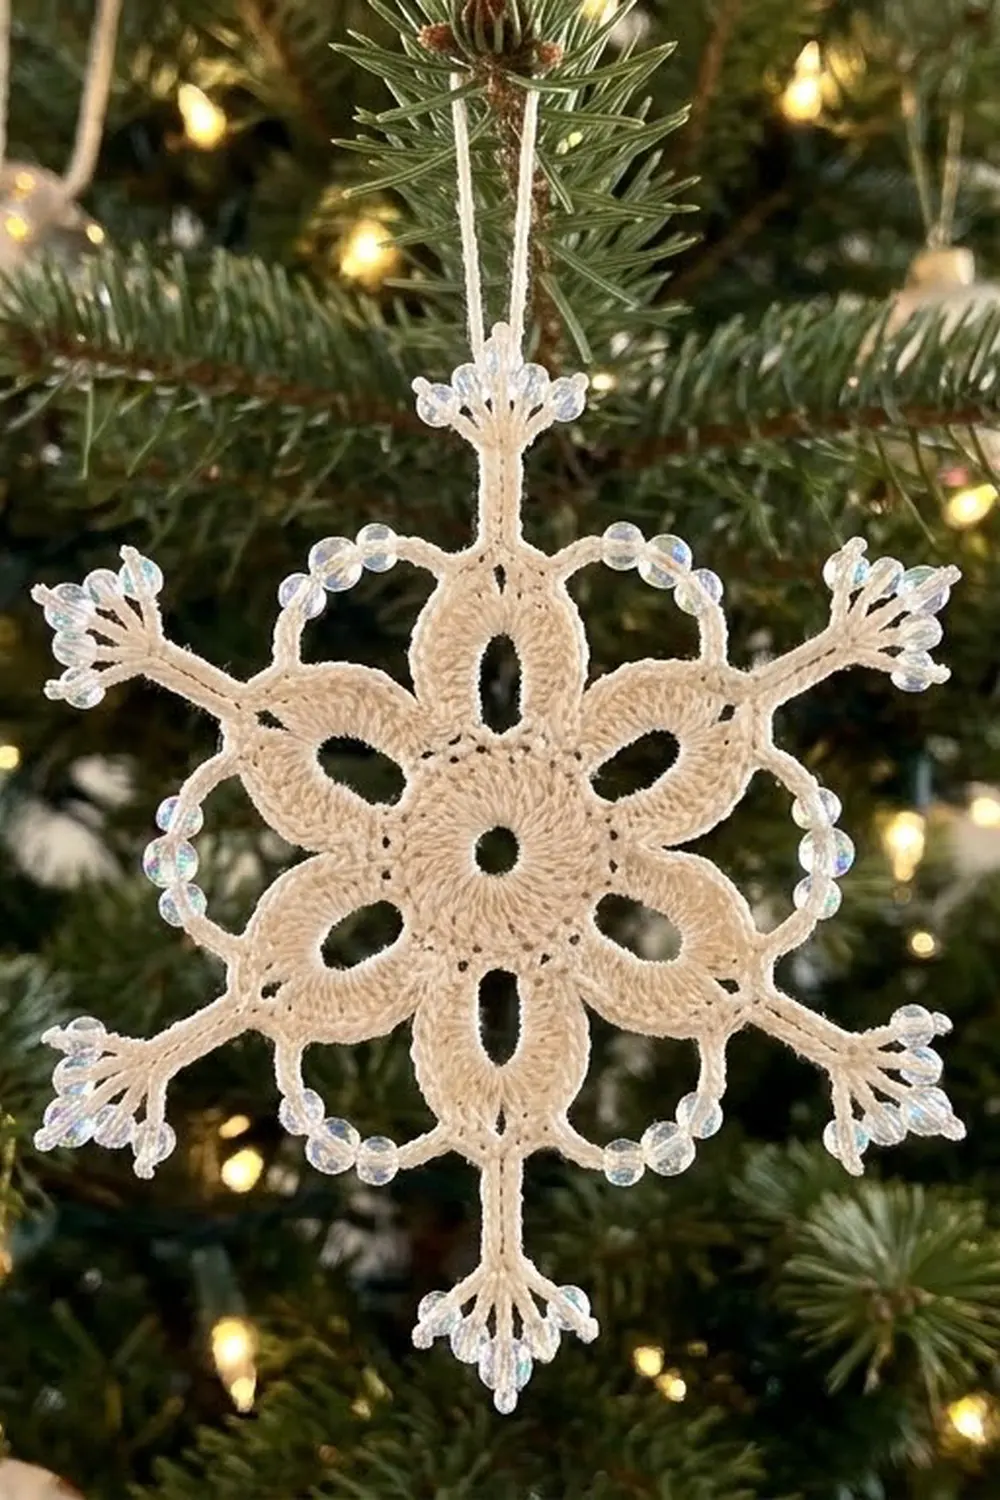
The Frost Pearl Snowflake is a six-pointed lace motif in soft cream cotton thread. Clear, iridescent beads are worked into the arm tips and along the scalloped arcs between the arms. Because the beads catch the light, the finished piece looks almost frosted, even when it hangs in a dim corner.
The design uses a single color of thread and one type of bead, so the texture carries the look. A solid center circle sits under six open teardrop petals. Six beaded arms come out of the petal tips, and gently curved arcs with beads link one arm to the next. The pattern uses US crochet terms throughout.
Blocked, the snowflake is 6 in (15.2 cm) from one arm tip to the opposite arm tip. That size works as a tree ornament, a gift-tag topper, or a window hanger. You can also use it as a test motif before committing to a larger project.
Construction is simple. You crochet the snowflake in the round from a magic ring as one piece, with no joining. Rounds 1–4 build the center and the petals without beads. Before Round 5 you string the beads, and then you work the arms. A short beaded edging round finishes the arcs. Starching and pinning give the motif its crisp, flat shape.
Finished Size and Construction
- Finished size: 6 in (15.2 cm) point to point, blocked
- Skill level: Intermediate (beaded picots, working into chain loops)
- Terminology: US crochet terms
- Yarn weight: Size 3 cotton crochet thread (fingering-weight thread)
- Hook: 2.25 mm (US B-1)
- Number of pieces: 1 (single motif, no joining)
- Layout: One six-pointed snowflake worked in the round
- Piece size: 6 in (15.2 cm) point to point
- Size before border: 6 in (15.2 cm) point to point after Round 5. The border sits on the arcs, so it does not change the point-to-point measurement.
- Border depth: About 0.25 in (0.6 cm) along each arc
Materials
Thread: Choose a mercerized cotton crochet thread in size 3. It has crisp stitch definition and takes starch well, so the points stay sharp. Avoid acrylic, which tends to curl back after you block it. Use a smooth, tightly plied cream or ivory thread so the lace reads cleanly.
- Cream (Main Color): 8 g, about 13 m (14 yd)
Beads:
- 40 clear iridescent (AB finish) seed beads, size 6/0 (about 4 mm). The pattern uses 36, and 4 are spares. Before you buy, check that the bead hole slides easily over doubled size 3 thread.
Tools:
- 2.25 mm (US B-1) crochet hook
- Big-eye beading needle or a dental-floss threader, for stringing beads
- Tapestry needle
- Scissors
- Blocking board or foam mat
- Rust-proof pins
- Spray starch or a fabric stiffener
- Ruler or tape measure
The quantities above include a margin of about 20% for swatching and weaving in ends.
Abbreviations (US Terms)
- ch – chain
- sl st – slip stitch
- sc – single crochet
- hdc – half double crochet
- dc – double crochet
- sp – space
- st(s) – stitch(es)
- rep – repeat
- bp – bead picot (see below)
Special stitch – Bead picot (bp): Ch 1, slide 1 bead up against the hook, ch 2, sl st in the first ch of the picot. The bead locks in at the outer tip of a tiny loop. Push it to the front (right side) of the work as you go.
Gauge and Checkpoints
Gauge is not critical for an ornament. Still, to get the stated size, work the motif once and measure it at each stage before you make several. Thread tension varies a lot from person to person, and small differences in the center add up by the time you reach the arm tips.
Gauge: Rounds 1–2 = 1.25 in (3.2 cm) in diameter.
Checkpoints:
- After Round 1: 0.75 in (1.9 cm) across
- After Round 2: 1.25 in (3.2 cm) across
- After Round 4: 3.5 in (8.9 cm) from petal tip to opposite petal tip
- After Round 5: 6 in (15.2 cm) from arm tip to opposite arm tip, lightly stretched
- After Round 6 and blocking: 6 in (15.2 cm) point to point
Too big? Go down to a 2 mm hook, or make the chains tighter. Loose chains in Rounds 3 and 5 are the usual reason for oversized snowflakes.
Too small or ruffled? Go up to a 2.5 mm hook. If only the arcs pull tight, add 1 ch to each side of the arc in Round 5 (ch 7 instead of ch 6). Then work 4 sc instead of 3 on each side in Round 6.
Pattern
Work in the round with the right side facing. Do not turn. The ch 3 at the start of a dc round counts as the first dc.
Before you start: Leave a 6 in (15.2 cm) tail at the magic ring. Keep your chains the same size as your stitches, because chain length controls the petal and arc shapes. Mark the first stitch of each round with a scrap of contrasting thread until you’re comfortable with the counts.
Round 1 – Center
Make a magic ring. Ch 3 (counts as dc), work 11 dc in the ring, and sl st in the top of the beginning ch 3. Pull the ring closed, leaving a small hole about 0.13 in (0.3 cm) wide in the center.
Stitch count: 12 dc.
Round 2 – Solid Disc
Ch 3 (counts as dc), dc in the same st, then work 2 dc in each st around. Sl st in the top of the beginning ch 3.
Stitch count: 24 dc. The disc should lie flat at 1.25 in (3.2 cm).
Round 3 – Petal Frames
Ch 1, sc in the same st. *Ch 8, skip 3 sts, sc in next st; rep from * 4 more times, ch 8, skip 3 sts, sl st in the first sc.
Stitch count: 6 sc and 6 ch-8 loops. Each repeat uses 4 sts of Round 2 (1 sc + 3 skipped), and 6 × 4 = 24, so the loops sit evenly. Each ch-8 loop stands away from the disc and leaves an open teardrop-shaped eye.
Round 4 – Petal Outline
Sl st in the first ch-8 loop. Work in each ch-8 loop: (2 sc, 2 hdc, 2 dc, ch 3, 2 dc, 2 hdc, 2 sc). Then sl st in the next Round 3 sc between loops. Rep around and end with a sl st in the base of the first petal.
Stitch count: 72 sts (12 per petal) plus 6 ch-3 tip sps and 6 sl sts. The stitches step from sc up to dc and back down again, so each petal comes to a point at its ch-3 tip with the open eye in the middle.
Check: 3.5 in (8.9 cm) from petal tip to opposite petal tip. Fasten off and weave in the center tail.
Prepare the Beads
Thread 36 beads onto the working thread with the beading needle or floss threader. Slide them back along the ball about 1 yd (0.9 m), and move them forward only when a bp calls for one.
Round 5 – Arms and Arcs
Join the beaded thread with a sl st in any ch-3 petal tip sp. Ch 1, sc in the same sp.
*Arm: Ch 9, sl st in the 5th ch from the hook to form a small tip ring. In the ring work (sc, bp, sc, bp, sc, bp, sc). Working down the remaining 4 chs of the stem, sc in each ch. Sl st in the same petal tip sp.
Arc: Ch 6, bp, ch 6, sc in the next petal tip sp.*
Rep from * to * 5 more times. On the last rep, replace the final sc with a sl st in the first sc.
Stitch count per arm: 8 sc + 3 bp. Per arc: 12 ch + 1 bp. Round total: 6 base sc, 48 arm sc, 18 arm bp, 6 arcs with 6 arc bp. Beads used: 24.
Each arm has a straight stem and a beaded tip ring with three beads fanned outward, which gives it a pointed, sparkling end. Each arc spans the gap between two arms, and the bead hangs at its center.
Tension tip: Hold each arm stem straight as you work the sc down it. If the stem twists, the tip ring will face sideways. Keep the arc chains relaxed rather than pulled snug.
Check: 6 in (15.2 cm) from arm tip to opposite arm tip.
Border – Beaded Arc Edging
The border goes along the 6 arcs only. The arms are already finished.
Border gauge: 3 sc + 1 bp cover about 0.75 in (1.9 cm) of a ch-6 sp. That is a little longer than the bare chain, so the arc relaxes into a smooth scallop and does not tighten.
Round 6
Continue from the end of Round 5. Ch 1, then work into the first ch-6 sp to the left of the arm, holding the arm forward and out of the way.
In the ch-6 sp: 3 sc, bp, 3 sc. Skip the arc bead. In the next ch-6 sp: 3 sc, bp, 3 sc. Sl st in the next base sc, passing behind the next arm. Rep from * to * 5 more times. Fasten off.
Count per arc: 12 sc + 2 bp + 1 sl st. Round total: 72 sc, 12 bp, 6 sl sts. Beads used: 12.
Why the math works: Each ch-6 sp gets 6 sc plus 1 bp. A bp takes about one stitch-width, so 7 stitch-widths sit on 6 chains, about 1.17 sts per ch. That small excess is the usual ratio for working over a chain without cupping. Each arc then carries 3 beads (bp, center bead, bp), and with 6 arcs that adds up to 18 beads on the arcs. Together with the 18 tip beads, the motif has 36 beads in total, which matches what you strung.
Weave in all ends along the back of the stem sc and the petal stitches. Do not trim them until after blocking.
Final Blocking
- Hand-wash the motif in lukewarm water or soak it for 5 minutes, then roll it in a towel to remove excess water.
- Draw or print a 6 in (15.2 cm) circle on paper divided into 6 equal 60° wedges. Place it under a sheet of plastic wrap on the blocking board.
- Lay the snowflake right side up and line each arm with one wedge line.
- Pin each arm tip ring at the circle edge so the 6 in (15.2 cm) measurement is exact.
- Pin each petal tip and the center of each arc. Pull the arcs into even, matching scallops.
- Open each petal eye with a pin so the teardrop shape is clear.
- Spray starch evenly over the piece, or brush on fabric stiffener, and push the beads to the front.
- Let it dry completely, usually 6–12 hours. Unpin it, then trim the woven-in ends close to the work.
Final Quality-Control Checklist
- 12 dc in Round 1 and 24 dc in Round 2, and the disc lies flat.
- 6 open teardrop petals of equal size.
- 6 arms, each with a straight stem and 3 beads on its tip ring.
- 6 arcs, each with 3 beads evenly spaced.
- 36 beads in total, all facing the front.
- 6 in (15.2 cm) from point to point across all three axes.
- No stiff or puckered areas, and all ends are secured and trimmed.
Troubleshooting
The center cups. The Round 2 stitches are too tight. Loosen your tension or use a hook 0.25 mm larger for Rounds 1–2 only.
The petals twist sideways. You skipped an uneven number of sts in Round 3. Recount: it must be exactly 3 skipped sts between each pair of sc.
The beads slip to the back. Push each bead to the front before you close its picot with the sl st, then nudge it into place again while blocking.
The beads run out early. You counted the strung beads wrong. Cut the thread and pull back to the start of the round, or join a new beaded strand at the base of an arm.
A bead won’t slide onto the thread. The hole is too small or rough. Set that bead aside and use one of the spares.
The arcs pull the arms inward. The arc chains are too tight. Rework them with ch 7 per side as noted in the gauge section.
The arms are floppy. Use more starch, or dip the piece in a 1:1 mix of fabric stiffener and water and let it dry flat.
Care
Hand-wash in cool water with a mild soap, press out the water, and re-block with fresh starch. Store the snowflake flat between tissue paper so the points stay crisp and the beads don’t scratch.
Final Notes
The measurement chain is short and dependable. A 1.25 in (3.2 cm) disc after Round 2 leads to petals measuring 3.5 in (8.9 cm) tip to tip after Round 4, and arms measuring 6 in (15.2 cm) point to point after Round 5. The beaded arc edging then adds about 0.25 in (0.6 cm) of depth along the arcs without changing that final span. Check each stage and adjust the hook early, and every snowflake you make will come out the same 6 in (15.2 cm) size, ready to hang, gift, or tuck into a holiday card.
Happy crocheting!