

The Harvest Maple Leaf Panel is a small autumn piece made from ten framed maple leaf motifs set in a rust-and-cream checkerboard. Each leaf has five pointed lobes, a short stem, and raised vein lines. A cream outline and an open frame turn each leaf into a square, which leaves small triangular windows around the leaf.
The panel uses two colors, burnt orange (rust) and warm cream, which alternate across the panel. All outlines, frames, seams, and the border are cream, which ties the design together. You can use it as a table centerpiece, a dresser scarf, or a fall wall hanging.
This pattern uses US crochet terms. The finished panel measures 10 x 23.5 in (25.4 x 59.7 cm) after blocking.
You work each motif in the round from the center out. First comes a leaf in rust or cream, then surface veins, a cream outline, an open frame, and a square single crochet round. Next you join the ten squares with flat slip stitch seams. A two-round picot border finishes the panel.
Finished Size and Construction
- Finished size: 10 x 23.5 in (25.4 x 59.7 cm)
- Skill level: Intermediate
- Terminology: US terms
- Yarn weight: DK (light, #3)
- Hook: 4.5 mm (US 7)
- Number of pieces: 10 motifs (5 rust leaves, 5 cream leaves)
- Layout: 2 motifs across x 5 motifs down, checkerboard
- Motif size: 4.5 x 4.5 in (11.4 x 11.4 cm), 19 sts per side
- Size before border: 9 x 22.5 in (22.9 x 57.2 cm)
- Border depth: 0.5 in (1.3 cm) on each side
Materials
Choose a smooth DK cotton or cotton blend with a matte finish so the veins and leaf points show clearly. A yarn with about 230 m per 100 g works well. Fuzzy or splitty yarns will blur the points.
- Color A, Rust: 25 g (approx. 58 m)
- Color B, Cream: 95 g (approx. 219 m)
Tools:
- 4.5 mm (US 7) crochet hook
- Tapestry needle
- Scissors
- Stitch markers (at least 4)
- Rust-proof pins and a blocking mat
- Spray bottle
- Tape measure
All quantities include a margin of about 15–20% for gauge differences and a test motif.
Abbreviations (US Terms)
- ch – chain
- sl st – slip stitch
- sc – single crochet
- hdc – half double crochet
- dc – double crochet
- tr – treble crochet
- dtr – double treble crochet (yarn over 3 times, insert hook, pull up a loop, [yarn over, pull through 2 loops] 4 times)
- sp – space
- st(s) – stitch(es)
- RS – right side
Special stitches
- Picot: Ch 3, sl st in 3rd ch from hook.
- Surface sl st: Hold the yarn behind the motif. Insert the hook from front to back between stitches, pull up a loop, and draw it through the loop on your hook. This makes a raised chain line on the RS.
- Flat sl st join: With both motifs RS up and edges side by side, sl st into the back loop of a stitch on one motif. Then sl st into the back loop of the matching stitch on the other motif, and keep alternating.
Gauge and Checkpoints
Gauge: 17 sc = 4 in (10.2 cm) with a 4.5 mm hook.
Make one complete motif first and block it lightly before going on. This motif is your real gauge test.
Checkpoints for one motif:
- After Round 2: circle about 2 in (5.1 cm) across
- After Round 3: about 3.5 in (8.9 cm) from upper-left tip to upper-right tip
- After Round 4: about 3.75 in (9.5 cm) across the same tips
- After Round 6: 4.5 x 4.5 in (11.4 x 11.4 cm) square, 19 sts per side
If the motif is bigger than 4.5 in (11.4 cm), go down to a 4.0 mm hook. If it’s smaller, go up to a 5.0 mm hook. If the leaf is fine but the frame pulls in or ripples, change hooks for Rounds 5–6 only.
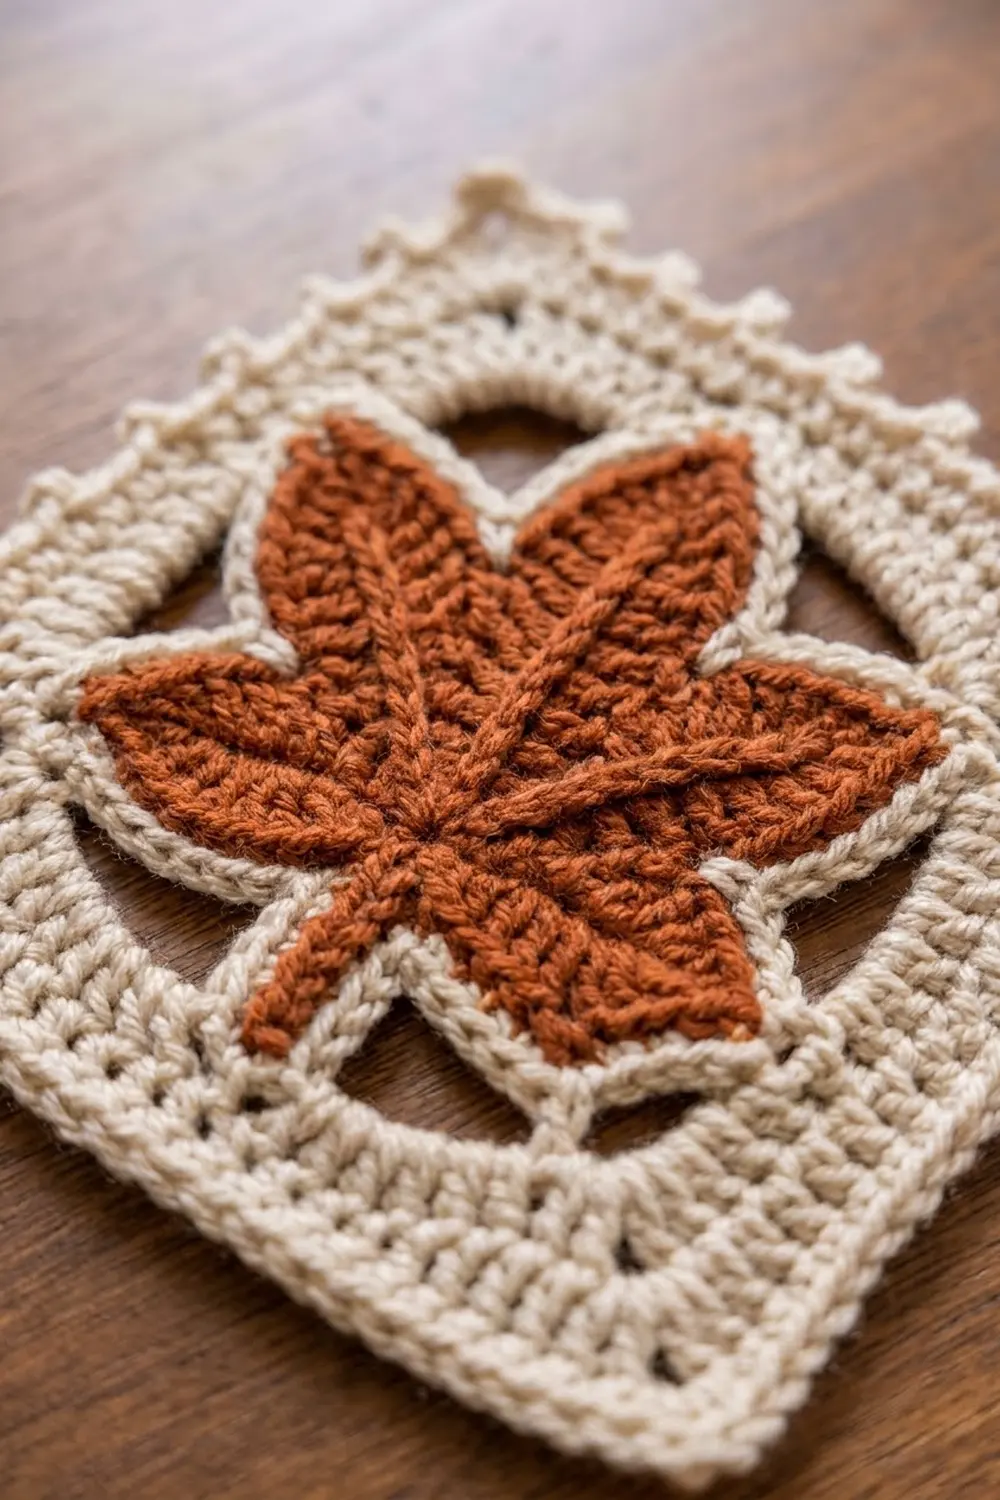
Motif Pattern
Work the leaf (Rounds 1–3) in Color A for rust motifs or Color B for cream motifs. Rounds 4–6 are always Color B.
Round 1: Magic ring, ch 3 (counts as dc), 11 dc in ring, sl st to top of beg ch-3. Pull the ring closed. (12 dc)
Round 2: Ch 3 (counts as dc), dc in same st, 2 dc in each st around, sl st to top of beg ch-3. (24 dc)
Round 3 (lobes and stem): This round splits the 24 sts into 6 sections of 4 sts: five lobes and one stem.
Lobe: sc in next st, (hdc, dc) in next st, (tr, ch 2, tr) in next st, (dc, hdc) in next st.
Stem section: sc in next 2 sts, ch 6, sl st in 2nd ch from hook and in next 4 ch, sc in next 2 sts.
Ch 1. Work a lobe 5 times around: lower-right, upper-right, top, upper-left, and lower-left. Then work the stem section. Sl st to first sc. Fasten off.
(35 lobe sts, 5 tip ch-2 sps, 4 stem-section sc, 5-st stem)
Turn the leaf so the stem points down. The first sc of each lobe sits in the notch between two lobes.
Veins: Using the leaf color, join a new strand at the center ring. Work surface sl sts in a straight line out to the tip ch-2 sp of one lobe, then fasten off on the back. Repeat for all 5 lobes, then add one short line to the stem base. Weave in all ends.
Round 4 (outline): With RS facing, join B with sc in the first sc of the lower-right lobe.
- Each lobe: sc in each st up to the tip, (sc, ch 2, sc) in the tip ch-2 sp, then sc in each remaining st of the lobe.
- Stem section: sc in each of the 4 sc, keeping the stem in front of your work.
Sl st to first sc.
(49 sc and 5 tip ch-2 sps: 9 sc per lobe x 5 = 45, plus 4 at the stem)
Round 5 (open frame): This round squares off the leaf. The chain spans skip over outline stitches, which creates the triangular windows.
Join B with sl st in the notch sc at the start of the top lobe. This is the top-right corner.
- Ch 5 (counts as dtr), (dtr, ch 2, 2 dtr) in same st. (top-right corner)
- Ch 5, sc in top tip ch-2 sp. (top midpoint)
- Ch 5, (2 dtr, ch 2, 2 dtr) in notch sc at start of upper-left lobe. (top-left corner)
- Ch 5, sc in upper-left tip ch-2 sp. (left midpoint)
- Ch 5, (2 hdc, ch 2, 2 hdc) in lower-left tip ch-2 sp. (bottom-left corner)
- Ch 5, sc in 2nd sc of stem section, behind the stem. (bottom midpoint)
- Ch 5, (2 hdc, ch 2, 2 hdc) in lower-right tip ch-2 sp. (bottom-right corner)
- Ch 5, sc in upper-right tip ch-2 sp. (right midpoint)
- Ch 5, sl st to top of beg ch-5.
(20 sts: 8 dtr, 8 hdc, 4 sc; plus 8 ch-5 sps and 4 corner ch-2 sps)
Between corner ch-2 sps, each side now has 2 sts, ch-5, 1 sc, ch-5, 2 sts. The top corners use tall dtr because they sit in the notches. The bottom corners use hdc because they sit on lobe tips.
Round 6 (square): Sl st in next dtr and into the corner ch-2 sp. Ch 1, 3 sc in same sp.
Sc in next 2 sts, 5 sc in next ch-5 sp, sc in next sc, 5 sc in next ch-5 sp, sc in next 2 sts, 3 sc in next corner ch-2 sp. Repeat from * 3 more times, leaving out the final 3-sc corner because you already worked it. Sl st to first sc. Fasten off.
(72 sc: 15 sc between corner groups x 4 = 60, plus 4 corner groups of 3 = 12)
The middle sc of each 3-sc group is the corner st. Each side has 19 sts, counting both of its corner sts. Check: 4 x 19 – 4 shared corners = 72.
Make All Pieces
- Rust motifs: 5 (leaf in A, Rounds 4–6 in B)
- Cream motifs: 5 (whole motif in B)
Layout grid (R = rust, C = cream), RS facing:
Row 1:  R  C
Row 2:  C  R
Row 3:  R  C
Row 4:  C  R
Row 5:  R  C
Turn every motif so its stem points toward the bottom of the panel. Lightly spray-block each motif to 4.5 in (11.4 cm) square before joining.
Joining
Use the flat sl st join in Color B. It adds no height, keeps the panel flat, and leaves a thin cream line between squares.
Stitch-to-stitch logic: Each motif side has 19 sts, so every seam matches 19 sts to 19 sts. Start in the corner st of both motifs and end in the corner st of both. Don’t skip or add any stitches.
Order:
- Short seams: Join the 2 motifs in each row, for 5 seams of 19 sts each.
- Long seams: Join Row 1 to Row 2, Row 2 to Row 3, and so on, for 4 seams of 38 sts each (2 motifs x 19). Where four corners meet, work through both corner sts on each side so the intersection lies flat.
Tension: Keep your slip stitches as loose as the Round 6 sc. If a seam pulls in, redo it with a hook one size larger. After each long seam, check that the panel lies flat with no puckers.
Checkpoint: The joined panel measures 9 x 22.5 in (22.9 x 57.2 cm).
Border
Work the border in Color B at the same gauge as the motifs: 17 sc = 4 in (10.2 cm).
Starting counts along the edge:
- Short sides: 2 motifs x 19 sts = 38 sts per side, including both panel corner sts
- Long sides: 5 motifs x 19 sts = 95 sts per side, including both panel corner sts
- Panel perimeter: 2 x 38 + 2 x 95 – 4 shared corners = 262 sts
At each seam, work into both motifs’ corner sts as normal stitches. Nothing is added at the seams.
Border Round 1: Join B with sc in any panel corner st, then work 2 more sc in the same st. Sc in each st around, with 3 sc in each of the other 3 panel corner sts. Sl st to first sc.
- Each corner st becomes 3 sc. The middle sc is the new corner.
- Short side: 40 sts including both new corners (38 between corners)
- Long side: 97 sts including both new corners (95 between corners)
- Total: 270 sc (262 + 4 corners x 2 extra)
Border Round 2 (picot points): Sl st to the corner sc. Ch 1, (sc, picot, sc) in the corner sc.
Along each side, repeat this 19-st section (one motif width): sc in next 2 sts, [picot, sc in next 3 sts] 5 times, picot, sc in next 2 sts.
- Short sides: Work the section 2 times (38 sts, 12 picots).
- Long sides: Work the section 5 times (95 sts, 30 picots).
At each remaining corner, work (sc, picot, sc) in the corner sc. Sl st to first sc. Fasten off.
Total: 274 sc and 88 picots
- Sc: 266 side sc + 8 corner sc = 274
- Picots: 84 side picots + 4 corner picots = 88
Why the math works: Round 1 puts exactly one sc in each edge stitch. The border and the motifs share the same gauge, so the border matches the edge length and won’t ruffle or cup. The only extras are 2 sc per corner, which let the border turn. In Round 2, each 19-st section matches one motif side, so the picots repeat evenly along every edge.
The border adds 0.5 in (1.3 cm) per side, taking the panel from 9 x 22.5 in (22.9 x 57.2 cm) to 10 x 23.5 in (25.4 x 59.7 cm).
Final Blocking
- Weave in every end.
- Spray the panel evenly until damp but not dripping.
- Lay it RS up on the blocking mat.
- Pin the 4 outer corners to 10 x 23.5 in (25.4 x 59.7 cm). Check that both diagonals are the same length.
- Pin along each seam so each motif sits at 4.5 in (11.4 cm).
- Pin out each leaf’s 5 tips and its stem, and gently open the triangular windows.
- Pin each border picot into a small point.
- Let it dry completely (at least 12 hours) before unpinning.
Final Quality-Control Checklist
- [ ] 10 motifs: 5 rust and 5 cream, in a checkerboard with rust at top left
- [ ] All stems point toward the same short edge
- [ ] Each motif has 72 sc in Round 6, with 19 sts per side
- [ ] Every leaf has 5 vein lines and 1 stem line
- [ ] Seams match 19 sts to 19 sts, and the four-corner joins lie flat
- [ ] Border Round 1 has 270 sc, and Round 2 has 274 sc and 88 picots
- [ ] Finished size is 10 x 23.5 in (25.4 x 59.7 cm)
- [ ] All ends are woven in and invisible from the RS
Troubleshooting
- Leaf cups in Round 3: Your tall stitches are too tight. Loosen your tr, or use a 5.0 mm hook for Round 3 only.
- Leaf ruffles: Check that Round 2 has exactly 24 dc and that each lobe uses exactly 4 sts.
- Frame corners are off: Recount the Round 4 notch sts. The top-right corner must sit in the first sc of the top lobe.
- Windows are too large: Change each ch-5 to ch-4. Keep working 5 sc into each sp in Round 6 so the counts stay the same.
- Seam puckers: A stitch was probably skipped or doubled. Redo the seam with exactly 19 pairs per motif.
- Border waves: Your border is looser than the motifs. Rework it with a 4.0 mm hook.
Care
Hand wash in cool water with mild soap. Roll it in a towel to press out the water, then dry it flat and reshape the leaf points.

Final Notes
The measurement chain:
- Motif: 4.5 in (11.4 cm) square, 19 sts per side.
- Joined panel: 2 x 5 motifs, 9 x 22.5 in (22.9 x 57.2 cm), with 38 and 95 sts along the edges.
- Finished panel: a 0.5 in (1.3 cm) border brings it to 10 x 23.5 in (25.4 x 59.7 cm).
If your first motif hits 4.5 in (11.4 cm), every later number falls into place.
Happy crocheting!