

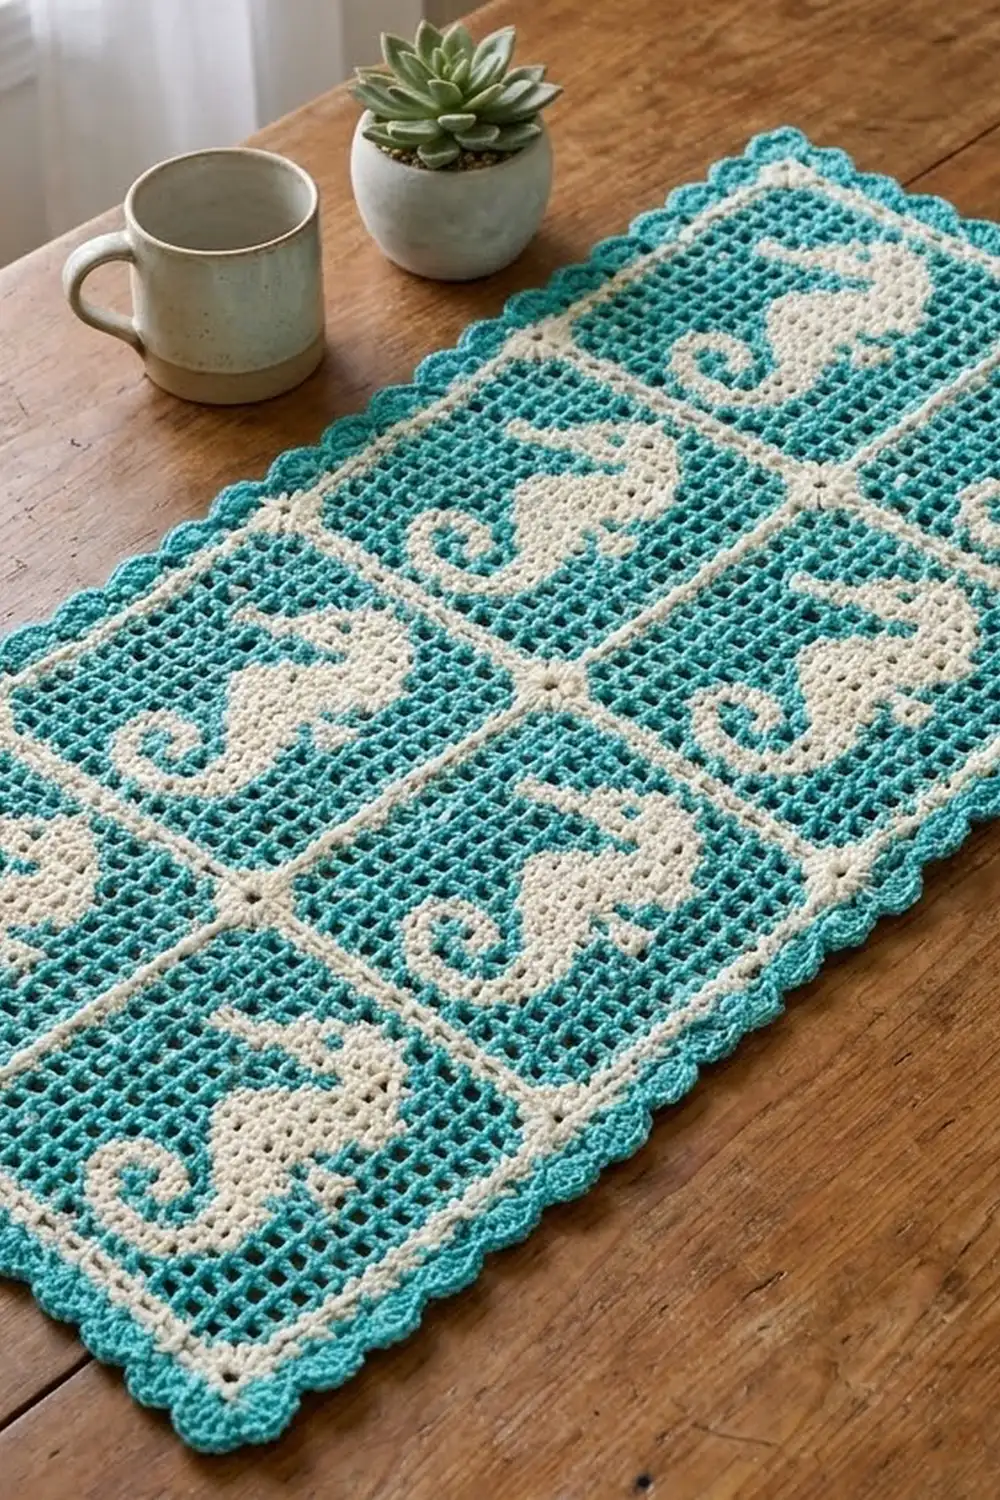
This panel has six filet squares, each with a cream seahorse on an open teal mesh. Thin cream frames outline every square, and a teal shell edging finishes the outside. You can use it as a table mat, a dresser scarf or a small wall hanging.
The colors are turquoise teal and soft cream, so it has a calm, coastal look. The seahorse is made of solid cream blocks, and the teal mesh around it lets light through, so the shape stands out clearly.
All terms are US crochet terms. The finished panel measures 16.5 x 23.5 in (41.9 x 59.7 cm) after blocking.
You make six identical filet squares in rows, using intarsia color changes. Then you add a cream single-crochet frame to each square, join the squares with cream slip stitches, and work a three-round border.
Finished Size and Construction
- Finished size: 16.5 x 23.5 in (41.9 x 59.7 cm)
- Skill level: Intermediate (filet crochet plus intarsia color changes)
- Terminology: US
- Yarn weight: DK / light (3) cotton
- Hook: 4.0 mm (G-6)
- Number of pieces: 6 squares
- Layout: 2 squares across x 3 squares down
- Filet area of each square: 6.5 x 6.5 in (16.5 x 16.5 cm), 13 x 13 meshes
- Each square with frame: 7 x 7 in (17.8 x 17.8 cm)
- Size before border: 14 x 21 in (35.6 x 53.3 cm)
- Border depth: 1.25 in (3.2 cm) on each side
Materials
Use a smooth mercerized or matte cotton in DK weight. Cotton holds the mesh crisp and blocks well. Avoid fuzzy yarns, because they blur the seahorse outline.
- Teal (Color A): 100 g / 220 m
- Cream (Color B): 55 g / 120 m
These amounts include a margin of about 15% for swatching, bobbins and weaving in ends.
Tools:
– 4.0 mm (G-6) crochet hook
– 4 small yarn bobbins or cardboard cards
– Locking stitch markers
– Tapestry needle
– Rust-proof pins, blocking mats and a spray bottle
– Measuring tape
Abbreviations (US Terms)
- ch – chain
- sl st – slip stitch
- sc – single crochet
- dc – double crochet
- sk – skip
- sp – space
- st(s) – stitch(es)
- RS / WS – right side / wrong side
Special stitches
- Open mesh (OM), in Teal: ch 1, sk next st, dc in next dc.
- Filled block (FB), in Cream: dc in next ch-1 sp (or dc), dc in next dc.
- Color change: work the last yarn over of the st before the new color with the new color.
Each row starts with ch 3, which counts as the first dc and is the edge post. After that, every mesh uses 2 sts, so each row has 1 + (13 x 2) = 27 sts.
Gauge and Checkpoints
Gauge: 2 meshes and 2 rows = 1 in (2.5 cm) in filet mesh, measured after blocking. That is the same as 8 meshes x 8 rows = 4 in (10.2 cm).
Make one complete square first and treat it as your swatch.
- Checkpoint 1, after Row 13: the filet area measures 6.5 x 6.5 in (16.5 x 16.5 cm).
- Checkpoint 2, after the frame round: the square measures 7 x 7 in (17.8 x 17.8 cm).
- Checkpoint 3, after joining: the panel measures 14 x 21 in (35.6 x 53.3 cm).
- Checkpoint 4, after the border: the panel measures 16.5 x 23.5 in (41.9 x 59.7 cm).
If your square is too big, go down a hook size. If it is too small, go up a hook size. If the square comes out taller than it is wide, make the ch-3 at the start of each row a little tighter, or replace it with ch 2 plus a loose dc. Do not change the number of meshes, because the border math depends on 27 sts per side.
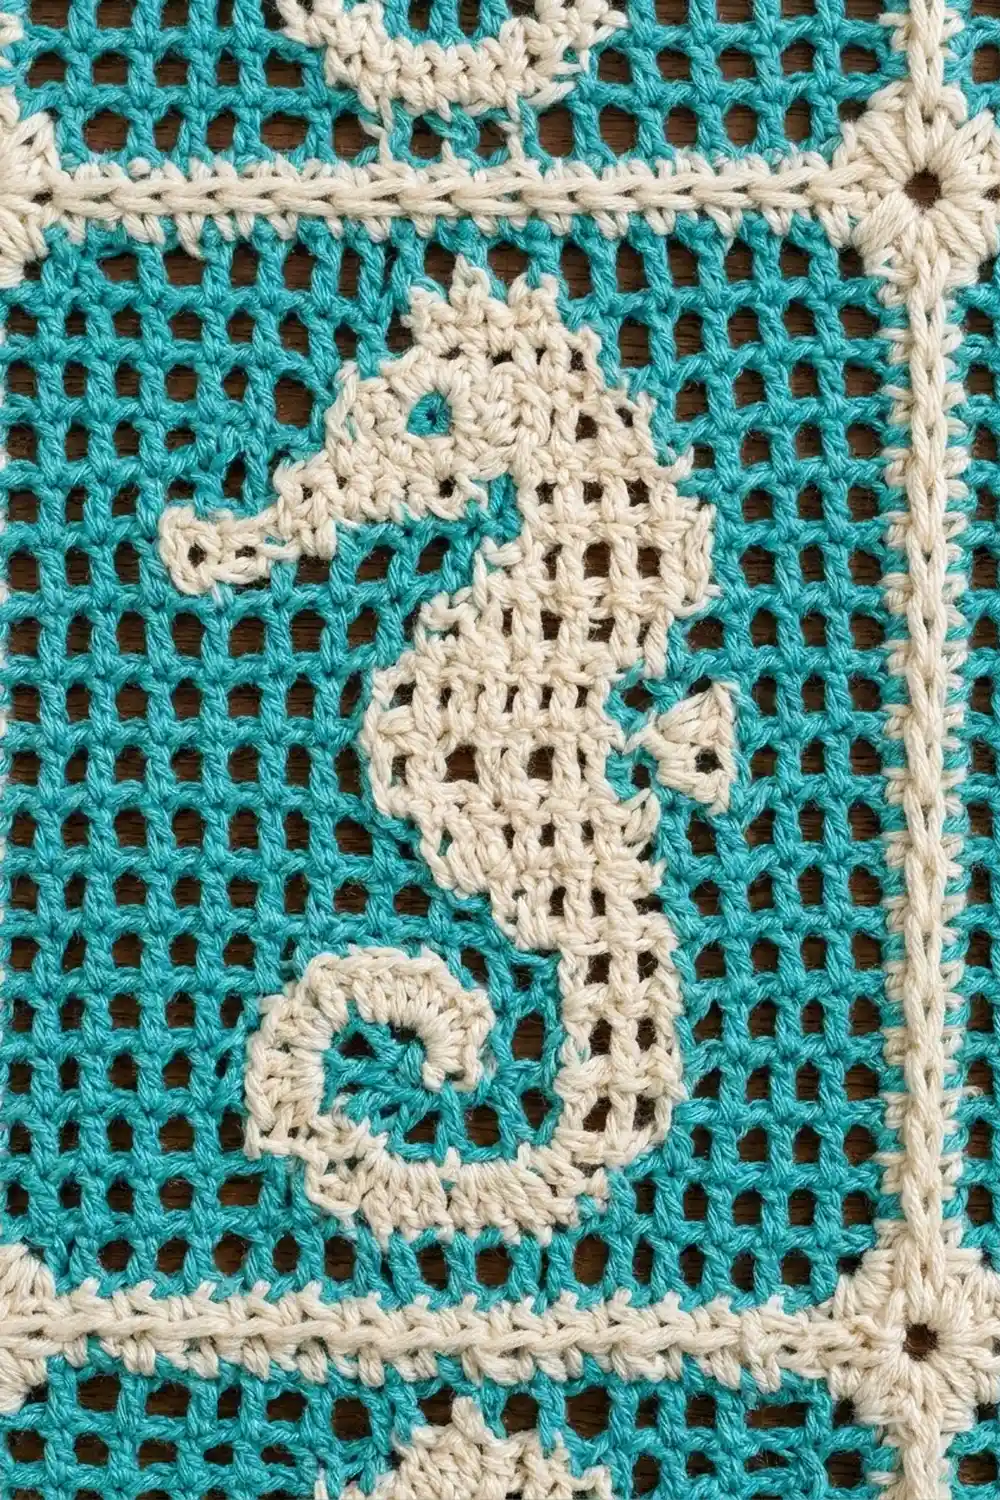
Seahorse Square (make 6)
Bobbins: Never carry yarn across an open mesh. Use the Teal ball for the right-hand teal section and a Teal bobbin for the left-hand section. Use one Cream bobbin for the seahorse. Rows 3 and 11 each need one more Cream bobbin and one more Teal bobbin for the small extra sections.
The instructions are written for right-handed crocheters. RS rows are read from the right edge and WS rows from the left edge, so the seahorse faces left on the RS. If you crochet left-handed, the seahorse will face right.
Foundation: With Teal, ch 30.
Row 1 (RS): Dc in 6th ch from hook. The skipped chains make the edge post and the first ch-1 sp. Ch 1, sk 1 ch, dc in next ch 12 times. (13 OM; 27 sts)
For Rows 2–13, ch 3 (counts as dc) and turn at the start of each row. The last dc of each row goes into the 3rd ch of the turning ch-3.
Row 2 (WS): 4 OM, 4 FB, 5 OM. (27 sts)
Row 3 (RS): 4 OM, 2 FB, 2 OM, 1 FB, 4 OM. (27 sts)
Row 4: 6 OM, 3 FB, 4 OM. (27 sts)
Row 5: 4 OM, 4 FB, 5 OM. (27 sts)
Row 6: 4 OM, 5 FB, 4 OM. (27 sts)
Row 7: 3 OM, 6 FB, 4 OM. (27 sts)
Row 8: 4 OM, 6 FB, 3 OM. (27 sts)
Row 9: 4 OM, 4 FB, 5 OM. (27 sts)
Row 10: 6 OM, 4 FB, 3 OM. (27 sts)
Row 11: 3 OM, 2 FB, 1 OM, 6 FB, 1 OM. (27 sts) The single OM between the two FB groups is the eye. The group of 6 FB is the head and the snout.
Row 12: 6 OM, 3 FB, 4 OM. (27 sts)
Row 13: 13 OM. (27 sts)
Each row adds up to 13 meshes. The seahorse uses 50 filled blocks and the background uses 119 open meshes. Rows 2–3 form the tail curl, Rows 4–9 the body and belly, and Rows 10–12 the neck, head, crown, eye and snout. Rows 1 and 13 are open teal margins. Fasten off Teal.
Checkpoint 1: 6.5 x 6.5 in (16.5 x 16.5 cm).
Frame Round (Cream)
With the RS facing, join Cream in the top of the turning ch at the top-right corner.
Round 1: Ch 1.
– Top edge: sc in same st, then sc in each ch-1 sp and each dc across. (27 sc) Ch 2 for the corner.
– Left side: work 2 sc in each of the 13 row-ends, but work 3 sc in the Row 7 row-end. (27 sc) Ch 2.
– Bottom edge: sc in the free loop of each of the 27 foundation chains. (27 sc) Ch 2.
– Right side: work the same as the left side. (27 sc) Ch 2, then sl st to the first sc.
(108 sc: 27 per side, plus 4 corner ch-2 sps)
Each side has 27 sc between its corner spaces. The ch-2 corners are not counted as stitches.
Checkpoint 2: 7 x 7 in (17.8 x 17.8 cm). Weave in the ends, then pin the square to 7 in (17.8 cm) and steam or mist it before joining.
Make All Pieces
- Squares: 6
- Teal per square: about 20 m
- Cream per square: about 13 m
Layout (A = seahorse square; all squares have the same orientation, with the snout pointing left and Row 13 at the top):
[A][A]
[A][A]
[A][A]
Joining
Method: Slip stitch seam in Cream, worked with the wrong sides together. This makes the raised cream lines between the squares on the RS.
Stitch-to-stitch logic: Each square side has 27 sc between two corner ch-2 sps. You match one sc to one sc, so no stitches are added or skipped.
- Join each pair across (3 short seams). Hold two squares with the WS together. Through both loops of both layers, sl st in the matching corner ch-2 sps, sl st in each of the 27 sc pairs, then sl st in the next corner ch-2 sps. (29 sl st) Repeat for all three pairs.
- Join the pairs top to bottom (2 long seams). Hold two pairs with the WS together. Sl st through the corner sps, the 27 sc pairs, both pairs of corner sps where the squares meet, the next 27 sc pairs, and the last corner sps. (58 sl st) At the center, where four corners meet, work 1 sl st over the earlier seam. This makes the small cream knot.
Tension: Your sl sts should be as loose as your sc. If the seam puckers, use a hook one size larger for joining only.
Checkpoint 3: 14 x 21 in (35.6 x 53.3 cm).
Border
Border gauge: Round 1 is about 0.25 in (0.6 cm) deep, Round 2 about 0.5 in (1.3 cm) and Round 3 about 0.5 in (1.3 cm). The total is 1.25 in (3.2 cm).
Starting count: short side = 2 squares x 27 sc = 54 sc. Long side = 3 squares x 27 sc = 81 sc.
Round 1 (Cream): With the RS facing, join in any outer corner ch-2 sp. Ch 1.
– Each corner: (sc, ch 2, sc) in the corner sp.
– Along each side: sc in each sc. Where two squares meet, work 1 sc through both joined corner ch-2 sps together.
– Short sides: 54 + 1 seam sc + 2 corner sc = 57 sc.
– Long sides: 81 + 2 seam sc + 2 corner sc = 85 sc.
Sl st to the first sc. (284 sc + 4 ch-2 sps) Fasten off.
Round 2 (Teal): Join in any corner ch-2 sp. Ch 3 (counts as dc).
– Each corner: (dc, ch 2, dc) in the corner sp.
– Along each side: dc in each sc.
– Short sides: 57 + 2 = 59 dc.
– Long sides: 85 + 2 = 87 dc.
Sl st to the top of ch-3. (292 dc + 4 ch-2 sps)
Round 3 (Teal scallops): Sl st into the corner sp.
– Each corner: 7 dc in the corner ch-2 sp.
– Along each side: sk 1, sc in next, sk 1, 5 dc in next across, ending with sk 1, sc in next, sk 1 before the corner.
– Short sides: 14 shells and 15 sc.
– Long sides: 21 shells and 22 sc.
Sl st to the first dc. (70 side shells + 4 corner shells; 74 sc) Fasten off.
Why the math works: The scallop needs a side count of 4k + 3. Short sides: 4 x 14 + 3 = 59. Long sides: 4 x 21 + 3 = 87. The square sides themselves give 54 and 81, a difference of 27, so they could never both fit a 4-stitch repeat. Round 1 adds 1 sc at each seam point, which is 1 on the short sides and 2 on the long sides. That brings the difference to 28, which divides evenly by 4.
Checkpoint 4: 16.5 x 23.5 in (41.9 x 59.7 cm).
Final Blocking
- Soak the panel in cool water for 10 minutes. Press the water out gently, without wringing.
- Roll it in a towel to remove the extra water.
- Lay it flat on blocking mats with the RS up.
- Pin the four outer corners to 16.5 x 23.5 in (41.9 x 59.7 cm).
- Pin every seam point so the joined area measures 14 x 21 in (35.6 x 53.3 cm) and all seams are straight.
- Open each square so the meshes are square. A ruler laid along a mesh row should show 2 meshes per inch (2.5 cm).
- Pin the center of each scallop to make even points.
- Let it dry completely before you unpin.
Final Quality-Control Checklist
- All six seahorses face the same way and their eyes show as open meshes.
- Each square has 13 x 13 meshes and 27 sc per frame side.
- There are no teal strands showing behind the cream blocks.
- The seams lie straight, with 29 or 58 sl sts as stated.
- Border Round 1 has 57/85 sc, Round 2 has 59/87 dc, and Round 3 has 14/21 shells per side.
- The panel measures 16.5 x 23.5 in (41.9 x 59.7 cm).
- All ends are woven in along the cream lines, where they are hidden best.
Troubleshooting
- The seahorse looks jagged: Check each row against its mesh counts. A block shifted by one mesh breaks the outline.
- Teal shows through the cream: You carried the yarn. Use a separate bobbin for each section instead.
- The square is taller than it is wide: Tighten the turning chains, or block the square wider.
- The frame ripples: Too many sc on the sides. Use exactly 27.
- The scallops ruffle: Use a hook a half size smaller for Round 3.
- The border cups: Your Round 2 tension is tight. Loosen it, or go up a hook size.
- The seams pucker: Use a larger hook for the sl st seams.
Care
Hand wash in cool water with a mild soap and dry flat, pinning it back into shape. Do not tumble dry, because cotton filet can shrink and lose its open mesh.
Final Notes
Here is the measurement chain:
– 2 meshes per inch gives a 6.5 in (16.5 cm) filet square.
– The frame brings each square to 7 in (17.8 cm).
– Six squares joined two by three give 14 x 21 in (35.6 x 53.3 cm).
– The 1.25 in (3.2 cm) border brings the panel to 16.5 x 23.5 in (41.9 x 59.7 cm).
If your first square matches Checkpoints 1 and 2, the rest of the panel will come out to size.
Happy crocheting!