

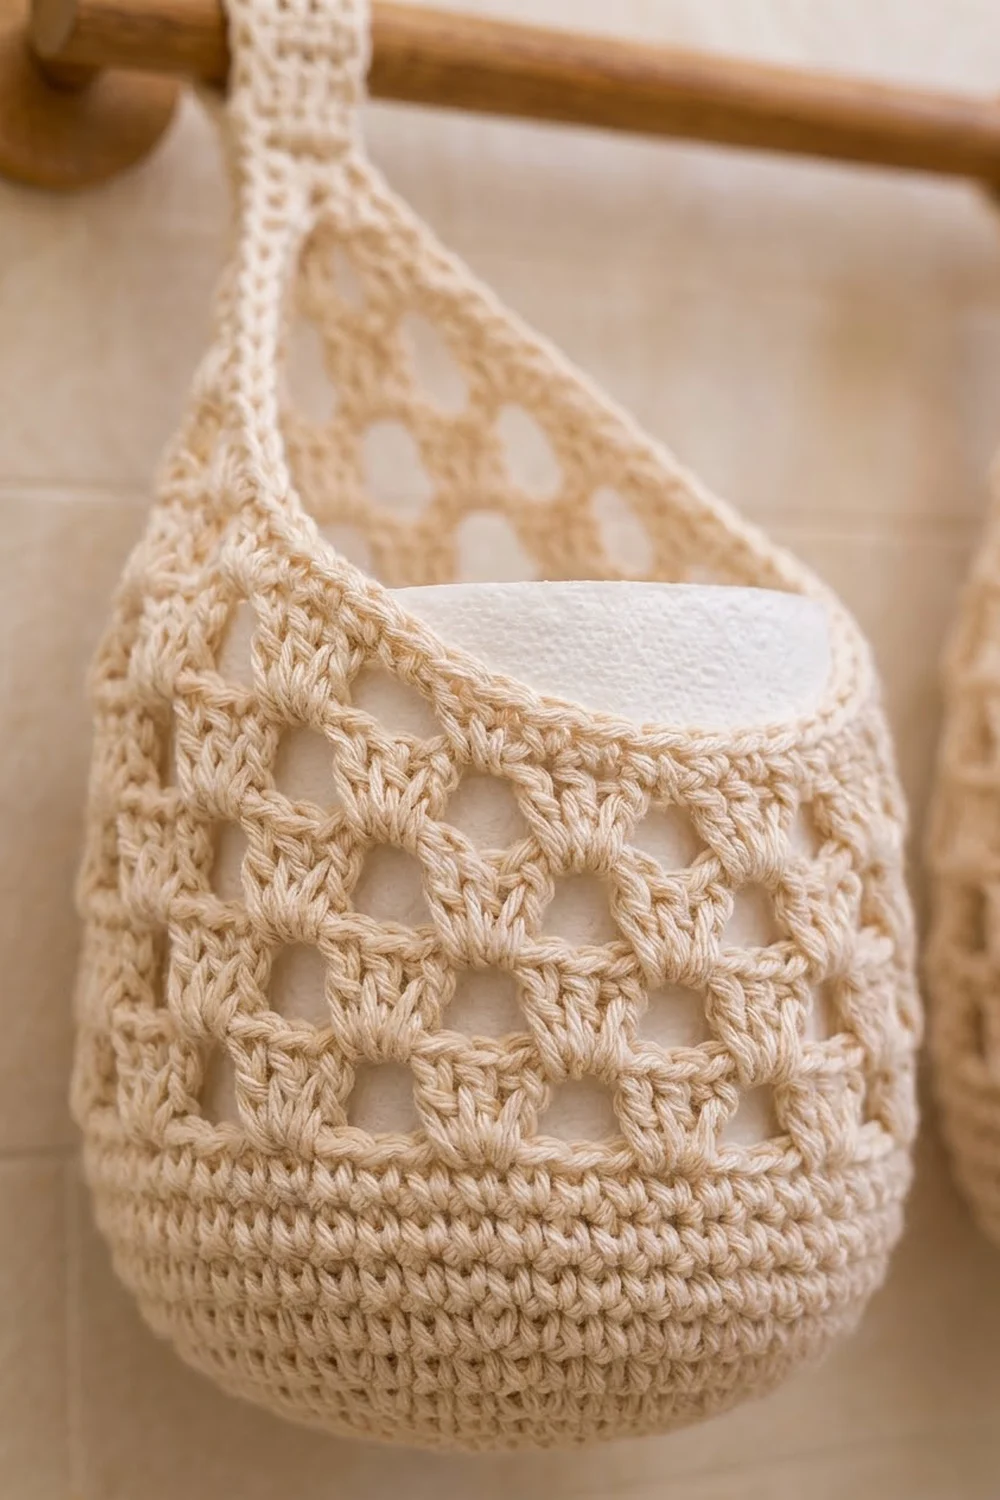
This hanging pocket is a soft, teardrop-shaped wall organizer. It holds one standard toilet roll and hangs from a towel rod by a looped strap. The body is an open shell mesh with diamond-shaped holes on a firm oval base. The back rises into a tapered panel that narrows into the hanging strap.
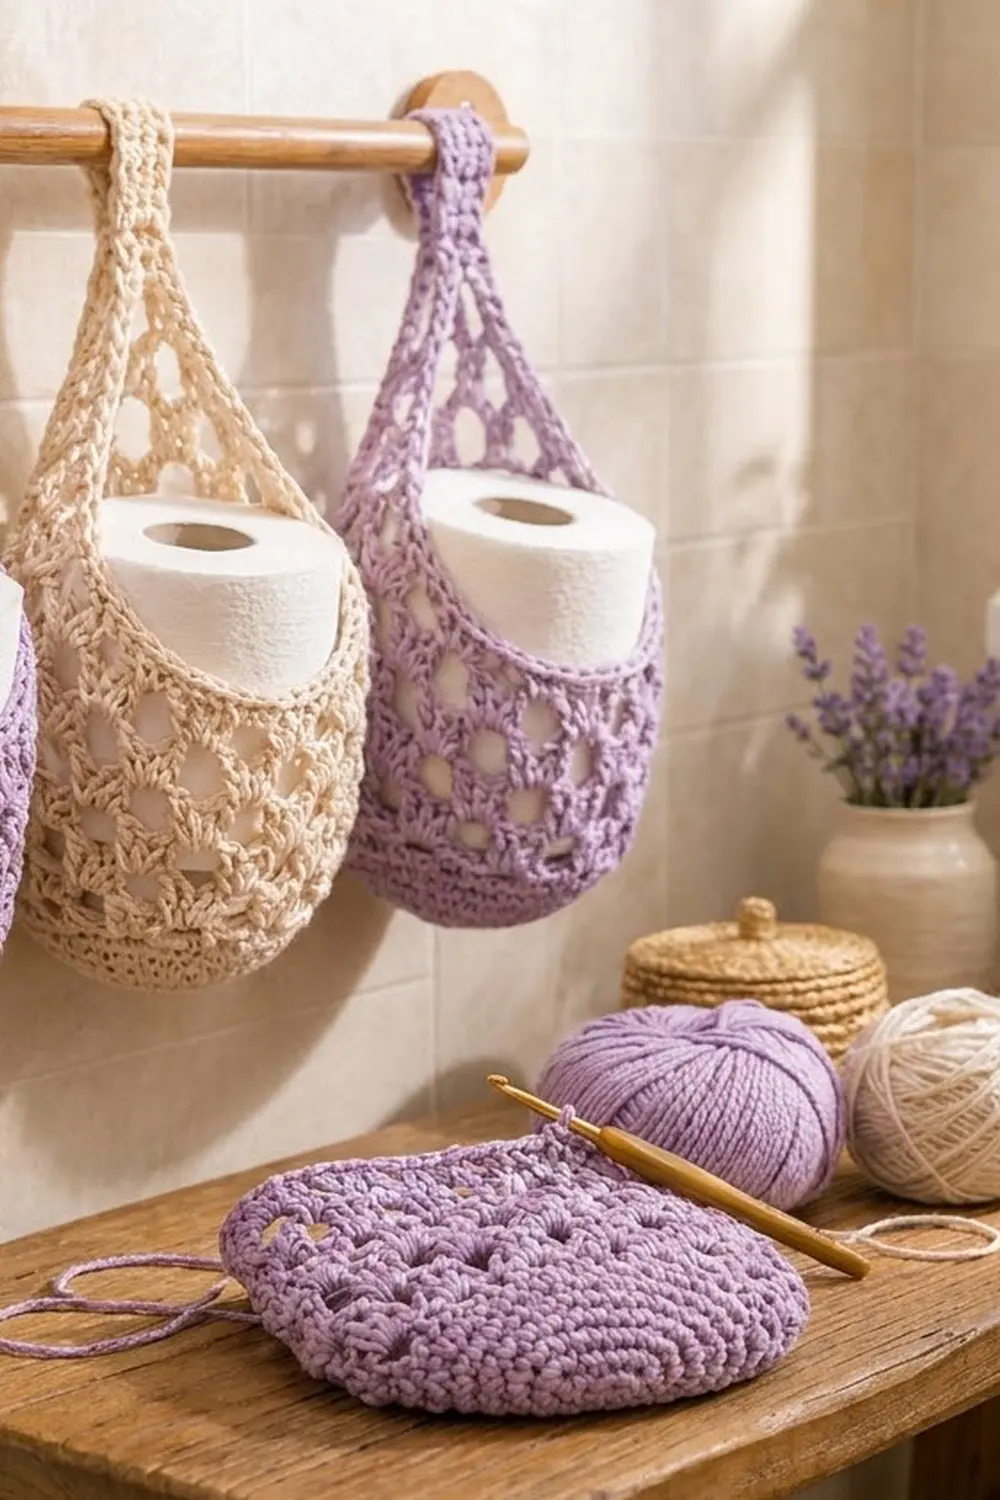
The sample set is three separate pockets, two in soft lavender and one in warm cream, hung side by side as lavender, cream, lavender. The pockets are not joined to each other. Each one is a single piece, so you can make one, three, or as many as your rod allows.
All instructions use US crochet terms. One finished pocket measures 7.5 in (19.1 cm) wide laid flat and 10 in (25.4 cm) tall from the base to the top of the back panel. From the base to the top of the hanging loop it is about 11.5 in (29.2 cm).
The construction is seamless except for one short strap seam. You work an oval base in single crochet, turn up a solid wall, then work 10 rounds of shell mesh. The back half continues in rows that lose one shell per row to form the teardrop point, and the strap is worked straight up from there. A two-round edging finishes the opening, the panel sides and the strap.
Finished Size and Construction
- Finished size (one pocket): 7.5 in (19.1 cm) wide flat x 10 in (25.4 cm) tall, plus loop
- Skill level: Easy to intermediate
- Terminology: US crochet terms
- Yarn weight: Worsted (#4) cotton or cotton blend
- Hook: 5.0 mm (H-8)
- Number of pieces: 3 separate pockets (2 lavender, 1 cream), each made in one piece
- Layout: Hung side by side on one rod, not joined
- Piece size before border: 7.5 in (19.1 cm) wide x 9.75 in (24.8 cm) tall
- Border depth: About 0.25 in (0.6 cm) on the front rim, panel sides and strap
- Base: Oval, about 6 in x 2.75 in (15.2 cm x 7.0 cm)
Materials
Choose a smooth, firm cotton. Cotton holds the pocket’s shape, doesn’t stretch much under the weight of a roll and copes with bathroom humidity. Avoid splitty or very soft yarns, because the shells lose definition.
- Lavender: 130 g, about 245 m (268 yd), for 2 pockets
- Cream: 65 g, about 125 m (137 yd), for 1 pocket
These amounts include a margin of roughly 15% for gauge differences and swatching. One pocket uses about 55 g.
Tools:
- 5.0 mm (H-8) crochet hook
- Stitch markers (at least 6)
- Tapestry needle
- Scissors
- Measuring tape
- Rust-proof pins and a towel for blocking
Abbreviations (US Terms)
- ch – chain
- sl st – slip stitch
- sc – single crochet
- sc2tog – single crochet 2 together
- dc – double crochet
- BLO – back loop only
- sp – space
- st(s) – stitch(es)
- RS / WS – right side / wrong side
Special stitch – Shell: (2 dc, ch 2, 2 dc) all in the same stitch or space. The ch-2 in the center of a shell is called the “shell sp.”
Gauge and Checkpoints
Gauge in sc: 16 sc x 18 rows = 4 in (10.2 cm).
Gauge in shell mesh: 2 pattern repeats (12 base sts) = 3 in (7.6 cm) wide; 4 mesh rounds = 2.5 in (6.4 cm) tall.
Make one complete pocket before you start the rest of the set. It’s a quick project and the most reliable gauge test you can do.
Checkpoints:
- After Rnd 6: The base measures about 6 in x 2.75 in (15.2 cm x 7.0 cm), with a perimeter of 15 in (38.1 cm).
- After Rnd 8: The wall stands up about 0.5 in (1.3 cm) from the base.
- After Rnd 18: Laid flat, the pocket measures 7.5 in (19.1 cm) wide and 6.75 in (17.1 cm) tall.
- After Row 6: The top of the back panel is 9.75 in (24.8 cm) above the base.
- After Row 33: The strap measures 6 in (15.2 cm) long and 1.5 in (3.8 cm) wide.
If your base is too large, go down a hook size to 4.5 mm. If it’s too small or the fabric feels stiff, go up to 5.5 mm. Check the base again before you continue, because every later count depends on its 60 stitches.
Pattern: One Pocket
Oval Base
Ch 15.
Rnd 1: Sc in 2nd ch from hook and in next 12 ch, 3 sc in last ch. Working along the other side of the chain, sc in next 12 ch, 2 sc in last ch (the same ch as the first sc). Join with sl st to first sc. (30 sts)
Rnd 1 layout: 13 sc on side A, 3 sc at end B, 12 sc on side B and 2 sc at end A.
Don’t turn at the end of any round. The ch 1 at the start of each round does not count as a stitch.
Rnd 2: Ch 1, 2 sc in first st, sc in next 12, 2 sc in each of next 3, sc in next 12, 2 sc in each of next 2. Join. (36 sts)
Rnd 3: Ch 1, sc in first st, 2 sc in next, sc in next 12, [sc in next, 2 sc in next] 3 times, sc in next 12, [sc in next, 2 sc in next] 2 times. Join. (42 sts)
Rnd 4: Ch 1, sc in next 2, 2 sc in next, sc in next 12, [sc in next 2, 2 sc in next] 3 times, sc in next 12, [sc in next 2, 2 sc in next] 2 times. Join. (48 sts)
Rnd 5: Ch 1, sc in next 3, 2 sc in next, sc in next 12, [sc in next 3, 2 sc in next] 3 times, sc in next 12, [sc in next 3, 2 sc in next] 2 times. Join. (54 sts)
Rnd 6: Ch 1, sc in next 4, 2 sc in next, sc in next 12, [sc in next 4, 2 sc in next] 3 times, sc in next 12, [sc in next 4, 2 sc in next] 2 times. Join. (60 sts)
Each round adds 6 sts, all at the curved ends, while the two straight sides stay at 12 sts. This keeps the base a true oval rather than a circle.
Solid Wall
Rnd 7: Ch 1, sc in BLO of each st around. Join. (60 sts)
The unused front loops form the fold line where the base turns up.
Rnd 8: Ch 1, sc in each st around. Join. (60 sts)
Shell Mesh Body
Rnd 9 (set-up): Ch 1, sc in first st, ch 2, skip 2 sts, shell in next st, ch 2, skip 2 sts, sc in next st; repeat from * 8 more times, ch 2, skip 2 sts, shell in next st, ch 2, skip 2 sts. Join with sl st to first sc. (10 shells, 10 sc, 20 ch-2 sps)*
Each repeat uses exactly 6 sts of Rnd 8, and 10 repeats x 6 sts = 60 sts.
Rnd 10: Sl st in next ch-2 sp, sl st in next 2 dc, sl st in shell sp. Ch 1, sc in same shell sp, ch 2, shell in next sc, ch 2, sc in next shell sp; repeat from * 8 more times, ch 2, shell in next sc, ch 2. Join to first sc. (10 shells, 10 sc, 20 ch-2 sps)*
This round places each new shell above an sc of the previous round and each new sc in the center of a previous shell. The ch-2 spaces on either side of every sc open into the diamond holes.
Rnds 11–18: Repeat Rnd 10 eight more times. (10 shells, 10 sc each round)
You now have 10 mesh rounds (Rnds 9–18). Fasten off.
Checkpoint: Lay the pocket flat with the long sides of the base at the front and back. It should measure 7.5 in (19.1 cm) wide and 6.75 in (17.1 cm) tall.
Tapered Back Panel
With the pocket flat, choose one face as the back. Put markers in the shell sps of 5 shells in a row from Rnd 18 on that face. Number them Shell 1 to Shell 5, from right to left. The other 5 shells form the front rim.
Row 1 (RS): Join yarn in Shell 1 sp. Ch 1, sc in same sp, ch 2, shell in next sc, ch 2, sc in next shell sp; repeat from * 3 more times, ending in Shell 5 sp. Turn. (4 shells, 5 sc)*
Row 2 (WS): Sl st in next ch-2 sp, sl st in next 2 dc, sl st in shell sp. Ch 1, sc in same shell sp, ch 2, shell in next sc, ch 2, sc in next shell sp; repeat from * 2 more times. Turn. (3 shells, 4 sc)*
Row 3: Work as for Row 2, but repeat from * only 1 more time. Turn. (2 shells, 3 sc)
Row 4: Sl st in next ch-2 sp, sl st in next 2 dc, sl st in shell sp. Ch 1, sc in same sp, ch 2, shell in next sc, ch 2, sc in next shell sp. Turn. (1 shell, 2 sc)
Each row starts and ends half a repeat in from the row below. That way the panel loses one shell per row and narrows into the teardrop point.
Row 5: Ch 1, sc in first sc, sc in next ch-2 sp, sc in next 2 dc, skip shell sp, sc in next 2 dc, sc in next ch-2 sp, sc in last sc. Turn. (8 sc)
Row 6: Ch 1, sc2tog, sc in next 4, sc2tog. Turn. (6 sc)
Checkpoint: The top of Row 6 sits 9.75 in (24.8 cm) above the base.
Hanging Strap
Rows 7–33: Ch 1, sc in each st across. Turn. (6 sc per row, 27 rows)
The strap measures 6 in (15.2 cm) long and 1.5 in (3.8 cm) wide. Don’t fasten off; go straight on to the edging.
Make All Pieces
Work the full pattern three times:
- Lavender: 2 pockets
- Cream: 1 pocket
Layout on the rod, seen from the front:
[ Lavender ] [ Cream ] [ Lavender ]
The pockets are hung, not joined. Leave about 1 in (2.5 cm) between pockets so the rims sit just apart. A 24.5 in (62.2 cm) length of rod fits the set.
Border (Edging)
Border gauge: 4 sc = 1 in (2.5 cm), the same as the body gauge. The edging is one continuous round around every open edge.
Edging Rnd 1: Ch 1 at the end of Row 33 and work down the strap:
- Strap side A: 1 sc in each row end of Rows 33–7. (27 sc)
- Panel side A: 1 sc in each row end of Rows 6–5, then 4 sc in each row end of Rows 4–1. (18 sc)
- Front rim: Starting in Shell 5 sp, work 5 repeats of [sc in shell sp, sc in next dc, sc in next ch-2 sp, sc in next sc, sc in next ch-2 sp, sc in first dc of next shell], ending at Shell 1. (30 sc)
- Panel side B: 4 sc in each row end of Rows 1–4, then 1 sc in each row end of Rows 5–6. (18 sc)
- Strap side B: 1 sc in each row end of Rows 7–33. (27 sc)
- Strap end: 1 sc in each st of Row 33. (6 sc)
Join to first sc. (126 sc)
Check: 27 + 18 + 30 + 18 + 27 + 6 = 126. Don’t add extra corner stitches.
Edging Rnd 2: Sl st loosely in each sc around. (126 sl sts) Fasten off.
Why the math works:
- Front rim: Each mesh repeat spans 1.5 in (3.8 cm). Six sc at 4 sc per inch also span 1.5 in, so 30 sc fit the 7.5 in (19.1 cm) rim without ruffling.
- Panel sides: Each mesh row rises 0.625 in (1.6 cm) and steps in 0.75 in (1.9 cm). That makes each diagonal edge about 1 in (2.5 cm) long, which fits 4 sc.
- Sc rows: Each sc row is about one stitch tall, so it gets 1 sc.
Closing the Strap Loop
Fold the strap over the rod toward the WS of the panel. Overlap Rows 29–33 onto Rows 7–11, about 1 in (2.5 cm), and whipstitch them together securely. The loop (Rows 12–28) is about 3.75 in (9.5 cm) around and fits rods up to about 1 in (2.5 cm) thick. If your rod has fixed brackets, take it down before you sew.
Final Blocking
- Weave in ends along sc rows or inside shells, never across the open holes.
- Soak the pocket in cool water for 10 minutes, then press out the water without wringing.
- Roll it in a towel to remove excess moisture.
- Fill the pocket with a toilet roll in a plastic bag, or a rolled-up towel.
- Lay it on its back and pin the panel and strap straight.
- Ease each shell into place so the diamond holes open evenly.
- Check that it measures 7.5 in (19.1 cm) wide and 10 in (25.4 cm) tall, then let it dry completely.
Final Quality-Control Checklist
- The base has 60 sts and lies flat.
- Every mesh round has 10 shells and 10 sc.
- The panel rows have 4, 3, 2 and 1 shells.
- The strap is 6 sts wide and 27 rows long.
- The edging has 126 sc and the rim lies flat.
- The strap seam is secure on the WS.
- All the pockets match in size within 0.25 in (0.6 cm).
Troubleshooting
- Base cups into a bowl: Go up a hook size for Rnds 1–6.
- Base ripples: Recount; each round should add exactly 6 sts.
- Shells lean or drift: Work each shell into an sc, never into a ch-2 sp.
- Panel tilts: Start every row with the slip stitches so both ends step in evenly.
- Rim flares: You worked more than 6 sc per repeat. Recount to 30.
- Pocket sags: Use a firmer cotton or go down one hook size.
Care
Hand wash in cool water with mild soap and dry flat over a rolled towel. Don’t use the dryer, which can shrink cotton and distort the mesh.
Final Notes
Here is how the measurements build on each other:
- The base has 60 sts and a 15 in (38.1 cm) perimeter.
- Ten 6-st repeats keep that 15 in through every mesh round, so the pocket lies flat at 7.5 in (19.1 cm) wide.
- The panel tapers from 4 shells to 1, then becomes a 6-st strap 1.5 in (3.8 cm) wide.
- The 126-st edging matches each edge length, so the finished pocket measures 7.5 in x 10 in (19.1 cm x 25.4 cm).
Check these numbers on your first pocket and the others will match.
Happy crocheting!