

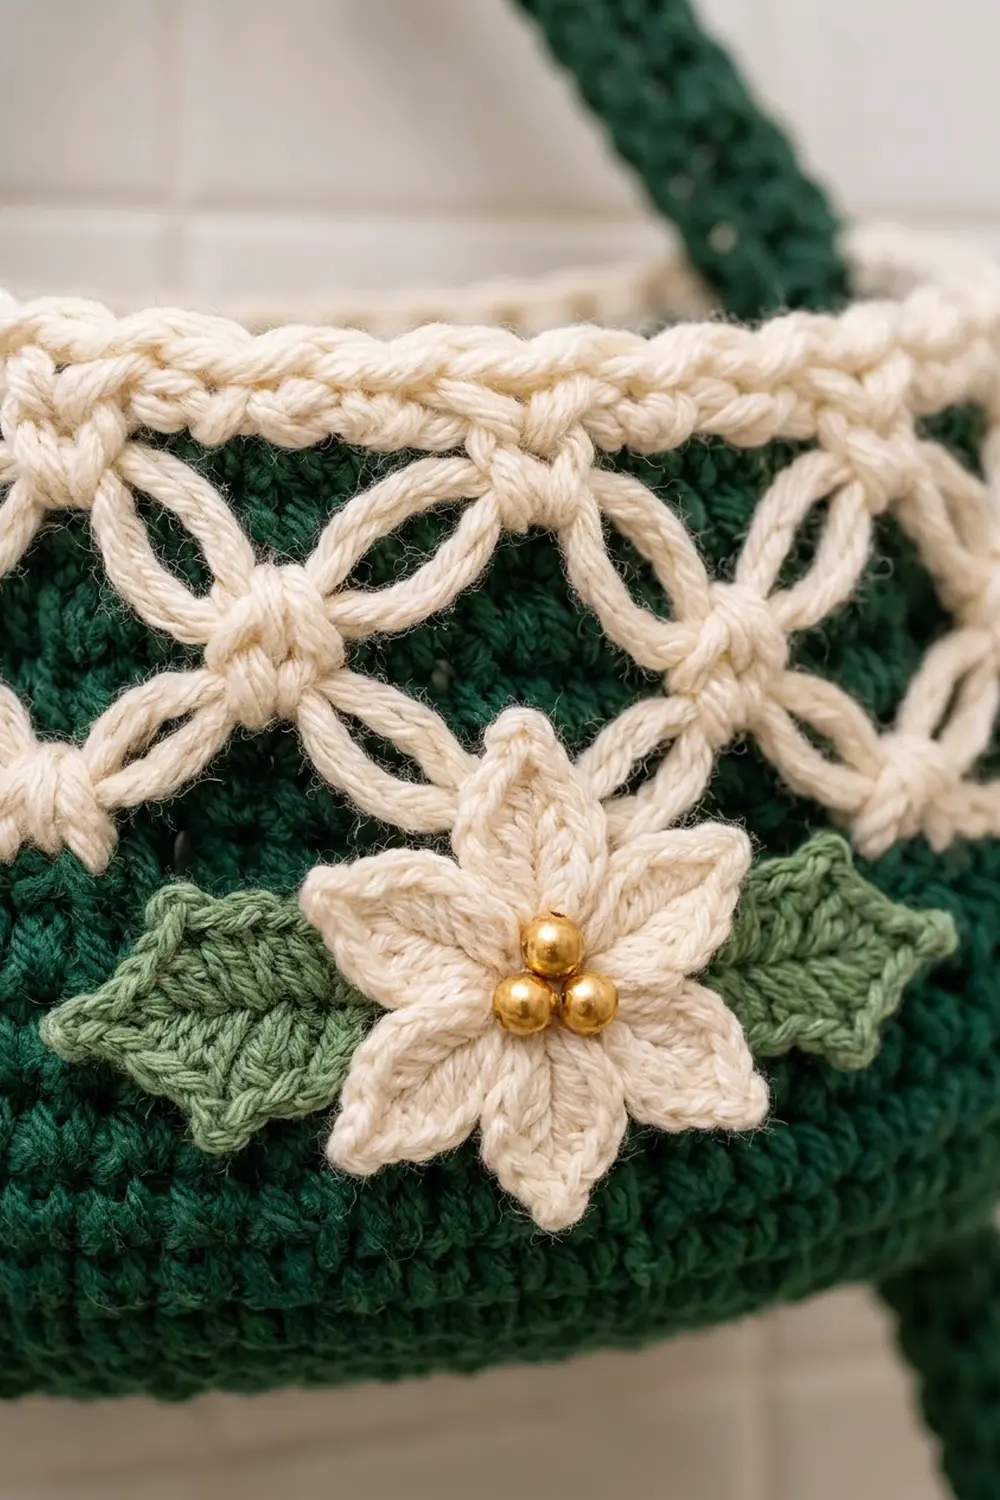
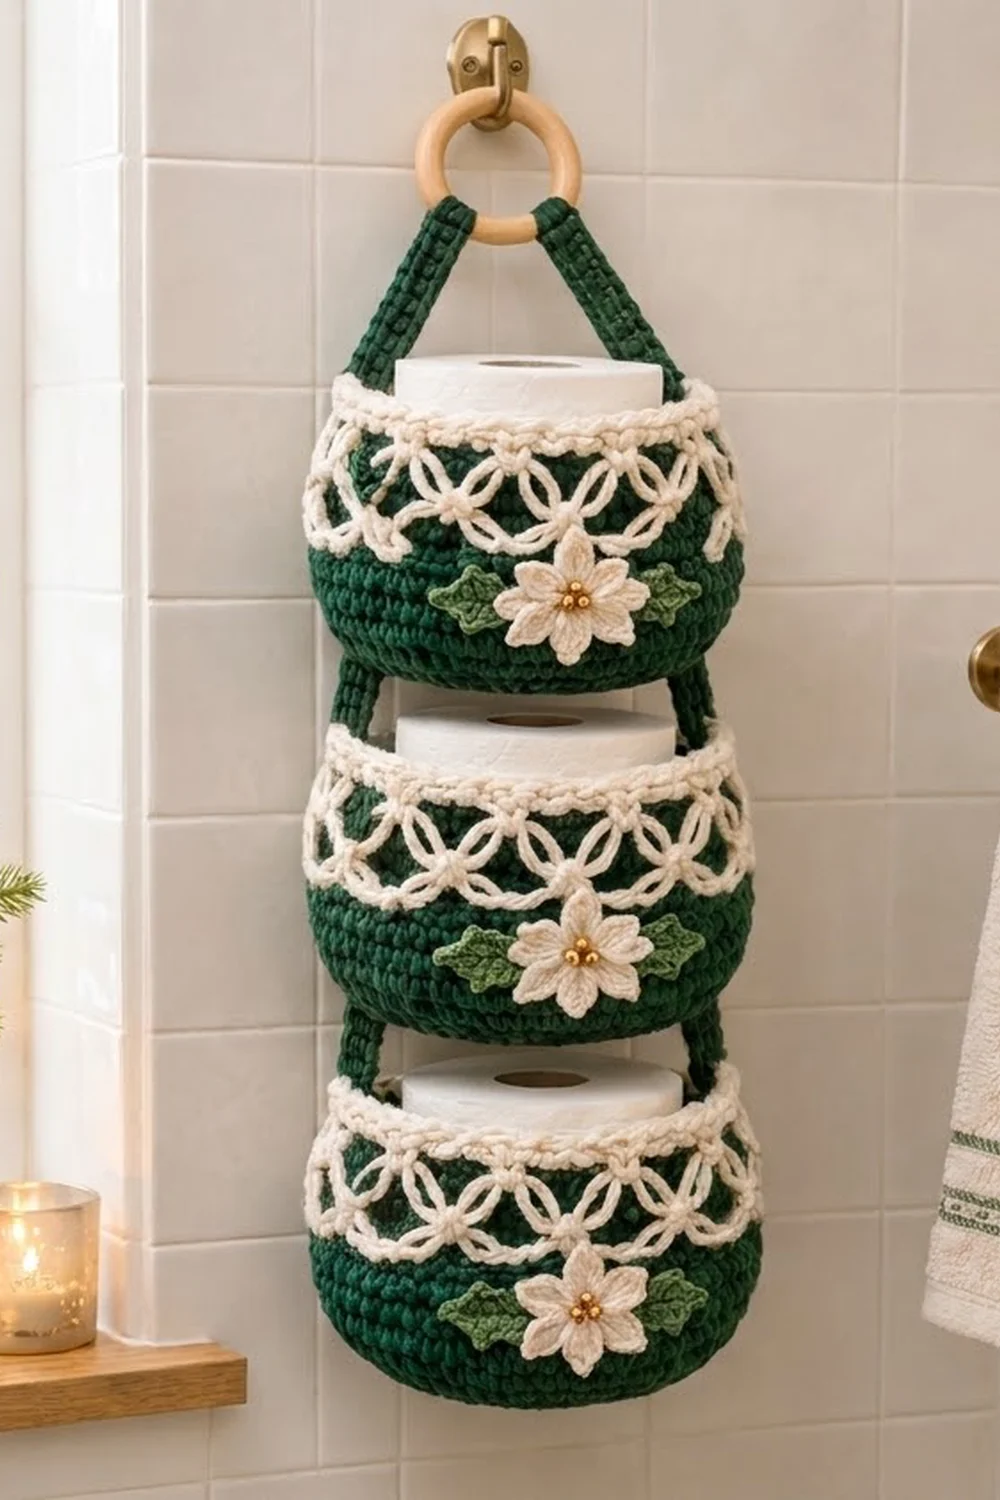
This hanging organizer has three oval pockets, each holding one standard toilet roll. The pockets are dense evergreen single crochet below and open cream lace above. A twisted cream rim finishes each top edge.
The palette is dark green, cream and soft sage. Each pocket has a pointed cream flower on the front, with three gold beads in the center and two sage holly leaves behind it. The look is cozy and festive without being loud, so it suits a bathroom all winter.
The pattern uses US crochet terms. Each pocket is 7 in (17.8 cm) long, 4.75 in (12.1 cm) deep and 5.25 in (13.3 cm) tall. The finished organizer is about 26 in (66.0 cm) tall from the top of the ring and about 7.25 in (18.4 cm) wide.
Each pocket starts as a flat oval base. The walls go straight up in green, followed by three rounds of Solomon’s knot lace and a three-round cream rim. Two long straps are sewn down the narrow ends of all three pockets and wrapped around a wooden ring. Finally, a flower and two leaves are sewn onto each pocket.
Finished Size and Construction
- Finished size: about 26 in (66.0 cm) tall × 7.25 in (18.4 cm) wide
- Skill level: Intermediate
- Terminology: US
- Yarn weight: Worsted (#4) cotton
- Hook: 4.5 mm (US 7)
- Number of pieces: 3 pockets, 2 straps, 3 flowers, 6 leaves
- Layout: pockets stacked vertically, 1.5 in (3.8 cm) apart
- Pocket size: 7 in (17.8 cm) × 4.75 in (12.1 cm) × 5.25 in (13.3 cm) tall
- Pocket height before rim: 4.75 in (12.1 cm)
- Rim depth: 0.5 in (1.3 cm)
Materials
Use a smooth, firm worsted cotton or cotton blend. Cotton keeps the pockets upright and holds up well in a humid bathroom. Avoid fuzzy yarn, because it hides the Solomon’s knots.
- Dark green (MC): 300 g, about 465 m (510 yd)
- Cream (CC1): 100 g, about 155 m (170 yd)
- Sage green (CC2): 25 g, about 40 m (44 yd)
These amounts include a safety margin of about 20 percent.
Tools:
– 4.5 mm (US 7) hook
– One wooden ring, 2.5 in (6.4 cm) outer diameter
– Nine 6 mm gold beads
– Cream sewing thread and a beading needle
– Tapestry needle
– Stitch markers
– Measuring tape
– Rust-proof pins
Abbreviations (US Terms)
- ch – chain
- sl st – slip stitch
- sc – single crochet
- hdc – half double crochet
- dc – double crochet
- tr – treble crochet
- BLO – back loop only
- MR – magic ring
- st(s) – stitch(es)
- sk – skip
- rep – repeat
- PM – place marker
- SK – Solomon’s knot
- rev sc – reverse single crochet
Solomon’s knot (SK): Pull the loop on your hook up to 0.75 in (1.9 cm). Yarn over and pull through. Then insert the hook under the single back strand of the long loop, yarn over, pull up a loop, and yarn over and pull through both loops. You now have one locked knot.
Picot: Ch 2, sl st in the 2nd ch from the hook.
Reverse sc (rev sc): Work sc from left to right (right to left if you crochet left-handed). This makes a twisted rope edge.
Gauge and Checkpoints
Gauge: 16 sc × 18 rnds = 4 in (10.2 cm) in sc worked in the round, with MC.
Work one complete pocket before you start the others. Check these measurements as you go:
- After Rnd 5: the oval measures about 4.5 × 2.5 in (11.4 × 6.4 cm).
- After Rnd 10: the oval measures 7 × 4.75 in (17.8 × 12.1 cm), and the edge measures 19 in (48.3 cm) around.
- After Rnd 24: the green wall is 3.1 in (7.9 cm) tall, measured from the turning ridge.
- After the lace: the pocket is 4.75 in (12.1 cm) tall.
- After the rim: the pocket is 5.25 in (13.3 cm) tall.
If the base comes out too big, go down half a hook size. If it is too small, go up half a size. A base that is too small will not fit a roll. If only the lace is the wrong height, adjust the knot length rather than the hook size.
Pocket (Make 3)
Oval Base
With MC, ch 11.
Rnd 1: Sc in 2nd ch from hook and in next 8 ch, 3 sc in last ch. Working along the opposite side of the chain, sc in next 8 ch, then 2 sc in the last ch (the same ch as the first sc). Do not join; PM in the first st. (22 sts)
Rnd 2: 2 sc in each of next 3 sts, sc in next 8 sts, 2 sc in each of next 3 sts, sc in next 8 sts. (28 sts)
From Rnd 3 on, increase 6 sts per round, spread evenly over the two curved ends. Keep each new increase lined up above the increases of the previous round.
Rnd 3: *(Sc in next st, 2 sc in next st) 3 times, sc in next 8 sts; rep from * once more. (34 sts)
Rnd 4: *(Sc in next 2 sts, 2 sc in next st) 3 times, sc in next 8 sts; rep from * once more. (40 sts)
Rnd 5: *(Sc in next 3 sts, 2 sc in next st) 3 times, sc in next 8 sts; rep from * once more. (46 sts)
Rnd 6: *(Sc in next 4 sts, 2 sc in next st) 3 times, sc in next 8 sts; rep from * once more. (52 sts)
Rnd 7: *(Sc in next 5 sts, 2 sc in next st) 3 times, sc in next 8 sts; rep from * once more. (58 sts)
Rnd 8: *(Sc in next 6 sts, 2 sc in next st) 3 times, sc in next 8 sts; rep from * once more. (64 sts)
Rnd 9: *(Sc in next 7 sts, 2 sc in next st) 3 times, sc in next 8 sts; rep from * once more. (70 sts)
Rnd 10: *(Sc in next 8 sts, 2 sc in next st) 3 times, sc in next 8 sts; rep from * once more. (76 sts)
Check: the base should measure 7 × 4.75 in (17.8 × 12.1 cm).
Green Wall
Rnd 11: Sc in BLO of each st around. (76 sts) This makes the turning ridge.
Rnds 12–24: Sc in each st around. (76 sts)
At the end of Rnd 24, sl st into the next st to smooth the step. Lay the pocket flat with the long sides facing you and PM at the center of each curved end. The two markers are 38 sts apart. Fasten off MC.
Check: the wall is 3.1 in (7.9 cm) tall.
Solomon’s Knot Lace
Keep all knots 0.75 in (1.9 cm) long.
Rnd 25: Join CC1 with a sl st at one end marker, ch 1, sc in the same st. *2 SK, sk 3 sts, sc in next st; rep from * 17 more times. Finish with 2 SK, sk 3 sts, sl st to the first sc. (19 arches, 38 knots)
Rnd 26: 1 SK, sc in the center knot of the first arch. *2 SK, sc in the center knot of the next arch; rep from * 17 more times. Finish with 1 SK, sl st to the first sc of Rnd 25. (19 arches, counting the two half arches as one)
Rnd 27: Ch 1, sc in the join. *2 SK, sc in the center knot of the next arch; rep from * 17 more times. Finish with 2 SK, sl st to the first sc. (19 arches) Fasten off.
The knots now form linked diamonds that open into rings once the pocket is stretched.
Check: the pocket is 4.75 in (12.1 cm) tall, with the lace pinned open.
Make All Pieces
Pockets: 3 in MC and CC1.
Straps (make 2), MC:
– Ch 105.
– Row 1: Sc in 2nd ch from hook and in each ch across. (104 sts)
– Rows 2–3: Ch 1, turn, sc in each st. (104 sts)
– Fasten off. Each strap measures 26 in (66.0 cm) × 0.67 in (1.7 cm).
On each strap, PM after sts 5, 29, 50, 56, 77 and 83. That gives these sections:
– Sts 1–5: ring fold, 1.25 in (3.2 cm)
– Sts 6–29: V section, 6 in (15.2 cm)
– Sts 30–50: Pocket 1, 5.25 in (13.3 cm)
– Sts 51–56: gap, 1.5 in (3.8 cm)
– Sts 57–77: Pocket 2
– Sts 78–83: gap
– Sts 84–104: Pocket 3
The total is 5 + 24 + 21 + 6 + 21 + 6 + 21 = 104 sts.
Flowers (make 3), CC1:
– Rnd 1: 10 sc in MR, join. (10 sts)
– Rnd 2: Ch 1, 2 sc in each st, join. (20 sts)
– Rnd 3: *Sl st in next st, (hdc, dc) in next st, (tr, picot, tr) in next st, (dc, hdc) in next st; rep from * 4 more times. Join. (5 pointed petals, 4 sts used per petal)
– The flower measures about 2.25 in (5.7 cm) across.
Leaves (make 6), CC2: Ch 9.
– Side 1: Sl st in 2nd ch from hook, sc in next ch, hdc in next ch, dc in next ch, picot, dc in next ch, hdc in next ch, picot, sc in next ch.
– Tip: (sc, picot, sc) in the last ch.
– Side 2: Working along the opposite side of the chain: sc in next ch, picot, hdc in next ch, dc in next ch, picot, dc in next ch, hdc in next ch, sc in next ch, sl st in the last ch.
– Each leaf has 2 points per side plus a tip and measures about 2 in (5.1 cm) long.
Layout (top to bottom):
        ( ring )
         /    \
        /      \
  [ Pocket 1 ]
  |  gap 1.5 in  |
  [ Pocket 2 ]
  |  gap 1.5 in  |
  [ Pocket 3 ]
Joining
Work the rim (see the Border section) on all three pockets before joining.
Method: Whipstitch with MC through the outer loops only.
Stitch-to-stitch logic: Each pocket section on a strap is 21 sts, which matches the pocket height of 5.25 in (13.3 cm).
1. Pin strap sts 30–50 down one end marker of Pocket 1. St 30 sits at the rim top and st 50 sits at the turning ridge.
2. Sew both long edges of that section, plus the strap end of the section, through the rim, the lace anchor sc and the green wall.
3. Repeat on Pocket 2 with sts 57–77, and on Pocket 3 with sts 84–104.
4. Attach the second strap to the opposite ends of all three pockets the same way.
5. Fold strap sts 1–5 of both straps over the ring and sew them down flat. The two straps should cross the ring side by side.
Tension: Keep each stitch snug but not puckered. The strap should lie flat on the pocket wall. If the gaps sag, take out the seam and re-pin so the gap sections are exactly 6 sts long.
Checkpoint: Hang the organizer. The gaps should be 1.5 in (3.8 cm) and the overall height about 26 in (66.0 cm).
Appliqués:
1. Sew two leaves to the front center of each pocket, about 1 in (2.5 cm) below the lace. Point them left and right with their bases touching.
2. Sew a flower on top, covering the leaf bases.
3. Sew three gold beads in a cluster at the flower center.
Border (Pocket Rim)
Border gauge: Each rim round has 76 sts, which equals 19 in (48.3 cm) at 4 sts per inch. That matches the wall exactly. Work the rim on each pocket.
Rnd 28: Join CC1 with a sc in the center knot of any Rnd 27 arch. *Ch 3, sc in the center knot of the next arch; rep from * 17 more times, ch 3, sl st to the first sc.
– Count: 19 sc worked into existing knots + 57 ch added = 76 sts.
– That is 38 sts on the front half and 38 on the back half (9½ repeats each).
Rnd 29: Ch 1, sc in each sc and in each ch (work into the chain itself, not the space), join. (76 sts: 38 front, 38 back)
Rnd 30: Ch 1, rev sc in each st, join. (76 sts: 38 front, 38 back) Fasten off.
Why the math works: Each arch spans 4 wall sts (1 anchor sc + 3 skipped sts). The rim gives each arch 4 sts back (1 sc + 3 ch), so 19 × 4 = 76, the same as Rnds 11–24. The rim stays straight with no flare or pull. Rim depth is 0.5 in (1.3 cm), so the pocket goes from 4.75 in (12.1 cm) before the rim to 5.25 in (13.3 cm) after.
Final Blocking
- Lightly mist the whole organizer with water.
- Stuff each pocket with a rolled towel or a toilet roll wrapped in plastic.
- Pin the lace upward and outward so each knot pair opens into a ring.
- Pin the flower petals and leaf points flat.
- Lay the straps straight and check that both are the same length.
- Let everything dry completely, then remove the pins.
Final Quality-Control Checklist
- [ ] Each base measures 7 × 4.75 in (17.8 × 12.1 cm).
- [ ] Each wall and rim round has 76 sts.
- [ ] Every lace round has 19 arches.
- [ ] All pockets are 5.25 in (13.3 cm) tall.
- [ ] The straps are 104 sts and 26 in (66.0 cm) long.
- [ ] The gaps are 1.5 in (3.8 cm).
- [ ] The flowers are centered and the beads are secure.
- [ ] All ends are woven in and hidden.
Troubleshooting
- The base curls up: add one extra sc to each end group, or loosen your tension.
- The base ruffles: you have extra increases. Recount against the round totals.
- The knots are uneven: check each loop against a 0.75 in (1.9 cm) strip of card.
- The rim flares: make the Rnd 28 chains tighter or use ch 2.
- The pockets tilt: re-sew the straps so both line up with the end markers.
- The roll doesn’t fit: the base gauge is too tight, so remake it with a larger hook.
Care
Hand wash in cool water and reshape while damp. Dry flat, and keep the beads away from the dryer.
Final Notes
The size of the whole organizer comes from a chain of measurements:
– 16 sc = 4 in (10.2 cm) gives a 76-st oval base of 7 × 4.75 in (17.8 × 12.1 cm).
– 19 lace arches of 4 sts each keep the lace at 76 sts.
– The rim returns exactly 76 sts, finishing each pocket at 5.25 in (13.3 cm).
– 104-st straps map 21 sts to each pocket and 6 sts to each gap.
That gives an organizer about 26 in (66.0 cm) tall, with each pocket fitting one roll.
Happy crocheting!