

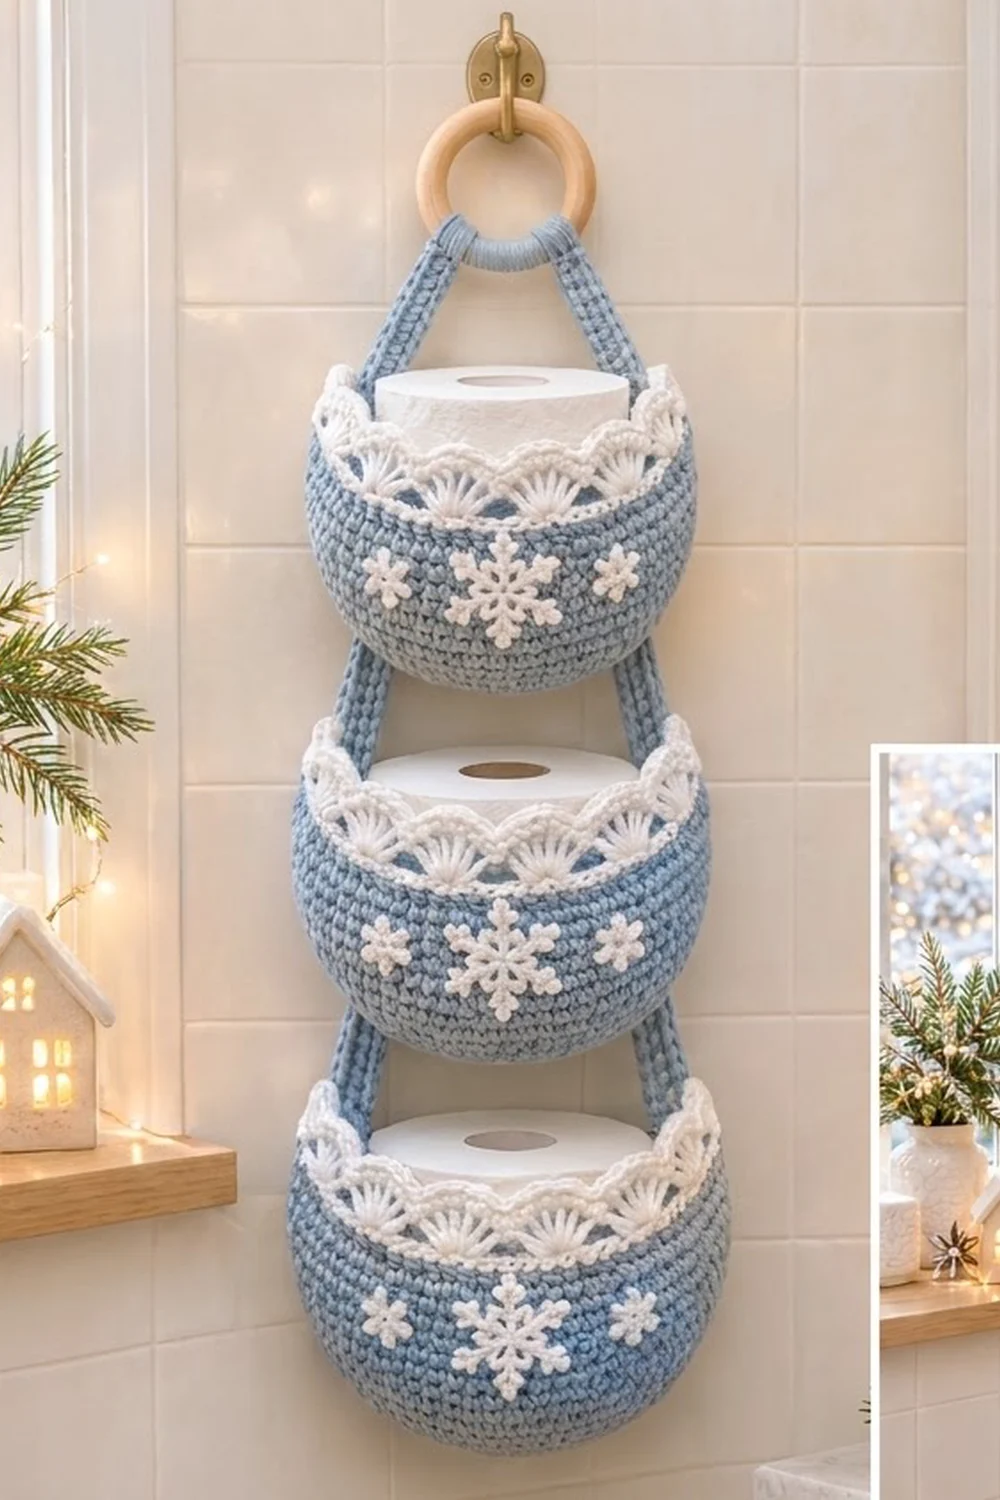
This hanging toilet paper holder has three rounded pockets in soft dusty blue, each trimmed with a white fan-stitch lace edge and decorated with white snowflakes. It looks wintry and calm, and it puts three spare rolls on the wall without taking up floor space.
The palette uses just two colors: light blue for the pockets and straps, and crisp white for the lace edges and snowflakes. The style is cozy farmhouse with a holiday touch, but it works in a bathroom all year.
This pattern uses US crochet terms. The finished holder is about 5.5 in (14.0 cm) wide at the lace edge and 19.5 in (49.5 cm) long from the top of the ring to the bottom of the lowest pocket.
Each pocket is worked in joined rounds from the center of the base up, with gradual increases that form a bowl. Next you add a three-round white fan edge to each pocket and sew on three snowflakes. Finally, two flat straps are sewn to the back of all three pockets and folded over a wooden ring.
Finished Size and Construction
- Finished size: 5.5 in (14.0 cm) wide x 19.5 in (49.5 cm) long, hanging
- Skill level: Intermediate
- Terminology: US
- Yarn weight: Worsted (#4) cotton
- Hooks: 4.0 mm (G-6) for the main pieces, 3.5 mm (E-4) for the snowflakes
- Number of pieces: 3 pockets, 2 straps, 9 snowflakes (3 large, 6 small), plus 1 wooden ring
- Layout: 1 column of 3 pockets, spaced 5.5 in (14.0 cm) apart, rim to rim
- Pocket size before edging: 5.1 in (13.0 cm) across the rim, 3.5 in (8.9 cm) tall
- Edging depth: 1 in (2.5 cm)
- Pocket size after edging: 4.5 in (11.4 cm) tall in total
Materials
Use a smooth, mercerized or combed worsted-weight cotton. Cotton holds the bowl shape, can be washed, and gives the fans clear stitch definition. Avoid fuzzy acrylic, because it blurs the lace.
- Light blue (main color, MC): 150 g / 255 m (279 yd)
- White (contrast color, CC): 50 g / 85 m (93 yd)
These amounts assume a yarn of about 50 g = 85 m (93 yd) and include a margin of about 25%.
Tools:
– 4.0 mm (G-6) crochet hook
– 3.5 mm (E-4) crochet hook
– 1 wooden ring, 2 in (5.1 cm) in diameter
– Stitch markers (at least 6)
– Tapestry needle
– Rust-proof pins
– Scissors
– Measuring tape
– Wall hook or a sturdy nail
Abbreviations (US Terms)
- ch – chain
- sl st – slip stitch
- sc – single crochet
- dc – double crochet
- inc – 2 sc in the same stitch
- sk – skip
- MR – magic ring
- st(s) – stitch(es)
- rnd(s) – round(s)
- MC / CC – main color / contrast color
Special stitches:
– Fan: 7 dc in the same stitch.
– Picot: ch 3, sl st in the 3rd ch from the hook.
– Branch pair: [picot] twice, then sl st in the same spine chain. This makes two small loops that splay to the left and right.
Gauge and Checkpoints
Gauge: 18 sc x 20 rnds = 4 in (10.2 cm) with the 4.0 mm hook. This works out to 4.5 sts and 5 rnds per inch.
Make one complete pocket and check it before you start the other two. The pockets must hold a standard roll, which is about 4.5 in (11.4 cm) across and 4 in (10.2 cm) tall.
Checkpoints:
– After Rnd 8: The base lies flat and measures about 3.25 in (8.3 cm) across.
– After Rnd 19: The circumference measures 16 in (40.6 cm), or about 5.1 in (13.0 cm) across.
– After Rnd 24: Standing, the pocket is 3.5 in (8.9 cm) tall.
– After the edging: Each fan spans about 1.33 in (3.4 cm), and the edge is 1 in (2.5 cm) deep.
If your pocket is too big (the circumference after Rnd 19 is over 16.5 in / 41.9 cm), go down a hook size.
If it is too small (the roll does not drop in easily), go up a hook size.
Do not change the stitch counts. The edging relies on a 72-stitch rim.
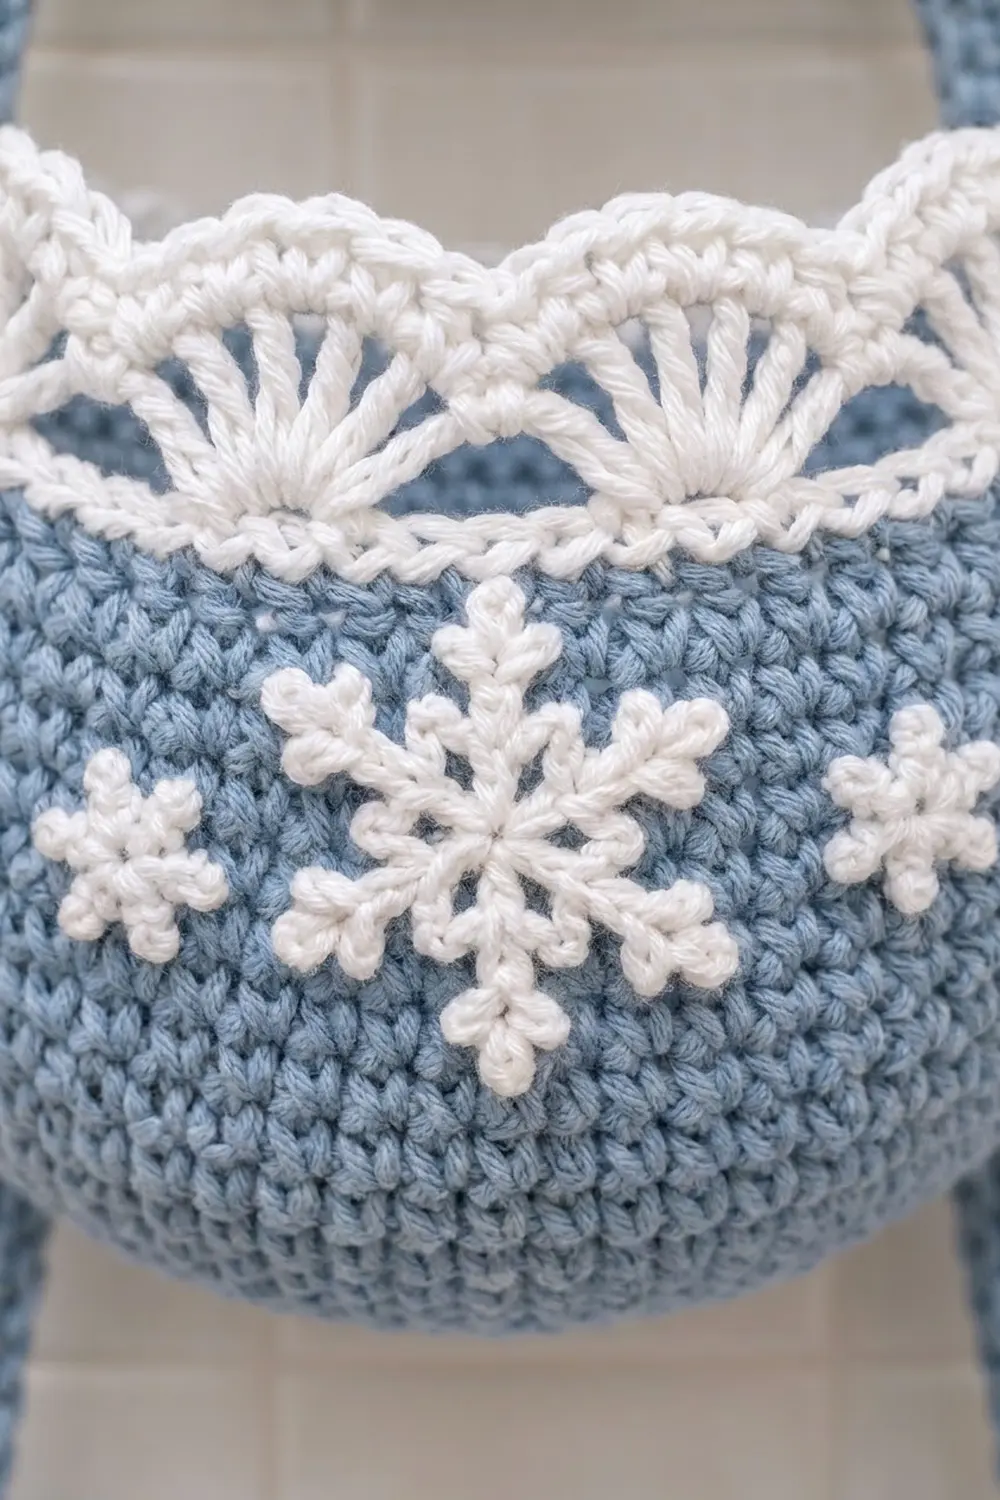
Pocket (make 3)
Use MC and the 4.0 mm hook. Work in joined rounds: begin each round with ch 1 (this does not count as a stitch) and join with a sl st to the first sc. The join seam marks the center back of the pocket.
Rnd 1: 6 sc in MR, join. (6)
Rnd 2: Inc in each st around. (12)
Rnd 3: Sc 1, inc 6 times. (18)
Rnd 4: Sc 2, inc 6 times. (24)
Rnd 5: Sc 3, inc 6 times. (30)
Rnd 6: Sc 4, inc 6 times. (36)
Rnd 7: Sc 5, inc 6 times. (42)
Rnd 8: Sc 6, inc 6 times. (48)
Checkpoint: the base is a flat circle about 3.25 in (8.3 cm) across.
Rnd 9: Sc in each st around. (48) This round without increases starts turning the side up.
Rnd 10: Sc 7, inc 6 times. (54)
Rnds 11–12: Sc around. (54)
Rnd 13: Sc 8, inc 6 times. (60)
Rnds 14–15: Sc around. (60)
Rnd 16: Sc 9, inc 6 times. (66)
Rnds 17–18: Sc around. (66)
Rnd 19: Sc 10, inc 6 times. (72)
Checkpoint: the circumference is 16 in (40.6 cm).
Rnds 20–24: Sc around. (72)
Fasten off MC and weave in the ends. With the join seam at stitch 1, place markers in stitches 12, 36 and 60. Stitch 36 is the center front. Stitches 12 and 60 are the strap points, 24 stitches apart across the back.
Fan Lace Edging
This edging works as the pocket’s “border”. Use CC and the 4.0 mm hook.
Edging gauge: one fan repeat uses 6 rim stitches, so each fan covers 6 ÷ 4.5 = 1.33 in (3.4 cm) of the rim.
Edging Rnd 1: Join CC with a sl st in the seam stitch. Ch 1, then sc in each st around and join. (72 sc)
Edging Rnd 2: Ch 1, sc in the first st. Sk 2 sts, fan in the next st, sk 2 sts, sc in the next st. Repeat from * 11 more times, leaving out the final sc on the last repeat. Join to the first sc.
Each repeat uses 6 stitches (sc + 2 skipped + fan stitch + 2 skipped), and 12 x 6 = 72.
Count: 12 fans (84 dc) + 12 sc = 96 sts.
Edging Rnd 3 (trim round): Ch 1. Sc in the next 3 dc, (sc, ch 3, sc) in the center (4th) dc, sc in the next 3 dc, sl st in the next sc. Repeat from * 12 times. Join to the first sc.
Count: 84 sc worked one into each dc, plus 12 extra sc at the fan centers, makes 96 sc. Add 12 sl sts (one in each sc between the fans) and 12 ch-3 loops (one at each fan peak).
Why the math works: 72 is an exact multiple of 6, so the 12 fans close perfectly with no leftover stitches. Rnd 3 adds only one stitch per fan, at the peak. This rounds the scallop tops without making the rim ruffle.
Fasten off and weave in the ends. The edging stands about 1 in (2.5 cm) above the blue rim and flares out to about 5.5 in (14.0 cm) across.
Snowflakes
Use CC and the 3.5 mm hook. The smaller hook keeps the arms crisp.
Large Snowflake (make 3)
Finished size: 2 in (5.1 cm) across.
Center: 6 sc in MR, then pull the ring tight and join with a sl st to the first sc. (6)
Arms: Ch 4 for the spine. Make a picot for the tip. Sl st in the next 2 spine chains, make a branch pair, sl st in the remaining 2 spine chains, then sl st in the next sc of the center. Repeat from * 5 more times. The last sl st lands in the first sc.
Count: 6 arms, each with 1 tip picot and 1 branch pair.
Small Snowflake (make 6)
Finished size: 1.25 in (3.2 cm) across.
Center: 6 sc in MR, join. (6)
Arms: Ch 3, picot, sl st in each of the 3 spine chains, sl st in the next sc. Repeat 6 times.
Count: 6 arms.
Leave a 10 in (25.4 cm) tail on each snowflake for sewing.
Placement:
1. Center the large snowflake on the stitch-36 marker, 1.5 in (3.8 cm) below the blue rim.
2. Place one small snowflake on each side, with its center 2 in (5.1 cm) to the side of the large snowflake’s center and 2 in (5.1 cm) below the rim.
3. Pin all three, then tack each arm tip and the center with small stitches that don’t show from the front.
Make All Pieces
| Piece | Qty | Color |
|---|---|---|
| Pocket body | 3 | MC |
| Fan lace edging | 3 | CC |
| Strap | 2 | MC |
| Large snowflake | 3 | CC |
| Small snowflake | 6 | CC |
Layout (seen from the front):
        [ wooden ring ]
          /         \
   Strap A           Strap B
   |   [ Pocket 1 – top    ]  |
   |   [ Pocket 2 – middle ]  |
   |   [ Pocket 3 – bottom ]  |
Strap (make 2)
Use MC and the 4.0 mm hook.
Row 1: Ch 78, then sc in the 2nd ch from the hook and in each ch across. (77)
Rows 2–3: Ch 1, turn, sc across. (77)
Fasten off. Each strap measures 17.1 in (43.4 cm) x 0.6 in (1.5 cm).
Joining
Method: whipstitch with MC through both loops.
Mark each strap, measuring from its top end:
– 1 in (2.5 cm): the fold line around the ring
– 4 in (10.2 cm): the rim of Pocket 1
– 9.5 in (24.1 cm): the rim of Pocket 2
– 15 in (38.1 cm): the rim of Pocket 3
The pockets are 5.5 in (14.0 cm) apart, rim to rim, which leaves about a 1 in (2.5 cm) gap between the bottom of one pocket and the edging of the next.
Stitch-to-stitch logic:
1. Lay each strap flat against the outside back of the pocket, centered on its strap point (stitch 60 for Strap A, stitch 12 for Strap B). The strap runs from Rnd 24 down to Rnd 15, which is 10 rounds, or 2 in (5.1 cm).
2. Whipstitch both long edges of the strap with one stitch per pocket round, giving 10 whipstitches per edge.
3. The strap stitches meet the pocket rounds at a ratio of 9 to 10, so ease in the one extra round evenly.
4. On Pocket 3, the bottom 2 in (5.1 cm) of each strap ends exactly at Rnd 15.
5. The edging stands free above the rim, in front of the straps.
Tension: keep the whipstitches snug but not tight. Pull too hard and the rim puckers between the straps.
Top: pass both straps through the ring. Fold each strap’s top 1 in (2.5 cm) back over the ring and sew it down securely, with Strap A on the left of the ring and Strap B on the right.
Size checkpoint: at every rim, the straps sit 4.4 in (11.2 cm) apart, which is the straight-line distance across 24 of the 72 stitches. Hung up, the holder measures 19.5 in (49.5 cm) from the top of the ring to the bottom of Pocket 3.
Final Blocking
- Lightly spray each pocket and its edging with water.
- Stuff each pocket firmly with a towel or put a roll inside so it holds a round bowl shape.
- Pin the fans outward so the edging flares to 5.5 in (14.0 cm) across.
- Pin each snowflake’s arm tips flat and evenly spaced.
- Let everything dry completely, for at least 12 hours.
- Remove the pins and hang the holder.
Final Quality-Control Checklist
- Each pocket has 72 sts at the rim and is 16 in (40.6 cm) around.
- Each edging has 12 even fans with no extra or missing stitches.
- Every snowflake has 6 complete arms.
- The large snowflake is centered on stitch 36 of each pocket.
- The straps are 4.4 in (11.2 cm) apart at every rim.
- The pockets are 5.5 in (14.0 cm) apart, rim to rim.
- The ring folds are sewn through all layers.
- All ends are woven in on the inside.
Troubleshooting
- The base cups too early: your tension is tight. Go up half a hook size for Rnds 1–8.
- The pocket flares like a plate: you have too many stitches. Recount Rnds 10–19.
- The fans don’t close evenly: the rim count is off. You need exactly 72 sts after Rnd 24.
- The edging ruffles: you added more than one extra stitch per fan in Edging Rnd 3.
- The pockets tip forward: extend the strap seams down to Rnd 13.
- The snowflakes curl: block them flat under pins before sewing.
Care
Hand wash in cool water, press out the water in a towel, and reshape the pockets over rolls to dry. Do not tumble dry.
Final Notes
The measurement chain works like this:
– Gauge: 18 sc = 4 in (10.2 cm)
– 72-stitch rim: 16 in (40.6 cm) around, or 5.1 in (13.0 cm) across
– Pocket height: 3.5 in (8.9 cm) plus a 1 in (2.5 cm) edging = 4.5 in (11.4 cm)
– Pocket spacing: 5.5 in (14.0 cm), rim to rim, on 17.1 in (43.4 cm) straps
– Finished holder: 19.5 in (49.5 cm) long
If you check each link in that chain as you go, the finished holder will hang straight and every roll will fit.
Happy crocheting!