

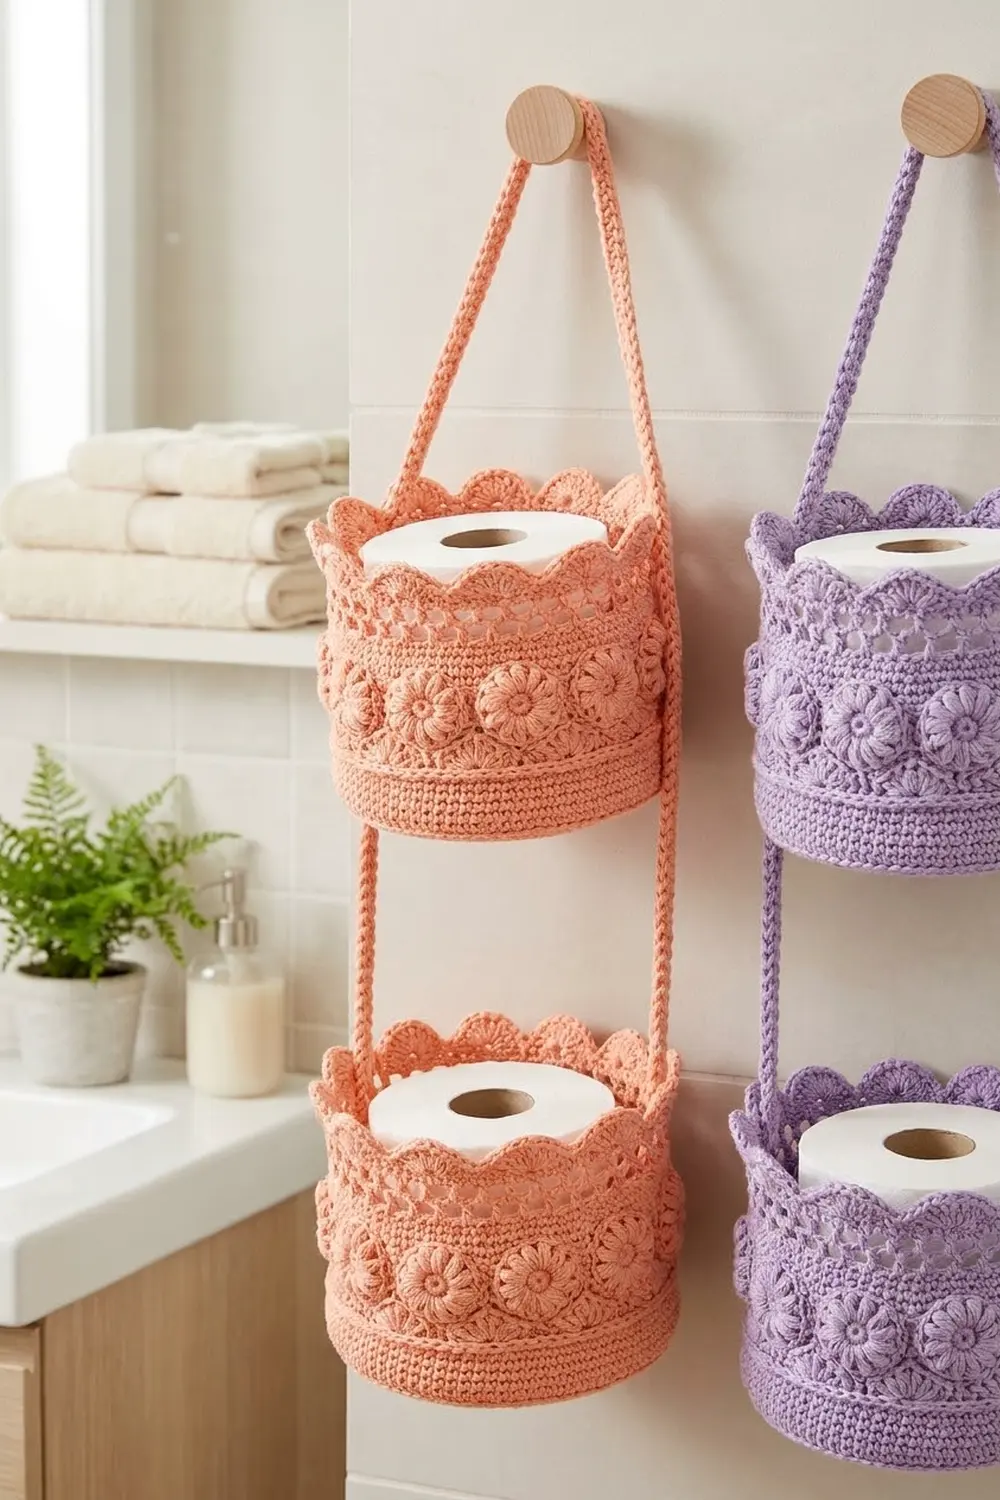
This two-tier hanging basket keeps two spare toilet rolls tidy and in sight. It has two oval baskets with raised daisy walls and scalloped crown rims, linked by a braided-look cord that ends in a pointed hanging loop.
The sample is soft peach. Lavender, cream or sage work just as well. Choose a smooth cotton so the daisies and crown picots stand out clearly. The baskets are firm enough to keep their shape with a roll inside, but soft enough to fold flat for storage or gifting.
The pattern uses US crochet terms. Each basket measures about 8 x 6 in (20.3 x 15.2 cm) across the top and 4 in (10.2 cm) high. The hung organizer is about 22 in (55.9 cm) from the top point to the bottom.
For each basket, you work a flat oval base, turn up the wall with a back-loop round, and then work the daisy band, the lattice band and the crown rim. One long cord is sewn to both baskets to finish the organizer.
Finished Size and Construction
- Finished size: about 22 in (55.9 cm) tall when hung
- Skill level: Intermediate
- Terminology: US crochet terms
- Yarn weight: Worsted (#4) cotton
- Hook: 5 mm (H-8)
- Number of pieces: 3 (2 baskets, 1 cord)
- Layout: Vertical, one basket above the other
- Piece size: Each basket is 8 x 6 in (20.3 x 15.2 cm) across the top and 4 in (10.2 cm) high
- Size before border: The base is 7 x 5 in (17.8 x 12.7 cm) and the wall is 3 in (7.6 cm) high
- Border depth: The crown rim adds 1 in (2.5 cm)
Materials
Use 100% cotton or a cotton blend in worsted weight. Cotton holds its shape, softens with washing and doesn’t shed in a damp bathroom. Avoid fuzzy acrylic, which blurs the daisy texture.
- Peach (main color): 150 g, about 255 m (279 yd), or three 50 g balls of about 85 m (93 yd) each
- Lavender (optional second colorway): the same amount, 150 g, about 255 m (279 yd), if you want a second organizer
These quantities include a margin of about 20% over what the sample used.
Tools
- 5 mm (H-8) crochet hook
- 4 stitch markers
- Tapestry needle
- Scissors
- Tape measure
- Spray bottle and rust-proof pins for blocking
Abbreviations (US Terms)
- ch – chain
- sl st – slip stitch
- sc – single crochet
- hdc – half double crochet
- dc – double crochet
- tr – treble crochet
- BLO – back loop only
- sp – space
- st(s) – stitch(es)
- rep – repeat
- inc – 2 sc in the same st
Special stitches
- cl6 (6-stitch cluster): *Yarn over, insert the hook in the next st, yarn over and pull up a loop, then yarn over and draw through 2 loops. Rep from * in each of the next 5 sts (6 times in total). You now have 7 loops on the hook. Yarn over and draw through all 7 loops.
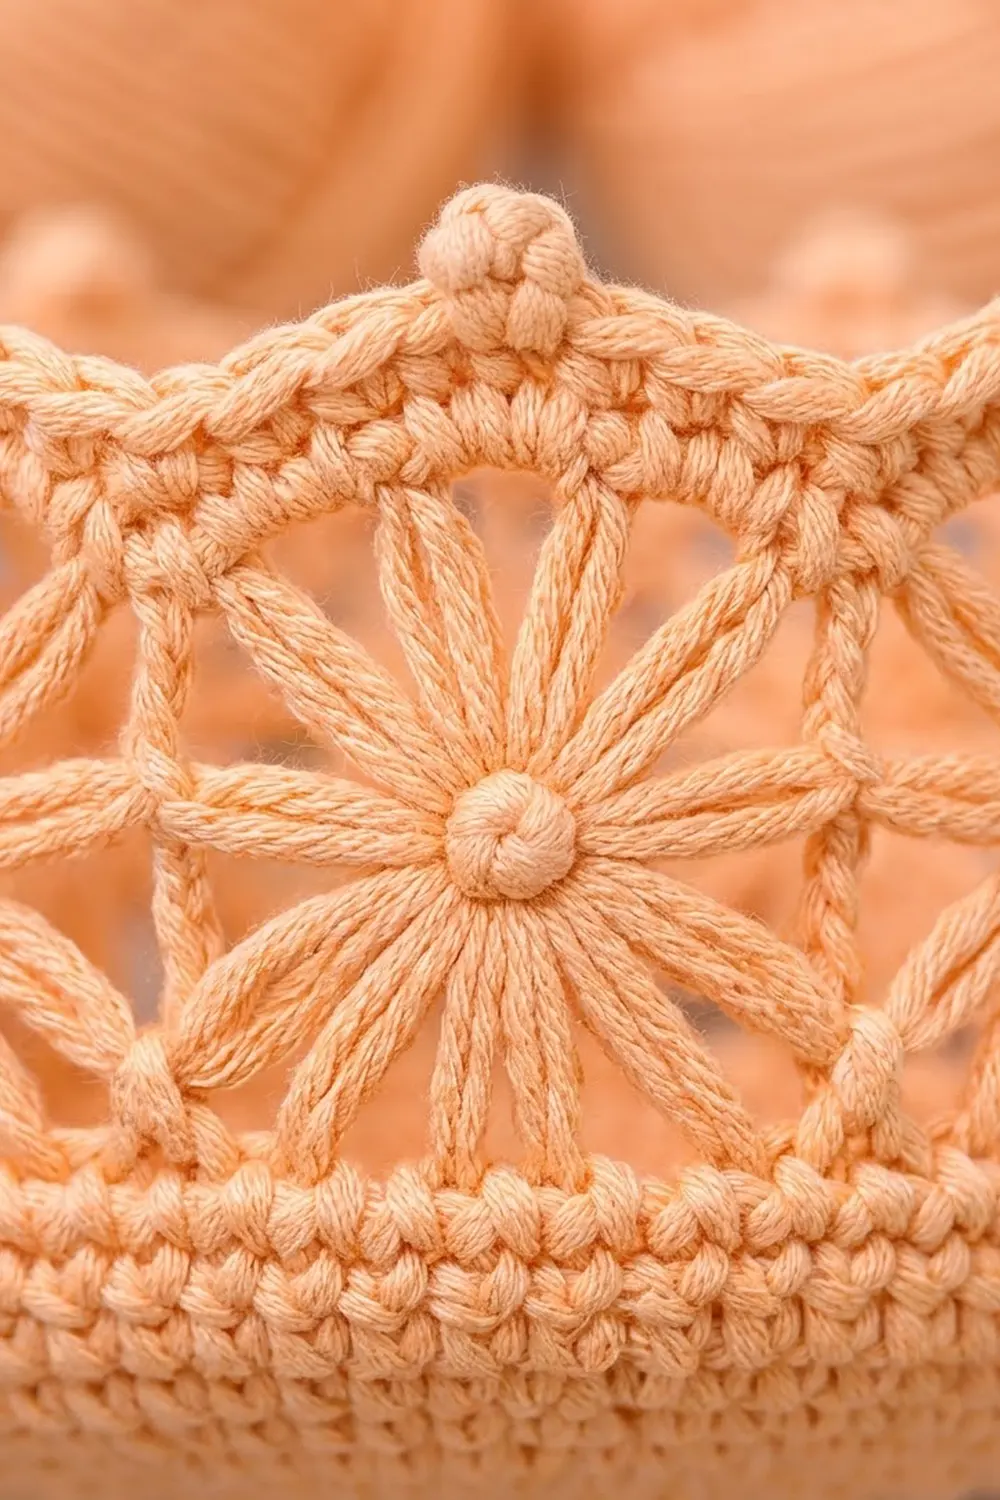
- Eye: After a cl6, ch 1 and pull it snug. This ch-1 becomes the knotted center of the daisy.
- Picot-knob: In one st, work (dc, ch 3, sl st in the 3rd ch from the hook, dc).
Gauge and Checkpoints
Gauge: 14 sc and 16 rounds = 4 in (10.2 cm) in sc worked in joined rounds.
Make one full basket before you buy more yarn or start the second basket. Measure with the piece lying flat and unstretched.
- After Rnd 6: The base measures 5 x 3 in (12.7 x 7.6 cm).
- After Rnd 10: The base measures 7 x 5 in (17.8 x 12.7 cm).
- After Rnd 12: The wall is 0.5 in (1.3 cm) high.
- After Rnd 15: The wall is 2 in (5.1 cm) high.
- After Rnd 17: The wall is 3 in (7.6 cm) high.
- After Rnd 18: The wall is 4 in (10.2 cm) high at the picot tips.
If the base is too big, go down 0.5 mm in hook size. If it’s too small, go up 0.5 mm. Don’t add or skip rounds to fix the size, because the wall repeats need exactly 72 stitches.
Basket (Make 2)
Oval Base
Ch 9.
Rnd 1: Work 3 sc in the 2nd ch from the hook (end A). Sc in each of the next 6 ch, then 3 sc in the last ch (end B). Rotate the work and, along the other side of the foundation chain, sc in each of the next 6 ch. Join with a sl st to the first sc. (18 sts: two 3-st ends and two 6-st sides)
Each round from here is made of 4 sections: an end, a side, an end and a side. The sides always stay at 6 sts. Each end grows by 3 sts per round.
Rnd 2: Ch 1. [2 sc in the next st] 3 times, sc in the next 6, [2 sc in the next st] 3 times, sc in the next 6. Join. (24 sts)
Rnds 3–10: Ch 1. [Sc in the next (R − 2) sts, 2 sc in the next st] 3 times, sc in the next 6. Rep from * once more and join. R is the number of the round you’re working. Each end changes from 3(R − 1) sts to 3R sts.
- Rnd 3: 30 sts
- Rnd 4: 36 sts
- Rnd 5: 42 sts
- Rnd 6: 48 sts
- Rnd 7: 54 sts
- Rnd 8: 60 sts
- Rnd 9: 66 sts
- Rnd 10: 72 sts (two 30-st ends and two 6-st sides)
The total for each round is 6R + 12. Check Rnd 10: 6 x 10 + 12 = 72.
On Rnd 10, place markers in st 15 and st 51. These are the centers of the 2 ends. Move both markers up as you go, because they show where the cord is attached later.
Wall
Rnd 11: Ch 1, sc in the BLO of each st around. Join. (72 sts) This round creates the fold ridge where the wall turns up.
Rnd 12: Ch 1, sc in each st around. Join. (72 sts)
Rnd 13 (half-wheel fans): Ch 1. Sc in each of the next 2 sts, skip 3 sts, 7 dc in the next st, skip 3 sts. Rep from * 8 times in total and join. Each repeat uses 9 sts and makes 9 sts (2 sc and 7 dc). (72 sts, 8 fans)
In each fan, call the dc stitches dc1 to dc7. The center dc is dc4.
Rnd 14 (cluster round): Sl st in each of the first 4 sts (2 sc, dc1 and dc2) to reach dc3 of the first fan. Ch 1. Sc in each of the next 3 dc (dc3–dc5), ch 3. Work cl6 over the next 6 sts (dc6, dc7, 2 sc, and dc1 and dc2 of the next fan), then make an eye and ch 3. Rep from * 8 times in total. On the last repeat, the cl6 goes through the slip-stitched sts at the start of the round. Join to the first sc. (8 groups of 3 sc and 8 clusters)
Rnd 15 (top half of the daisies): Ch 1. Sc in each of the next 3 sc, skip the ch-3 sp, 7 dc in the eye, skip the ch-3 sp. Rep from * 8 times in total and join. Each cluster and the fan above it now form one full daisy around its eye. This round is a growth round. (80 sts: 8 repeats of 10 sts)
Rnd 16 (leveling round): Ch 1. Dc in the next sc, tr in the next sc, dc in the next sc, sc in each of the next 7 dc. Rep from * 8 times in total and join. (80 sts) The tall stitches fill the dips between daisies so the top edge is level. St 2 of each repeat is the tr, and st 7 sits above the center of a daisy.
Rnd 17 (lattice): Sl st in the next st (the first tr). Ch 1, sc in the same st. Ch 4, skip 4 sts, sc in the next st. Rep from * 15 more times, leaving out the last sc. Join to the first sc. (16 ch-4 loops)
The sc stitches now sit over st 2 and st 7 of each 10-st repeat. These positions alternate between a gap between daisies and the center of a daisy.
Make All Pieces
Make 2 baskets and 1 cord in peach (or 2 baskets and 1 cord in lavender for a second organizer). Each basket uses about 55 g, and the cord uses about 15 g.
Cord: Ch 165. Sl st in the back bump of the 2nd ch from the hook and in each ch across. (164 sl sts) Cord gauge is 4 sts = 1 in (2.5 cm), so the cord measures 41 in (104.1 cm). Fasten off and leave a long tail at each end.
Layout grid (front view):
            /\
           /  \        cord legs, 40 sts each
          /    \
        [ BASKET 1 ]   upper basket, cord on both end walls
         |        |    gap, 20 cord sts each side
        [ BASKET 2 ]   lower basket, cord on top 1.5 in of end walls
Joining
Attach the cord with whipstitch using matching yarn. Make one whipstitch through each cord st and catch the marked center column of the basket wall.
Fold the cord in half and mark the middle; this becomes the apex. Working from the apex down each half:
- Legs: 40 sts, 10 in (25.4 cm), left free.
- Upper basket: 16 sts sewn up the marked end column from Rnd 11 to Rnd 18, 4 in (10.2 cm). Eight wall rounds take 16 cord sts, so each round gets 2 whipstitches.
- Gap: 20 sts, 5 in (12.7 cm), left free.
- Lower basket: The last 6 sts are sewn down the outside of the end column, covering Rnds 18 and 17, which are 1.5 in (3.8 cm).
Each half uses 40 + 16 + 20 + 6 = 82 sts, and 2 halves make 164 sts.
Keep your tension even. Pull each whipstitch just enough to close it without puckering the wall. Don’t stretch the free sections of the cord.
Size checkpoint: Hang the organizer. The gap from the lower rim to the upper base should be 5 in (12.7 cm), and the full height should be about 22 in (55.9 cm).
Border: Scalloped Crown Rim
Work this border on each basket before joining.
Border gauge: One scallop is about 2.75 in (7.0 cm) wide and 1 in (2.5 cm) deep.
Rnd 18: Ch 1. In the next ch-4 sp, work (sc, hdc, 3 dc). In the next sc, work a picot-knob. In the next ch-4 sp, work (3 dc, hdc, sc). Sl st in the next sc. Rep from * 8 times in total. The final sl st goes into the first sc of Rnd 17 and is the join. Fasten off and weave in the ends.
Counts per side: Split the oval into 4 sides: the front, one end, the back and the other end. Each side has 20 sts of Rnd 16, 4 ch-4 loops and 2 scallops. Each scallop has 12 sts (5 + dc + dc + 5), 1 picot and 1 sl st.
Why the math works: Rnd 16 has 80 sts. 80 ÷ 5 = 16 loops, and 16 ÷ 2 = 8 scallops, which is one scallop for each daisy. Each peak sits over st 7, the center of a daisy, and each sl st valley sits over the tr between daisies.
Final Blocking
- Lightly spray each basket until it is damp.
- Put a toilet roll wrapped in a towel inside each basket to shape the walls.
- Pinch each picot-knob into a round knob, and pin the scallops out evenly.
- Hang the organizer from a hook and let the cord legs straighten with the baskets attached.
- Let it dry completely for about 24 hours.
Final Quality-Control Checklist
- Each base measures 7 x 5 in (17.8 x 12.7 cm) and lies flat.
- Each basket has 8 daisies and 8 crown peaks.
- Both baskets are 4 in (10.2 cm) high.
- The cord seams sit at the exact end centers.
- The gap is 5 in (12.7 cm) on both sides.
- All ends are woven in securely.
Troubleshooting
- The base ruffles: Your increases are too tight together. Check that the sides stay at 6 sts on every round.
- The base cups: Your tension is too tight. Go up a hook size.
- The fan count is wrong: Recount Rnd 12. You need exactly 72 sts.
- The daisies look flat: Pull each eye snug, and push the clusters forward with your fingers.
- A roll won’t fit: The base is too small. Check your gauge and remake the basket with a larger hook instead of adding rounds.
- The baskets tilt: Move the cord to the marked center columns.
- The cord stretches: Use a tighter tension for the cord, or a hook 0.5 mm smaller.
Care
Take out the rolls, hand wash in cool water and reshape while damp. Dry flat or hanging, away from direct heat, and re-pinch the crown peaks if they relax.
Final Notes
Here is the full measurement chain. The gauge is 14 sc = 4 in (10.2 cm). The base is 72 sts and 7 x 5 in (17.8 x 12.7 cm). The wall grows to 80 sts with 8 daisies, which gives 16 loops and 8 scallops. Each basket is 4 in (10.2 cm) high. The cord has 164 sts and is 41 in (104.1 cm) long, and the finished organizer is about 22 in (55.9 cm) tall.
Happy crocheting!