

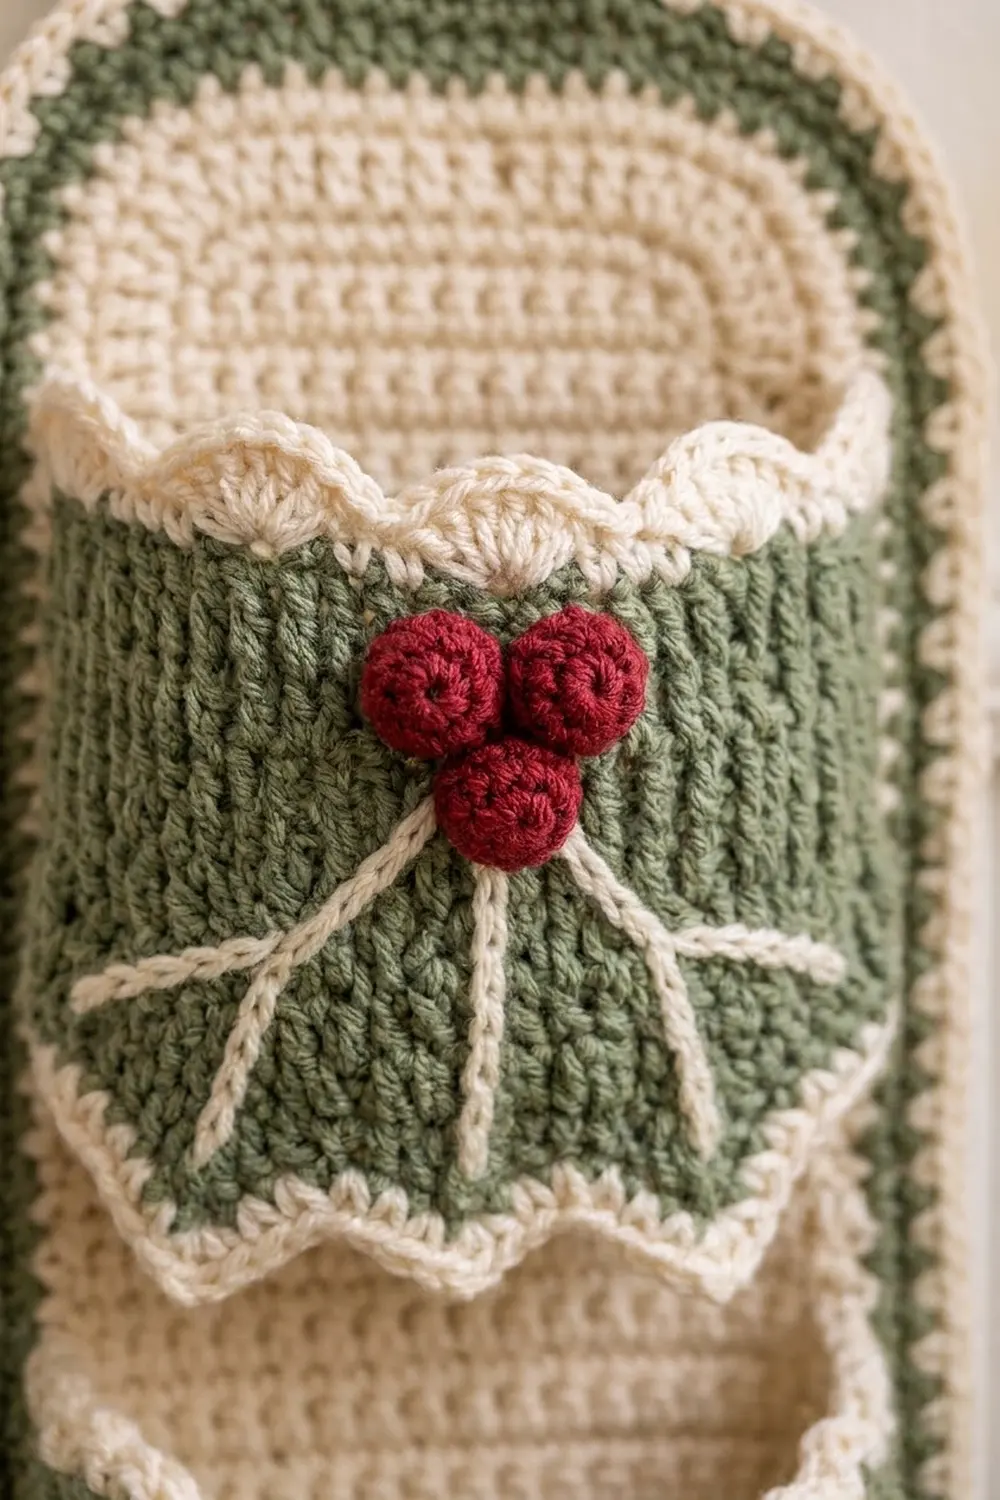
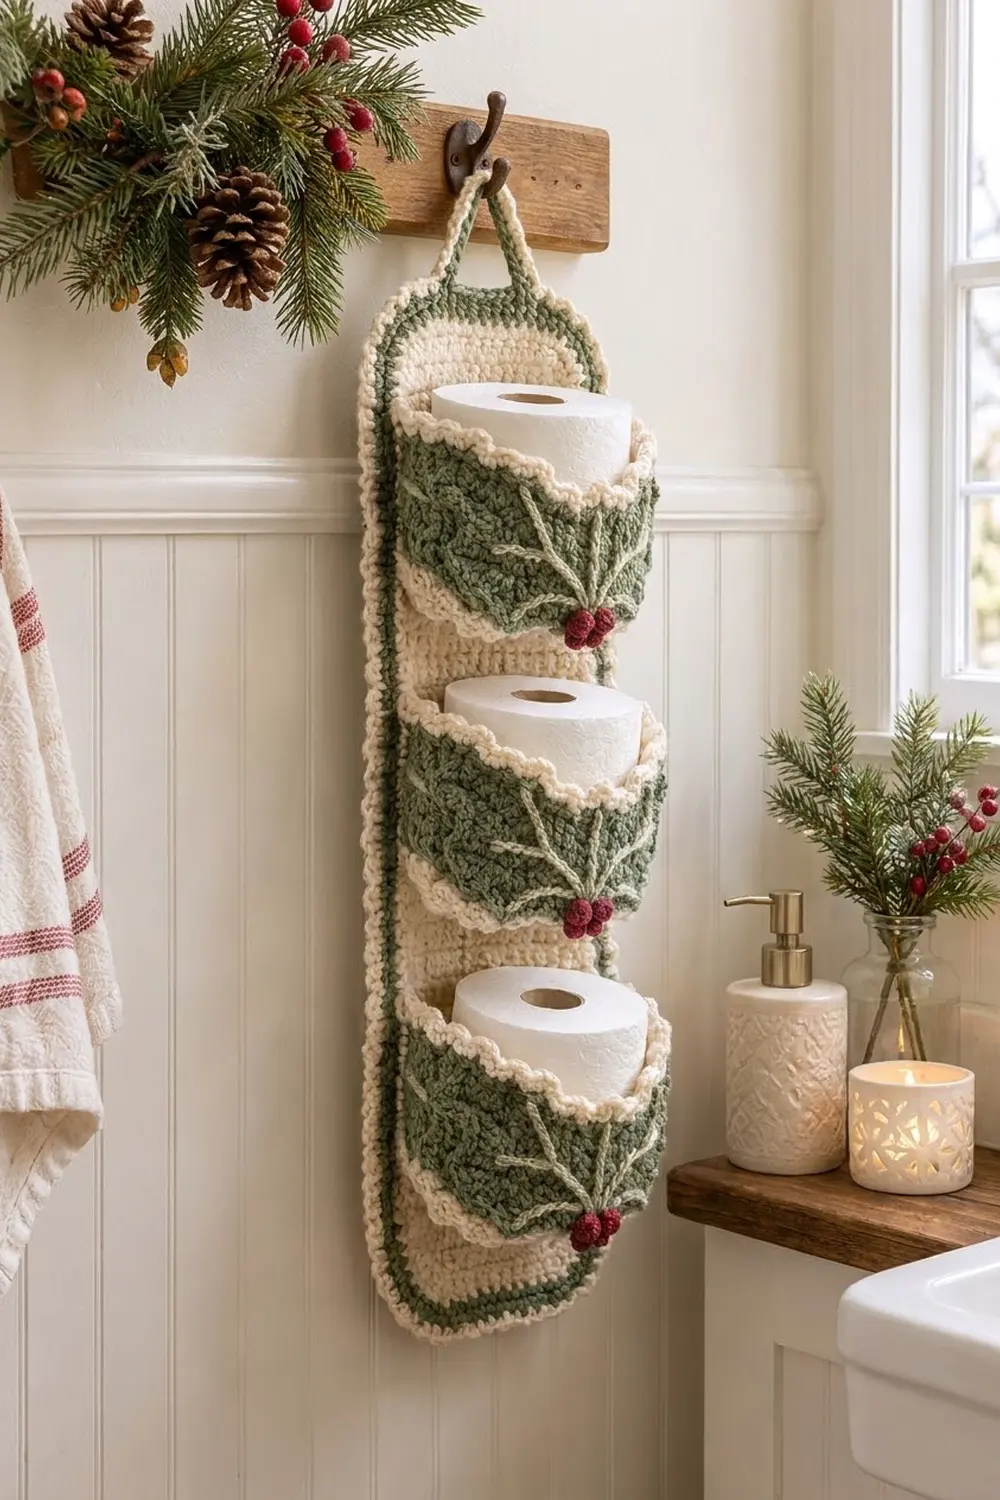
The Hollyberry Pocket Toilet Paper Holder is a hanging bathroom organizer that holds three standard rolls. It has a soft cream backing panel and three sage green pockets with scalloped tops. Cream embroidered holly veins and little cranberry berries give it a cozy Christmas look.
The colors are cream, sage green and cranberry red. The style is rustic and farmhouse-inspired. It suits a guest bath during the holidays and still looks nice in January. This pattern uses US crochet terms throughout.
The finished holder measures 7 in (17.8 cm) wide and 22.5 in (57.2 cm) long, not counting the loop. With the hanging loop it measures about 26 in (66.0 cm).
You work the backing panel in rounds of single crochet around a foundation chain. Each pocket is a flat trapezoid worked bottom-up. Its top edge is wider than the panel, which is what makes it bulge out to hold a roll. You sew the pockets on, work a three-round border on the panel, and then add the strap, embroidery and berries.
Finished Size and Construction
- Finished size: 7 in × 22.5 in (17.8 cm × 57.2 cm), plus a 3.5 in (8.9 cm) loop
- Skill level: Intermediate
- Terminology: US
- Yarn weight: Worsted (#4)
- Hook: 5.0 mm (H-8)
- Number of pieces: 1 panel, 3 pockets, 1 strap, 9 berries
- Layout: 3 pockets stacked vertically, 1 column
- Pocket size (flat): 5.4 in (13.7 cm) at the bottom, 10.6 in (26.9 cm) at the top, about 5.25 in (13.3 cm) tall including edgings
- Panel size before border: 5.5 in × 21 in (14.0 cm × 53.3 cm)
- Border depth: 0.75 in (1.9 cm) on each side
Materials
Choose a smooth worsted yarn in cotton or a cotton blend. It holds its shape well and handles steamy bathrooms. Acrylic works too, but steam-block it gently. The amounts below assume about 200 m per 100 g.
- Cream (main color, MC): 60 g / 120 m
- Sage green (CC1): 40 g / 80 m
- Cranberry red (CC2): 5 g / 10 m
The quantities include a margin of about 20% for your gauge swatch and seaming.
Tools:
– 5.0 mm (H-8) crochet hook
– Tapestry needle
– Stitch markers (at least 4)
– Locking pins or sewing pins
– Measuring tape
– Small amount of fiberfill or yarn scraps (optional, for the berries)
Abbreviations (US Terms)
- ch: chain
- sl st: slip stitch
- sc: single crochet
- hdc: half double crochet
- dc: double crochet
- BLO: back loop only
- sc2tog: single crochet 2 together
- MR: magic ring
- st(s): stitch(es)
- RS / WS: right side / wrong side
Special stitches
- Reverse sc (crab stitch): Work sc from left to right (right to left if you crochet left-handed). It makes a corded, rope-like edge.
- Holly point: Work (hdc, dc, ch 2, sl st in top of the dc just made, dc, hdc) all in the same st.
Gauge and Checkpoints
Gauge: 14 sc × 16 rows = 4 in (10.2 cm). Use the same gauge for sc in BLO. Each sc round or row adds about 0.25 in (0.6 cm).
Make one pocket first and use it as your gauge test. When it’s flat, Row 10 should measure 10.6 in (26.9 cm) across, and Rows 1–16 should be 4 in (10.2 cm) tall.
Checkpoints:
– Panel after Round 1: about 16 in (40.6 cm) long. The straight edge alone is about 15.4 in (39.1 cm).
– Panel after Round 5: about 2.75 in (7.0 cm) wide.
– Panel after Round 10: 5.5 in × 21 in (14.0 cm × 53.3 cm).
– Finished panel after border: 7 in × 22.5 in (17.8 cm × 57.2 cm).
If your piece is too big, go down 0.5 mm in hook size. If it is too small, go up 0.5 mm. Don’t add or remove rounds to fix the size, because the pocket spacing depends on the panel length.
Backing Panel
Use cream (MC). Work in continuous rounds and keep a marker in the first stitch of each round.
Foundation: Ch 57.
Round 1: Work 3 sc in the 2nd ch from hook, then sc in each of the next 54 ch. Work 3 sc in the last ch. Rotate the piece and work along the underside of the chain: sc in each of the next 54 ch. (114 sts: 54 per straight side + 3 per end)
Round 2: [2 sc in each of next 3 sts, sc in next 54 sts] twice. (120 sts)
Round 3: [(sc in next st, 2 sc in next st) 3 times, sc in next 54 sts] twice. (126 sts)
Round 4: [(sc in next 2 sts, 2 sc in next st) 3 times, sc in next 54 sts] twice. (132 sts)
Rounds 5–10: Keep working 3 increases evenly around each end and 1 sc in each st along the straight sides. Add one plain sc between the increases on each new round. Each round adds 6 sts.
– Round 5: 138 sts
– Round 6: 144 sts
– Round 7: 150 sts
– Round 8: 156 sts
– Round 9: 162 sts
– Round 10: 168 sts
Each straight side stays at 54 sts. Each end has 3 × (round number) sts, so after Round 10 each end has 30 sts. Check the total: 54 + 30 + 54 + 30 = 168.
Stagger the increases on each end so the curves stay round instead of hexagonal. Sl st to the next st, fasten off and weave in the ends. Check: the panel should measure 5.5 in × 21 in (14.0 cm × 53.3 cm).
Pocket (Make 3)
Use sage green (CC1). Work in rows, ch 1 at the start of each row and turn. The ch 1 does not count as a stitch. Work Rows 2–16 in BLO, which gives the ridged, pebbly texture.
Row 1: Ch 20. Sc in the 2nd ch from hook and in each ch across. (19 sts)
Rows 2–10 (growth rows): Work 2 sc in the first st, sc BLO in each st across to the last st, then 2 sc in the last st.
– Row 2: 21 sts
– Row 3: 23 sts
– Row 4: 25 sts
– Row 5: 27 sts
– Row 6: 29 sts
– Row 7: 31 sts
– Row 8: 33 sts
– Row 9: 35 sts
– Row 10: 37 sts
Rows 11–16: Sc BLO in each st across. (37 sts on each row)
Don’t fasten off the green yet. Rows 1–10 make the slanted bottom corners, and Rows 11–16 make the straight upper sides.
Side and Bottom Holly Edge
Edging Row 1 (green, trim row): Ch 1. Turn the piece so you can work down the first side edge.
– Work 16 sc down the side, 1 in each row end.
– Work 2 sc in the first foundation ch (corner).
– Sc in each of the next 17 foundation ch.
– Work 2 sc in the last foundation ch (corner).
– Work 16 sc up the other side, 1 in each row end.
Total: (16 + 17 + 16 = 49 worked 1 per st or row) + (2 extra at the corners) = 53 sts. Fasten off the green.
Edging Row 2 (cream points): Join cream (MC) in the first sc of Edging Row 1. Sc in the first st, skip 1 st, holly point in the next st, skip 1 st, sc in the next st. Repeat from * to * 13 times. (13 holly points, 14 sc)
The math works because 53 = (4 × 13) + 1. Fasten off.
Scalloped Top
Top Row 1 (cream): Join cream in the first st of Row 16 on the top edge. Ch 1, sc in each st across. (37 sts) Turn.
Top Row 2 (scallops): Ch 1. Sc in the first st, skip 2 sts, 5 dc in the next st, skip 2 sts, sc in the next st. Repeat from * to * 6 times. (6 scallops: 7 sc + 30 dc = 37 sts)
The math works because 37 = (6 × 6) + 1. Fasten off and weave in the ends.
Pocket check: The flat pocket should measure 5.4 in (13.7 cm) across Row 1 and 10.6 in (26.9 cm) across Row 16. Its height should be about 5.25 in (13.3 cm) from the tips of the points to the tops of the scallops.
Holly Embroidery
Thread cream yarn on a tapestry needle and use chain stitch or backstitch on the RS.
- Find the center of Row 2, just above the green edging. This is the berry point.
- Center leaf: stitch a vein straight up for 2.5 in (6.4 cm).
- Side leaves: stitch one vein toward each top corner at about 45 degrees, each 3 in (7.6 cm) long.
- Side veins: on each of the three veins, add 3 short side veins on each side. Make each 0.5 in (1.3 cm) long and angle them upward like feathers.
Keep the stitches loose enough that the fabric doesn’t pucker.
Berries (Make 9)
Use cranberry red (CC2).
- Round 1: Work 6 sc in a MR. (6 sts)
- Round 2: Sc in each st around. (6 sts) Tuck the starting tail or a bit of fiberfill inside.
- Round 3: Sc2tog 3 times. (3 sts)
Fasten off and leave a 6 in (15.2 cm) tail. Each berry is about 0.6 in (1.5 cm) across. Sew 3 berries in a tight triangle over the berry point on each pocket.
Hanging Strap
Use cream (MC).
- Row 1: Ch 36. Sc in the 2nd ch from hook and in each ch across. (35 sts)
- Rows 2–3: Ch 1, turn, sc in each st across. (35 sts)
- Outline: Join green and sl st loosely all the way around the strap. Fasten off.
The strap measures about 10 in × 0.75 in (25.4 cm × 1.9 cm).
Make All Pieces
| Piece | Qty | Colors |
|---|---|---|
| Backing panel | 1 | Cream |
| 3 | Green body and edge row, cream points, scallops and veins | |
| Berry | 9 | Red |
| Strap | 1 | Cream with green outline |
Layout (one column, top to bottom):
   [ STRAP LOOP ]
 [  PANEL TOP END  ]
 [   POCKET  1     ]
 [   POCKET  2     ]
 [   POCKET  3     ]
 [ PANEL BOTTOM END ]
Joining the Pockets to the Panel
Attach the pockets before you work the border. That way Round 10 of the panel stays free for the border.
Placement: Lay the panel flat with the RS up.
– The bottom edge of Pocket 3 sits 1.75 in (4.4 cm) above the bottom tip of the panel.
– Pocket 2 sits 6.25 in (15.9 cm) above Pocket 3, and Pocket 1 sits 6.25 in (15.9 cm) above Pocket 2. Measure from bottom edge to bottom edge.
– The top corners of Pocket 1 end about 1.75 in (4.4 cm) below the top tip of the panel.
Method: Whipstitch with green yarn. Go through Edging Row 1 of the pocket, and through the panel’s Round 9 stitches, one round in from the edge.
Stitch-to-stitch logic:
– Bottom edge: The pocket’s bottom edge has 21 sts (2 + 17 + 2). Sew it straight across the panel. Within Round 9, the panel is crossed by 19 rounds (9 + the center chain + 9). Ease in the 2 extra pocket sts by sewing 2 pocket sts into one panel round at each corner.
– Sides: Each side edge has 16 sts. Sew each side straight up along Round 9 for about 5 in (12.7 cm), which is about 18 panel sts. Skip 1 extra panel st after every 8 pocket sts.
– Top edge: The 37-st top stays free. Because it’s twice as wide as the space it spans, it bows out into a cup.
The cream holly points should lie flat on top of the panel, pointing outward.
Tension: Pull each whipstitch snug, but don’t let it gather the panel. If the panel ripples, loosen the stitches.
Checkpoint: The panel should still lie flat at 5.5 in × 21 in (14.0 cm × 53.3 cm). Each pocket should open about 3 in (7.6 cm) from the panel at its top center.
Border
The border is worked on the panel only. It uses the same gauge: 14 sts = 4 in (10.2 cm), with 0.25 in (0.6 cm) per round. Work it into the free stitches of Round 10, folding the pockets out of the way as you go.
Border Round 1 (green): Join green at the start of one straight side.
– Sc in each of the 54 sts along each straight side.
– Around each end, work 3 increases spaced evenly, for 33 sts per end.
– Total: 174 sts (54 + 33 + 54 + 33).
Border Round 2 (cream): Join cream.
– Sc in each of the 54 sts along each straight side.
– Around each end, work 3 increases spaced evenly, for 36 sts per end.
– Total: 180 sts (54 + 36 + 54 + 36).
Border Round 3 (cream, trim round): Work reverse sc in each st around. (180 sts) Join and fasten off.
Why the math works: The straight sides never increase, so their length stays at 54 sts, or 15.4 in (39.1 cm). Each curved end needs about 6 extra sts per round to lie flat (3 per end), the same rate the panel used. Round 3 is a trim round, so it has no increases.
The border adds 0.75 in (1.9 cm) on each side. That takes the panel from 5.5 in to 7 in (14.0 cm to 17.8 cm) wide, and from 21 in to 22.5 in (53.3 cm to 57.2 cm) long.
Attach the strap: Fold the strap in half. Overlap its ends 1.5 in (3.8 cm) onto the back of the panel, centered on the top end, and sew them securely in place. The loop should stand 3.5 in (8.9 cm) above the panel.
Final Blocking
- Lightly mist the whole holder, or steam it if you used acrylic.
- Pin the panel flat on a blocking mat at 7 in × 22.5 in (17.8 cm × 57.2 cm).
- Pin out each holly point and each top scallop.
- Stuff each pocket with a rolled towel so it dries in a round cup shape.
- Leave it to dry completely, for at least 12 hours.
- Remove the towels and fluff the berries with your fingers.
Final Quality-Control Checklist
- The panel measures 7 in × 22.5 in (17.8 cm × 57.2 cm).
- The border has 180 sts with no ruffling at the ends.
- Each pocket has 13 holly points and 6 scallops.
- All three pockets are centered and spaced 6.25 in (15.9 cm) apart.
- Each pocket holds a roll 4.25 in (10.8 cm) across and 4.5 in (11.4 cm) tall.
- All 9 berries are tightly sewn on, with no loose tails.
- The strap is sewn through the panel at the back and doesn’t show on the front.
- All ends are woven in on the WS.
Troubleshooting
- Panel ends cup or curl: You have too few increases. Check that each end gains exactly 3 sts per round.
- Panel ends ruffle: You have too many increases, or they are stacked in the same spot. Stagger them.
- Pocket too tight for a roll: Your gauge is tight. Remake the pocket with a 5.5 mm hook.
- Pocket sags forward: The side seams are too short. Sew the full 16 sts on each side.
- Scallops look crooked: Recount Top Row 1. It must have exactly 37 sts.
- Embroidery puckers: Loosen the stitches, then steam the area and press it flat.
Care
Hand wash in cool water, press out the water in a towel, and dry flat with the pockets stuffed so they keep their shape. Do not tumble dry.
Final Notes
The measurement chain is:
1. Gauge of 14 sts = 4 in (10.2 cm).
2. A 168-st panel at 5.5 in × 21 in (14.0 cm × 53.3 cm).
3. Three 37-st pockets sewn on 6.25 in (15.9 cm) apart.
4. A three-round, 180-st border that brings the panel to 7 in × 22.5 in (17.8 cm × 57.2 cm).
If each checkpoint matches, the finished holder will match too.
Happy crocheting!