
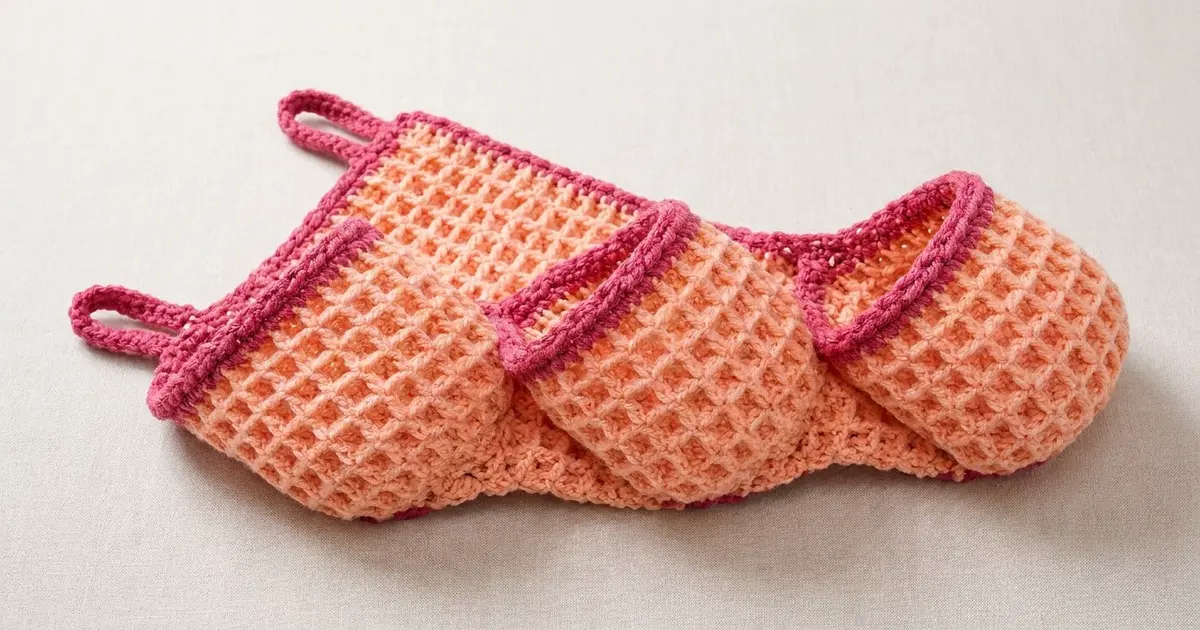
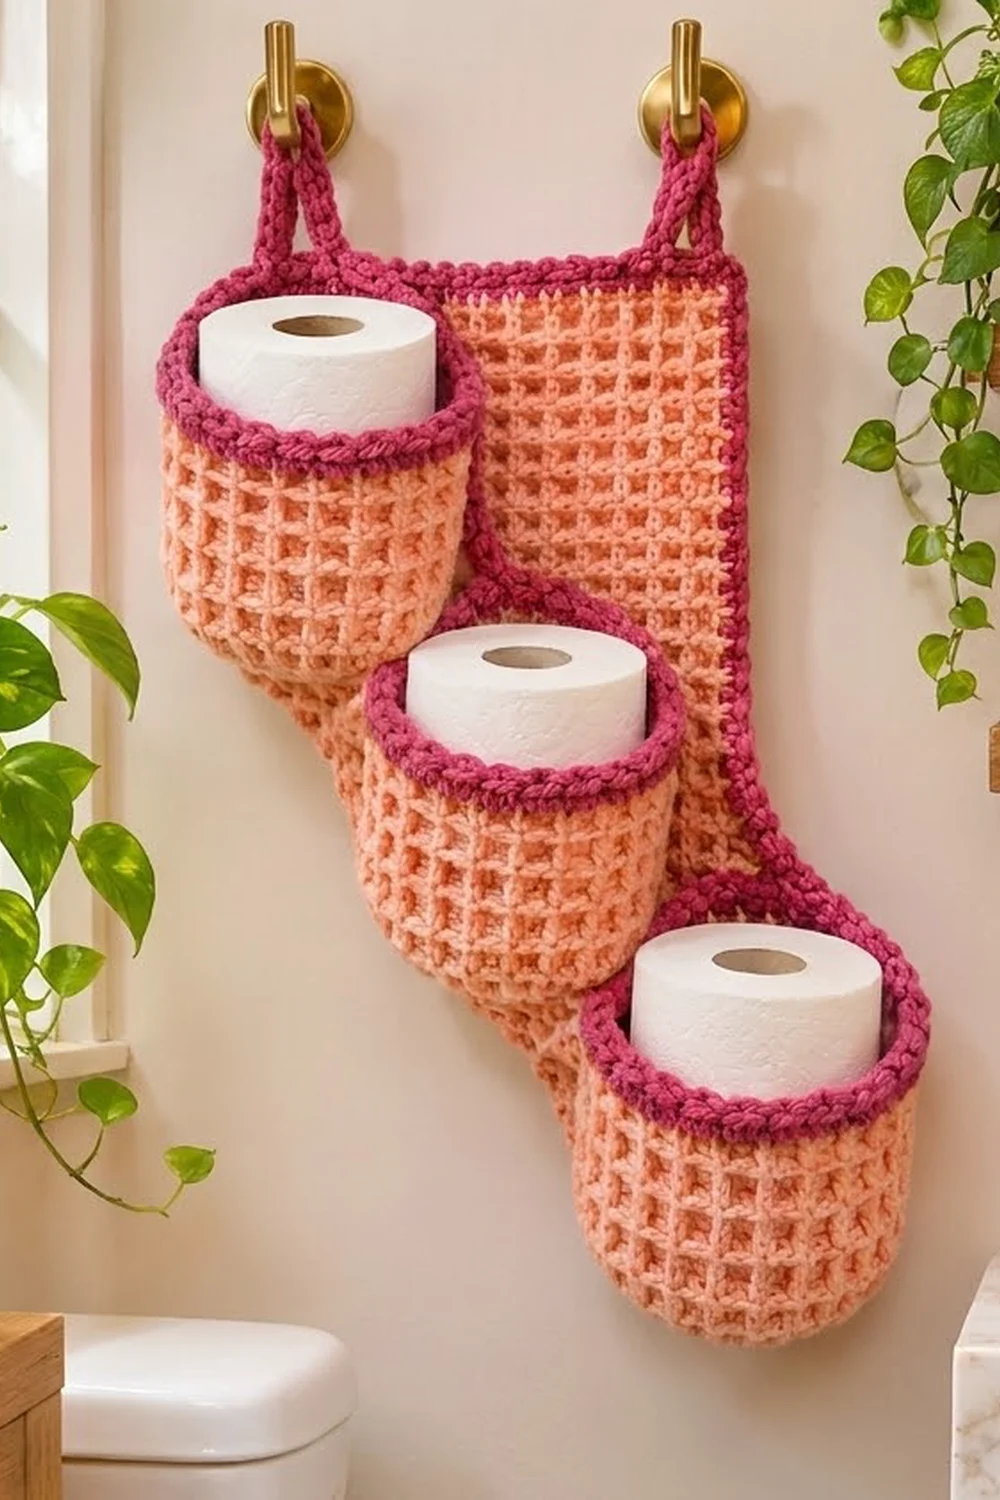
This hanging toilet paper holder is a small, practical bathroom piece with a lot of texture. A flat coral backing panel hangs from two wall hooks, and three round pockets step down it diagonally. Each pocket holds one standard roll.
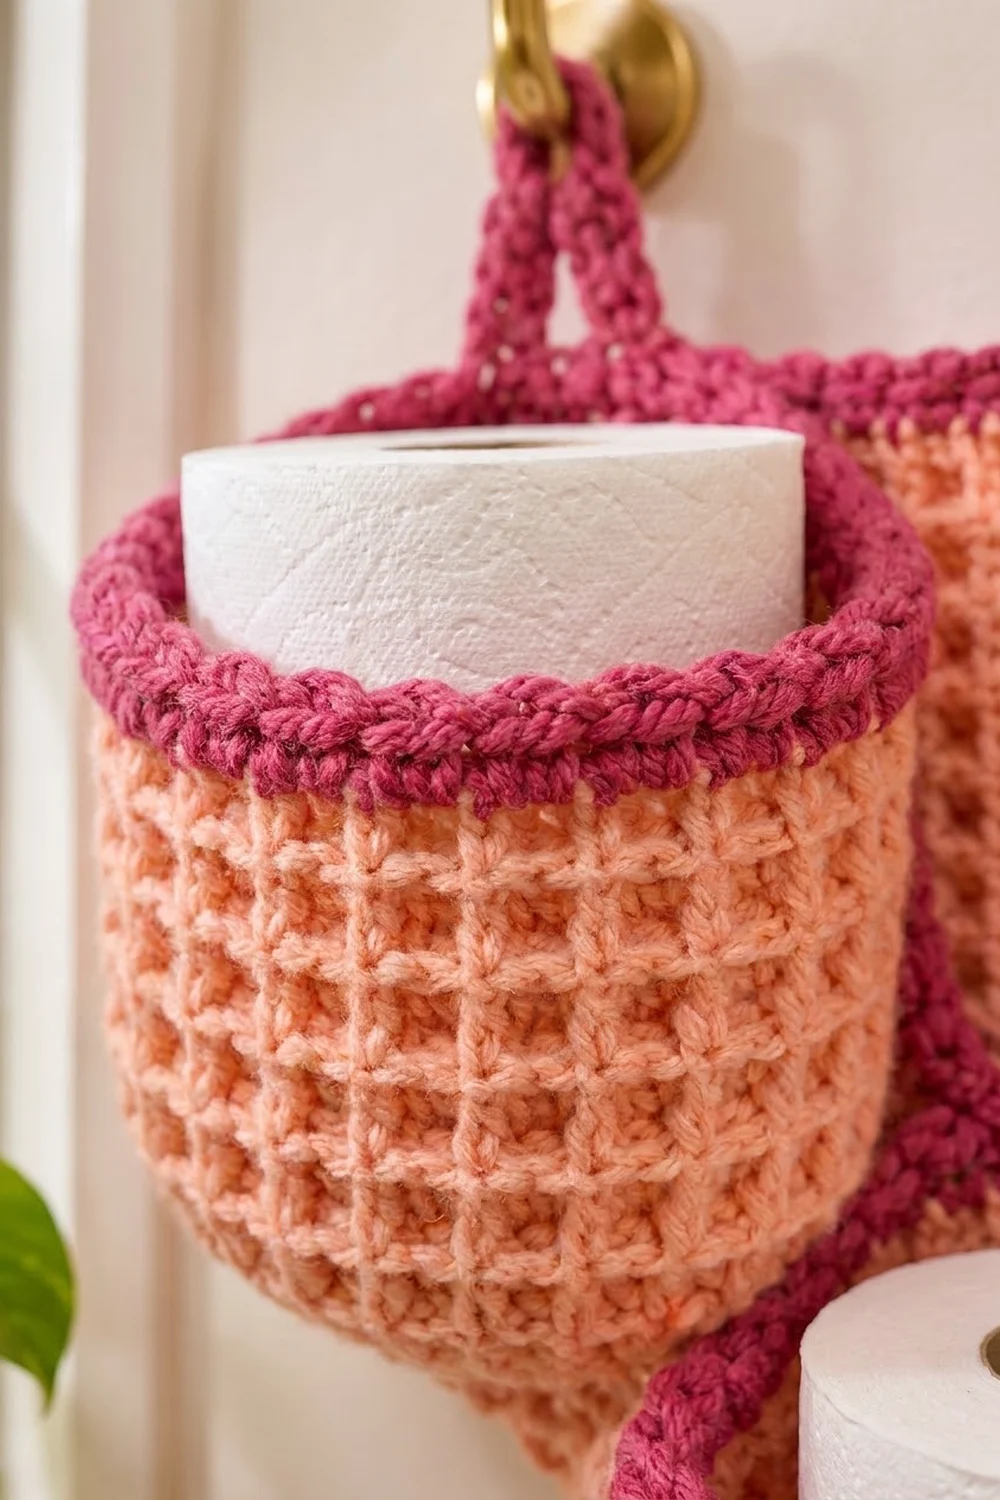
The main fabric is waffle stitch in soft coral peach, which makes a deep, squishy grid. A raspberry pink border goes around the panel and continues into two hanging straps. The same raspberry color trims the rim of each pocket, so the whole piece reads as one design.
The pattern uses US crochet terms. The finished panel is 9″ wide x 17″ tall (22.9 x 43.2 cm), and the straps add about 3″ (7.6 cm) above the panel. Each pocket is about 5″ (12.7 cm) across and 4.9″ (12.4 cm) deep.
You’ll make one rectangular panel worked flat in rows and three pockets worked in joined rounds from the base up. Then you add the raspberry border and straps to the panel, add the rims to the pockets, and sew the pockets onto the panel in a diagonal cascade.
Finished Size and Construction
- Finished panel size: 9″ x 17″ (22.9 x 43.2 cm)
- Overall height with straps: about 20″ (50.8 cm)
- Pocket size: 5″ (12.7 cm) diameter x 4.9″ (12.4 cm) deep
- Skill level: Intermediate (post stitches, working in the round, seaming)
- Terminology: US
- Yarn weight: Worsted (#4)
- Hook: 5.0 mm (H-8)
- Number of pieces: 4 (1 back panel + 3 pockets), joined into one item
- Layout: 3 pockets stepping diagonally from upper left to lower right
- Panel size before border: 8″ x 16″ (20.3 x 40.6 cm)
- Border depth: 0.5″ (1.3 cm), 2 rounds of sc
Materials
Use a smooth worsted weight yarn. Cotton or a cotton blend gives the crispest waffle grid and holds its shape well in a humid bathroom. Acrylic also works but will be a little softer and more stretchy.
- Color A, coral peach: 600 g (about 1,100 m)
- Color B, raspberry pink: 150 g (about 275 m)
Waffle stitch is yarn-hungry because of all the post stitches. The quantities above include a margin of roughly 10%.
Tools:
- 5.0 mm (H-8) crochet hook
- Tapestry needle
- 8–12 locking stitch markers
- Rustproof pins
- Measuring tape
- Blocking mat and spray bottle
- Scissors
Abbreviations (US Terms)
- ch – chain
- sl st – slip stitch
- sc – single crochet
- dc – double crochet
- BLO – back loop only
- FPdc – front post double crochet: yo, insert hook from front to back to front around the post of the stitch below, complete as a dc
- BPdc – back post double crochet: yo, insert hook from back to front to back around the post, complete as a dc
- st(s) – stitch(es)
- RS / WS – right side / wrong side
Special stitch – Waffle stitch. A grid made by alternating rows of single raised posts with rows of paired posts. Flat, it uses a stitch count that is a multiple of 3. In the round, it uses a multiple of 3 with no edge stitches. The turning ch 2 never counts as a stitch in this pattern.
Gauge and Checkpoints
Gauge: 15 sts x 9 rows = 4″ (10.2 cm) in waffle stitch, after light blocking.
Make one pocket first. It’s the best gauge swatch because it uses every technique except the border. Check it at these points:
- After base Round 5: flat circle about 5″ (12.7 cm) across.
- After Round 15: wall about 4.4″ (11.2 cm) tall measured from the base fold.
- After the rim: pocket 4.9″ (12.4 cm) deep, and a standard roll slides in easily.
For the panel:
- After Row 1: 8″ (20.3 cm) wide.
- After Row 36: 8″ x 16″ (20.3 x 40.6 cm).
- After border: 9″ x 17″ (22.9 x 43.2 cm).
If your pieces are too big, change to a 4.5 mm hook. If they are too small, or the roll won’t fit, change to a 5.5 mm hook. Don’t change stitch counts. All of the joining and border math depends on them.
Back Panel
With Color A, ch 32.
Row 1 (WS): Dc in 3rd ch from hook and in each ch across. Turn. (30 dc)
Row 2 (RS, Waffle Row A): Ch 2, dc in first st, FPdc around next st, dc in next 2 sts; repeat from * 8 more times, FPdc around next st, dc in last st. Turn. (30 sts: 1 dc + 9 repeats of 3 + FPdc + dc)
Row 3 (WS, Waffle Row B): Ch 2, dc in first st, dc in next st, FPdc around next 2 sts; repeat from * 8 more times, dc in next st, dc in last st. Turn. (30 sts)
On Row 3, the single dc always lands on top of the FPdc from Row 2, and the paired post stitches land on the 2 dc between them. Because the count is a multiple of 3, the pattern mirrors perfectly when you turn.
Rows 4–36: Repeat Rows 2 and 3, ending with a Row 2 repeat on Row 36. Fasten off. (30 sts in every row, 36 rows total)
Checkpoint: 8″ x 16″ (20.3 x 40.6 cm).
Pockets (Make 3)
Each pocket is worked in joined rounds with the RS facing. Don’t turn.
Base
With Color A, make a magic ring.
Round 1: Ch 2, 12 dc in ring, join with sl st to first dc. (12)
Round 2: Ch 2, 2 dc in each st around, join. (24)
Round 3: Ch 2, dc in next st, 2 dc in next st; repeat around, join. (36)
Round 4: Ch 2, dc in next 2 sts, 2 dc in next st; repeat around, join. (48)
Round 5: Ch 2, dc in next 3 sts, 2 dc in next st; repeat around, join. (60)
Checkpoint: flat circle about 5″ (12.7 cm) across.
Wall
Round 6 (turning round): Ch 2, dc in BLO of each st around, join. (60)
The unused front loops create a crisp fold, so the pocket stands up straight instead of rounding at the bottom.
Round 7 (Waffle Round A): Ch 2, FPdc around next st, dc in next 2 sts; repeat 19 more times, join. (60: 20 repeats of 3)
Round 8 (Waffle Round B): Ch 2, dc in next st, BPdc around next 2 sts; repeat 19 more times, join. (60)
Working in the round, the RS always faces you. That’s why Round B uses BPdc where the flat panel uses FPdc on WS rows. Both give the same grid on the outside.
Rounds 9–15: Repeat Rounds 7 and 8, ending with a Round 7 repeat on Round 15. Fasten off Color A. (60 sts every round)
Checkpoint: wall 4.4″ (11.2 cm) tall.
Rim
Round 16: Join Color B in any st. Ch 1, sc in each st around, join. (60)
Round 17: Ch 1, sc in each st around, join. Fasten off, leaving a 6″ (15.2 cm) tail. Weave in. (60)
Checkpoint: pocket 4.9″ (12.4 cm) deep.
Make All Pieces
- Color A: 1 back panel (Rows 1–36), 3 pocket bodies (Rounds 1–15).
- Color B: 1 panel border (2 rounds), 2 hanging straps, 3 pocket rims (Rounds 16–17).
Layout grid (panel seen from the front, measured from the top and left edges of the finished bordered panel):
   [strap]                        [strap]
   +-----------------------------------+
   | [P1 ]                             |  P1 top at 1"
   | [P1 ]                             |
   |        [P2 ]                      |  P2 top at 6.25"
   |        [P2 ]                      |
   |                [P3 ]              |  P3 top at 11.5"
   |                [P3 ]              |
   +-----------------------------------+
   P1 center 2.5" | P2 center 4.5" | P3 center 6.5"
Joining
Add the border and straps (next section) before you sew on the pockets. The placements below are measured on the finished bordered panel.
Placement: Mark these positions on the panel with pins:
- Pocket 1: top at 1″ (2.5 cm) below the panel top, center 2.5″ (6.4 cm) from the left edge. Its left side sits flush with the left border.
- Pocket 2: top at 6.25″ (15.9 cm), center 4.5″ (11.4 cm) from the left.
- Pocket 3: top at 11.5″ (29.2 cm), center 6.5″ (16.5 cm) from the left. Its right side sits flush with the right border.
Pocket 1 spans 1–5.9″ (2.5–15.0 cm), Pocket 2 spans 6.25–11.15″ (15.9–28.3 cm), and Pocket 3 spans 11.5–16.4″ (29.2–41.7 cm). That leaves about 0.35″ (0.9 cm) between pockets and about 0.6″ (1.5 cm) of panel below Pocket 3.
Method: Use a whipstitch with a 24″ (61.0 cm) length of Color A and a tapestry needle.
On each pocket, place markers so that 15 sts of the wall form a flat back section, which is one quarter of the 60-st round. Lay this section against the panel and sew a box seam:
- Bottom edge: 15 sts of Round 6 to 15 sts of one panel row. One pocket st to one panel st, since both are 3.75 sts per inch.
- Two side edges: Rounds 6–15 (10 rounds) to 10 panel rows, one round to one row, since both are 9 per 4″ (10.2 cm). Then sew Rim Rounds 16–17 to the border or the next panel row, 2 sc rounds to 1 row.
- Top edge: 15 rim sts to 15 panel sts.
Tension: Keep each stitch snug but not tight. Lay the work flat after every 5 stitches and check that the panel isn’t puckering. A seam that’s too tight pulls the waffle grid into a curve.
Size checkpoint: After joining, the panel should still measure 9″ x 17″ (22.9 x 43.2 cm), and each pocket should keep a round 5″ (12.7 cm) opening.
Border and Hanging Straps
Border gauge: 15 sc = 4″ (10.2 cm), the same 3.75 sts per inch as the waffle fabric. That’s why the border lies flat without rippling or pulling.
With the RS of the panel facing, join Color B in the last st of Row 36 (top right corner).
Round 1: Ch 1. 3 sc in corner st. Along the top, sc in next 28 sts, 3 sc in last st (corner). Down the left side, work 2 sc in next row end, 2 sc in next row end, 1 sc in next row end; repeat 11 more times. Working in the opposite side of the foundation ch, 3 sc in first ch (corner), sc in next 28 ch, 3 sc in last ch (corner). Up the right side, repeat the row-end sequence 12 times. Join with sl st to first sc. (188)
Round 1 per-side counts between the corner center sts are: top 30, left 62, bottom 30, right 62, plus 4 corner centers. That’s 30 + 62 + 30 + 62 + 4 = 188.
Round 2: Ch 1, sc in each st around, working 3 sc in each corner center st. Join. (196)
Round 2 per-side counts between corner centers are: top 32, left 64, bottom 32, right 64, plus 4 corner centers. That’s 32 + 64 + 32 + 64 + 4 = 196. Each corner adds 1 st to each of its 2 sides, so each side grows by exactly 2. Fasten off.
Why the math works: The top and bottom have 30 sts, and 30 sts at 3.75 per inch equals 8″ (20.3 cm). The sides have 36 rows. The 2-2-1 row-end sequence places 5 sc over every 3 rows, so 12 repeats give 60 sc. At 3.75 per inch that’s 16″ (40.6 cm), the same as the measured height. Two sc rounds add 0.25″ (0.6 cm) each on every edge, which brings the panel from 8″ x 16″ to 9″ x 17″ (22.9 x 43.2 cm).
Hanging Straps (Make 2)
Left strap: With RS facing, join Color B in the top left corner center st of Round 2.
Row 1: Ch 1, sc in same st and in next 3 sts along the top edge. Turn. (4)
Rows 2–10: Ch 1, sc in each st across. Turn. (4)
Loop: Ch 10, sl st in first st of Row 10 to form a ring. Fasten off. Weave the tail back through the strap to reinforce it.
Right strap: Join Color B in the 4th st before the top right corner center. Work Rows 1–10 and the loop as for the left strap, ending with the corner center st as the 4th st of Row 1.
Each strap is about 1″ (2.5 cm) wide and 2.5″ (6.4 cm) long. Its ring is about 1.25″ (3.2 cm) across, which fits over a standard robe hook.
Final Blocking
- Weave in all ends before blocking.
- Spray the panel with water until it’s damp, but not soaked.
- Pin the panel flat to 9″ x 17″ (22.9 x 43.2 cm), keeping the edges straight and corners square.
- Stuff each pocket with a roll wrapped in a plastic bag, or with a rolled towel, so it dries round.
- Steam the rims lightly if you’re using acrylic. Don’t press.
- Let it dry completely, at least 12 hours, before hanging.
Final Quality-Control Checklist
- Panel is 9″ x 17″ (22.9 x 43.2 cm) with square corners.
- Every panel row has 30 sts, and every pocket round from 5 onward has 60 sts.
- Border Round 2 counts 196 sts.
- Waffle grid lines up vertically with no shifted columns.
- Both straps are the same length, and the rings fit your hooks.
- Pockets step down evenly with about 0.35″ (0.9 cm) gaps.
- Each pocket holds a roll with room to spare.
- All ends are secured and invisible.
Troubleshooting
- The grid looks like ribs, not waffles: You’re probably working FPdc on every row. Alternate Row A and Row B exactly.
- The panel is wider at the top: Check that every row has 30 sts and that the ch 2 isn’t being counted as a stitch.
- The pocket flares: Your wall gauge is loose. Go down a hook size for Rounds 6–15.
- The pocket base cups: Your base rounds are too tight. Go up a hook size for Rounds 1–5 only.
- The border ripples: You have too many sc on the sides. Recheck the 2-2-1 row-end repeat.
- The border pulls in: Your sc tension is tight. Use a 5.5 mm hook for the border only.
- The pockets droop forward: Add the top-edge seam, or sew it more firmly.
Care
Hand wash in cool water, press out the water gently in a towel, and dry flat with the pockets stuffed into shape. Don’t wring it or tumble dry it.
Final Notes
The measurement chain is simple. Gauge is 15 sts x 9 rows = 4″ (10.2 cm). The panel is 30 sts x 36 rows = 8″ x 16″ (20.3 x 40.6 cm), and the border brings it to 9″ x 17″ (22.9 x 43.2 cm). Each pocket is 60 sts around, about 5″ (12.7 cm) across and 4.9″ (12.4 cm) deep. Sewing 15 back stitches of each pocket to 15 panel stitches keeps the cascade flat and square. Check the numbers at each checkpoint and the finished holder will hang straight and hold three rolls neatly.
Happy crocheting!