

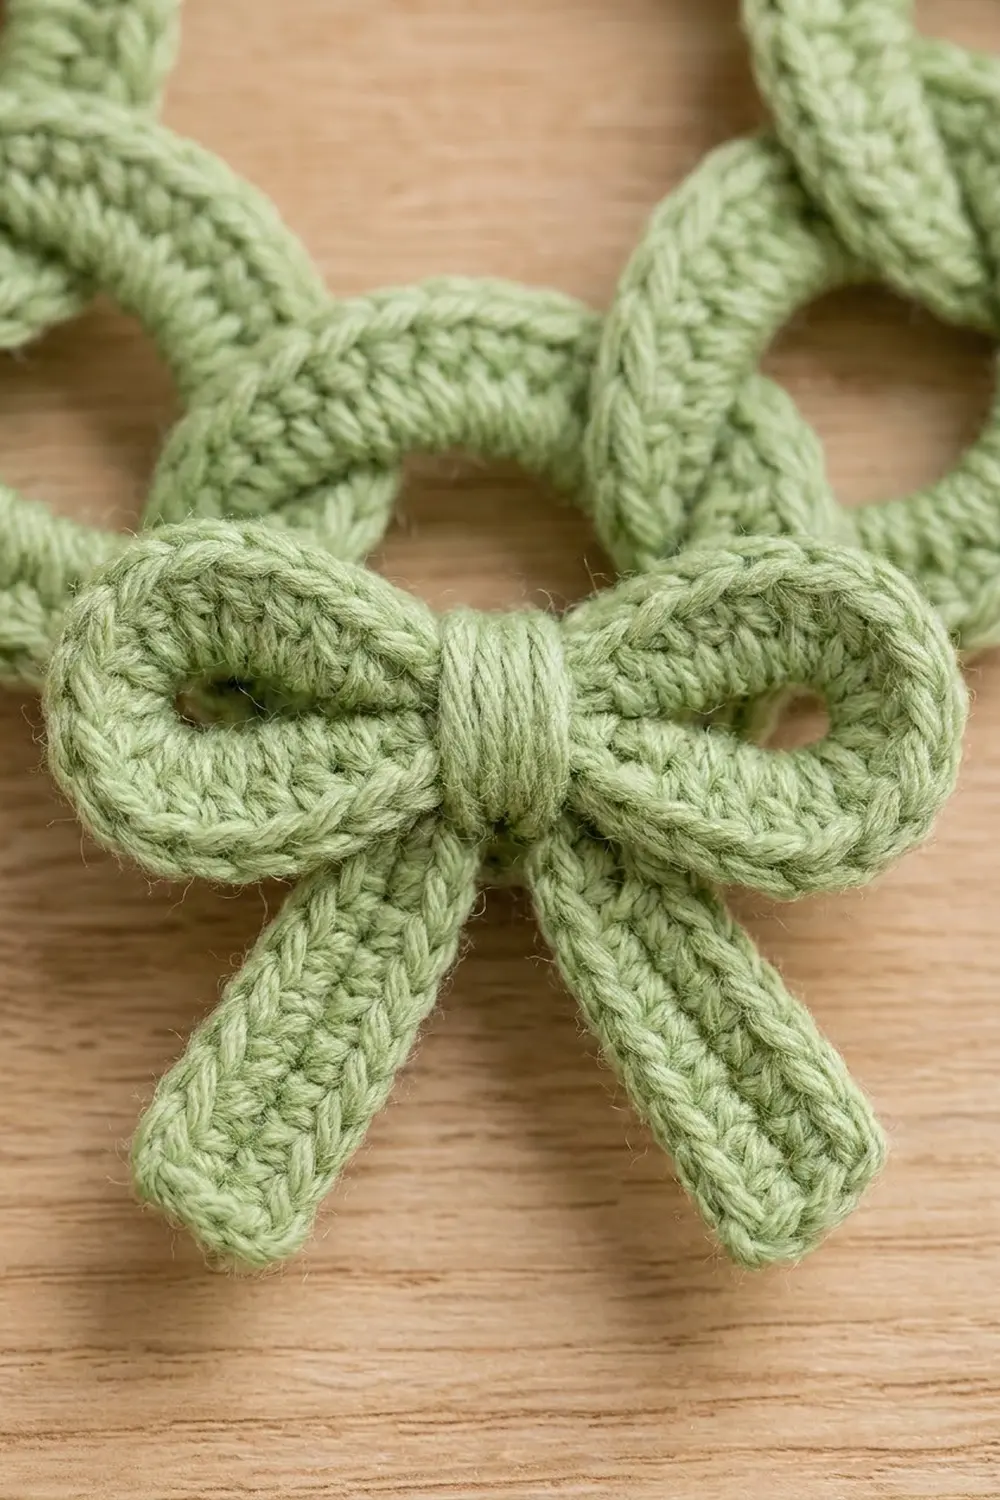
This little wreath ornament is built from eight crocheted rings linked together like a chain, finished with a ribbed bow and a slim hanging loop. The rings sit over and under each other in turn, so the wreath gets a braided, scalloped outline without any complicated stitches.
The sample is worked in one soft sage green cotton. A single muted color lets the texture stand out, and it looks calm and modern hanging among gold baubles and warm lights. A whole tree of matching ornaments looks lovely, and each one is quick enough to make in an evening.
The pattern uses US crochet terms. The finished wreath measures about 4 in (10.2 cm) across and 5 in (12.7 cm) tall including the bow tails. The hanging loop adds about 1.5 in (3.8 cm) above the top ring.
Construction is simple. Each ring starts as a chain loop covered with single crochet, then gets a back-loop slip stitch round that forms the raised ridge. From Ring 2 onward, you thread the starting chain through the previous ring before closing it, so the wreath links up as you go. Then you make the bow in three small strips, add the hanging loop, and block.
Finished Size and Construction
- Finished size: 4 in (10.2 cm) wide x 5 in (12.7 cm) tall, plus a 1.5 in (3.8 cm) hanging loop
- Skill level: Easy / advanced beginner
- Terminology: US crochet terms
- Yarn weight: DK (light worsted, #3) cotton or cotton blend
- Hook: 3.5 mm (US E-4)
- Number of pieces: 8 rings, 3 bow parts (loops, tails, knot), 1 hanging loop
- Layout: 8 rings linked in a closed circle, bow over the bottom ring, loop on the top ring
- Piece size: each ring 1.5 in (3.8 cm) outer diameter, 0.75 in (1.9 cm) opening
- Size before border: 4 in (10.2 cm) across the linked rings
- Border depth: 0 in (0 cm). No separate border is added; the ridge round on each ring forms the edge.
Materials
Yarn: Use a smooth DK cotton or cotton blend with good stitch definition, about 115 m per 50 g. Cotton holds the round ring shape well and gives the crisp ridges you see in the photo. Avoid fuzzy or loosely plied yarn, because the rings get handled a lot during linking and will pill.
- Sage green: 15 g (35 m) for one ornament. One 50 g ball makes three ornaments.
Quantities include a margin of about 30 percent for swatching and tails.
Tools:
- 3.5 mm (US E-4) crochet hook
- Tapestry needle
- Scissors
- Stitch marker
- Ruler or tape measure
- Blocking mat and rust-proof pins
- Spray bottle with water
- Optional: fabric stiffener for a firmer ornament
Abbreviations (US Terms)
- ch – chain
- sl st – slip stitch
- sc – single crochet
- BLO – back loop only
- st(s) – stitch(es)
- RS – right side
Special technique, covered ring: Work each sc into the center opening of the chain ring, not into the chains themselves. The sc wraps around the chain and hides it completely. Push stitches along the chain as you go so they pack tightly.
Gauge and Checkpoints
Flat gauge: 22 sc x 24 rows = 4 in (10.2 cm) square, worked in rows. This gauge controls the bow and hanging loop.
Ring gauge: one finished ring measures 1.5 in (3.8 cm) across the outside, with a 0.75 in (1.9 cm) opening. This works out to 26 sc around the outside edge, or about 5.5 sts per inch, which matches the flat gauge.
Test one piece first. Make one ring and measure it before you link any others.
Checkpoints:
- After Ring 1, Round 1: outer diameter 1.5 in (3.8 cm), no chain showing.
- After Ring 1, Round 2: same diameter, with an even ridge all the way around.
- After linking all 8 rings: wreath 4 in (10.2 cm) across.
- Bow loop strip before folding: 4 in (10.2 cm) x 0.5 in (1.3 cm).
- Finished ornament: 4 in (10.2 cm) x 5 in (12.7 cm), plus the loop.
Ring too big? Use a 3.25 mm hook, or keep the chain tighter. Ring too small or cupping? Use a 3.75 mm hook. If the chain still shows between stitches, add 1 sc (27 sc), but count carefully and keep all eight rings the same.
Ring 1
Ch 16, sl st in first ch to form a ring. Don’t twist the chain.
Round 1: Ch 1 (does not count as a st). Work 26 sc into the center of the ring, over the chain. Sl st in the first sc to join. (26 sc)
Pack the stitches close as you go. The chain should be completely hidden by the end of the round.
Round 2 (trim round): Ch 1. Sl st in BLO of each sc around. Join with sl st in the first sl st. (26 sl st = 26 worked 1 per sc + 0 extra)
Working only the back loops leaves the front loops standing up as the rope-like ridge on top of the ring. Keep the slip stitches loose so the ring stays flat.
Fasten off, leaving a 4 in (10.2 cm) tail. Weave in the tail along the back of the ring.
Checkpoint: 1.5 in (3.8 cm) across, 0.75 in (1.9 cm) opening.
Rings 2 to 7 (Linked Rings)
Ch 16. Before joining, pass the free end of the chain through the opening of the previous ring from front to back. Make sure the chain isn’t twisted, then sl st in the first ch to close it. The new chain ring now hangs through the old ring.
Work Rounds 1 and 2 exactly as for Ring 1. (Round 1: 26 sc; Round 2: 26 sl st) As you work, slide the previous ring around the chain so it stays out of the way of your hook.
Fasten off and weave in ends after each ring. You now have a chain of seven rings.
Ring 8 (Closing Ring)
Ch 16. Pass the chain through Ring 7 and through Ring 1, making sure the chain of rings isn’t twisted end to end. Sl st in the first ch to close.
Work Rounds 1 and 2 as before. (26 sc, then 26 sl st) Fasten off and weave in ends.
Over-under check: Lay the circle flat. Each ring should sit on top of one neighbor and under the other, all the way around. Flip any ring that sits wrong; links allow this without unpicking.
Bow
The bow has three small strips, all worked flat in sc rows. Turning chains do not count as stitches.
Bow Loops
Ch 23.
Row 1: Sc in the 2nd ch from the hook and in each ch across. Turn. (22 sc)
Rows 2–3: Ch 1, sc in each st across. Turn. (22 sc)
Fasten off, leaving a 10 in (25.4 cm) tail. The strip measures 4 in (10.2 cm) x 0.5 in (1.3 cm), and its sc rows give the ribbed look.
Fold both short ends to the center of the strip so they overlap by 0.25 in (0.6 cm) on the back. Use the tail to stitch the ends down. The bow now measures 2 in (5.1 cm) wide.
Bow Tails
Ch 23. Work Rows 1–3 exactly as for the Bow Loops. (22 sc) Fasten off.
Fold the strip in half to make an inverted V, with each leg 2 in (5.1 cm) long. Tack the fold to the back center of the bow loops so both legs angle down and outward.
Center Knot
Ch 7.
Row 1: Sc in the 2nd ch from the hook and in each ch across. Turn. (6 sc)
Rows 2–3: Ch 1, sc in each st across. Turn. (6 sc)
Fasten off, leaving an 8 in (20.3 cm) tail. The strip measures 1.1 in (2.8 cm) x 0.5 in (1.3 cm).
Wrap the knot strip around the center of the bow loops and the top of the tails, covering the folds. Pinch the bow center slightly so the loops puff. Sew the short ends together on the back. Keep the tail to attach the bow later.
Hanging Loop
Ch 17.
Row 1: Sc in the 2nd ch from the hook and in each ch across. (16 sc)
Fasten off, leaving a 6 in (15.2 cm) tail. The strip measures about 2.9 in (7.4 cm) long.
Fold the strip in half to form a narrow loop about 1.5 in (3.8 cm) tall.
Make All Pieces
Everything is in sage green:
- Rings: 8, each 26 sc + 26 sl st
- Bow loops: 1 strip, 22 sc x 3 rows
- Bow tails: 1 strip, 22 sc x 3 rows
- Center knot: 1 strip, 6 sc x 3 rows
- Hanging loop: 1 strip, 16 sc x 1 row
Layout (rings numbered in working order, RS facing):
          [1]  <- hanging loop
     [8]       [2]
  [7]             [3]
     [6]       [4]
          [5]  <- bow
Joining
Method: The rings are already joined, because each one was linked through its neighbor before closing. The remaining steps hold the shape and attach the bow and hanger.
Stitch-to-stitch logic: Where two rings overlap, the top ring crosses the lower one in two places. At the inner overlap of each pair, use a short length of yarn to sew 2 small stitches through the back of the top ring’s sc round and into the front of the lower ring’s sc round. That gives 8 tack points, one per overlap. The tacks stop the rings from sliding and keep the 8 rings evenly spaced around the circle.
Bow: Center the bow over Ring 5 so the knot sits over the ring’s opening. Use the knot tail to sew through the back of the knot and Ring 5’s Round 1 stitches in 3 places: top, left, and right.
Hanging loop: Place both ends of the folded loop behind the top of Ring 1, overlapping the ring by 0.5 in (1.3 cm). Sew through both layers and Ring 1’s sc round, then weave in the tail.
Tension advice: Keep tack stitches snug but not tight. If you pull too hard, the rings pinch into ovals and the wreath gets smaller.
Size checkpoint: The wreath should measure 4 in (10.2 cm) across from the outer edge of Ring 3 to the outer edge of Ring 7. The opening in the middle should be about 1.5 in (3.8 cm).
Border
This ornament has no added border. Its scalloped outer edge is made by the Round 2 ridge on each ring.
Border gauge: the ridge round matches the sc round 1 to 1, at about 5.5 sts per inch.
Ridge round, per ring: 26 sl st into 26 sc. That’s 26 worked 1 per stitch, plus 0 extra.
Visible outer edge: roughly half of each ring (about 13 sts) shows on the outside of the wreath. That gives 8 x 13 = 104 ridge sts around the scalloped outline.
Why the math works: 26 sts at 5.5 sts per inch gives 4.7 in (11.9 cm) around the outside of a 1.5 in (3.8 cm) ring, because 1.5 x 3.14 = 4.7 in. So each ring lies flat with no ruffling or cupping. Because Round 2 adds no stitches, the ring size and the 4 in (10.2 cm) wreath width don’t change.
Final Blocking
- Lightly mist the ornament with water until it’s damp but not soaked.
- Lay it RS up on a blocking mat.
- Shape each ring into a true circle with your fingertips, keeping the openings round.
- Pin the wreath to 4 in (10.2 cm) across, pinning only through the outer edges of Rings 3 and 7, and Rings 1 and 5.
- Spread the bow loops evenly and pin the tails into a V so the bottom tips are about 1.5 in (3.8 cm) apart.
- Pin the hanging loop straight up.
- Optional: brush on diluted fabric stiffener for a firmer ornament.
- Leave the ornament to dry completely, about 6–8 hours, before unpinning.
Final Quality-Control Checklist
- 8 rings, each 26 sc + 26 sl st, with no chain showing
- Ridge on every ring faces RS
- Over-under linking alternates all the way around
- 8 tack points, all secure and hidden on the back
- Wreath 4 in (10.2 cm) across
- Bow centered over Ring 5, loops even, tails 2 in (5.1 cm) each
- Total height 5 in (12.7 cm) plus a 1.5 in (3.8 cm) loop
- All ends woven in; no tails visible from the front
Troubleshooting
Chain shows through the sc round: Pack stitches closer, or work 27 sc in every ring.
Rings ruffle: You have too many sc for the chain. Remove stitches, or use 15 ch.
Rings cup or curl: The sl st round is too tight. Redo it more loosely, or with a hook one size up.
Wreath twists: A ring was linked with a twist. Flip that ring through its neighbor, or unpick and relink the last ring.
Bow droops: Add one more tack between the bow back and Ring 5, or stiffen the bow.
Rings slide unevenly: Check that all 8 tack points are in place.
Care
Spot clean, or hand wash in cool water. Reshape and dry flat. If you’ve used stiffener, spot clean only.

Final Notes
The measurement chain is short. A 16-ch ring with 26 sc gives a 1.5 in (3.8 cm) ring. Eight linked rings give a 4 in (10.2 cm) wreath. A 22-st bow folds to 2 in (5.1 cm) wide and brings the height to 5 in (12.7 cm). The 16-st hanging loop adds 1.5 in (3.8 cm) on top. Check the first ring, and the rest follows.
Happy crocheting!