

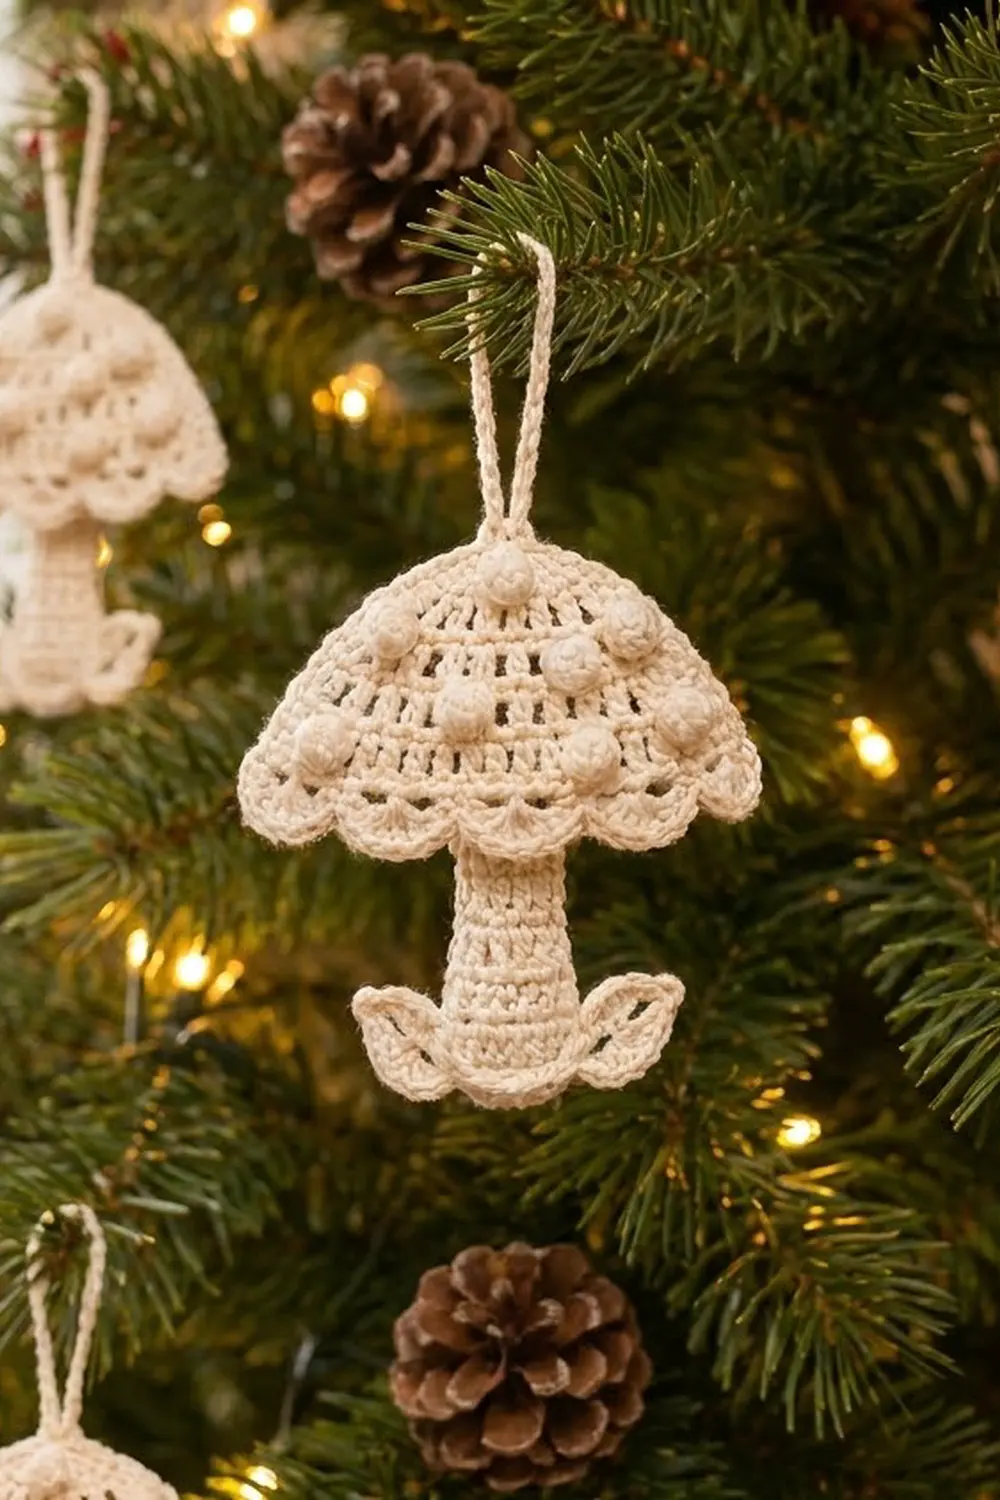
The Snowcap Mushroom is a small, flat, textured ornament. It has a domed cap dotted with raised popcorn spots, two lacy bands and a scalloped rim, on a sturdy stem with two pointed leaves at its base. A slim chain loop at the top makes it ready to hang.
It is worked in one color, a soft cream or ivory cotton, so the texture does all the work. The popcorns, the openwork rows and the shell scallops catch the light on a tree without needing extra colors. The style is cozy and vintage, like old lace trims.
This pattern uses US crochet terms. The finished ornament is about 4.1 in (10.4 cm) wide at the cap. It is 4.4 in (11.2 cm) tall from the top of the cap to the bottom of the stem, plus a hanging loop of about 1.2 in (3.0 cm).
The cap is worked flat in rows from the top down and grows at both edges to form the dome. The stem is worked flat from the bottom up, and each leaf is worked around a short chain. You sew the stem behind the cap and sew on the leaves. Then you add a single crochet border with the hanging loop around the cap.
Finished Size and Construction
- Finished size: 4.1 in (10.4 cm) wide x 4.4 in (11.2 cm) tall, plus a 1.2 in (3.0 cm) loop
- Skill level: Easy-intermediate (popcorns, edge increases)
- Terminology: US crochet terms
- Yarn weight: Sport weight (#2) cotton
- Hook: 3.25 mm (US D/3)
- Number of pieces: 1 finished ornament, made from 4 small parts (cap, stem, 2 leaves) sewn together
- Layout: Single standalone ornament, with the cap on top, the stem centered below, and one leaf on each side of the stem base
- Cap size before border: 3.8 in (9.7 cm) wide x 2.3 in (5.8 cm) tall (Rows 1-7)
- Stem size: 1.5 in (3.8 cm) wide at the base, 1.1 in (2.8 cm) at the top, 2.3 in (5.8 cm) tall
- Leaf size: about 1.3 in (3.3 cm) long
- Border depth: scallop row about 0.35 in (0.9 cm); single crochet border on the sides and top about 0.15 in (0.4 cm)
Materials
Choose a smooth mercerized or combed cotton in sport weight. Cotton keeps the popcorns crisp and blocks flat. Avoid fuzzy or splitty yarn, because the mesh rows and scallops lose their definition.
- Cream / ivory: 20 g, about 60 m (66 yd)
That is enough for one ornament. For a set of separate tree ornaments, multiply by the number you plan to make. The quantity includes a margin of about 25 percent for swatching and sewing tails.
Tools:
- 3.25 mm (US D/3) crochet hook
- Tapestry needle
- Scissors
- Stitch markers (2 or 3)
- Rust-proof pins and a blocking mat or folded towel
- Spray bottle with water
- Ruler or tape measure
Abbreviations (US Terms)
- ch – chain
- sl st – slip stitch
- sc – single crochet
- hdc – half double crochet
- dc – double crochet
- dc2tog – double crochet 2 together
- st(s) – stitch(es)
- sp – space
- sk – skip
- RS / WS – right side / wrong side
- pc – popcorn
Popcorn (pc): Work 5 dc in the same stitch and remove the hook from the loop. Insert the hook from front to back into the top of the first dc of the group, put the dropped loop back on the hook, and pull it through. Ch 1 to close. The closing ch 1 is not counted, and each pc counts as 1 stitch. Popcorns are only worked on RS rows, so they always pop toward the front.
Counting note: A ch-3 at the start of a row counts as 1 dc. In mesh rows, each ch-1 space counts as 1 stitch. On the next row, work 1 stitch into each dc and each ch-1 space.
Gauge and Checkpoints
Gauge: 11 dc and 6 dc rows = 2 in (5.1 cm) with a 3.25 mm hook. That is 5.5 dc and 3 rows per inch.
The cap is small, so even a small gauge error changes its shape. Make the cap first and check it at each stage before you make the stem.
Cap checkpoints:
- After Row 1: 9 sts, about 1.6 in (4.1 cm) wide
- After Row 3: 17 sts, about 3.1 in (7.9 cm) wide
- After Row 5: 21 sts, about 3.8 in (9.7 cm) wide and 1.7 in (4.3 cm) tall
- After Row 7: 21 sts, 3.8 in (9.7 cm) wide and 2.3 in (5.8 cm) tall
If your cap is too big, change to a 3.0 mm hook. If it is too small, change to a 3.5 mm (US E/4) hook. If the width is right but the height is off, adjust how far you pull up your dc loops. Do not change the stitch counts.
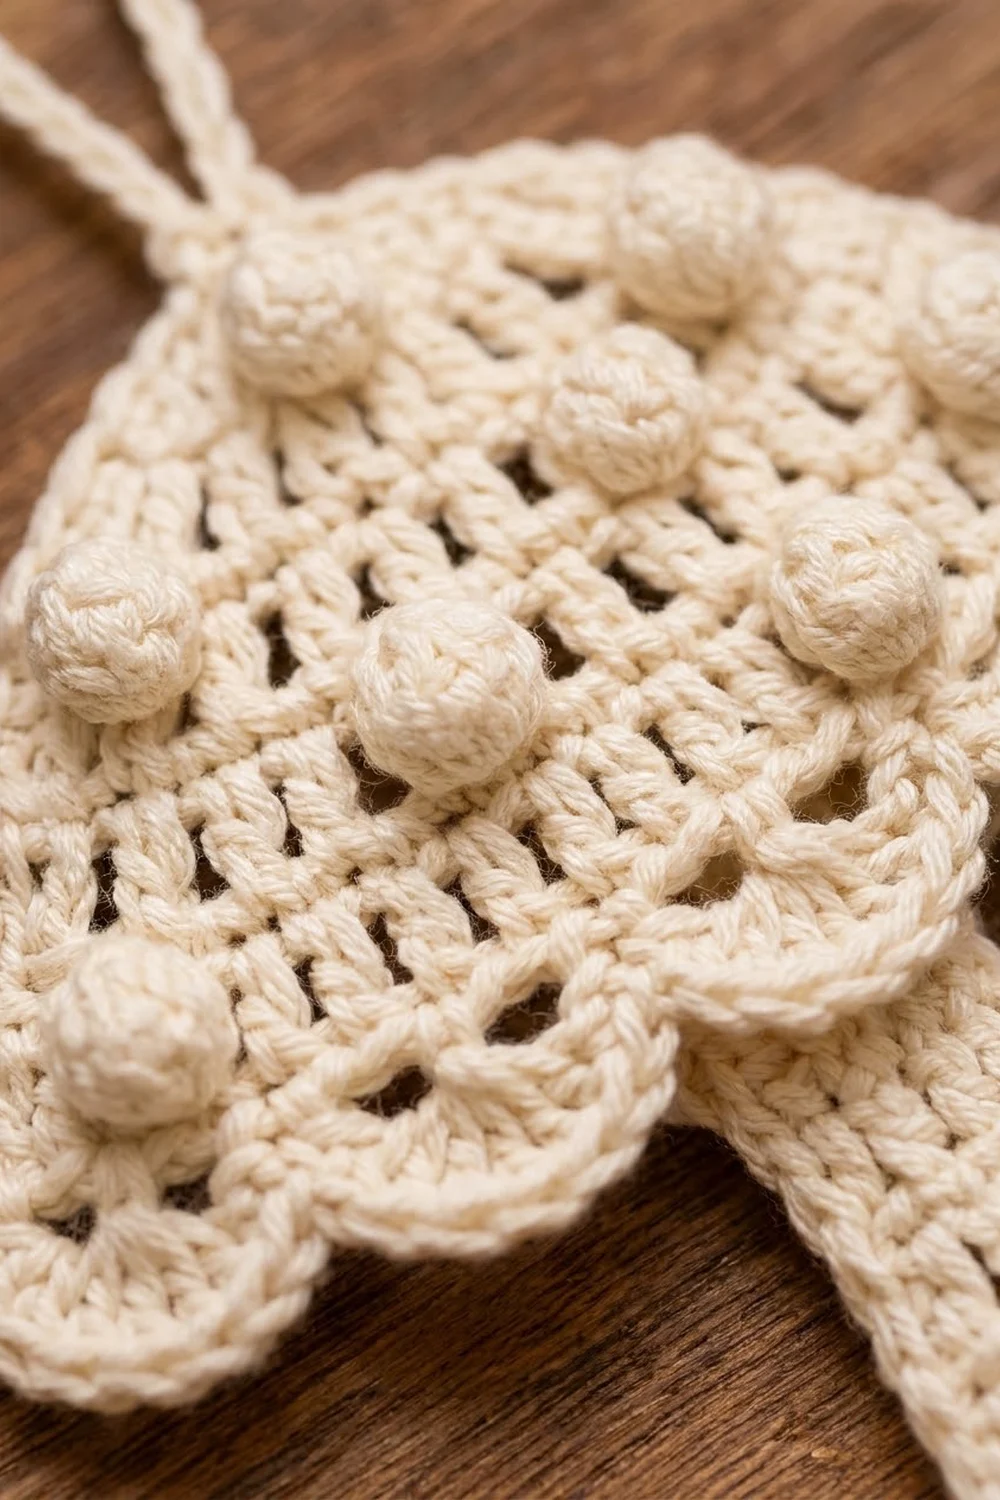
The Cap
The cap starts at its top edge and is worked downward, so Row 1 is the top of the dome.
Row 1 (RS): Ch 11. Dc in 4th ch from hook (the skipped ch-3 counts as dc), dc in next 2 ch, pc in next ch, dc in last 4 ch, turn. (9 sts: 8 dc, 1 pc)
The single popcorn sits at stitch 5, the topmost spot.
Row 2 (WS, growth): Ch 3 (counts as dc), 2 dc in first st, dc in next 7 sts, 3 dc in last st, turn. (13 sts)
Row 3 (RS, growth): Ch 3, 2 dc in first st, dc in next 2 sts, pc in next st, dc in next 5 sts, pc in next st, dc in next 2 sts, 3 dc in last st, turn. (17 sts: 15 dc, 2 pc)
Check: the popcorns sit at stitches 6 and 12, mirrored around the center.
Row 4 (WS, mesh growth): Ch 3 (counts as dc), dc in first st, ch 1, sk next st, dc in next st; repeat from * 6 more times, ch 1, sk next st, 2 dc in last st, turn. (19 sts: 11 dc, 8 ch-1 sps)*
This is the first openwork band. The 2 dc at each end add 1 stitch per edge.
Row 5 (RS, growth): Ch 3, dc in first st, dc in next 2 sts, pc in next st, dc in next 5 sts, pc in next st, dc in next 5 sts, pc in next st, dc in next 2 sts, 2 dc in last st, turn. (21 sts: 18 dc, 3 pc)
The popcorns sit at stitches 5, 11 and 17.
Row 6 (WS, mesh): Ch 4 (counts as dc + ch 1), sk next st, dc in next st, ch 1, sk next st, dc in next st; repeat from * 8 more times, turn. (21 sts: 11 dc, 10 ch-1 sps)*
This second openwork band sits just above the scallops.
Row 7 (RS): Ch 3, dc in next 2 sts, pc in next st, dc in next 4 sts, pc in next st, dc in next 3 sts, pc in next st, dc in next 4 sts, pc in next st, dc in last 3 sts, turn. (21 sts: 17 dc, 4 pc)
The popcorns sit at stitches 4, 9, 13 and 18. Measure now: the cap should be 3.8 in (9.7 cm) wide and 2.3 in (5.8 cm) tall.
Row 8 (WS, scallops): Sc in first st, sk next st, 5 dc in next st, sk next st, sc in next st; repeat from * 4 more times. (5 scallops: 6 sc, 25 dc)*
Each repeat uses 4 sts, and 1 + (5 x 4) = 21, which uses every stitch of Row 7. Fasten off and weave in the ends.
The cap now has 10 popcorns arranged 1-2-3-4, two mesh bands and a scalloped rim.
The Stem
The stem is worked from the bottom up, with a slightly wider base.
Row 1 (RS): Ch 10. Dc in 4th ch from hook (the skipped ch-3 counts as dc) and in each ch across, turn. (8 sts)
It should be about 1.5 in (3.8 cm) wide.
Row 2 (decrease): Ch 3, dc2tog over next 2 sts, dc in next 2 sts, dc2tog over next 2 sts, dc in last st, turn. (6 sts)
Rows 3-7: Ch 3, dc in each st across, turn. (6 sts per row)
Fasten off and leave a 12 in (30.5 cm) tail. The stem should be 1.1 in (2.8 cm) wide at the top and 2.3 in (5.8 cm) tall.
The Leaves (make 2)
Leaf: Ch 9. Working in the back bumps, sc in 2nd ch from hook, hdc in next ch, dc in next 3 ch, hdc in next ch, sc in next ch, then work (sc, ch 2, sc) in last ch for the tip. Rotate and work along the other side of the chain: sc in next ch, hdc in next ch, dc in next 3 ch, hdc in next ch, sc in last ch. Sl st to first sc. (16 sts plus 1 ch-2 tip sp)
Fasten off and leave an 8 in (20.3 cm) tail. Each leaf is about 1.3 in (3.3 cm) long, with a sharp tip at one end and a narrower point at the base.
Optional vein: Work a line of surface sl sts down the center of the leaf, from base to tip.
Assembly
- Lay the cap RS down. Place the stem RS down on top of it, centered across the cap’s 21 sts. Line up the top edge of stem Row 7 with the top of cap Row 7.
- Use the stem tail to whipstitch the stem to the back of cap Row 7, catching only back loops. About 0.7 in (1.8 cm) of the stem stays hidden behind the cap, and 1.6 in (4.1 cm) shows below it.
- Turn the ornament RS up. Place one leaf on each side of the stem base, with the leaf base at the bottom corner of the stem and the tip angled up and outward at about 30 degrees.
- Sew each leaf to the stem along about 0.5 in (1.3 cm) of its base, then weave in all ends.
Border
This border is one round of sc around the sides and top of the cap. It smooths the stepped row-ends of the dome and builds in the hanging loop.
Border gauge: 2 sc per dc row-end and 1 sc per foundation ch. A dc row is about 0.33 in (0.8 cm) tall, close to the width of 2 sc, so the edge lies flat.
Border Round: With RS facing, join yarn with a sl st in the sc at one bottom corner of Row 8, then ch 1.
- Side 1: Work 2 sc in each of the 7 dc row-ends. (14 sc)
- Top: Working in the free loops of the foundation chain, sc in next 4 ch, (sc, ch 25, sc) in next ch, sc in last 4 ch. (10 sc plus ch-25 loop)
- Side 2: Work 2 sc in each of the 7 dc row-ends. (14 sc)
Sl st to the sc at the other corner of Row 8. Fasten off and weave in the ends.
Total: 14 + 10 + 14 = 38 sc, plus the loop.
Why the math works: Row 1 was worked into 9 foundation chains, which leaves 9 free loops along the top. Eight of them get 1 sc each, and the center loop gets 2 sc, one on each side of the loop, for 10 sc in total. Each side has 7 dc rows, and 7 x 2 = 14 sc. The scallops on Row 8 already form the rim, so the border does not go along the bottom. The ch-25 loop folds to about 1.2 in (3.0 cm) and sits directly above the top popcorn.
Final Blocking
- Mist the ornament until it is damp but not dripping.
- Lay it RS up on a mat or towel.
- Pin the bottom corners of the cap so the cap is 4.1 in (10.4 cm) wide across the scallops.
- Pin each of the 5 scallops into an even curve.
- Round the dome evenly so the cap is 2.8 in (7.1 cm) tall from the border to the scallop tips.
- Center the stem and pin the leaf tips outward.
- Push each popcorn gently from the back so it stands up on the front.
- Let it dry completely, which takes 6-12 hours. The ornament should measure 4.1 in (10.4 cm) x 4.4 in (11.2 cm).
Final Quality-Control Checklist
- 10 popcorns (1, 2, 3, 4), all popping to the front
- Two even mesh bands
- 5 even scallops on Row 8
- 14 border sc on each side and 10 sc across the top
- Loop centered above the top popcorn
- Stem centered, with no stitching visible on the front
- Leaves mirrored and angled the same way
- Ornament measures 4.1 in (10.4 cm) x 4.4 in (11.2 cm)
- All ends secured
Troubleshooting
- Popcorns sink to the back: Close each one by inserting the hook from front to back, and work them only on RS rows.
- Cap edges ripple: Recount Rows 2-5. They should have 13, 17, 19 and 21 sts.
- Top edge puckers: Your foundation chain is too tight. Make the chain with a hook one size larger.
- Scallops come out uneven: Row 7 needs exactly 21 sts for the 4-stitch repeat to fit.
- Border flares: Work 3 sc over every 2 row-ends instead of 2 sc in each, and keep both sides equal.
- Stem or leaves curl: Steam them lightly and pin them flat to dry.
Care
Hand wash in cool water with mild soap, roll the ornament in a towel to remove water, and dry it flat in shape. Store it away from direct sunlight so the cream color does not yellow.
Final Notes
All the measurements build on each other, starting from the gauge. At 5.5 dc and 3 rows per inch, the 21-stitch cap is 3.8 in (9.7 cm) wide and 2.3 in (5.8 cm) tall after Row 7. The scallops and border bring the cap to 4.1 in (10.4 cm) wide and 2.8 in (7.1 cm) tall. The 2.3 in (5.8 cm) stem tucks 0.7 in (1.8 cm) behind the cap and leaves 1.6 in (4.1 cm) showing, so the finished height is 4.4 in (11.2 cm).
If each checkpoint matches, the ornament will too. Make one, check it, then make as many as your tree needs.
Happy crocheting!