

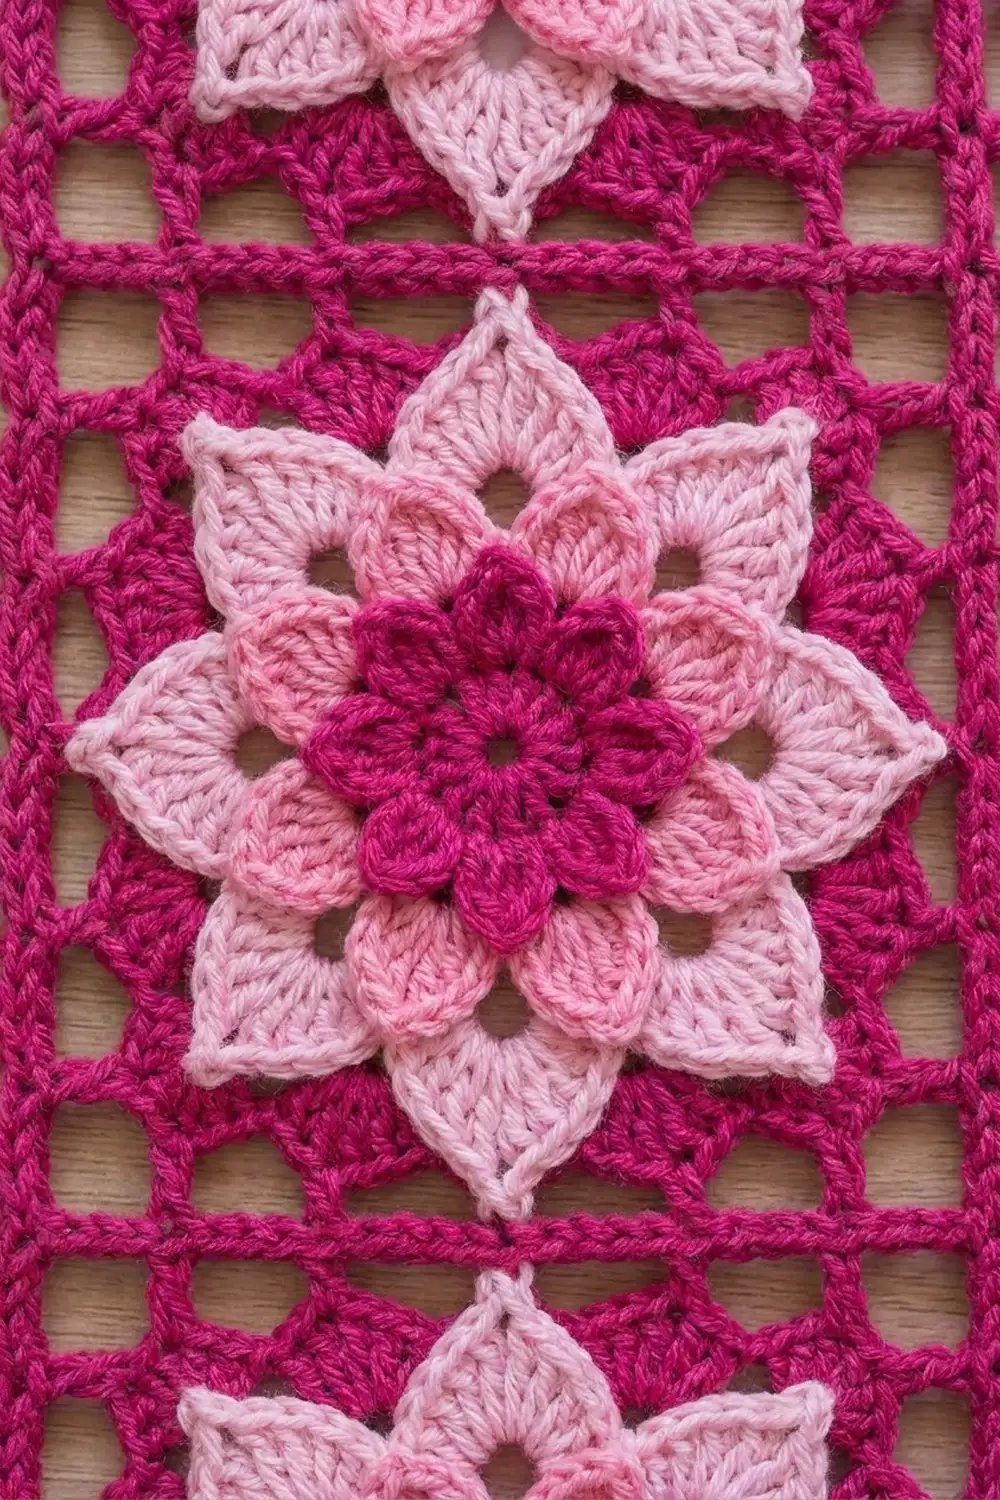
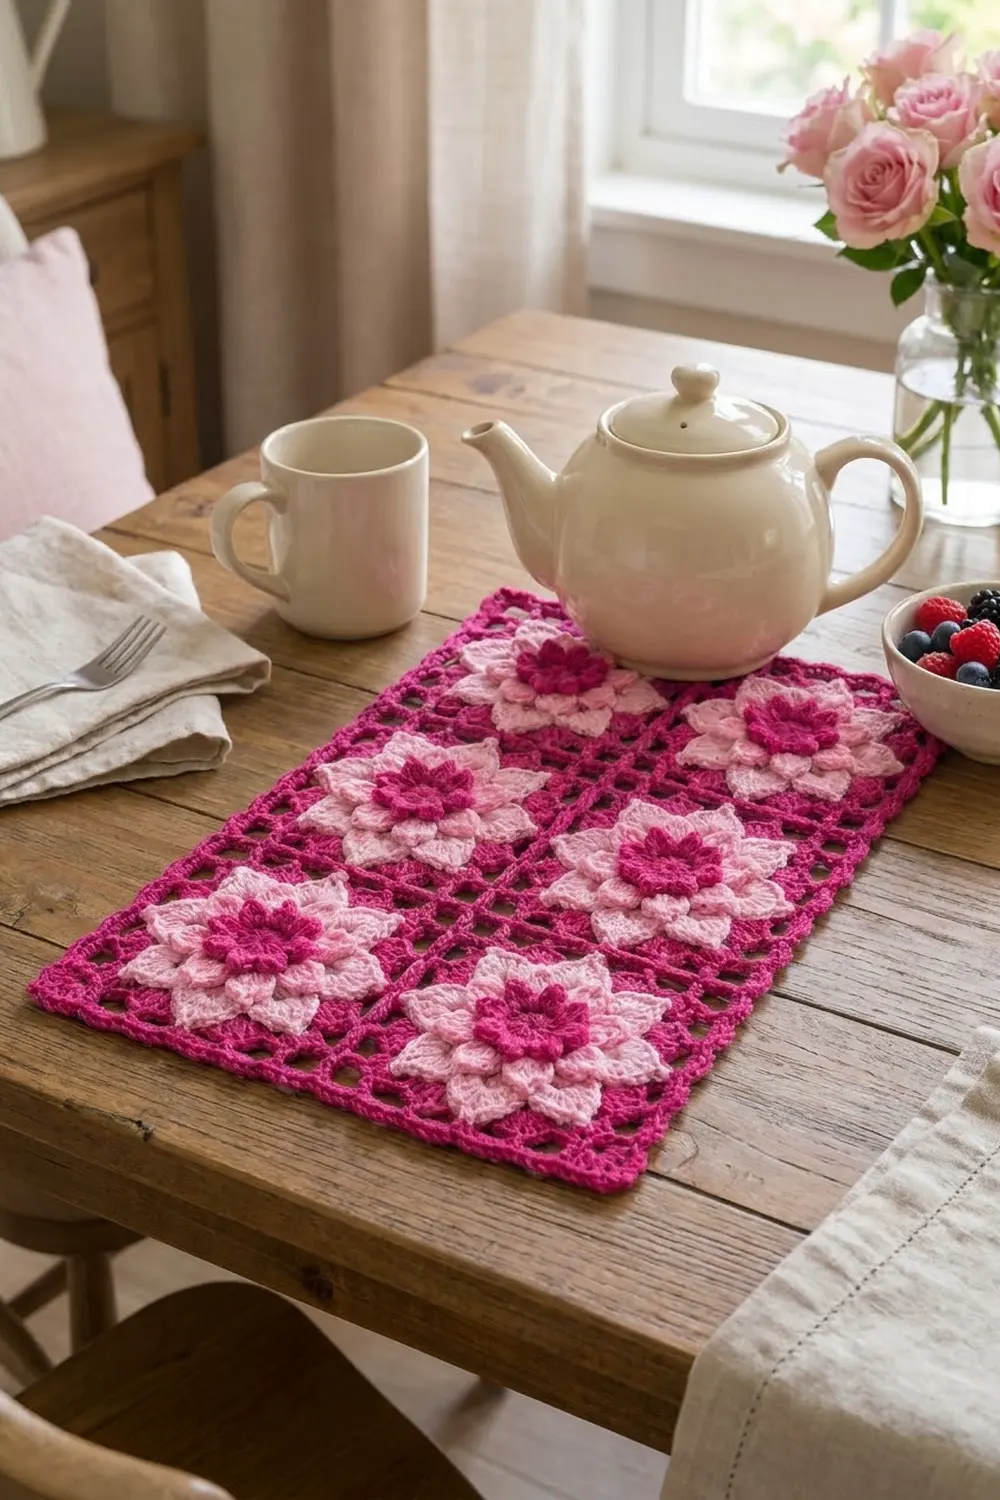
The Fuchsia Bloom Lattice Panel is a small rectangle made of six flower squares. Each square has a raised, layered flower set into an open magenta mesh, and bold magenta seam lines frame every flower. It looks like a garden seen through a trellis.
The pattern uses three colors. Magenta makes the flower center, the mesh background, the seams and the border. Rose pink makes a small ring of rounded inner petals. Light pink makes eight large pointed outer petals that sit behind the inner ring, which gives the flower real depth.
The finished panel measures 13 in x 18.5 in (33.0 cm x 47.0 cm). You can use it as a table mat, a dresser top or a wall piece. The pattern uses US crochet terms throughout.
The construction is simple:
– Crochet six identical squares in the round.
– Join them into 2 columns of 3 squares with a single crochet seam on the right side.
– Finish with a 3-round border: single crochet, then open double crochet mesh, then single crochet.
Finished Size and Construction
- Finished size: 13 in x 18.5 in (33.0 cm x 47.0 cm)
- Skill level: Intermediate
- Terminology: US crochet terms
- Yarn weight: Worsted (#4)
- Hook: 5.0 mm (H-8)
- Number of pieces: 6 squares
- Layout: 2 squares wide x 3 squares long
- Square size: 5.5 in x 5.5 in (14.0 cm x 14.0 cm)
- Size before border: 11 in x 16.5 in (27.9 cm x 41.9 cm)
- Border depth: 1 in (2.5 cm) on each side
Materials
Choose a smooth worsted cotton or cotton blend. Cotton shows the petal shaping well and keeps the mesh square after blocking. Soft acrylic also works but will feel a little springier. Pick colors with clear contrast: a deep magenta, a mid rose pink and a pale pink.
- Color A, magenta: 100 g, about 200 m
- Color B, rose pink: 20 g, about 40 m
- Color C, light pink: 35 g, about 70 m
These quantities include a margin of about 20% for gauge swatches and differences between brands.
Tools:
- 5.0 mm (H-8) crochet hook
- Tapestry needle
- Stitch markers
- Scissors
- Measuring tape
- Blocking mat, rust-proof pins and a spray bottle
Abbreviations (US Terms)
- ch – chain
- sl st – slip stitch
- sc – single crochet
- hdc – half double crochet
- dc – double crochet
- tr – treble crochet
- sp(s) – space(s)
- st(s) – stitch(es)
- FLO – front loop only
- BLO – back loop only
- RS / WS – right side / wrong side
Special stitch – Pointed Petal: In the stated loop, work (sc, hdc, 2 dc, tr, ch 2, tr, 2 dc, hdc, sc). This makes 10 sts and a ch-2 tip.
Gauge and Checkpoints
Make one complete square and measure it before you start the rest. Gauge for Round 8 of the square is 23 sc per side over 5.5 in (14.0 cm), or about 4.2 sc per inch (1.7 sc per cm).
Checkpoints for one square:
- After Round 1: circle about 1.75 in (4.4 cm) across
- After Round 4: flower about 4.5 in (11.4 cm) from one petal tip to the opposite tip
- After Round 6: square about 4.5 in (11.4 cm) per side
- After Round 7: about 5 in (12.7 cm) per side
- After Round 8: 5.5 in (14.0 cm) per side
If your square is too big, go down half a hook size. If it is too small, go up half a hook size. Change the hook, not the stitch counts. The border math depends on every square having exactly 23 sts per side.
Flower Square (Make 6)
Round 1 – Center (Color A)
Make a magic ring with A. Ch 3 (counts as dc), then work 15 dc in the ring. Join with sl st to top of beginning ch-3. Pull the ring closed, leaving a small opening in the center.
Count: 16 dc. Fasten off A.
Round 2 – Inner Petals (Color B)
With RS facing, join B in the front loop of any st of Round 1. Working in FLO only:
*(Sc, hdc, dc) in next st, (dc, hdc, sc) in next st; repeat from * 7 more times. Join with sl st to first sc.
Count: 48 sts, forming 8 rounded inner petals. Fasten off B.
The back loops of Round 1 stay free for the next layer.
Round 3 – Petal Base (Color C)
Fold the inner petals toward you. Join C in the back loop of any Round 1 st.
*Sc in BLO of this st, ch 4, skip next st; repeat from * 7 more times, working each new sc in the BLO of the next unused st. Join with sl st to first sc.
Count: 8 sc and 8 ch-4 loops. These loops sit behind the inner petals.
Round 4 – Outer Petals (Color C)
Sl st into the first ch-4 loop. Work 1 Pointed Petal in each ch-4 loop around. Join with sl st to first sc.
Count: 8 petals, 80 sts plus 8 ch-2 tips. Fasten off C.
The light pink petals now frame the rose pink ring and show between its petals.
Round 5 – Squaring Frame (Color A)
The 8 petal tips act as anchors: 4 become corners and 4 become side centers.
Join A in the ch-2 tip of any petal. Ch 4 (counts as tr), then (ch 3, tr) in the same tip. Ch 5, sc in ch-2 tip of next petal, ch 5.
*(Tr, ch 3, tr) in ch-2 tip of next petal, ch 5, sc in ch-2 tip of next petal, ch 5; repeat from * 2 more times. Join with sl st to top of beginning ch-4.
Count: 8 tr, 4 sc, 4 ch-3 corner sps, 8 ch-5 sps.
The tall trebles push the diagonal petals out toward the corners. The short sc at the side petals keeps the sides straight.
Round 6 – Solid Round (Color A)
Sl st into next ch-3 corner sp. Ch 3 (counts as dc), then (dc, ch 2, 2 dc) in same sp.
*Dc in next tr, 5 dc in next ch-5 sp, dc in next sc, 5 dc in next ch-5 sp, dc in next tr, (2 dc, ch 2, 2 dc) in next corner sp; repeat from * 2 more times. Dc in next tr, 5 dc in next ch-5 sp, dc in next sc, 5 dc in next ch-5 sp, dc in top of beginning ch-4 of Round 5. Join with sl st to top of beginning ch-3.
Count: 17 dc per side between corner sps (2 + 1 + 5 + 1 + 5 + 1 + 2), 68 dc total, plus 4 ch-2 corner sps.
Round 7 – Mesh Round (Color A)
Sl st in next dc and into the ch-2 corner sp. Ch 5 (counts as dc and ch 2), then dc in same sp.
*Ch 1, skip next dc, (dc in next dc, ch 1, skip next dc) 8 times, (dc, ch 2, dc) in next corner sp; repeat from * 2 more times. Ch 1, skip next dc, (dc in next dc, ch 1, skip next dc) 8 times. Join with sl st to 3rd ch of beginning ch-5.
On each side, the 17 dc of Round 6 are used as 1 skip, then 8 pairs of (dc, skip): 1 + 16 = 17 sts.
Count: 10 dc per side (2 corner dc + 8 side dc) and 9 ch-1 sps per side. Total: 40 dc, 36 ch-1 sps, 4 ch-2 corner sps.
These open squares form the lattice behind the flower.
Round 8 – Edging Round (Color A)
Sl st into next ch-2 corner sp. Ch 1, then 3 sc in same sp.
*Sc in each dc and each ch-1 sp across to next corner sp (19 sc), 3 sc in corner sp; repeat from * 2 more times. Sc in each dc and each ch-1 sp across (19 sc). Join with sl st to first sc.
This is a conversion round: 76 sc worked 1 per existing st and sp (40 dc + 36 sps) + 12 sc in the 4 corner sps = 88 sc.
Per side, counting both corner center sts: 1 + 1 + 19 + 1 + 1 = 23 sts. Check: 4 x 23 − 4 shared corners = 88.
Fasten off, leaving a 6 in (15.2 cm) tail. Weave in all ends on the WS, hiding each end in its own color.
Make All Pieces
Make 6 identical squares.
- Color A: Round 1 and Rounds 5–8 of all 6 squares
- Color B: Round 2 of all 6 squares
- Color C: Rounds 3–4 of all 6 squares
Layout (2 wide x 3 long):
[ 1 ][ 2 ]
[ 3 ][ 4 ]
[ 5 ][ 6 ]
Lightly steam or wet block each square to 5.5 in x 5.5 in (14.0 cm x 14.0 cm) before joining. Squares that match in size make neat seams.
Joining
Method: Single crochet join with A. Hold the squares WS together so the seam ridge sits on the RS. This ridge makes the bold magenta grid lines between the flowers.
Stitch-to-stitch logic: Each side has 23 sts, from corner center st to corner center st. Hold two squares WS together with the sts lined up. Work 1 sc through both loops of both layers in each matching pair, for 23 sc per square side. Do not skip or add sts.
Order:
- Columns: Join square 1 to square 3, then square 3 to square 5, along their horizontal edges. Repeat with squares 2, 4 and 6. Each seam is 23 sc. Carry the yarn across the corner between seams instead of fastening off.
- Long seam: Hold the two columns WS together and join along the full long edge: 3 x 23 = 69 sc.
Tension: Keep the seam sc as loose as the sc in Round 8. A tight seam will pucker the panel and pull the corners in. If you tend to pull tight, use a 5.5 mm hook for joining only.
Checkpoint: The joined panel should measure 11 in x 16.5 in (27.9 cm x 41.9 cm). Lay it flat and measure before you start the border.
Border
Border gauge: About 4.2 sc per inch (1.7 sc per cm), the same as Round 8 of the squares.
Starting counts:
– Each short edge has 2 x 23 = 46 sts.
– Each long edge has 3 x 23 = 69 sts.
– These include the panel’s outer corner sts. No extra sts are counted at the seams.
– Total around, one per stitch: 2 x 46 + 2 x 69 − 4 shared corners = 226 sts.
Border Round 1 – Single Crochet (Color A)
Join A in any panel corner st. Ch 1, then 3 sc in the same st. Work sc in each st around, with 3 sc in each panel corner st (the middle sc becomes the new corner st). On each short edge only, also work 1 sc into the top of the joining seam between the two squares. Join with sl st to first sc.
Count between corner sts:
- Short sides: 44 sts + 2 corner extras + 1 seam sc = 47 sc
- Long sides: 67 sts + 2 corner extras = 69 sc
This is a conversion round: 226 sc worked 1 per existing st + 8 corner extras + 2 seam sc = 236 sc. Check: 2 x 47 + 2 x 69 + 4 corner sts = 236.
Border Round 2 – Mesh (Color A)
Sl st in next sc (the corner st). Ch 5 (counts as dc and ch 3), then dc in same st.
*Ch 1, skip next sc, (dc in next sc, ch 1, skip next sc) across to next corner st, (dc, ch 3, dc) in corner st; repeat around. End with ch 1, skip last sc, sl st in 3rd ch of beginning ch-5.
Count between corner groups:
- Short sides: 23 dc and 24 ch-1 sps (uses 47 sts: 1 + 23 x 2)
- Long sides: 34 dc and 35 ch-1 sps (uses 69 sts: 1 + 34 x 2)
Total: 122 dc (114 side dc + 8 corner dc), 118 ch-1 sps, 4 ch-3 corner sps.
Border Round 3 – Single Crochet (Color A)
Sl st into next ch-3 corner sp. Ch 1, then 3 sc in same sp. Sc in each dc and each ch-1 sp around, working 3 sc in each corner sp. Join with sl st to first sc.
Count between corner groups:
- Short sides: 1 + 24 + 23 + 1 = 49 sc
- Long sides: 1 + 35 + 34 + 1 = 71 sc
This is a conversion round: 240 sc worked 1 per existing st and sp (122 dc + 118 sps) + 12 sc in corner sps = 252 sc.
Fasten off and weave in the end.
Why the Math Works
The mesh needs an odd number of sts between corners so it starts and ends with a skipped st and stays symmetric. The long sides already have 69, which is odd. The short sides have 46, which is even, so the one seam sc brings them to 47. That extra sc is the 24th st, right on the center seam, and the mesh puts a dc there. This keeps the border centered over the panel.
The 3-sc corners in Rounds 1 and 3 and the ch-3 corners in Round 2 add just enough to turn each corner flat. Together, the three rounds add about 1 in (2.5 cm) per side:
– Width: 11 + 2 = 13 in (33.0 cm)
– Length: 16.5 + 2 = 18.5 in (47.0 cm)
Final Blocking
- Weave in any remaining ends before blocking.
- Soak the panel in cool water for 10 minutes. Press out the water gently; do not wring it.
- Roll it in a towel to remove extra moisture.
- Lay it RS up on the blocking mat.
- Pin the 4 outer corners first, to 13 in x 18.5 in (33.0 cm x 47.0 cm).
- Pin along each edge so it runs straight. Put one pin in each corner ch-3 sp and one every few mesh spaces.
- Line up the seam ridges so the grid lines run straight in both directions.
- Shape each outer petal tip with your fingers. Lift the inner petals slightly so the layers stand apart.
- Let the panel dry completely before you unpin it.
Final Quality-Control Checklist
- Each square has 16 sts in Round 1, 8 inner petals and 8 outer petals.
- Each square measures 5.5 in (14.0 cm) and has 23 sts per side.
- All seams are on the RS and lie flat with no puckers.
- The joined panel measures 11 in x 16.5 in (27.9 cm x 41.9 cm).
- Border Round 1: 47 sc on short sides and 69 sc on long sides.
- Border Round 2: 23 dc on short sides and 34 dc on long sides.
- Border Round 3 totals 252 sc.
- Finished panel: 13 in x 18.5 in (33.0 cm x 47.0 cm).
- All ends are woven in invisibly.
Troubleshooting
Inner petals lie flat instead of standing up. Check that Round 2 is worked in FLO only and Round 3 in BLO only.
Square cups or ruffles after Round 5. If it cups, the ch-5 sps are too short for your tension; try ch 6. If it ruffles, they are too long; try ch 4. Keep 5 dc per sp in Round 6 either way.
Corners are rounded. Check that Round 5 corners use tr, not dc, and that you worked the full corner groups in Rounds 6–8.
Wrong count in Round 7. Each side must use exactly 17 dc: 1 skip, then 8 pairs of (dc, skip).
Panel is wider at the seams. The joining is too loose. Redo the seam with a smaller hook.
Border waves. Your border tension is looser than your squares. Go down half a hook size for the border.
Border pulls in. Go up half a hook size, and check that you worked 3 sc in every corner.
Care
Hand wash in cool water with mild soap and dry flat, reshaping the petals while they are damp. Do not tumble dry, because it can flatten the layered flowers.
Final Notes
The measurements build in a short, predictable chain:
– One square measures 5.5 in (14.0 cm) with 23 sts per side.
– Six squares in a 2 x 3 layout make an 11 in x 16.5 in (27.9 cm x 41.9 cm) panel, with 46 sts on each short edge and 69 sts on each long edge.
– The 3-round border adds 1 in (2.5 cm) per side, for a finished panel of 13 in x 18.5 in (33.0 cm x 47.0 cm).
If your first square is right, every later step will fit.
Happy crocheting!