

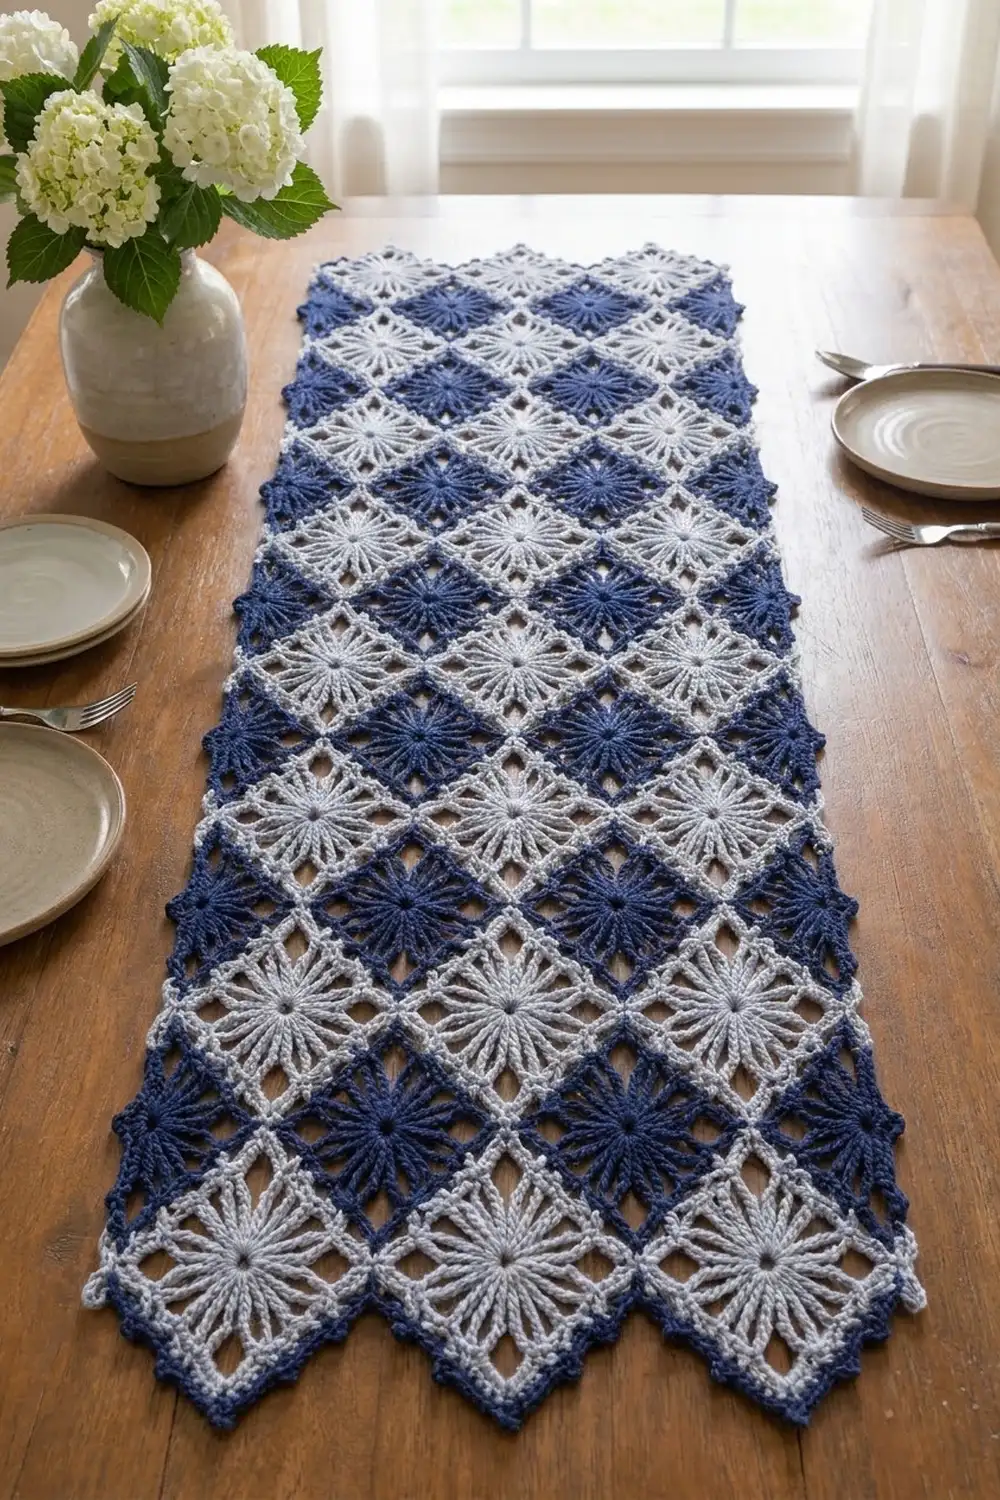
The Midnight Frost Panel is a lacy rectangle of starburst motifs in deep navy and soft silver-gray. Each square has a dense, sunburst-style center inside an open frame of chain loops. Because the frame is most open at the corners, each center looks like a diamond, and the finished panel has a crisp argyle feel.
The two colors alternate in a checkerboard, with navy at all four corners. A navy border of single crochet and small picot points frames the panel and gives it a neat zigzag edge. It works as a table centerpiece, a dresser scarf or a wall piece.
This pattern uses US crochet terms. The finished panel measures 13 x 21 in (33.0 x 53.3 cm) after blocking.
Construction is simple. You make 15 identical motifs in the round, join them into a 3 x 5 grid with slip stitches, then add a two-round border.
Finished Size and Construction
- Finished size: 13 x 21 in (33.0 x 53.3 cm)
- Skill level: Intermediate
- Terminology: US crochet terms
- Yarn weight: Sport weight (2), cotton or cotton blend
- Hook: 3.5 mm (E-4)
- Number of pieces: 15 square motifs, joined into one panel
- Layout: 3 motifs across x 5 motifs down, checkerboard
- Motif size: 4 x 4 in (10.2 x 10.2 cm)
- Size before border: 12 x 20 in (30.5 x 50.8 cm)
- Border depth: 0.5 in (1.3 cm) per side
Materials
Yarn: Choose a smooth, mercerized sport-weight cotton. It shows the starburst rays clearly and blocks crisply. Fuzzy or very splitty yarns will blur the chain-loop frame.
- Color A – Navy: 50 g / 140 m (153 yd). Used for 8 motifs and the border.
- Color B – Silver-Gray: 40 g / 115 m (126 yd). Used for 7 motifs and all joining.
These quantities include a margin of about 20% for gauge differences and swatching.
Tools:
- 3.5 mm (E-4) crochet hook
- Tapestry needle
- Scissors
- Rustproof pins
- Blocking mats
- Spray bottle
- Measuring tape
Abbreviations (US Terms)
- ch – chain
- sl st – slip stitch
- sc – single crochet
- dc – double crochet
- tr – treble crochet
- sp(s) – space(s)
- st(s) – stitch(es)
- RS / WS – right side / wrong side
- BLO – back loop only
Special stitch: Picot Point (PP). Work all of this in the same stitch or space: (dc, ch 3, sl st in 3rd ch from hook, dc).
Gauge and Checkpoints
Base gauge: 24 sc and 28 rows = 4 in (10.2 cm) in sc with a 3.5 mm hook. That works out to 6 sc per inch.
Make one complete motif before starting the others. It is your real gauge swatch. Check it against these sizes after each round, measured flat without stretching:
- After Round 1: about 1 in (2.5 cm) across
- After Round 2: about 2 in (5.1 cm) across
- After Round 3: about 3 in (7.6 cm) square
- After Round 4: about 3.5 in (8.9 cm) square, corner to corner along a side
- After Round 5: 4 x 4 in (10.2 x 10.2 cm)
If your motif is too big: go down a half size to a 3.25 mm hook. Also check Round 2: loose treble stitches are the most common cause.
If your motif is too small: go up to a 3.75 mm hook.
You can be up to 1/8 in (0.3 cm) off per motif. Any more than that adds up to more than 0.5 in (1.3 cm) along the long side.
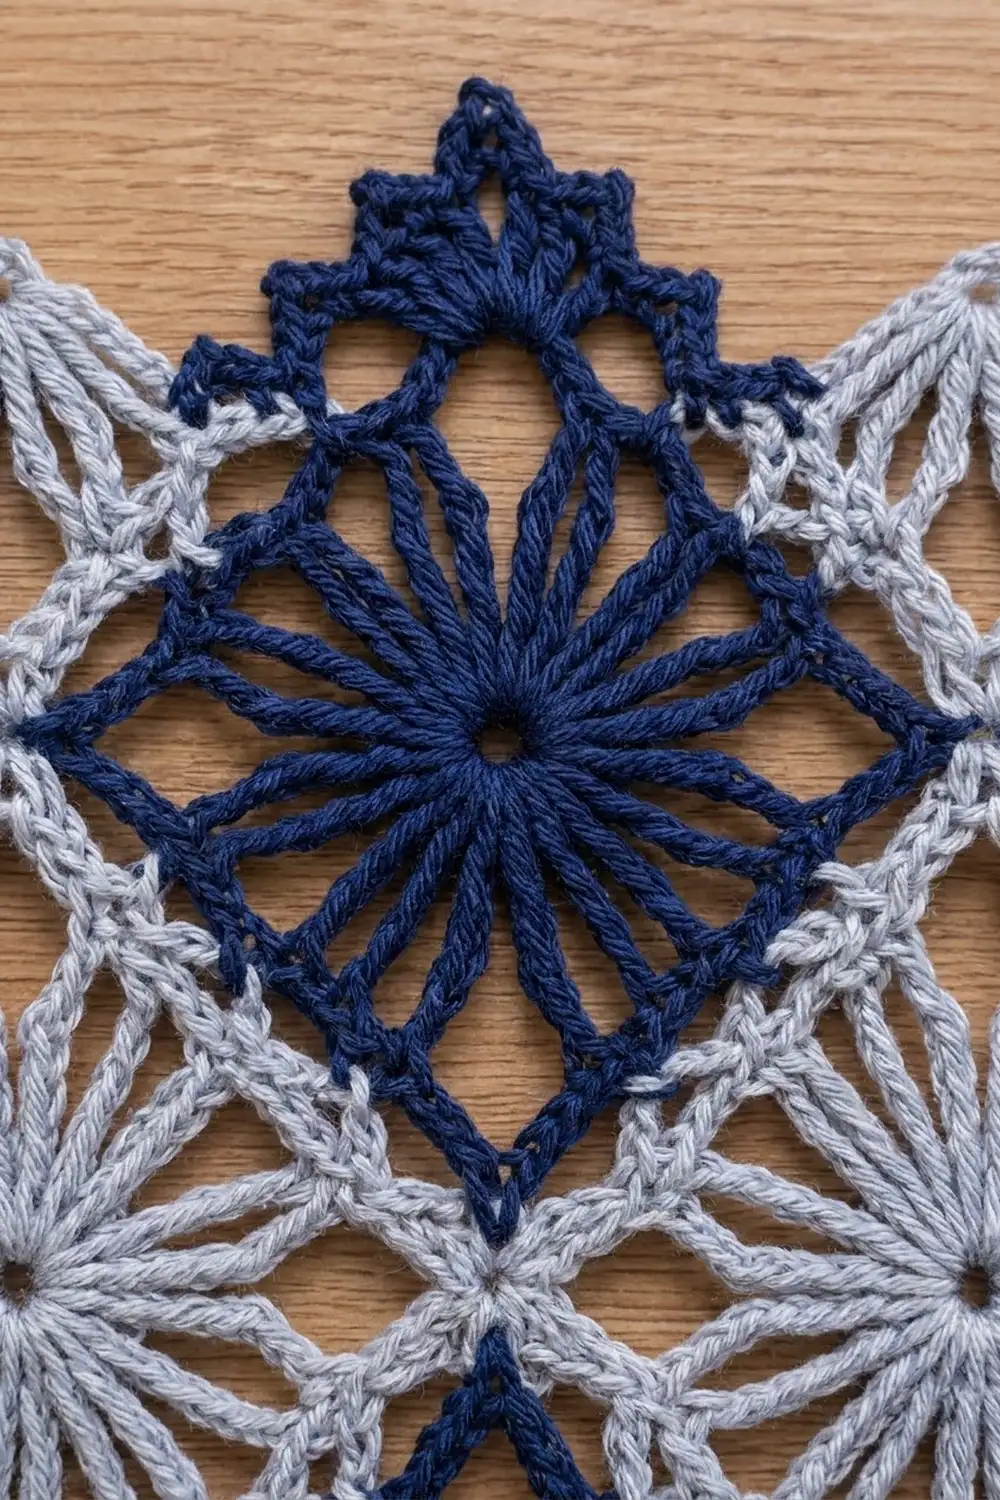
Starburst Motif (Make 15)
Make every motif entirely in one color. Make 8 in Color A (navy) and 7 in Color B (silver-gray).
Round 1: Make a magic ring. Ch 3 (counts as dc). Work 15 dc in the ring, then join with a sl st to the top of the beginning ch-3. Pull the ring closed. (16 dc)
Round 2 (Starburst Rays): Ch 4 (counts as tr). Work 1 tr in the same st, then ch 1. Work 2 tr in the next st, ch 1. Repeat from * 14 more times. Join with a sl st to the top of the beginning ch-4. (32 tr in 16 pairs, 16 ch-1 sps)
The 16 paired trebles are the rays of the starburst. The small ch-1 gaps between them give the center its fine, spoked texture.
Round 3 (Squaring Round): Sl st into the next tr, then sl st into the first ch-1 sp. This space is your first corner.
- Ch 3 (counts as dc). Work (dc, ch 2, 2 dc) in the same sp.
- Work 3 dc in each of the next 3 ch-1 sps. In the next ch-1 sp, work (2 dc, ch 2, 2 dc) for a corner.
- Repeat from * 2 more times.
- Work 3 dc in each of the last 3 ch-1 sps. Join to the top of the beginning ch-3.
(52 dc: 13 dc per side, plus 4 corner ch-2 sps)
This round turns the 16-point circle into a square. Four spaces become corners and each side gets 3 side spaces of 3 dc. The side count is 2 + 9 + 2 = 13 dc.
Round 4 (Open Frame): Sl st into the next dc, then sl st into the corner ch-2 sp. On each side, number the 13 dc from 1 to 13, starting just after the corner.
- Ch 1. Work (sc, ch 5, sc) in the corner sp.
- Ch 4, skip dc 1–3, sc in dc 4. Ch 3, skip dc 5–6, sc in dc 7. Ch 3, skip dc 8–9, sc in dc 10. Ch 4, skip dc 11–13. Work (sc, ch 5, sc) in the next corner sp.
- Repeat from * around, leaving out the last corner group. Join to the first sc.
(20 sc in total, plus 4 ch-5 loops, 8 ch-4 loops and 8 ch-3 loops)
Per side, this gives 3 side sc and 4 loops (ch-4, ch-3, ch-3, ch-4), plus the corner groups. The skips are symmetrical (3, 2, 2, 3), so each side mirrors itself. The large ch-5 corner loops make the diamond-shaped openings that set off the starburst center.
Round 5 (Edge Round): Sl st into the first ch-5 corner loop.
- Ch 1. Work (2 sc, ch 2, 2 sc) in the corner loop.
- Sc in the next sc, 4 sc in the ch-4 loop, sc in the next sc, 3 sc in the ch-3 loop, sc in the next sc, 3 sc in the ch-3 loop, sc in the next sc, 4 sc in the ch-4 loop, sc in the next sc. Work (2 sc, ch 2, 2 sc) in the next corner loop.
- Repeat from * around, leaving out the last corner group. Join to the first sc.
(92 sc: 23 sc per side, plus 4 corner ch-2 sps)
Side count: 2 + 1 + 4 + 1 + 3 + 1 + 3 + 1 + 4 + 1 + 2 = 23 sc. In this pattern, a “side” means the 23 sc between two corner ch-2 sps. The corner ch-2 sps are not counted as stitches.
Fasten off, leaving a 6 in (15.2 cm) tail. Weave in the ends on the WS.
At 6 sc per inch, 23 sc plus the corner spaces measure 4 in (10.2 cm) per side.
Make All Pieces
- Color A (navy): 8 motifs
- Color B (silver-gray): 7 motifs
Layout grid (A = navy, B = silver-gray), RS facing:
Row 1:  A  B  A
Row 2:  B  A  B
Row 3:  A  B  A
Row 4:  B  A  B
Row 5:  A  B  A
Lay the motifs out on a flat surface before joining. Check that the navy motifs sit at all four corners.
Joining
Method: Slip stitch join in BLO, using Color B for every seam. Silver-gray joins blend into both colors and outline each diamond lightly.
Stitch-to-stitch logic:
- Hold two motifs with WS together and edges matched.
- Sl st through both corner ch-2 sps together.
- Sl st through the back loops of the 23 matching sc pairs, one by one.
- Sl st through the next pair of corner ch-2 sps.
Each motif edge takes 25 sl sts (1 + 23 + 1). Every stitch matches a stitch, so the seam never gathers or stretches.
Order:
- Join all horizontal seams first. Join Row 1 to Row 2 across all 3 motifs without fastening off: at each motif change, sl st through the next pair of corner sps and carry on.
- Repeat for Rows 2/3, 3/4 and 4/5.
- Join the 2 vertical seams the same way, working down all 5 motifs.
- Where four corners meet, sl st through all the stacked corner sps together.
Tension: Keep your slip stitches as loose as your sc. Tight joins pull the panel inward and shrink it by up to 0.25 in (0.6 cm) per seam. If you tend to slip stitch tightly, go up a hook size for joining only.
Size checkpoint: The joined panel should measure 12 x 20 in (30.5 x 50.8 cm).
Border
Work the border in Color A (navy) with RS facing.
Border gauge: 6 sc per inch, the same as the motifs. This is why the stitch counts below lie flat.
Starting count per side:
- Long sides: 5 motifs x 23 sc = 115 sc. Add 4 seam sts (one at each of the 4 seams) to get 119.
- Short sides: 3 motifs x 23 sc = 69 sc. Add 2 seam sts (one at each of the 2 seams) to get 71.
A seam st is a single sc worked through the two joined corner ch-2 sps where two motifs meet along the edge. These 6 seam sts are the only ones added. They fill the small notch at each seam.
Border Round 1: Join A in the top-right outer corner ch-2 sp.
- Ch 1. Work (sc, ch 2, sc) in the corner sp.
- Sc in each sc along the side, working 1 sc through the joined corner sps at each seam. In the next outer corner ch-2 sp, work (sc, ch 2, sc).
- Repeat from * around, leaving out the last corner group. Join to the first sc.
Counts per side, including that side’s 2 corner sc:
- Long sides: 119 + 2 = 121 sc
- Short sides: 71 + 2 = 73 sc
- Total: 2 x 121 + 2 x 73 = 388 sc, plus 4 corner ch-2 sps
Each corner sp has one sc on each side of it, and each of those belongs to the side it starts. No corner stitch is counted twice.
Why it works: 121 sc / 6 per inch = 20.2 in, which matches the 20 in (50.8 cm) long side. 73 sc / 6 per inch = 12.2 in, which matches the 12 in (30.5 cm) short side. The extra fraction is used up by the corner turns.
Border Round 2 (Picot Points): Sl st into the first corner ch-2 sp.
- Work a PP in the corner sp.
- Number the side sts 1 to 121 (long side) or 1 to 73 (short side). Sc in st 1. [Skip 1 st, PP in the next st, skip 1 st, sc in the next st] across to the last st of the side. Work a PP in the next corner ch-2 sp.
- Repeat from * around, leaving out the last corner PP. Join to the first dc.
Counts:
- Long sides: 31 sc and 30 PP (121 = 1 + 4 x 30)
- Short sides: 19 sc and 18 PP (73 = 1 + 4 x 18)
- Corners: 4 PP
- Total: 100 sc and 100 PP, alternating evenly all the way around
Why it works: Each repeat covers exactly 4 sts. Both side counts equal 1 more than a multiple of 4, so every side starts and ends with an sc on its corner stitches. A point sits in every corner.
Fasten off and weave in the ends. The border adds 0.5 in (1.3 cm) on every side, so the panel becomes 13 x 21 in (33.0 x 53.3 cm).
Final Blocking
- Soak the panel in cool water for 15 minutes. Press out the water gently; don’t wring it.
- Roll it in a towel to remove excess moisture.
- Lay it RS up on blocking mats.
- Pin the four corners to a 13 x 21 in (33.0 x 53.3 cm) rectangle. Check the diagonals: they should be equal.
- Pin along each seam line so the grid stays straight.
- Pin every picot point outward to sharpen the zigzag edge.
- Open each ch-5 corner loop with a pin so the diamond windows show clearly.
- Let it dry completely, at least 24 hours, before unpinning.
Final Quality-Control Checklist
- Every motif has 23 sc per side and 4 corner ch-2 sps.
- Each Round 2 has 16 tr pairs with even gaps.
- The checkerboard has navy at all four corners.
- The seams are flat and the stitches are matched one-to-one.
- The panel measured 12 x 20 in (30.5 x 50.8 cm) before the border.
- Border Round 1 has 121 / 73 / 121 / 73 sc.
- Border Round 2 has 100 sc and 100 PP.
- The final size is 13 x 21 in (33.0 x 53.3 cm).
- All ends are woven in securely on the WS.
Troubleshooting
The center cups: Round 2 is too tight. Loosen your treble yarn-overs, or go up a hook size for Round 2 only.
The center ruffles: Round 2 is too loose, or you made extra rays. Count for exactly 16 pairs.
The motif isn’t square: Check the Round 3 corner placement. Every fourth ch-1 sp should be a corner.
A side doesn’t add up to 23 sc: Recheck the Round 4 skips (3, 2, 2, 3) and the Round 5 loop fills (4, 3, 3, 4).
The seams pucker: Your joining is tighter than your sc. Rejoin using a larger hook.
The border waves: Recount Round 1. Extra stitches at the seams are the usual cause.
The border pulls in: You may have skipped the seam sc. Add them back.
The picots flop: Pin them firmly while blocking, or use a crisper mercerized cotton.
Care
Hand wash in cool water with a mild detergent and lay flat to dry, reshaping the points as needed. Don’t tumble dry. Press lightly with a warm iron through a cloth if needed.
Final Notes
Here is the full measurement chain:
- Gauge: 6 sc per inch
- Each motif: 23 sc per side, 4 x 4 in (10.2 x 10.2 cm)
- Joined panel: 3 x 5 grid, 12 x 20 in (30.5 x 50.8 cm)
- Border Round 1: 121 and 73 sc per side
- Border Round 2: 100 picot points
- Finished panel: 13 x 21 in (33.0 x 53.3 cm)
If your gauge holds at each checkpoint, every later stage falls into place without fudging.
Happy crocheting!