

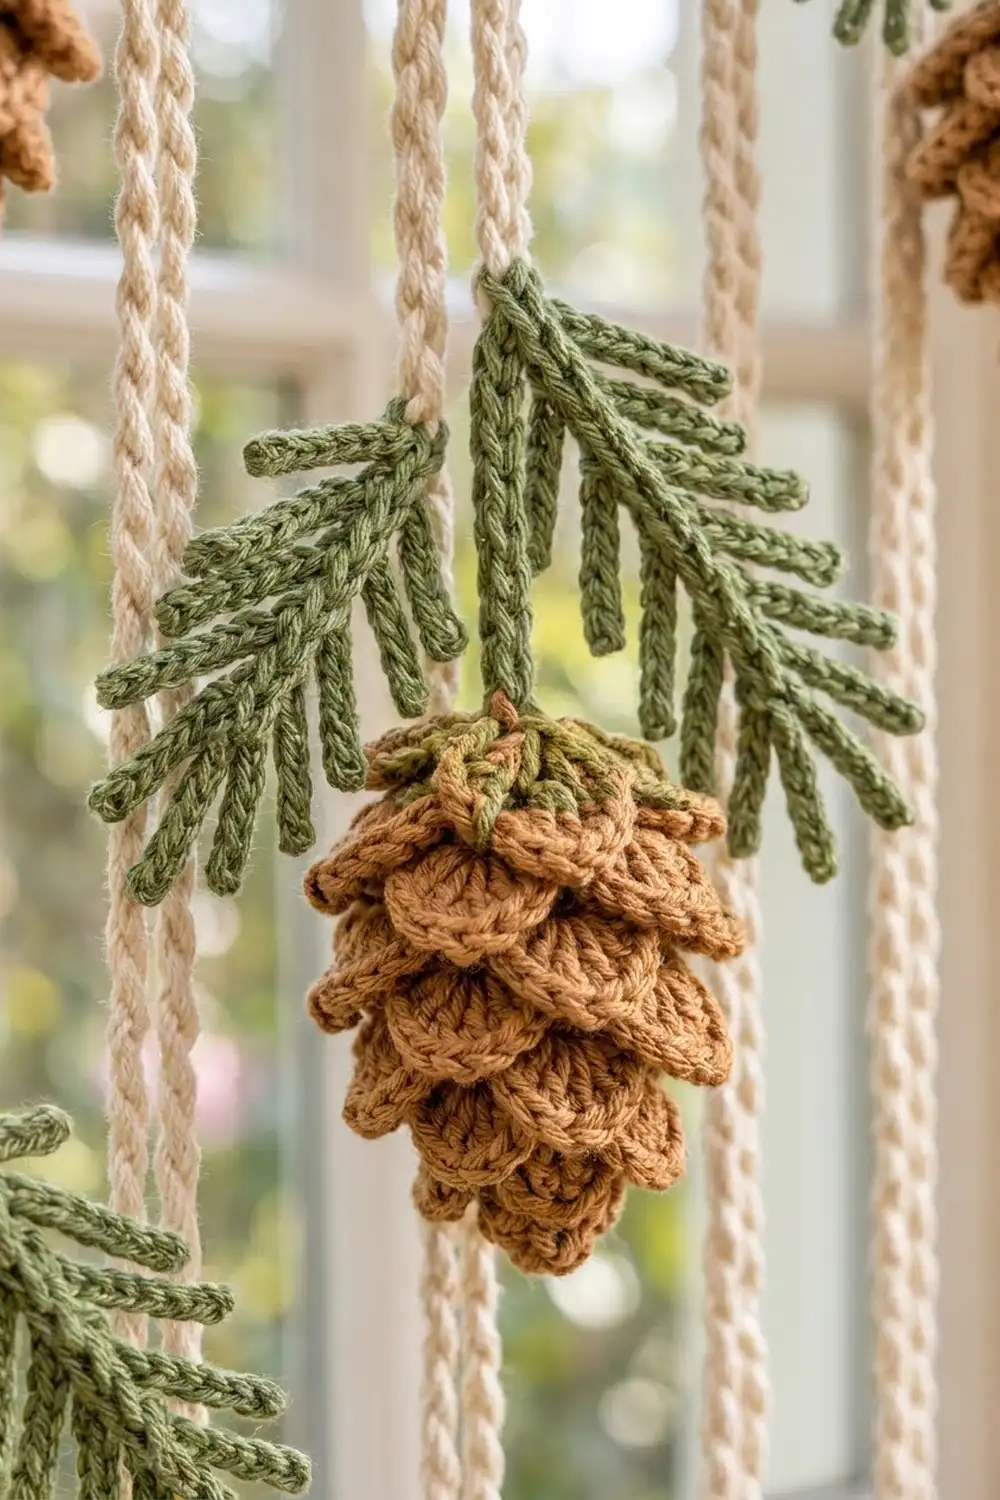
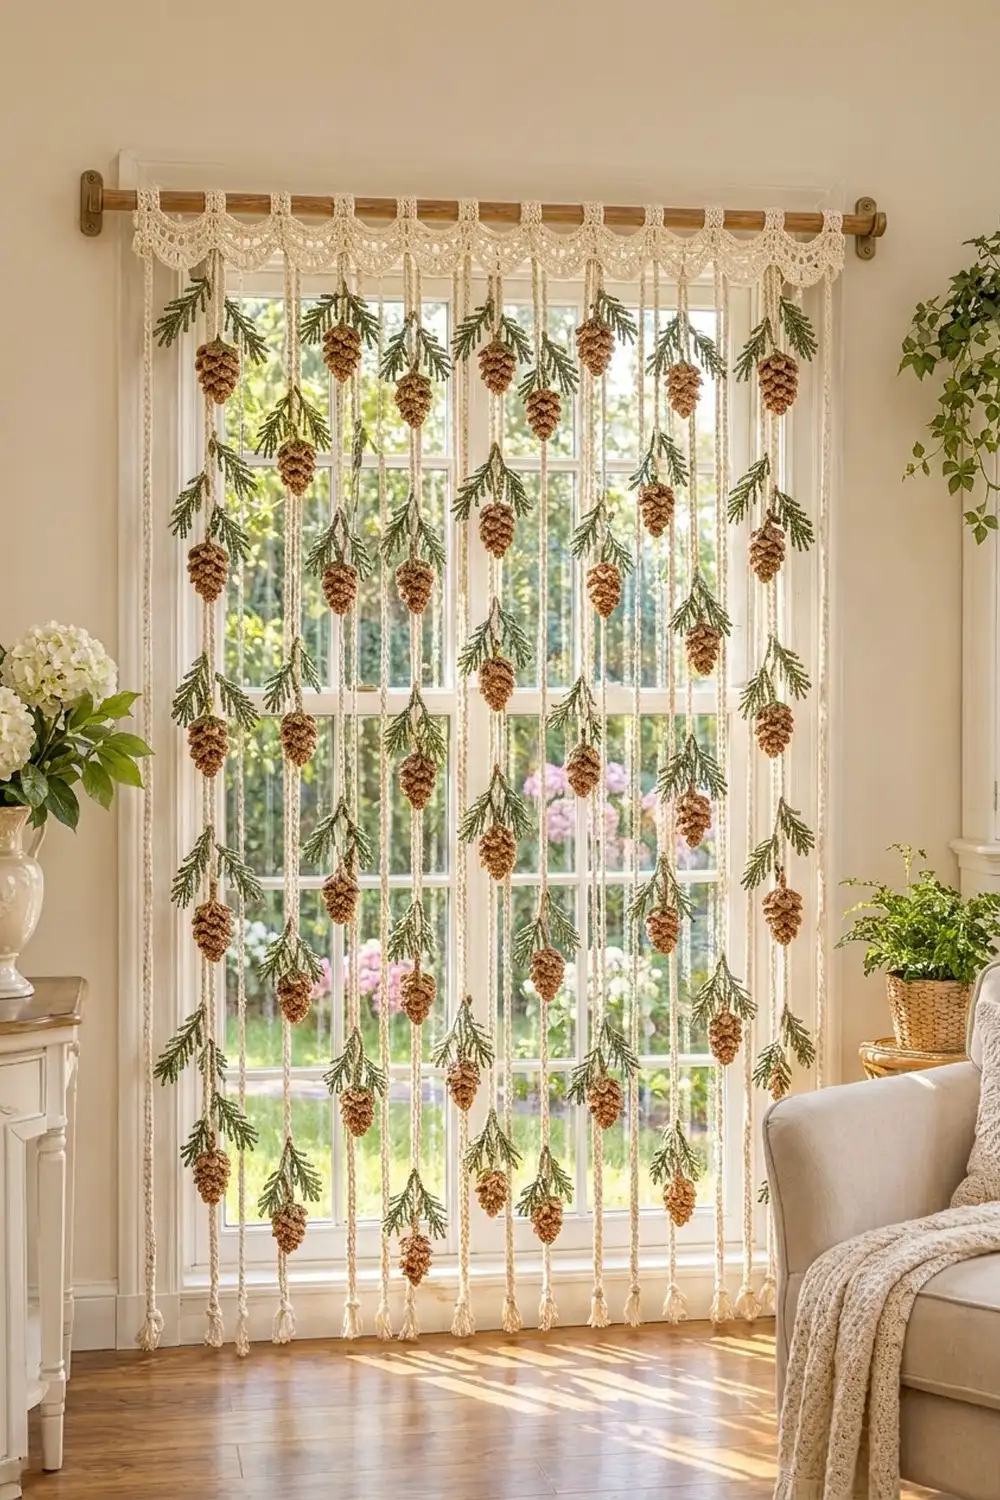
This curtain gives a window or doorway a quiet woodland feel. A lacy cream header with deep, layered scallops hangs from a wooden rod, and seventeen cream cords hang down from behind it. Each cord carries brown pinecones with overlapping scales, and each pinecone has a soft green pine sprig above it.
The palette has three colors: warm cream for the header and cords, a medium tan-brown for the pinecones, and a muted sage-olive green for the sprigs. The style is rustic cottage. It suits the season without being tied to one holiday.
All instructions use US crochet terms. The finished curtain measures 32.25 in (81.9 cm) wide and about 56 in (142.2 cm) from the rod to the cord ends, not counting the last pinecones.
You make the curtain in parts. First crochet a header band and edge it with scallops and rod tabs. Then make the cords, pinecones and sprigs separately and sew everything together using a staggered layout.
Finished Size and Construction
- Finished size: 32.25 in (81.9 cm) wide x about 56 in (142.2 cm) long
- Skill level: Intermediate
- Terminology: US
- Yarn weight: Worsted (#4)
- Hooks: 5.0 mm (H-8) for header and cords; 4.0 mm (G-6) for pinecones and sprigs
- Number of pieces: 222 (1 header, 17 cords, 102 pinecones, 102 sprigs)
- Layout: 17 cords across, 6 pinecone-and-sprig units per cord, staggered
- Piece sizes: cord 54 in (137.2 cm); pinecone 2.5 in (6.4 cm) tall x 1.75 in (4.4 cm) wide; sprig 5.5 in (14.0 cm) long x 2.5 in (6.4 cm) wide
- Header size before border: 32.25 x 1.75 in (81.9 x 4.4 cm)
- Border depth: scallops 2.5 in (6.4 cm) below the band; rod tabs 3.5 in (8.9 cm) long before folding
Materials
Choose a smooth worsted cotton or cotton blend. Cotton keeps the scallops crisp and stops the cords from stretching under the weight of the pinecones. The amounts below assume about 180 m (197 yd) per 100 g.
- Cream (header and cords): 200 g / 360 m
- Tan-brown (pinecones): 750 g / 1,350 m
- Sage green (sprigs): 400 g / 720 m
Quantities include a margin of roughly 15 percent for swatching and tails.
Tools:
- 5.0 mm (H-8) and 4.0 mm (G-6) hooks
- Tapestry needle
- Small amount of fiberfill or matching yarn scraps
- Stitch markers
- Measuring tape and straight pins
- Curtain rod up to 1 in (2.5 cm) in diameter
Abbreviations (US Terms)
- ch chain
- sl st slip stitch
- sc single crochet
- hdc half double crochet
- dc double crochet
- sc2tog single crochet 2 together
- sp space
- BLO / FL back loop only / front loop
- RS right side
Special stitches
- Picot: ch 3, sl st in the sc just made.
- Scale: (hdc, 2 dc, hdc) in the same front loop.
- Needle: ch 6, sl st in 2nd ch from hook and in next 4 ch (5 sl st).
Gauge and Checkpoints
Header gauge (5.0 mm): 16 dc and 8 rows = 4 in (10.2 cm).
Cord gauge (5.0 mm): 16 back-bump sl st = 4 in (10.2 cm).
Pinecone gauge (4.0 mm): 5 sc = 1 in (2.5 cm).
Test one of each small piece first: make one pinecone, one sprig, and a 20-chain sample cord. Then check:
- Pinecone: 2.5 in (6.4 cm) tall, 1.75 in (4.4 cm) wide across the scales.
- Sprig: 5.5 in (14.0 cm) long.
- Cord sample: 16 sl st = 4 in (10.2 cm).
- Header after Row 2: 32.25 in (81.9 cm) wide.
- Each scallop after Row S4: 4 in (10.2 cm) wide.
If your pieces are too big, go down a hook size. If they are too small, go up one. Stuffing will show between the scales of a loosely worked pinecone, so err on the firm side there.
Header Band
With cream and 5.0 mm hook, ch 130.
Row 1 (RS): Sc in 2nd ch from hook and in each ch across. (129 sc)
Row 2: Ch 3 (counts as dc), turn, dc in each st across. (129 dc)
Row 3: Ch 1, turn, sc in each st across. (129 sc)
Row 4: Repeat Row 2. (129 dc)
Row 5: Repeat Row 3. (129 sc)
Do not fasten off. The band measures 32.25 x 1.75 in (81.9 x 4.4 cm). Place the live loop on a marker. The scallops start from here in the Border section.
Cords (make 17)
With cream and 5.0 mm hook, leave an 8 in (20.3 cm) tail.
Ch 217. Sl st in the back bump of 2nd ch from hook and in the back bump of each ch across. (216 sl st)
Fasten off, leaving a 6 in (15.2 cm) tail. Each cord measures 54 in (137.2 cm). Working the sl st into the back bumps makes a firm cord that looks slightly twisted and resists stretching.
Pinecones (make 102)
Use tan-brown and the 4.0 mm hook. Work in joined rounds: at the end of each round, sl st to the first st, then ch 1 to start the next round (ch 1 does not count). Rounds 3, 5, 7, 9, and 11 are worked in BLO. This leaves free front loops on Rounds 2, 4, 6, 8, and 10 for the scales.
Rnd 1: 6 sc in magic ring. (6)
Rnd 2: (Sc in next st, 2 sc in next st) 3 times. (9)
Rnd 3 (BLO): (Sc in next 2 sts, 2 sc in next st) 3 times. (12)
Rnd 4: Sc in each st. (12)
Rnd 5 (BLO): (Sc in next 3 sts, 2 sc in next st) 3 times. (15)
Rnd 6: Sc in each st. (15)
Rnd 7 (BLO): (Sc in next 4 sts, 2 sc in next st) 3 times. (18)
Rnd 8: Sc in each st. (18)
Rnd 9 (BLO): Sc in each st. (18)
Rnd 10: (Sc in next 4 sts, sc2tog) 3 times. (15)
Rnd 11 (BLO): (Sc in next 3 sts, sc2tog) 3 times. (12)
Stuff firmly.
Rnd 12: Sc2tog 6 times. (6)
Fasten off with a 12 in (30.5 cm) tail, close the top, and keep the tail for attaching. Round 1 is the pointed tip and Round 12 is the rounded top.
Scales: Hold the cone tip down. Work from the top tier toward the tip so each tier overlaps the one below.
Tier 1: Join brown in any free FL of Rnd 10. Sl st in this FL, scale in next FL, skip next FL, repeat around; sl st to first sl st. (5 scales)
Tier 2: Repeat on the FLs of Rnd 8. (6 scales)
Tier 3: Repeat on the FLs of Rnd 6. (5 scales)
Tier 4: Repeat on the FLs of Rnd 4. (4 scales)
Tier 5: Repeat on the FLs of Rnd 2. (3 scales)
Each scale uses 3 FLs. Every FL count (15, 18, 15, 12, 9) divides evenly by 3, so the pinecone has 23 scales in total. Fasten off each tier and weave in the ends. Push the scales down toward the tip.
Pine Sprigs (make 102)
With green and 4.0 mm hook, leave an 8 in (20.3 cm) tail.
Ch 26. Sl st in 2nd ch from hook and in next 4 ch (tip needle made). 20 spine ch remain.
Needle, needle, sl st in next 2 spine ch, repeat 9 times. (18 spine ch used, 18 needles)
Sl st in last 2 spine ch (stem). Total: 19 needles on a 20-ch spine.
Fasten off. Spread the two needles of each pair to opposite sides of the spine and pin flat. The sprig measures about 5.5 in (14.0 cm) long and 2.5 in (6.4 cm) wide.
Make All Pieces
| Piece | Color | Quantity |
|---|---|---|
| Header | Cream | 1 |
| Cords | Cream | 17 |
| Pinecones | Tan-brown | 102 |
| Sprigs | Sage green | 102 |
The cords alternate between two types. J (junction) cords hang under the points between scallops. C (center) cords hang under the middle of each scallop. Units are spaced 9 in (22.9 cm) apart, and the units on center cords sit 4.5 in (11.4 cm) lower than those on junction cords.
Cord:      1  2  3  4  5  6  7  8  9 10 11 12 13 14 15 16 17
Type:      J  C  J  C  J  C  J  C  J  C  J  C  J  C  J  C  J
4 in       U  .  U  .  U  .  U  .  U  .  U  .  U  .  U  .  U
8.5 in     .  U  .  U  .  U  .  U  .  U  .  U  .  U  .  U  .
13 in      U  .  U  .  U  .  U  .  U  .  U  .  U  .  U  .  U
17.5 in    .  U  .  U  .  U  .  U  .  U  .  U  .  U  .  U  .
...pattern continues to...
49 in      U  .  U  .  U  .  U  .  U  .  U  .  U  .  U  .  U
53.5 in    .  U  .  U  .  U  .  U  .  U  .  U  .  U  .  U  .
U = one pinecone plus one sprig.
- J cords (9): units at 4, 13, 22, 31, 40, 49 in (10.2, 33.0, 55.9, 78.7, 101.6, 124.5 cm).
- C cords (8): units at 8.5, 17.5, 26.5, 35.5, 44.5, 53.5 in (21.6, 44.5, 67.3, 90.2, 113.0, 135.9 cm).
Distances are measured down from the top of the cord. Total units: 9 x 6 + 8 x 6 = 102.
Joining
Finish the header Border first, then join.
Cords to header. Lay the header RS down. Junction cords attach behind Row 5 sts 1, 17, 33, 49, 65, 81, 97, 113, and 129. Center cords attach behind sts 9, 25, 41, 57, 73, 89, 105, and 121. Using the 8 in (20.3 cm) top tail, whipstitch the first 0.5 in (1.3 cm) of each cord to the back of its Row 5 stitch and the Row 4 dc above it. The cords then hang down from behind the scallops.
The stitch logic is simple: Row 5 has 129 sts, and a cord attaches at every 8th stitch (1, 9, 17 … 129), which gives 17 cords.
Units to cords. At each marked point, use the pinecone’s tail to sew its top to the cord so the tip hangs straight down. Sew the sprig stem to the same point, angling the sprig up and out. Alternate the sprigs left and right down each cord.
Tension. Sew snugly, but do not pucker the cord. If a pinecone tilts, the tail was usually pulled off-center.
Size checkpoint. Hang the joined curtain. It should be 32.25 in (81.9 cm) wide and hang about 56 in (142.2 cm) below the rod.
Border
The border has three parts: four scallop rows on the bottom edge, sc on the short sides, and rod tabs on the top edge.
Border gauge: one scallop repeat = 16 sts = 4 in (10.2 cm).
Scallops (bottom edge). Continue from the live loop on Row 5.
Row S1: Ch 1, turn, sc in first st, ch 20, skip 15 sts, sc in next st, repeat 8 times. (9 sc, 8 ch-20 arches)
Row S2: Ch 1, turn, sc in first sc, (dc, ch 1) 11 times in next ch-20 sp, dc in same sp, sc in next sc, repeat across. (Per arch: 12 dc, 11 ch-1 sps; total 96 dc, 9 sc)
Row S3: Ch 1, turn, sc in first sc, sc in first ch-1 sp, (5 dc in next ch-1 sp, sc in next ch-1 sp) 5 times, sl st in next sc, repeat across. On the last repeat, work a sc instead of the final sl st, into the last sc. (Per scallop: 5 shells, 6 sc)
Row S4: Ch 1, turn, sc in first sc, sc in next sc, (sc in next 2 dc, sc and picot in next dc, sc in next 2 dc, sc in next sc) 5 times, sl st in next sl st, repeat across, ending with sc in last sc. (Per scallop: 31 sc, 5 picots)
Fasten off. Together, the three openwork tiers (arch, dc fan and shells) and the picot edge give the scallops their layered look.
Short sides. Join cream at the end of Row 5. Work 7 sc evenly along the side: 1 sc per sc row and 2 sc per dc row (1 + 2 + 1 + 2 + 1). Repeat on the other side.
Top edge, Row T1. With RS facing, join cream in the first foundation ch. Sc in each remaining loop of the foundation chain. (129 sc)
Rod tabs (make 8). The tabs sit above the scallop centers, over T1 sts 7-11 of each 16-st repeat (sts 7-11, 23-27, 39-43, 55-59, 71-75, 87-91, 103-107, 119-123).
Tab Row 1: Join cream with a sc in the first tab st, sc in next 4 sts. (5 sc)
Tab Rows 2-16: Ch 1, turn, sc in each st. (5 sc)
Fasten off with a 10 in (25.4 cm) tail. Each tab is 1.25 in (3.2 cm) wide and 3.5 in (8.9 cm) long. Fold it over the rod to the back and whipstitch the last row to the back of its own Tab Row 1.
Why the math works. Row S1 uses 1 + 8 x 16 = 129 sts, exactly the band count. Each scallop center falls on st 9 of its repeat. The layout is symmetric (st 9 from one end is st 121 from the other), so the tabs on the top edge line up directly over the scallop centers. The 3.5 in (8.9 cm) tab loop fits a rod up to 1 in (2.5 cm) in diameter.
Final Blocking
- Block the header before attaching the cords.
- Mist the header with water until damp.
- Pin it flat to a mat at 32.25 in (81.9 cm) wide.
- Pin the scallops so each one is 4 in (10.2 cm) wide, and open every picot.
- Pin the sprigs flat with needles spread evenly, then mist them.
- Leave everything to dry completely.
- Pinecones need no blocking; reshape the scales with your fingers.
- After joining, hang the curtain for 24 hours so the cords settle straight.
Final Quality-Control Checklist
- Header is 32.25 in (81.9 cm) wide with 8 even scallops.
- 8 rod tabs sit above the scallop centers and slide freely on the rod.
- 17 cords, each 54 in (137.2 cm), hang behind the scallops.
- Each cord carries 6 units in the staggered J/C layout.
- Every pinecone has 23 scales in 5 tiers and points straight down.
- Every sprig angles upward, and they alternate sides down each cord.
- All ends are woven in securely.
Troubleshooting
- Header wider than 32.25 in (81.9 cm): Your dc is loose; restart with a 4.5 mm hook.
- Scallops flat instead of curved: The ch-20 arches are too tight. Chain more loosely, or use a larger hook for Row S1 only.
- Scales lie flat against the cone: Tug each scale downward and check that the BLO rounds were worked correctly.
- Stuffing shows: Use a smaller hook or stuff with matching brown yarn.
- Cords stretch: Work each sl st into the back bump only, not into one of the chain’s top loops.
- Sprigs curl: Pin them flat and mist; cotton relaxes quickly.
Care
Dust the curtain with a hair dryer on the cool setting, or shake it gently. If needed, hand wash in cool water, roll in a towel, and lay flat to dry, reshaping the scales and sprigs.
Final Notes
The measurements build on each other in order. A gauge of 16 dc = 4 in (10.2 cm) makes the 129-st header 32.25 in (81.9 cm) wide. Each 16-st repeat makes a 4 in (10.2 cm) scallop, and a cord attaches every 8 sts, giving 17 cords. At 16 sl st = 4 in (10.2 cm), each cord reaches 54 in (137.2 cm), and 6 units per cord give 102 pinecones and 102 sprigs. Check each measurement before moving on, and the curtain will hang straight and balanced.
Happy crocheting!