

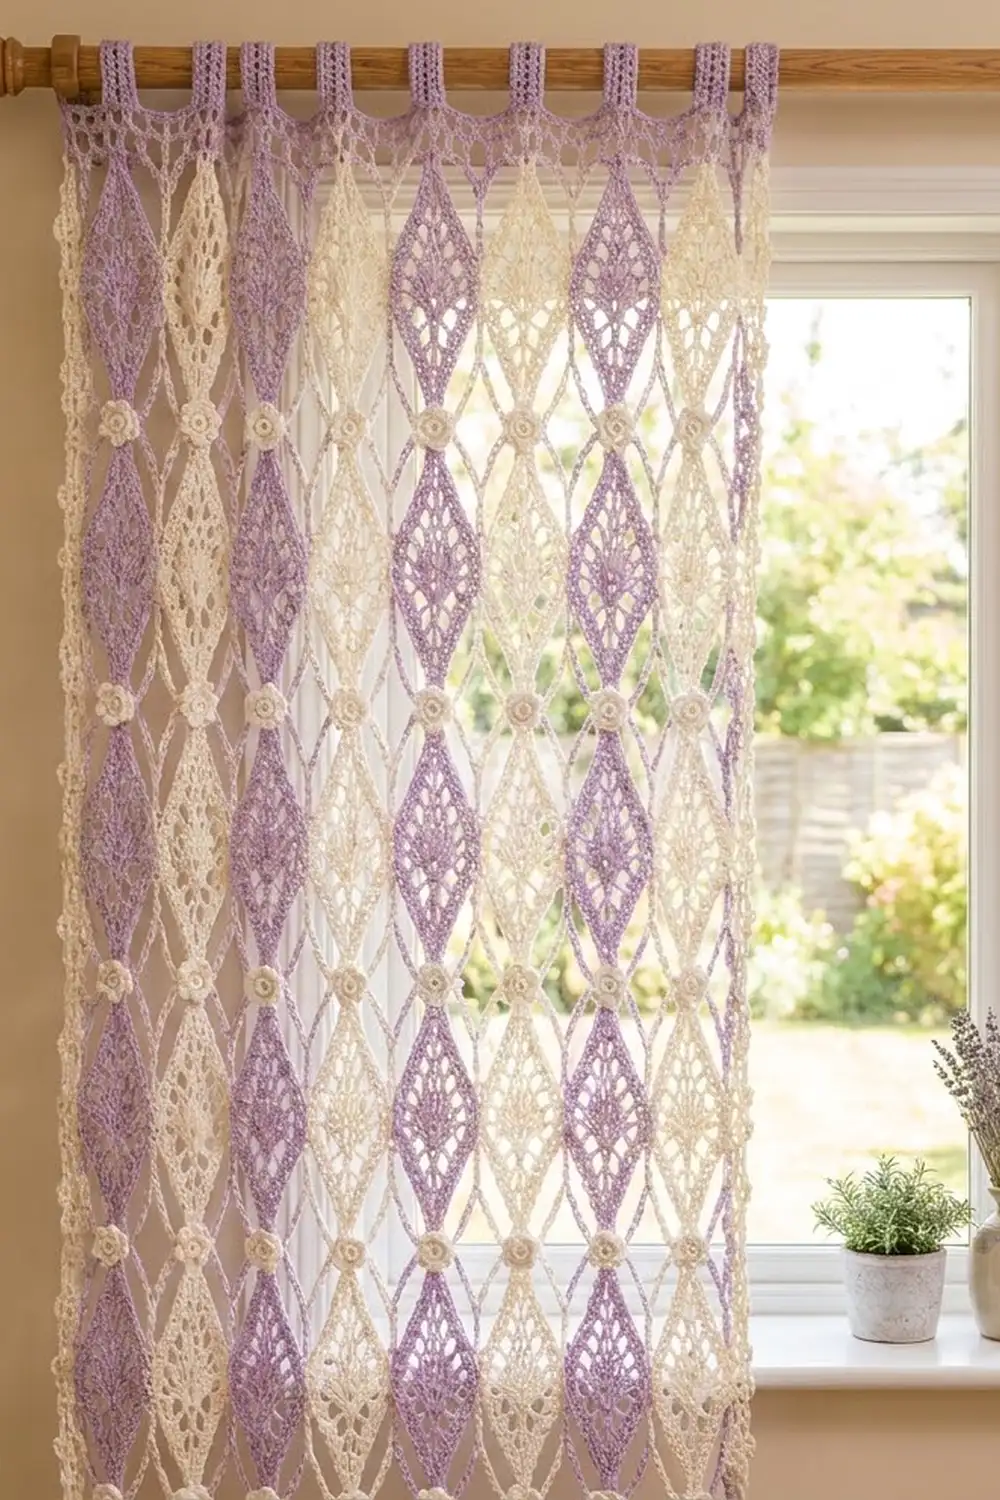
This curtain panel is made from tall lace diamonds in soft lilac and creamy ivory. They are joined tip to tip in vertical columns, and the colors alternate from column to column. A small cream flower covers every point where two diamonds meet in a column. Thin chain crosses fill the open spaces between the diamonds, so light still comes through and the panel looks airy.
Each diamond has a lacy mesh lower half, a radiating fan just above its widest point, and a scalloped chain-loop edging. Across the top, a lilac header band carries nine fold-over tabs that slide straight onto a curtain rod. The look is soft, vintage, and suited to a cottage room.
This pattern uses US crochet terms. One finished panel measures 36 in (91.4 cm) wide and 89.25 in (226.7 cm) from the top of the header to the lowest diamond tip. The tabs add about 2.5 in (6.4 cm) above the header. The photo shows two matching panels hung as a pair, so make a second panel the same way if you want the full window treatment.
Construction is simple to follow. You work each diamond in rows from the bottom tip to the top tip, then add a two-round edging. While you work the second edging round, you join the diamond to its neighbors. After that, you add the chain crosses and the flowers. Finally, you work the header straight off the top row of diamonds and finish with the tabs.
Finished Size and Construction
- Finished panel: 36 in (91.4 cm) wide × 89.25 in (226.7 cm) long, plus tabs
- Skill level: Intermediate
- Terminology: US
- Yarn weight: Worsted (#4) cotton
- Hook: 5.0 mm (H-8)
- Number of pieces: 48 diamond motifs (24 lilac, 24 cream) and 42 cream flowers
- Layout: 6 columns × 8 diamonds, joined at the points
- Diamond before edging: 5 in (12.7 cm) wide × 10 in (25.4 cm) tall
- Diamond after edging: 6 in (15.2 cm) point to point × 11 in (27.9 cm) tip to tip
- Joined body before header: 36 in (91.4 cm) × 88 in (223.5 cm)
- Header (border) depth: 1.25 in (3.2 cm), plus tabs
Materials
Choose a smooth, mercerized or matte worsted cotton. Cotton keeps the diamonds crisp and hangs straight, and it does not stretch the way acrylic can. The amounts below assume about 78 m (85 yd) per 50 g.
- Lilac: 600 g, about 936 m (1,024 yd) – diamonds, header, and tabs
- Cream: 650 g, about 1,014 m (1,109 yd) – diamonds, flowers, and chain crosses
- 5.0 mm (H-8) crochet hook
- Tapestry needle
- 9 locking stitch markers
- Measuring tape
- Blocking mats, rust-proof pins, and a spray bottle
The quantities already include roughly a 15% margin for swatching and tension differences. For a pair of panels, double everything.
Abbreviations (US Terms)
- ch – chain
- sl st – slip stitch
- sc – single crochet
- hdc – half double crochet
- dc – double crochet
- sk – skip
- st(s) – stitch(es)
- sp – space
- RS – right side
Special stitch – dc2tog (double crochet 2 together): [Yarn over, insert hook in next st, pull up a loop, yarn over, pull through 2 loops] twice, then yarn over and pull through all 3 loops on hook. This counts as 1 st.
Counting rule: In the diamond rows, every dc and every chain counts as 1 st. For example, a ch-2 sp counts as 2 sts.
Gauge and Checkpoints
Gauge is 16 dc and 8 rows = 4 in (10.2 cm). Each dc row is 0.5 in (1.3 cm) tall, and each stitch is 0.25 in (0.6 cm) wide. In the header, 4 sc rows = 1 in (2.5 cm). When stretched lightly, 4 ch = 1 in (2.5 cm).
Make one complete diamond, including both edging rounds, before you start the panel. Block it, then check it:
- After Row 10: 5 in (12.7 cm) wide at the widest point
- After Row 20: 10 in (25.4 cm) tall
- After edging: 6 in (15.2 cm) × 11 in (27.9 cm), measured to the outer edge of the corner loops
If your diamond is too big, go down 0.5 mm. If it is too small, go up 0.5 mm. An error of 0.25 in (0.6 cm) per diamond adds up to 2 in (5.1 cm) over the length of a column, so it is worth getting this right.
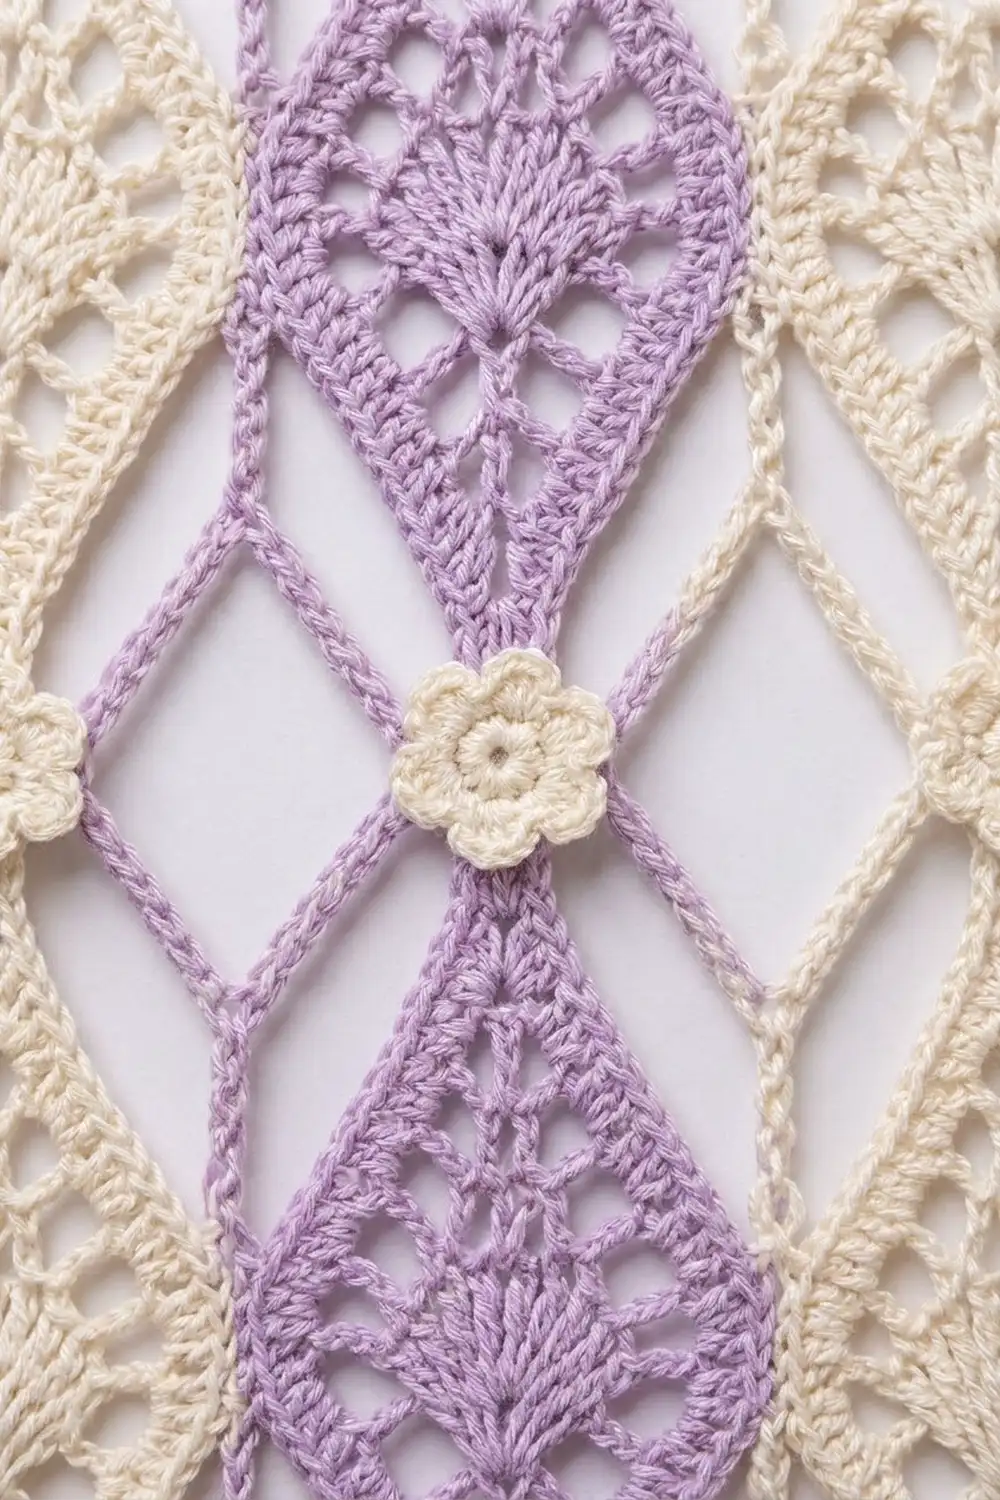
Diamond Motif (make 48)
You work the diamond in rows, from the bottom tip upward. Turn at the end of every row.
Increase Half
Use these two rules for the increase rows:
- Solid increase row: Ch 3 (counts as dc), dc in first st, dc in each st to last st, 2 dc in last st. This adds 2 sts.
- Mesh increase row: Ch 3 (counts as dc), dc in first st, [ch 1, sk next st, dc in next st] as instructed, 2 dc in last st. This adds 2 sts.
Row 1: Ch 4, dc in 4th ch from hook. The skipped chains count as a dc. (2 sts)
Row 2: Work a solid increase row. (4 sts)
Row 3: Work a mesh increase row, with the bracket worked 1 time. (6 sts)
Row 4: Solid increase row. (8 sts)
Row 5: Mesh increase row, bracket 3 times. (10 sts)
Row 6: Solid increase row. (12 sts)
Row 7: Mesh increase row, bracket 5 times. (14 sts)
Row 8: Solid increase row. (16 sts)
Row 9: Mesh increase row, bracket 7 times. (18 sts)
Row 10: Solid increase row. (20 sts) Checkpoint: 5 in (12.7 cm) wide.
Fan Rows
Row 11 (fan base): Ch 3 (counts as dc), dc in next st, ch 1, sk next st, dc in next st. Ch 2, sk next 5 sts. Work 4 dc in each of next 2 sts (8-dc shell). Ch 2, sk next 5 sts, dc in next st, ch 1, sk next st, dc in each of last 2 sts. (20 sts: 4 + 2 + 8 + 2 + 4)
Row 12 (fan spread): Ch 2 (does not count). Dc2tog over first 2 sts, ch 1, sk ch-1 sp, dc in next dc, sk ch-2 sp. Dc in first shell dc, [ch 1, dc in next 2 dc] 3 times, ch 1, dc in last shell dc. Sk ch-2 sp, dc in next dc, ch 1, sk ch-1 sp, dc2tog over last 2 sts. (18 sts: 3 + 12 + 3)
On this row the shell opens into 8 rays with 4 gaps between them. This is the fan you see just above the widest point of the diamond.
Decrease Half
Use these two rules for the decrease rows:
- Solid decrease row: Ch 2 (does not count), dc2tog over first 2 sts, dc in each st and ch-1 sp to last 2 sts, dc2tog over last 2 sts. This removes 2 sts.
- Mesh decrease row: Ch 2 (does not count), dc2tog, [ch 1, sk next st, dc in next st] as instructed, dc2tog. This removes 2 sts.
Row 13: Mesh decrease row, bracket 7 times. (16 sts)
Row 14: Solid decrease row. (14 sts)
Row 15: Mesh decrease row, bracket 5 times. (12 sts)
Row 16: Solid decrease row. (10 sts)
Row 17: Mesh decrease row, bracket 3 times. (8 sts)
Row 18: Solid decrease row. (6 sts)
Row 19: Mesh decrease row, bracket 1 time. (4 sts)
Row 20: Ch 2, dc2tog twice. (2 sts) Fasten off. Checkpoint: 10 in (25.4 cm) tall.
Edging
Round 1 (RS): Join the same color with a sl st at the base of Row 1. Ch 3 for the bottom corner loop. Work 2 sc around the end of each of Rows 1–10 up the right edge (20 sc), then ch 3 for the side point loop. Work 2 sc around each row end of Rows 11–20 (20 sc), then ch 3 for the top corner loop. Repeat down the left side: 20 sc, ch 3, 20 sc. Sl st to the base of the beginning ch-3. (80 sc and 4 ch-3 corner loops)
Here, “per side” means the 20 sc only. The corner loops sit between the sides and are not counted in the 20.
Round 2: Sl st into the first corner loop. (Sc, ch 5, sc) in corner loop, [ch 3, sk 1 sc, sc in next sc] 10 times. Repeat from * to * 3 more times, then sl st to the first sc. (10 ch-3 scallops per side and 4 ch-5 corner loops) For every motif after the first, join while you work this round, as described below.
Make All Pieces
- Lilac diamonds: 24 (columns 1, 3, 5)
- Cream diamonds: 24 (columns 2, 4, 6)
- Cream flowers: 42 (7 per column)
Flower: Make a magic ring. Round 1: ch 1, 10 sc in ring, sl st to first sc. (10 sc) Round 2: (hdc, dc, hdc) in next st, sl st in next st 5 times. (5 petals, 20 sts) Fasten off and leave a 10 in (25.4 cm) tail. The flower measures about 1.25 in (3.2 cm) across.
Layout (L = lilac, C = cream, * = flower over a tip join):
L  C  L  C  L  C     row 1 (top)
*  *  *  *  *  *
L  C  L  C  L  C     row 2
*  *  *  *  *  *
...repeat...
L  C  L  C  L  C     row 8 (bottom)
Every diamond points straight up and down, with Row 1 at the bottom.
Joining
Join as you go on Round 2. When you reach a corner that touches a diamond you have already finished, work it like this: sc in corner loop, ch 2, sl st into the neighbor’s ch-5 corner loop, ch 2, sc in same corner loop.
- Tip joins (vertical): Join the top corner of each new diamond to the bottom corner of the diamond above it.
- Side-point joins (horizontal): Join the side point of each new diamond to the facing side point of the diamond beside it.
The diamonds touch only at their points. Each join links exactly 2 corner loops, and the scallops in between stay free. Keep the ch-2 at your normal tension. If you pull it tight, the column puckers. If you leave it loose, the column grows.
Chain crosses: There are 35 enclosed diamond-shaped gaps (5 between columns × 7 between rows). Fill each one with cream. Sl st into the left tip join. Ch 24 (6 in / 15.2 cm), then sl st into the right tip join. Sl st back along 12 ch to reach the center, ch 22 (5.5 in / 14.0 cm), and sl st into the top side-point join. Sl st down the 22 ch, ch 22 more, and sl st into the bottom side-point join. Fasten off.
Then sew one flower over each of the 42 tip joins. This also hides the ends of the chain crosses.
Size check: The joined body should measure 36 in (91.4 cm) × 88 in (223.5 cm). That is 6 × 6 in across and 8 × 11 in down.
Border (Header and Tabs)
The header is the only added border. The sides and the bottom points keep the scalloped edge from Round 2, as shown in the photo. The header gauge is 4 sts = 1 in (2.5 cm).
Row 1 (lilac, RS): Ch 11. Work 2 sc in the top corner loop of the column 1 diamond, then [ch 22, 2 sc in the next top corner loop] 5 times. Ch 11 and turn. (144 sts)
Row 2: Ch 1 (does not count), sc in each st across. (144 sc)
Row 3: Ch 3 (counts as dc), dc in each st across. (144 dc)
Row 4: Ch 1, sc in each st across. (144 sc) Header depth: 1.25 in (3.2 cm).
Why the math works: Each top diamond owns 24 sts: 11 ch + 2 sc + 11 ch. The ch-22 between two tips is made of two of those 11-ch halves. Six diamonds × 24 sts gives 144 sts, and 144 ÷ 4 = 36 in (91.4 cm), which matches the body width exactly. No extra stitches are added at the seams.
Top half-gap bars: With cream, attach to the center of each ch-22 (between the 11th and 12th ch). Ch 22 (5.5 in / 14.0 cm), then sl st into the side-point join below. You will make 5 bars.
Tabs: Divide the 144 sts into 9 tabs of 8 sts with 8 gaps of 9 sts between them (72 + 72 = 144). Place markers on the first st of each tab: sts 1, 18, 35, 52, 69, 86, 103, 120, and 137. For each tab, join lilac and work 8 sc for 24 rows (6 in / 15.2 cm). Fold the tab to the back and whipstitch its last row to the back of Row 2. This gives a loop about 2.5 in (6.4 cm) high, which fits rods up to 1.5 in (3.8 cm) across.
Final Blocking
- Weave in all ends, working along the stitches of the same color.
- Lay the panel flat on mats over a large floor area.
- Pin each column straight, with the tips 11 in (27.9 cm) apart.
- Pin the side points 6 in (15.2 cm) apart across each row.
- Ease each chain cross until it is straight but not stretched.
- Mist the panel until it is damp, then lightly open each scallop and fan.
- Leave it to dry completely, about 24 hours.
Final Quality-Control Checklist
- 48 diamonds, alternating lilac and cream by column
- Every diamond is 6 in × 11 in (15.2 cm × 27.9 cm)
- 42 flowers are centered over the tip joins
- 35 chain crosses and 5 top bars are in place
- The header has 144 sts, and all 9 tabs are evenly spaced
- The body measures 36 in × 88 in (91.4 cm × 223.5 cm)
- No ends are visible from either side
Troubleshooting
- Diamond leans to one side: You probably missed an increase or decrease. Recount against the row counts.
- The fan is crowded: Check that you skipped exactly 5 sts on each side of the shell in Row 11.
- Columns pucker at the joins: The join chains are too tight. Work the ch-2 more loosely.
- The header ripples: The chains in Row 1 are too loose. Go down 0.5 mm for that row only.
- Chain crosses sag: Remove one or two chains per bar.
Care
Hand wash in cool water, or machine wash on a delicate cycle inside a mesh bag. Reshape the panel and dry it flat. Never hang it to dry while it is wet.
Final Notes
The measurement chain is short and checkable. Twenty dc at 4 sts per in give a 5 in (12.7 cm) diamond. The edging brings it to 6 in × 11 in (15.2 cm × 27.9 cm). Six columns of eight diamonds make a 36 in × 88 in (91.4 cm × 223.5 cm) body. The 144-st header matches that width exactly. Check each stage before you move on, and the panel will hang straight and even.
Happy crocheting!