

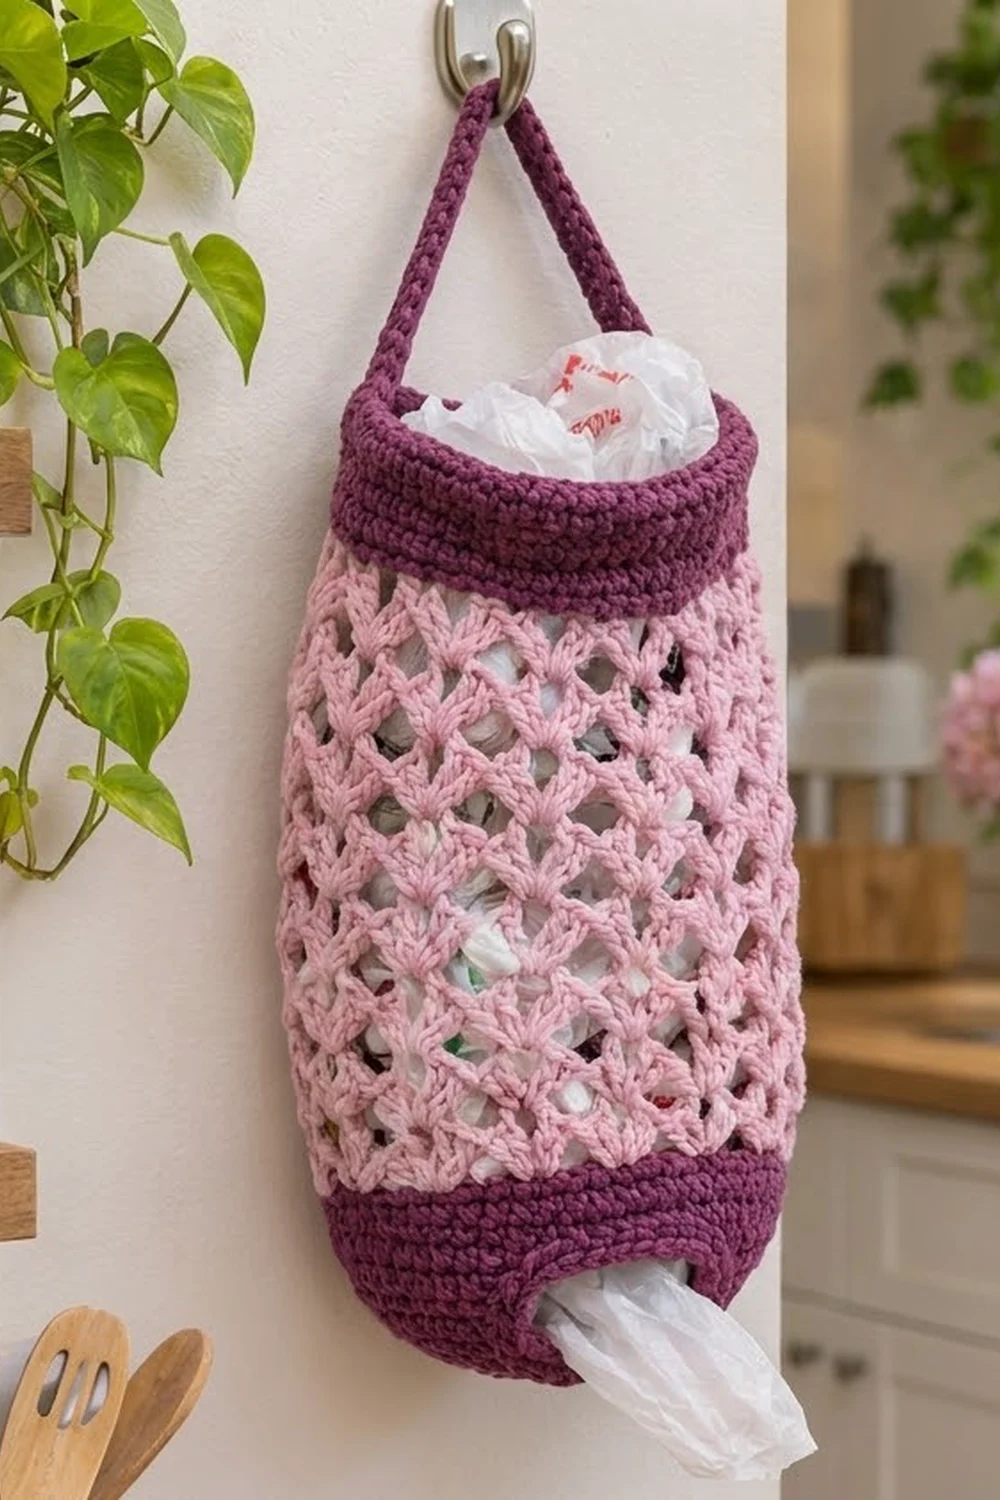
Plastic grocery bags tend to multiply in drawers and under sinks. This hanging holder keeps them in one tidy place. You stuff bags in through the wide top opening and pull them out one at a time through a rimmed oval hole near the bottom.
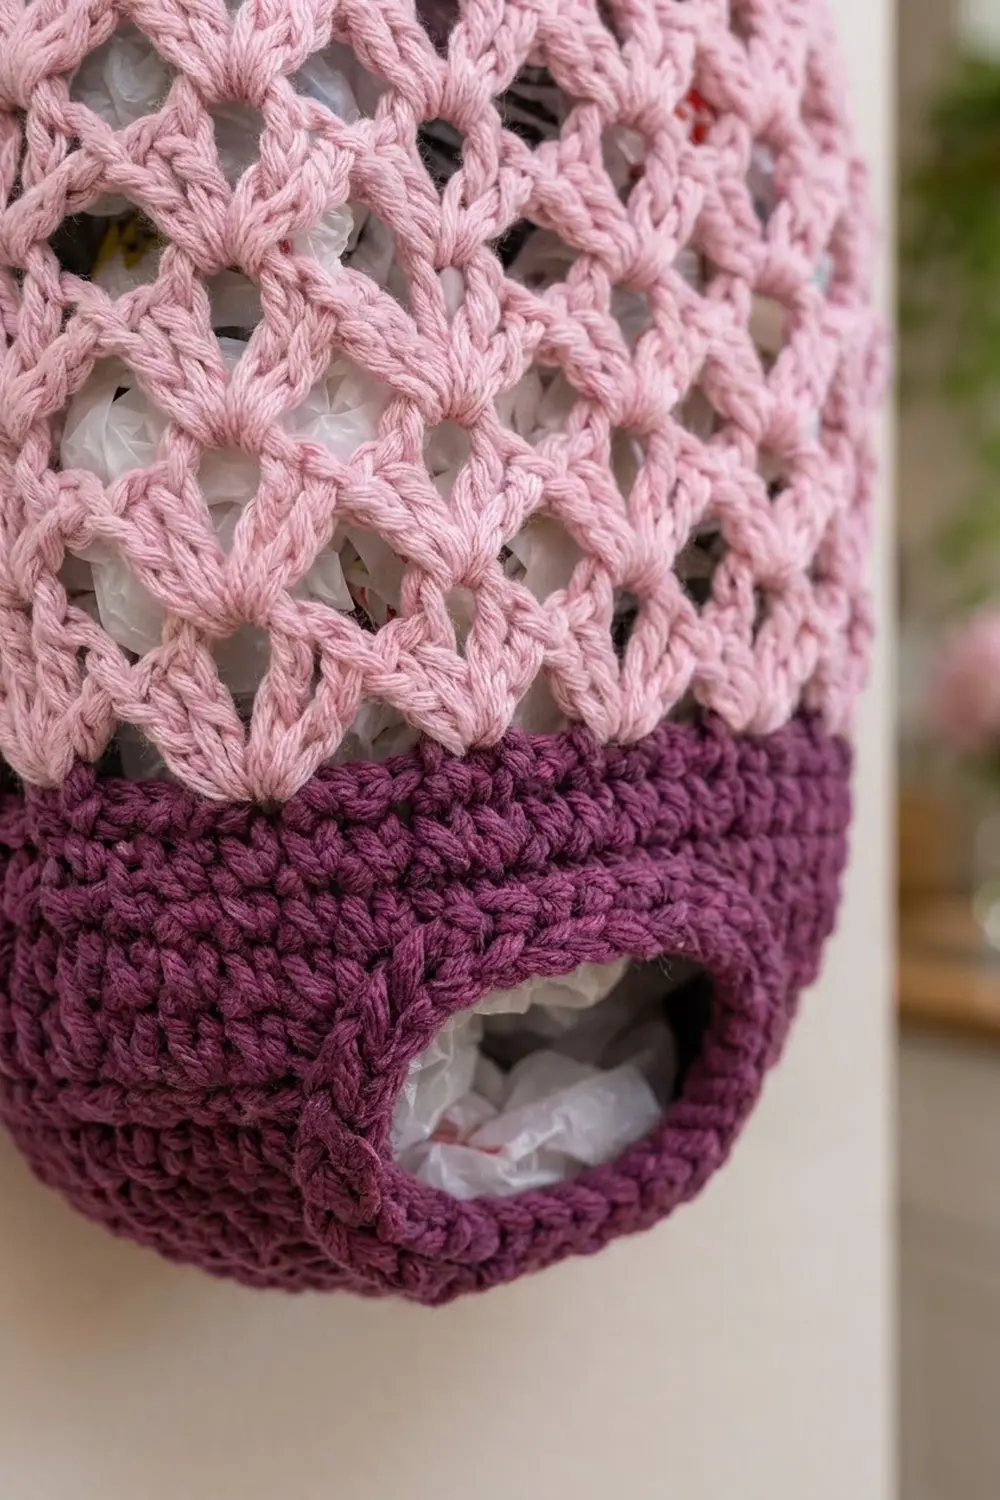
The design uses two colors. Deep plum frames the piece: the oval base, the solid bottom band, the solid top band and the hanging strap. Between the bands, a blush-pink lattice of offset V-stitches forms neat diamond openings. The mesh lets you see how many bags are left and keeps the holder light.
The pattern uses US crochet terms. The finished holder measures about 9 in (22.9 cm) wide when flattened and about 18.25 in (46.4 cm) tall, not counting the strap. The strap loop rises about 5 in (12.7 cm) above the rim.
The holder is made in one piece with no seams. You crochet a flat oval base in joined rounds, then turn the corner into the bottom band and leave a dispensing slot in one round. Next comes the pink V-stitch lattice, then a plum top band. You finish with a single-crochet strap and a reinforced rim around the dispensing hole.
Finished Size and Construction
- Finished size: about 9 in (22.9 cm) wide flat × 18.25 in (46.4 cm) tall, excluding the strap
- Skill level: Easy / Advanced Beginner
- Terminology: US crochet terms
- Yarn weight: Worsted weight (#4), cotton or cotton blend
- Hook: 5.0 mm (US H-8)
- Number of pieces: 1. The strap is worked directly off the top edge.
- Layout: a single seamless tube on an oval base
- Circumference: 64 sts, about 18.3 in (46.5 cm)
- Base size: about 6.5 × 3.5 in (16.5 × 8.9 cm)
- Size before top band: about 9 × 15.75 in (22.9 × 40.0 cm)
- Top band depth: 2.5 in (6.4 cm)
- Wall height (above base edge): 16.5 in (41.9 cm)
Materials
Yarn: Use a worsted weight cotton or cotton blend. Cotton holds its shape when the holder is packed full and stretches less than acrylic. Choose a smooth, tightly plied yarn so the V-stitches stay crisp.
- Color A (Plum): 120 g, about 220 m (240 yd)
- Color B (Blush Pink): 75 g, about 135 m (148 yd)
These quantities include a margin of about 15% for gauge differences and swatching.
Tools:
– 5.0 mm (US H-8) crochet hook
– 4 locking stitch markers
– Tapestry needle
– Scissors
– Measuring tape
– Rust-proof pins and a towel for blocking
Abbreviations (US Terms)
- ch – chain
- sl st – slip stitch
- sc – single crochet
- dc – double crochet
- st(s) – stitch(es)
- sk – skip
- sp – space
- BLO – back loop only
- rep – repeat
- Rnd – round
Special stitch – V-stitch (V-st): Work (dc, ch 1, dc) in the same stitch or space.
Gap: The space between the last dc of one V-st and the first dc of the next V-st.
Gauge and Checkpoints
Single crochet gauge: 14 sc × 16 rnds = 4 in (10.2 cm), which is 3.5 sts and 4 rnds per inch.
V-stitch mesh gauge: 7 V-st repeats = 8 in (20.3 cm) around, and 2 rnds = 1 in (2.5 cm) tall.
The base works as your gauge test. Make Rnds 1–7 first, measure, and only then continue.
Checkpoints:
– After Rnd 7 (base): about 6.5 × 3.5 in (16.5 × 8.9 cm), with 64 sts.
– After Rnd 19 (bottom band): the wall is 3 in (7.6 cm) tall.
– After Rnd 41 (mesh): the wall is 14 in (35.6 cm) tall, and the tube is about 9 in (22.9 cm) wide when flattened.
– After Rnd 51 (top band): the wall is 16.5 in (41.9 cm) tall.
If your base is too big, go down half a hook size (4.5 mm). If it’s too small, go up to 5.5 mm. A base that ruffles means your tension is loose at the curves. A base that cups means your tension is tight. Fix the base before moving on, because every later count depends on those 64 stitches.
Pattern
All rounds are joined with a sl st to the first st. The beginning ch 1 never counts as a stitch. In the V-st rounds, the beginning ch 4 counts as a dc plus ch 1.
Oval Base (Color A, Plum)
Ch 14.
Rnd 1: Sc in 2nd ch from hook and next 11 ch (12 sc). Work 3 sc in last ch. Rotate the work and continue along the other side of the chain: sc in next 11 ch, then 2 sc in last ch (the same ch as the first sc). Join. (28 sts)
Place a marker in the first st of Rnd 2 to mark the start of a long straight side. From here on, each half of the round is “11 straight sts + one end curve.”
Rnd 2: Ch 1, [sc in next 11 sts, 2 sc in each of next 3 sts] twice. Join. (34 sts)
Rnd 3: Ch 1, [sc in next 11 sts, (sc in next st, 2 sc in next st) 3 times] twice. Join. (40 sts)
Rnd 4: Ch 1, [sc in next 11 sts, (sc in next 2 sts, 2 sc in next st) 3 times] twice. Join. (46 sts)
Rnd 5: Ch 1, [sc in next 11 sts, (sc in next 3 sts, 2 sc in next st) 3 times] twice. Join. (52 sts)
Rnd 6: Ch 1, [sc in next 11 sts, (sc in next 4 sts, 2 sc in next st) 3 times] twice. Join. (58 sts)
Rnd 7: Ch 1, [sc in next 11 sts, (sc in next 5 sts, 2 sc in next st) 3 times] twice. Join. (64 sts)
Each half of Rnd 7 has 11 + 21 = 32 sts, and two halves make 64. Check your measurements against the base checkpoint now.
Bottom Band with Dispensing Hole (Color A)
Rnd 8 (turning round): Ch 1, sc BLO in each st around. Join. (64 sts) The unused front loops make a crisp ridge, and the work starts to rise into a wall.
Rnd 9: Ch 1, sc in each st around. Join. (64 sts)
Rnd 10 (hole round): Ch 1, sc in first 32 sts, ch 12, sk next 12 sts, sc in last 20 sts. Join. (32 sc + 12 ch + 20 sc = 64 sts)
The 12 skipped stitches are sts 33–44, which centers the slot on the second long face of the base.
Rnd 11: Ch 1, sc in first 32 sts, sc in each of the 12 ch, sc in last 20 sts. Join. (64 sts)
Rnds 12–19: Ch 1, sc in each st around. Join. (64 sts)
That makes 8 rounds. The band now covers 12 rounds (Rnds 8–19), which is 3 in (7.6 cm). Fasten off Color A.
Lattice Body (Color B, Blush Pink)
Rnd 20 (conversion to mesh): Join B in the first st. Ch 4 (counts as dc + ch 1), dc in the same st (first V-st made). Sk next 3 sts, V-st in next st. Rep from * 14 more times. Sk the last 3 sts and join with a sl st to the 3rd ch of the beginning ch-4. (16 V-sts)
Each V-st uses 1 st and skips 3, so 16 × 4 = 64. All 64 base stitches are used.
Rnd 21: Sl st in the ch-1 sp, sl st in the next dc, sl st in the next gap. Ch 4 (counts as dc + ch 1), dc in the same gap. V-st in next gap. Rep from * around. Join to the 3rd ch of the beginning ch-4. (16 V-sts)
Every new V-st sits in the gap between two V-sts of the round below. This offset is what creates the diamond-shaped openings.
Rnds 22–41: Rep Rnd 21. (16 V-sts each round)
That makes 22 mesh rounds (Rnds 20–41). At 2 rnds per inch they measure 11 in (27.9 cm). Fasten off Color B.
Checkpoint: The wall is now 3 + 11 = 14 in (35.6 cm). Flatten the tube; it should be about 9 in (22.9 cm) wide.
Border: Top Band, Opening Rim and Strap
The plum finishing works as the “border” of this piece. It stabilizes the stretchy mesh, frames the top opening and reinforces the dispensing hole.
Border gauge: The same 14 sc × 16 rnds = 4 in (10.2 cm) as the bottom band.
Top Band (Color A)
Rnd 42 (conversion round): Join A in the ch-1 sp of any V-st. Ch 1. Sc in the ch-1 sp, sc in the next dc, sc in the next gap, sc in the next dc (the first dc of the next V-st). Rep from * 15 more times. Join. (64 sts)
This round converts 16 V-sts back to 64 sc. In each V-st you work 1 sc into each of its 3 parts (dc, ch-1 sp, dc), which gives 48 sc. You also add 1 sc in each of the 16 gaps. 48 + 16 = 64.
Rnds 43–51: Ch 1, sc in each st around. Join. (64 sts)
The top band is 10 rounds (Rnds 42–51), or 2.5 in (6.4 cm). The final edge holds 32 sts on each flattened face (32 + 32 = 64), which matches the bottom band exactly. Fasten off.
Why the Math Works
Every section uses the same 64-stitch circumference. The base ends at 64 sts, and the bottom band keeps 64. The mesh uses 16 repeats of 4 sts (16 × 4 = 64), and the top band converts back to 3 + 1 sts per repeat, which is again 64. Because the stitch count never changes, the tube stays a straight cylinder with no flaring or pinching where the colors change.
Strap (Color A)
Flatten the holder with the dispensing hole centered on the front face. Mark the 5 sts centered on each side fold of Rnd 51. If your stitches stacked straight, these are sts 20–24 and sts 52–56.
Row 1: Join A in the first marked st on one side. Ch 1, sc in the same st and next 4 sts, turn. (5 sc)
Rows 2–48: Ch 1, sc in each st across, turn. (5 sc)
The strap is 48 rows, about 12 in (30.5 cm) long and about 1.4 in (3.6 cm) wide. Fasten off, leaving a 12 in (30.5 cm) tail. Check that the strap is not twisted. Then whipstitch the last row to the 5 marked sts on the opposite fold, working on the inside of the band and going through both loops. Sewn into an arch, the strap rises about 5 in (12.7 cm).
Opening Rim (Color A)
Join A at one corner of the dispensing hole. Ch 1. Work 12 sc evenly into the free bottom loops of the chain along the top edge of the hole. Work 1 sc in the corner. Then work 12 sc into the 12 stitches of Rnd 9 along the bottom edge, and 1 sc in the other corner. Join. (26 sc)
That is 12 + 1 + 12 + 1 = 26. The finished opening is about 3.4 in (8.6 cm) wide and relaxes to about 1 in (2.5 cm) tall. Fasten off and weave in all ends.
Final Blocking
- Wet the holder in lukewarm water, then gently press out the water. Do not wring it.
- Roll it in a towel to remove more moisture.
- Stuff it loosely with a rolled towel or plastic bags so it becomes a full cylinder.
- Lay it flat with the hole centered on the front. Pat it to 9 in (22.9 cm) wide and 18.25 in (46.4 cm) tall.
- Open each diamond in the lattice with your fingers so the V-sts line up straight in their columns.
- Pin the strap flat and straight.
- Let it dry completely, then remove the stuffing.
Final Quality-Control Checklist
- The base lies flat with no ruffles, and Rnd 7 has 64 sts.
- The BLO ridge in Rnd 8 is visible all the way around.
- The dispensing hole is centered on one face and has a 26-sc rim.
- Every mesh round has 16 V-sts, and the diamonds line up in neat columns.
- The top band has 64 sts and measures 2.5 in (6.4 cm).
- The strap is 5 sc wide, not twisted, and sits on the side folds.
- The total height is 18.25 in (46.4 cm), excluding the strap.
- All ends are woven in securely.
Troubleshooting
- Base ruffles: You have too many increases or loose tension. Recount each round against the stated totals, or go down a hook size.
- Base cups upward: Your tension is tight at the curves. Relax your grip or go up a hook size.
- V-sts drift into a spiral: You probably skipped the starting slip stitches. Always sl st into the gap before you ch 4.
- Mesh is too short: Your dc are compact. Add 2 more mesh rounds, keeping an even number of rounds.
- Top band flares: You may have added extra sc in Rnd 42. Recount to 64.
- Bags fall out of the hole: Tighten the rim by working a second rim round of 26 sl sts.
- Strap stretches: Use a smaller hook for the strap only, or add a second sl st row along both edges.
Care
Hand wash in cool water and lay flat to dry. Reshape the diamonds while the holder is damp, and don’t hang it while it’s wet.
Final Notes
Each stage of this holder depends on the one before it. A 7-round oval base gives you 64 stitches and measures 6.5 × 3.5 in (16.5 × 8.9 cm). The bottom band keeps those 64 stitches for 3 in (7.6 cm). The lattice turns them into 16 V-stitch repeats for 11 in (27.9 cm), and the top band converts them back to 64 for 2.5 in (6.4 cm). The result is a 16.5 in (41.9 cm) wall that hangs about 18.25 in (46.4 cm) tall and 9 in (22.9 cm) wide. If you check your counts at each checkpoint, the finished holder will hang straight and dispense bags easily.
Happy crocheting!