

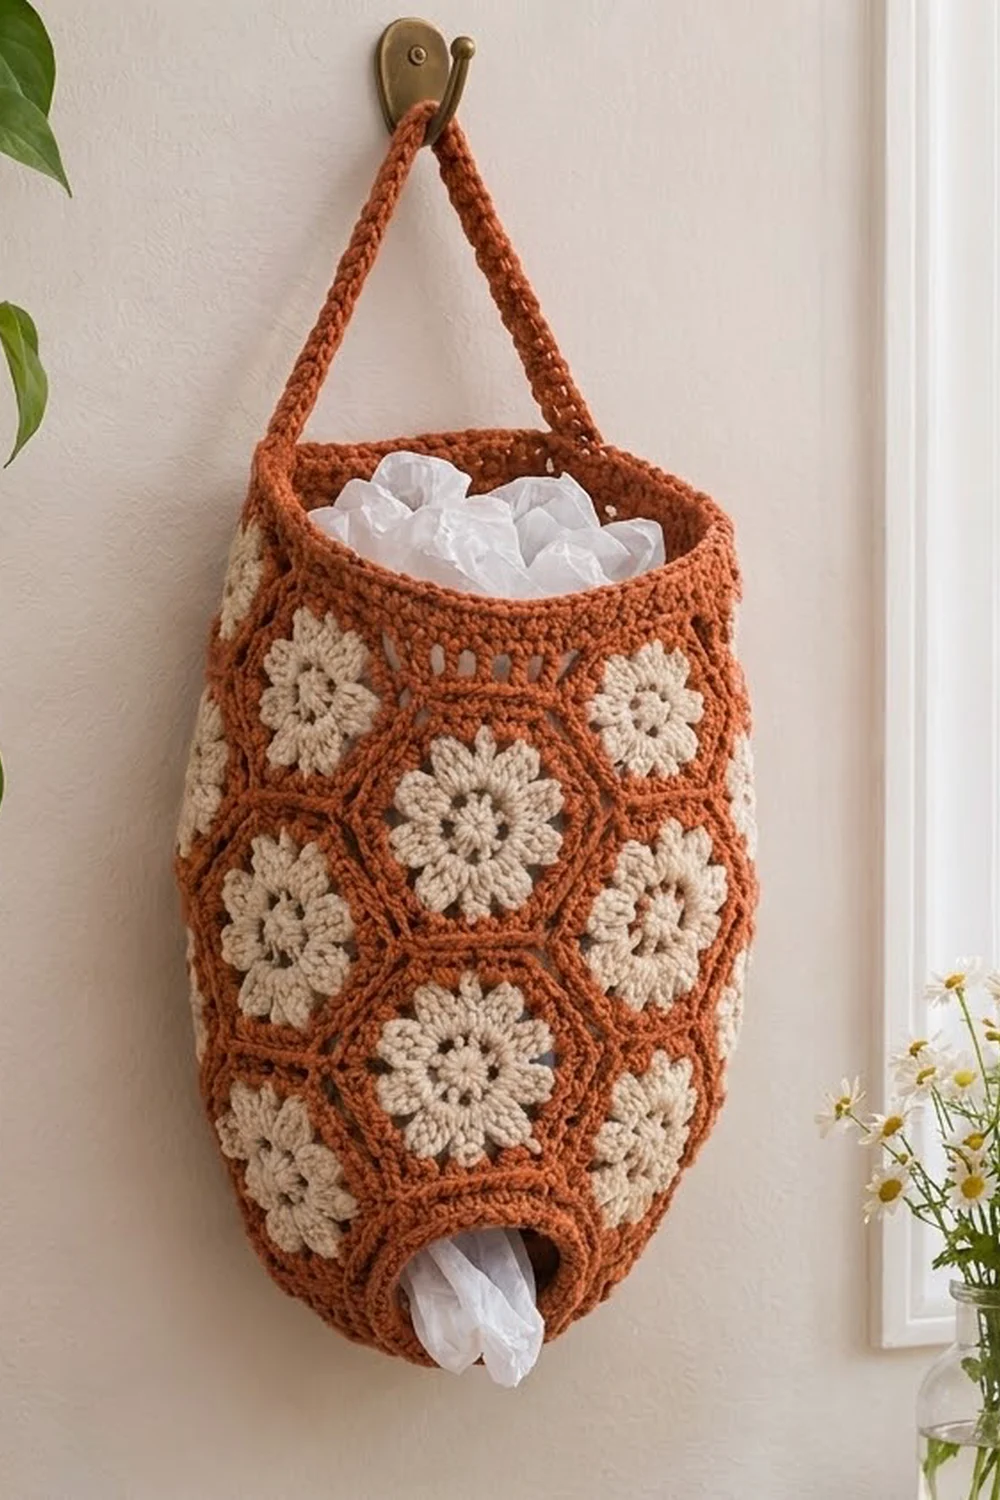
The Terracotta Daisy Bag Holder is a hanging kitchen organizer made from 18 small flower hexagons. Each hexagon has a cream daisy center framed in warm rust. The hexagons are joined into a honeycomb tube, so the finished holder looks like a cozy hive of flowers.
Two colors carry the whole design. Cream makes the 12-petal flower centers, and rust/terracotta makes the hexagon frames, raised seams, top band, bottom cuff and hanging strap. The style is cottage-kitchen and a little retro, and it suits wood, plants and white walls.
This pattern uses US crochet terms. The finished holder is about 14 in (35.6 cm) long and 10.5 in (26.7 cm) wide when flat, not counting the strap. The top opening is about 21 in (53.3 cm) around and the bottom opening is about 3 in (7.6 cm) across.
Construction is simple and modular. You make 18 hexagons and join them into three offset rings of six. Then you work a leveling band around the top and a tapered cuff at the bottom, and add a strap. Stuff bags in at the top and pull them out from the bottom.
Finished Size and Construction
- Finished size: 14 in (35.6 cm) long × 10.5 in (26.7 cm) wide, flat
- Skill level: Easy-intermediate
- Terminology: US
- Yarn weight: Worsted (#4) cotton or cotton blend
- Hook: 4.0 mm (G/6)
- Number of pieces: 18 hexagons + 1 strap
- Layout: 3 rings of 6 hexagons, offset in a honeycomb tube
- Hexagon size: 3.5 in (8.9 cm) flat-to-flat, 4 in (10.2 cm) point-to-point
- Body size before bands: 10 in (25.4 cm) tall, 21 in (53.3 cm) around
- Band depth: top band about 2 in (5.1 cm); bottom cuff adds about 2 in (5.1 cm)
Materials
Choose a smooth, firm cotton. Cotton holds its shape when the holder is packed with bags, and it shows the petal texture clearly. Avoid splitty or very soft acrylics, because the tube may sag.
- Cream/beige: 75 g, about 130 m (buy 100 g)
- Rust/terracotta: 170 g, about 290 m (buy 200 g)
Both quantities include a margin of about 15% for gauge swatches and seam tails.
Tools:
– 4.0 mm (G/6) crochet hook
– Tapestry needle
– 6 or more locking stitch markers
– Scissors
– Measuring tape
– Blocking mat and rust-proof pins
– Spray bottle
Abbreviations (US Terms)
- ch – chain
- sl st – slip stitch
- sc – single crochet
- hdc – half double crochet
- dc – double crochet
- tr – treble crochet
- sc2tog – single crochet 2 together
- tr2tog – treble 2 together
- sp – space
- st(s) – stitch(es)
- rep – repeat
Special stitches:
- 2-dc cluster (cl): Yarn over, insert hook in the stitch, pull up a loop, yarn over and pull through 2 loops. Repeat once more in the same stitch. Yarn over and pull through all 3 loops on the hook.
- Beginning cluster (beg cl): Ch 2, then work 1 unfinished dc in the same stitch. Yarn over and pull through both loops.
- tr2tog across a valley: Work an unfinished tr in the first space, then an unfinished tr in the second space. Yarn over and pull through all 3 loops.
Gauge and Checkpoints
Gauge: 18 sc and 20 rows = 4 in (10.2 cm) in sc with a 4.0 mm hook.
Make one full hexagon before you start the rest. Block it lightly, then measure.
- After Round 1: about 1.25 in (3.2 cm) across
- After Round 2: about 2 in (5.1 cm) across
- After Round 3: about 3 in (7.6 cm) flat-to-flat
- After Round 4: 3.5 in (8.9 cm) flat-to-flat, 4 in (10.2 cm) point-to-point, each side about 2 in (5.1 cm)
If the hexagon is too big, go down 0.5 mm in hook size. If it is too small, go up 0.5 mm. Even a 0.25 in (0.6 cm) difference per hexagon becomes 1.5 in (3.8 cm) around the tube, so match gauge before you make all 18.
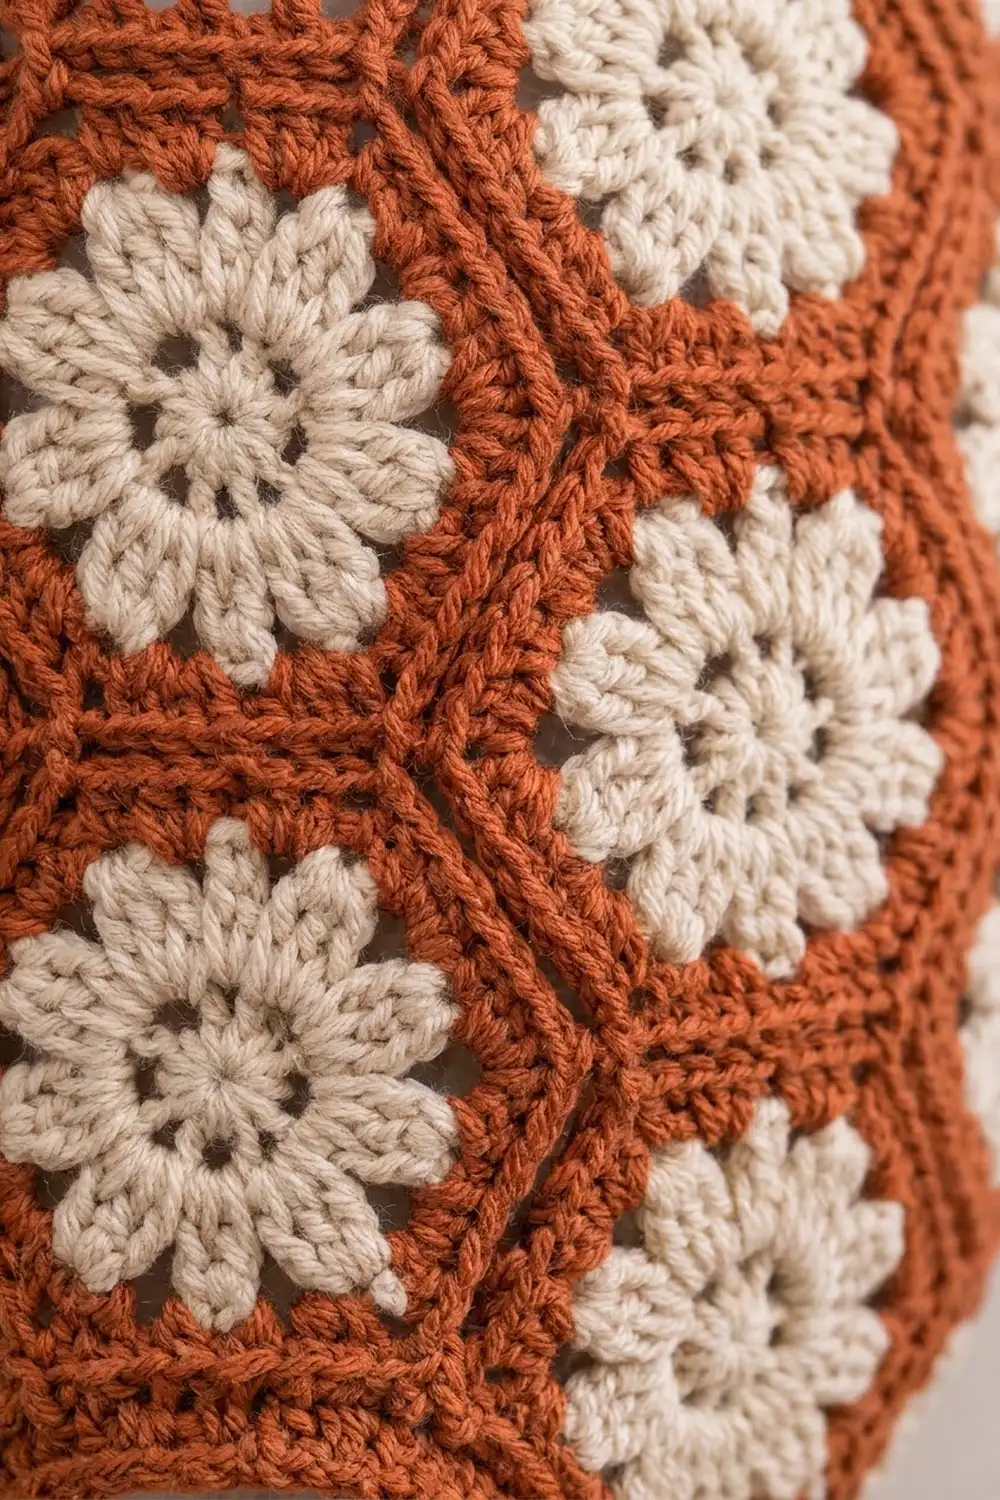
Hexagon Motif (Make 18)
Round 1 (cream): Make a magic ring. Ch 3 (counts as dc), then work 11 dc in the ring. Join with a sl st to the top of the ch-3. Pull the ring closed. (12 dc)
Round 2 (cream): Beg cl in the same st, ch 2. Work a cl in the next dc, ch 2. Rep from * to * 10 more times. Join with a sl st to the top of the beg cl. Fasten off. (12 clusters, 12 ch-2 sps)
These 12 clusters are the rounded daisy petals.
Round 3 (rust): Join rust in any ch-2 sp.
– First corner: ch 3 (counts as dc), then work (dc, ch 2, 2 dc) in the same sp.
– Work 3 dc in the next sp.
– (2 dc, ch 2, 2 dc) in the next sp, 3 dc in the next sp. Rep from * to * 4 more times.
– Join with a sl st to the top of the ch-3.
(42 dc, 6 corner ch-2 sps; 7 dc between corners)
Every other petal space becomes a corner, which turns the circle into a hexagon.
Round 4 (rust):
– Ch 1. Sc in the same st and in the next dc (2 sc).
– Work (sc, ch 2, sc) in the corner sp.
– Sc in the next 7 dc, then (sc, ch 2, sc) in the next corner sp. Rep from * to * 4 more times.
– Sc in the last 5 dc. Join with a sl st to the first sc. Fasten off and leave a 6 in (15.2 cm) tail.
(54 sc, 6 corner ch-2 sps)
Per-side count: Each side has 9 sc between corner ch-2 spaces: 1 corner sc + 7 sc + 1 corner sc. The corner sc are already included in the 9, so do not count them again.
Make All Pieces
- Hexagons: 18 total
- Cream: Rounds 1–2 of all 18, about 4 g per hexagon
- Rust: Rounds 3–4 of all 18, about 5 g per hexagon
Weave in the cream tails. Keep one rust tail on each hexagon for small fixes during joining.
Layout grid (tube shown opened flat; the A1 column wraps around to touch A6):
Ring 1 (top):     A1   A2   A3   A4   A5   A6
Ring 2 (middle):    B1   B2   B3   B4   B5   B6
Ring 3 (bottom):  C1   C2   C3   C4   C5   C6
- Each B hexagon nests into the valley below two A hexagons. B1 sits under A1 and A2, and B6 sits under A6 and A1.
- Each C hexagon nests under two B hexagons. C1 sits under B6 and B1, and C2 sits under B1 and B2.
- Ring 3 lines up directly under Ring 1.
Turn each hexagon so its points face up and down and its flat sides are vertical.
Joining
Method: Sc seam in rust.
1. Hold the two hexagons wrong sides together, so the ridge forms on the outside like the raised outlines in the photo.
2. Work through both layers, matching stitch to stitch.
3. Each seam is: sc in the matching corner ch-2 sps, 1 sc in each of the 9 matched sc pairs, sc in the next matching corner ch-2 sps.
That makes 11 sc per seam. These seam stitches are not part of any later stitch count, and the band rounds are worked into the hexagons’ own stitches.
Step 1 – Ring 1:
1. Join A1 to A2 along their vertical sides.
2. Continue the same way through A6. That is 5 seams.
3. Join A6 to A1 to close the ring, for a 6th seam.
Checkpoint: The ring measures 21 in (53.3 cm) around (6 × 3.5 in) and 4 in (10.2 cm) tall.
Step 2 – Ring 2:
1. Set each B hexagon into a valley of Ring 1.
2. Seam its upper-left and upper-right sides to the lower sides of the two A hexagons above it. That is 12 seams.
3. Seam the vertical sides between neighboring B hexagons. That is 6 seams.
Checkpoint: The body measures 7 in (17.8 cm) tall.
Step 3 – Ring 3: Repeat Step 2 with the C hexagons. That is 18 more seams.
Checkpoint: The body measures 10 in (25.4 cm) tall, from the top points to the bottom points. You should have 42 seams in total.
Tension: Work the seams at the same tension as Round 4. Tight seams pucker the tube and make it shorter. Loose seams show gaps where the corners meet. If three corners meet at a junction and it looks open, add 1 sl st through all three ch-2 sps.
Border: Top Band and Bottom Cuff
Band gauge: 18 sc = 4 in (10.2 cm), the same as the main gauge.
The top and bottom edges of the body are each 12 free hexagon sides, 2 per edge hexagon, so they zigzag into 6 peaks and 6 valleys. Each free side has 9 sc. Starting count per edge: 6 hexagons × 2 sides × 9 sc = 108 sc.
Top Band
Round 1 (leveling round, rust): Join yarn in the top-point ch-2 sp of A1.
– Sc in that peak sp (1 st).
– Work down the next side, 1 st in each of the 9 sc: sc, sc, hdc, hdc, dc, dc, tr, tr, tr.
– Tr2tog across the valley, with one leg in each of the two meeting corner ch-2 sps (1 st).
– Work up the next side, 1 st in each of the 9 sc: tr, tr, tr, dc, dc, hdc, hdc, sc, sc.
– Rep this sequence around all 6 peaks. Join with a sl st.
Count: 108 sts worked 1 per existing sc + 12 added (6 peak sc + 6 valley tr2tog) = 120 sts (20 per hexagon).
The valley stitches are about 1 in (2.5 cm) taller, which is the drop from peak to valley, so the edge comes out straight.
Round 2: Ch 1. Sc in the next 3 sts, sc2tog. Rep from * to * 24 times. Join. (96 sts)
Round 3: Ch 1. Sc in each st around. Join. (96 sts)
Round 4: Ch 3 (counts as dc). Dc in each st around. Join. (96 sts) This is the open-looking dc round.
Rounds 5–7: Ch 1. Sc in each st around. Join. (96 sts) Fasten off after Round 7.
Why the math works: At 18 sc per 4 in, 96 sts equal 21.3 in (54.1 cm). That matches the tube’s 21 in (53.3 cm) circumference, so the band neither flares nor pinches. You need Round 2 because 120 sts would ruffle.
Bottom Cuff
Turn the holder upside down. Work into the lower edges of Ring 3. The downward points of the hexagons are now the “peaks.”
Round 1: Work as top Round 1, with sc at each C-hexagon point and tr2tog at each valley. (108 + 12 = 120 sts)
Round 2: Sc 3, sc2tog. Rep 24 times. (96)
Round 3: Sc 6, sc2tog. Rep 12 times. (84)
Round 4: Sc 5, sc2tog. Rep 12 times. (72)
Round 5: Sc 4, sc2tog. Rep 12 times. (60)
Round 6: Sc 3, sc2tog. Rep 12 times. (48)
Round 7: Sc 6, sc2tog. Rep 6 times. (42)
Rounds 8–10: Sc in each st around. (42) Fasten off.
Why the math works: 42 sts ÷ 4.5 sts per in = 9.3 in (23.6 cm) around. That gives an opening about 3 in (7.6 cm) across: wide enough to pull bags out easily, and small enough to hold the rest in. The decreases are spread evenly, so the bottom curves in smoothly instead of folding.
Strap
- Place a marker in any st of top Round 7.
- Row 1: Join rust there. Ch 1, then sc in the same st and the next 3 sts. (4 sc)
- Rows 2–50: Ch 1, turn, sc 4. (4 sc)
The strap is about 10 in (25.4 cm) long and 0.9 in (2.3 cm) wide. Sew the last row securely to sts 49–52 of Round 7, directly opposite the start.
Final Blocking
- Weave in all remaining ends along the seam ridges.
- Stuff the holder firmly with plastic bags or a rolled towel so it holds a cylinder shape.
- Mist it evenly with water until it is damp, not soaked.
- Gently shape each hexagon flat and square up the seam ridges with your fingers.
- Pinch the top band into an even circle about 6.7 in (17.0 cm) across.
- Round out the bottom cuff to about 3 in (7.6 cm) across.
- Let it dry completely, standing upright, then remove the stuffing.
Final Quality-Control Checklist
- [ ] All 18 hexagons are 3.5 in (8.9 cm) flat-to-flat
- [ ] Each hexagon has 54 sc and 6 corner sps in Round 4
- [ ] 42 seams are complete, with ridges on the outside
- [ ] The body is 10 in (25.4 cm) tall and 21 in (53.3 cm) around
- [ ] Top Round 1 has 120 sts, and Rounds 2–7 have 96
- [ ] Bottom cuff ends at 42 sts and is about 3 in (7.6 cm) across
- [ ] The strap is 4 sc wide, 10 in (25.4 cm) long, and attached at opposite points
- [ ] Every junction where corners meet is closed
Troubleshooting
- Hexagon cups: Round 3 is too tight. Go up a hook size for that round only.
- Hexagon ruffles: Check Round 3. There should be 3 dc in each side sp, not 4.
- Top edge still wavy: Make sure the valley tr2tog and the tr stitches next to it are worked at full height.
- Band flares: You skipped the Round 2 decreases. Rip back and redo the round.
- Bags fall out the bottom: Add 1 more round of sc 5, sc2tog to the cuff. That gives 36 sts, about 2.5 in (6.4 cm) across.
- Strap stretches: Work the strap 1 hook size smaller, or sl st along both long edges.
Care
Hand wash in cool water and lay flat or hang to dry. Reshape the holder while it is damp.
Final Notes
Here is how the measurements build on each other:
1. Each hexagon is 3.5 in (8.9 cm) flat-to-flat, with 9 sc per side.
2. A ring of 6 hexagons is 21 in (53.3 cm) around.
3. Three offset rings make a body 10 in (25.4 cm) tall.
4. The 108 edge sc level to 120 sts, then settle to 96 sts at the top.
5. The bottom tapers from 120 to 42 sts.
6. The finished holder is 14 in (35.6 cm) long.
If your first hexagon is right, everything after it will be too. Happy crocheting!