

The Meadow Star Bag Holder turns a messy pile of grocery bags into something you will want on the kitchen wall. It is a rounded, egg-shaped hanging holder covered in cream six-petal flowers, each framed by a deep forest-green lattice. Bags go in through the wide top and come out one at a time from the small ring at the bottom.
There are only two colors. Dark forest green is used for the flower centers, the mesh, the rims and the strap, and soft cream for the petals. The open lattice lets a little of the contents show, and the solid green rims give the holder structure and a clean finish.
This pattern uses US crochet terms. Laid flat, the finished holder measures about 9 in (22.9 cm) wide at its widest point and about 16 in (40.6 cm) tall from the bottom ring to the top rim. The hanging strap adds a loop about 5 in (12.7 cm) high, so the total hanging length is about 21 in (53.3 cm).
The construction is simple and modular. You make 30 small hexagon flower motifs and join them as you go into a tube that is 6 motifs around and 5 rows tall. Then you work a solid top rim, a decreasing bottom ring that pulls the base into its rounded egg shape, and a flat strap.
Finished Size and Construction
- Finished size: 9 in (22.9 cm) wide flat x 16 in (40.6 cm) tall, plus strap
- Skill level: Intermediate (join-as-you-go)
- Terminology: US terms
- Yarn weight: Worsted (#4), cotton or cotton blend
- Hook: US H-8 (5 mm)
- Number of pieces: 30 flower motifs joined into one tube, plus rims and strap worked directly onto it
- Layout: 6 motifs around x 5 rows, honeycomb (each row offset by half a motif)
- Motif size: 3 in (7.6 cm) across the flats, 3½ in (8.9 cm) point to point
- Size before rims: tube 9 in (22.9 cm) wide flat x 14 in (35.6 cm) tall
- Rim depth: top rim about 1 in (2.5 cm); bottom ring about 1½ in (3.8 cm)
Materials
Choose a smooth worsted cotton or cotton blend. Cotton holds its shape when the holder is stuffed full and doesn’t stretch out under the weight of the bags. Avoid fuzzy yarns, which hide the lattice.
- Forest green: 200 g (about 310 m)
- Cream: 70 g (about 110 m)
Tools:
- US H-8 (5 mm) crochet hook
- Tapestry needle
- Stitch markers (at least 6)
- Scissors
- Blocking mat and rust-proof pins
- Spray bottle
Quantities include a margin of roughly 15 percent for gauge swatches and weaving in.
Abbreviations (US Terms)
- ch – chain
- sl st – slip stitch
- sc – single crochet
- hdc – half double crochet
- dc – double crochet
- sc2tog – single crochet 2 together
- sp – space
- st(s) – stitch(es)
- rnd(s) – round(s)
Special stitch – Petal: (hdc, 2 dc, ch 1, 2 dc, hdc) all in the same stitch. The ch 1 forms the pointed petal tip.
Gauge and Checkpoints
Rim gauge: 16 sc and 18 rnds = 4 in (10.2 cm). Motif gauge is measured on the motif itself.
Make one complete motif first and measure it before going any further. Check it at every stage:
- After Rnd 1: 1 in (2.5 cm) across
- After Rnd 2: 2¼ in (5.7 cm) across, petal tip to petal tip
- After Rnd 3: 2½ in (6.4 cm) across
- After Rnd 4: 3 in (7.6 cm) across the flats, 3½ in (8.9 cm) point to point
If your motif is larger than 3 in (7.6 cm) across the flats, go down one hook size. If it’s smaller, go up one hook size. A difference of only ¼ in (0.6 cm) per motif adds up to 1½ in (3.8 cm) around the tube, so it’s worth getting this right.
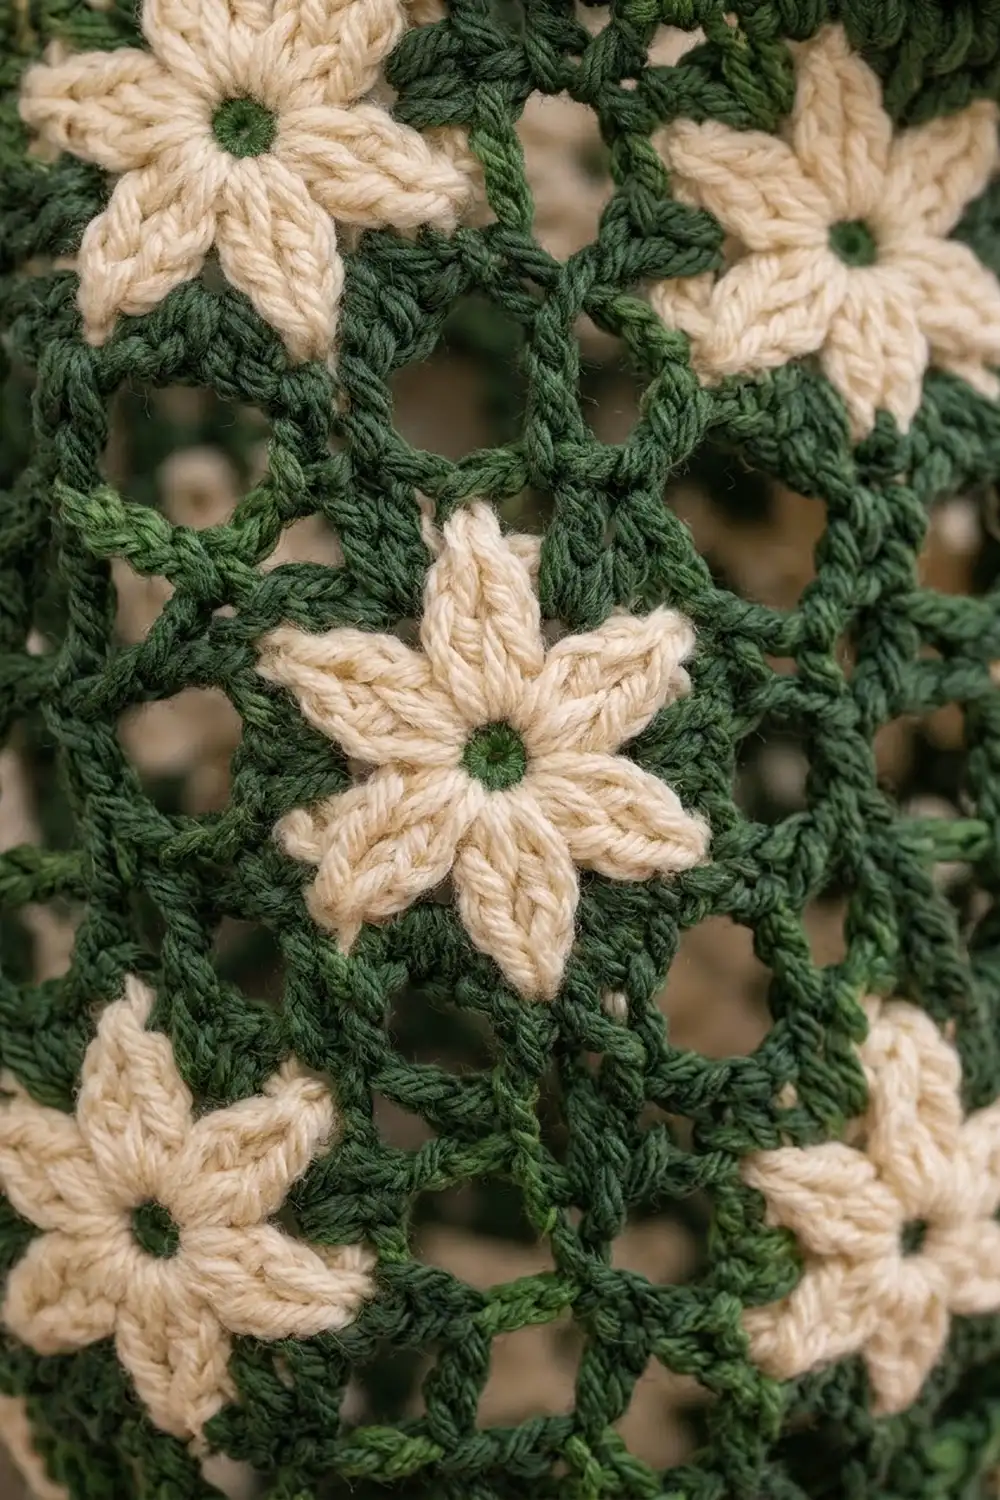
Flower Motif
Make 30. Motif 1 is worked complete. Every other motif joins to its neighbors on Rnd 4 (see Joining).
Rnd 1 (green): Make a magic ring, ch 1, 12 sc in ring, sl st to first sc to join. Pull the ring tight. Fasten off. (12 sc)
Rnd 2 (cream): Join cream in any sc. Petal in next sc, sl st in next sc; repeat from * 5 more times, so the last sl st lands in the joining st. Fasten off. (6 petals, 6 sl sts)
The green ring now shows as the flower center, framed by six pointed cream petals.
Rnd 3 (green): Join green in the ch-1 tip of any petal. Ch 1, sc in same tip, ch 4, sc in the sl st between petals (insert hook under both loops of the sl st and the sc beneath it), ch 4, sc in ch-1 tip of next petal; repeat from * 4 more times, ch 4, sc in last sl st between petals, ch 4, sl st to first sc. (12 sc, 12 ch-4 sps)
Rnd 4 (green): Sl st into first ch-4 sp. Ch 1, sc in same sp, ch 5, sc in next ch-4 sp; repeat from * 10 more times, ch 5, sl st to first sc. Fasten off for Motif 1. (12 sc, 12 ch-5 loops)
These 12 loops form the green lattice that spreads out between the petals. Place a marker in every other sc of Rnd 4. The 6 marked sc are the hexagon corners. Each side between two corners has exactly 2 ch-5 loops, with one unmarked sc between them.
Make All Pieces
You need 30 motifs in total:
- Green: Rnds 1, 3 and 4 of every motif, about 105 g
- Cream: Rnd 2 of every motif, about 60 g
Layout grid, shown flat from one side (the tube wraps, so column 6 joins column 1):
Row 5:  M  M  M  M  M  M     (top edge)
Row 4:   M  M  M  M  M  M
Row 3:  M  M  M  M  M  M
Row 2:   M  M  M  M  M  M
Row 1:  M  M  M  M  M  M     (bottom edge)
Each row is shifted by half a motif, so every motif nests into the two motifs below it in a honeycomb. Hold all motifs with the hexagon points at the top and bottom.
Joining
Join as you go on Rnd 4. Work Rnd 4 of the new motif as written until you reach a side that must attach to a neighbor. For each of the 2 loops on that side, replace “ch 5” with: ch 2, sl st into the matching ch-5 loop of the neighbor, ch 2. Then continue Rnd 4 as written.
How the joins match up: one side = 2 loops, so every shared side gets exactly 2 sl st joins. Where three motifs meet at a corner, don’t join the corner sc. The small gap is part of the lattice.
Row 1: Join each motif to the previous one along 1 vertical side (2 joins). Motif 6 joins to Motif 5 on one vertical side and to Motif 1 on the opposite vertical side, which closes the ring. Check that the ring isn’t twisted before you close it.
Rows 2–5: Each motif joins to the 2 motifs below it (lower-left and lower-right sides, 2 joins each) and to its neighbor in the same row (1 vertical side). The last motif in each row also joins to the first motif of that row.
Tension: keep the ch-2 segments the same size as the free loops. If the joins are too tight, the tube puckers. If they’re too loose, the lattice sags.
Size checkpoint: Laid flat, the joined tube should measure 9 in (22.9 cm) wide and 14 in (35.6 cm) tall. The distance around the tube is 6 x 3 in = 18 in (45.7 cm).
Border: Top Rim, Bottom Ring and Strap
The rims use the sc gauge: 16 sc = 4 in (10.2 cm).
At each open end of the tube, each motif has 2 free sides: the two upper sides at the top and the two lower sides at the bottom. That is 2 sides x 2 loops = 4 free loops per motif. With 6 motifs around, each edge has 6 x 4 = 24 free ch-5 loops. No extra stitches are added at the seams.
Top Rim
Rnd 1: Join green in any free loop of Row 5. Ch 1, 3 sc in each of the 24 loops, sl st to first sc. (24 loops x 3 sc = 72 sc)
Rnd 2: Ch 1, sc in next 4 sts, sc2tog; repeat 11 more times, sl st to first sc. (12 repeats x 5 = 60 sc)
Rnds 3–5: Ch 1, sc in each st around, sl st to first sc. (60 sc) Fasten off.
Why the math works: at 4 sc per inch, 60 sc is 15 in (38.1 cm) around, or 7½ in (19.1 cm) flat. That’s narrower than the 9 in (22.9 cm) tube, so the top draws in gently and forms the curved shoulder.
Hanging Strap
Place a marker in st 1 and st 31 of Rnd 5, directly opposite each other.
Row 1: Join green in st 1. Ch 1, sc in sts 1–4, turn. (4 sc)
Rows 2–50: Ch 1, sc in each st, turn. (4 sc)
The strap is about 11 in (27.9 cm) long and 1 in (2.5 cm) wide. Fasten off, leaving a 12 in (30.5 cm) tail. Without twisting the strap, sew the last row to sts 31–34 of the rim. Join green at one base corner and sl st evenly along both long edges of the strap for a firm finish.
Bottom Ring
Rnd 1: Join green in any free loop of Row 1. Ch 1, 3 sc in each of the 24 loops, sl st to first sc. (24 loops x 3 sc = 72 sc)
Rnd 2: Ch 1, sc in next st, sc2tog; repeat 23 more times, sl st to first sc. (24 repeats x 2 = 48 sc)
Rnd 3: Ch 1, sc in next 2 sts, sc2tog; repeat 11 more times, sl st to first sc. (12 repeats x 3 = 36 sc)
Rnd 4: Ch 1, sc in next st, sc2tog; repeat 11 more times, sl st to first sc. (12 repeats x 2 = 24 sc)
Rnds 5–7: Ch 1, sc in each st around, sl st to first sc. (24 sc) Fasten off.
Why the math works: dropping from 72 to 24 sc over three rounds pulls the bottom of the tube inward into the rounded egg base. The final 24 sc measure 6 in (15.2 cm) around, which gives an opening about 2 in (5.1 cm) across. That’s small enough to hold the bags in and large enough to pull one out. The three straight rounds form a smooth, slightly rolled collar.
Final Blocking
- Weave in all ends along the back of green stitches so no tails show through the lattice.
- Lightly mist the whole holder with water until it is damp but not soaked.
- Stuff the holder firmly with clean plastic bags or a rolled towel to shape the egg.
- Lay it on its back and pat each flower flat, opening the petals and straightening the ch-5 loops.
- Pin the top rim into a smooth oval about 7½ in (19.1 cm) across flat.
- Check the width: 9 in (22.9 cm) at the widest point.
- Pin the strap straight and let everything dry completely before you remove the stuffing.
Final Quality-Control Checklist
- 30 motifs, each with 12 sc and 12 loops on Rnd 4
- Every shared side has exactly 2 sl st joins
- Tube isn’t twisted, and all flowers face outward
- Top rim has 60 sc; bottom ring has 24 sc
- Strap is 4 sts wide, untwisted and sewn exactly opposite its starting point
- Widest point measures 9 in (22.9 cm) flat
- All ends woven in and invisible from the front
Troubleshooting
Petals look rounded instead of pointed. Make sure you work the ch 1 at the center of each Petal. That chain is what makes the point.
Green center shows gaps. Pull the magic ring tighter before joining Rnd 1, and weave the tail back through the ring.
Motif cups instead of lying flat. Your ch-4 or ch-5 loops are too short. Chain more loosely, or go up a hook size for Rnds 3–4 only.
Motif ruffles. Your loops are too long. Chain more firmly.
Tube is twisted. Undo the last join of Row 1, lay the ring flat with all flowers facing up, and rejoin.
Bottom opening too loose. Add one more round of sc 2, sc2tog (18 sc), then 1 plain round.
Strap stretches. Sew it through both Rnd 4 and Rnd 5 of the rim, not just the top edge.
Care
Hand wash in cool water with mild soap and gently press out the water. Dry flat with the holder stuffed into shape, and don’t tumble dry.

Final Notes
The whole holder follows one chain of measurements. Each motif is 3 in (7.6 cm) across the flats. Six motifs make an 18 in (45.7 cm) tube that is 9 in (22.9 cm) wide flat, and five rows make it 14 in (35.6 cm) tall. Each edge has 24 loops, which you work into 72 sc and then shape down to 60 sc at the top and 24 sc at the bottom. Check your first motif and keep your joins even, and the egg shape will form on its own.
Happy crocheting!