

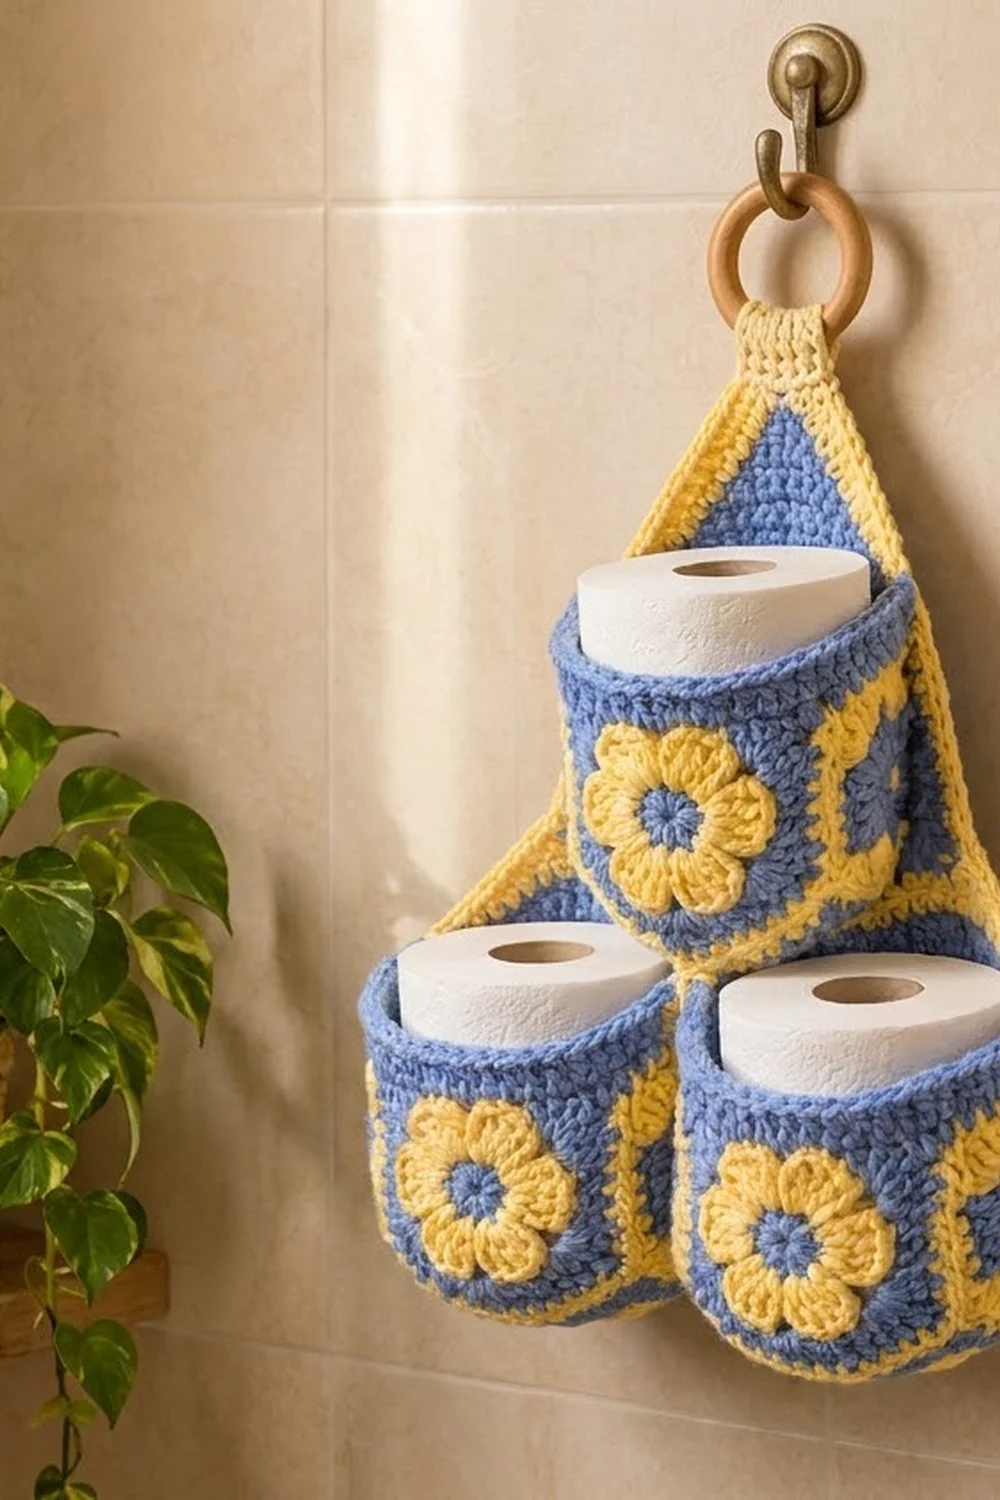
This cheerful hanging holder stores three spare toilet rolls in deep, sturdy pockets stacked in a pyramid. A pointed blue back panel with a sunny yellow edge carries all three pockets and hangs from a wooden ring on a simple cream tab.
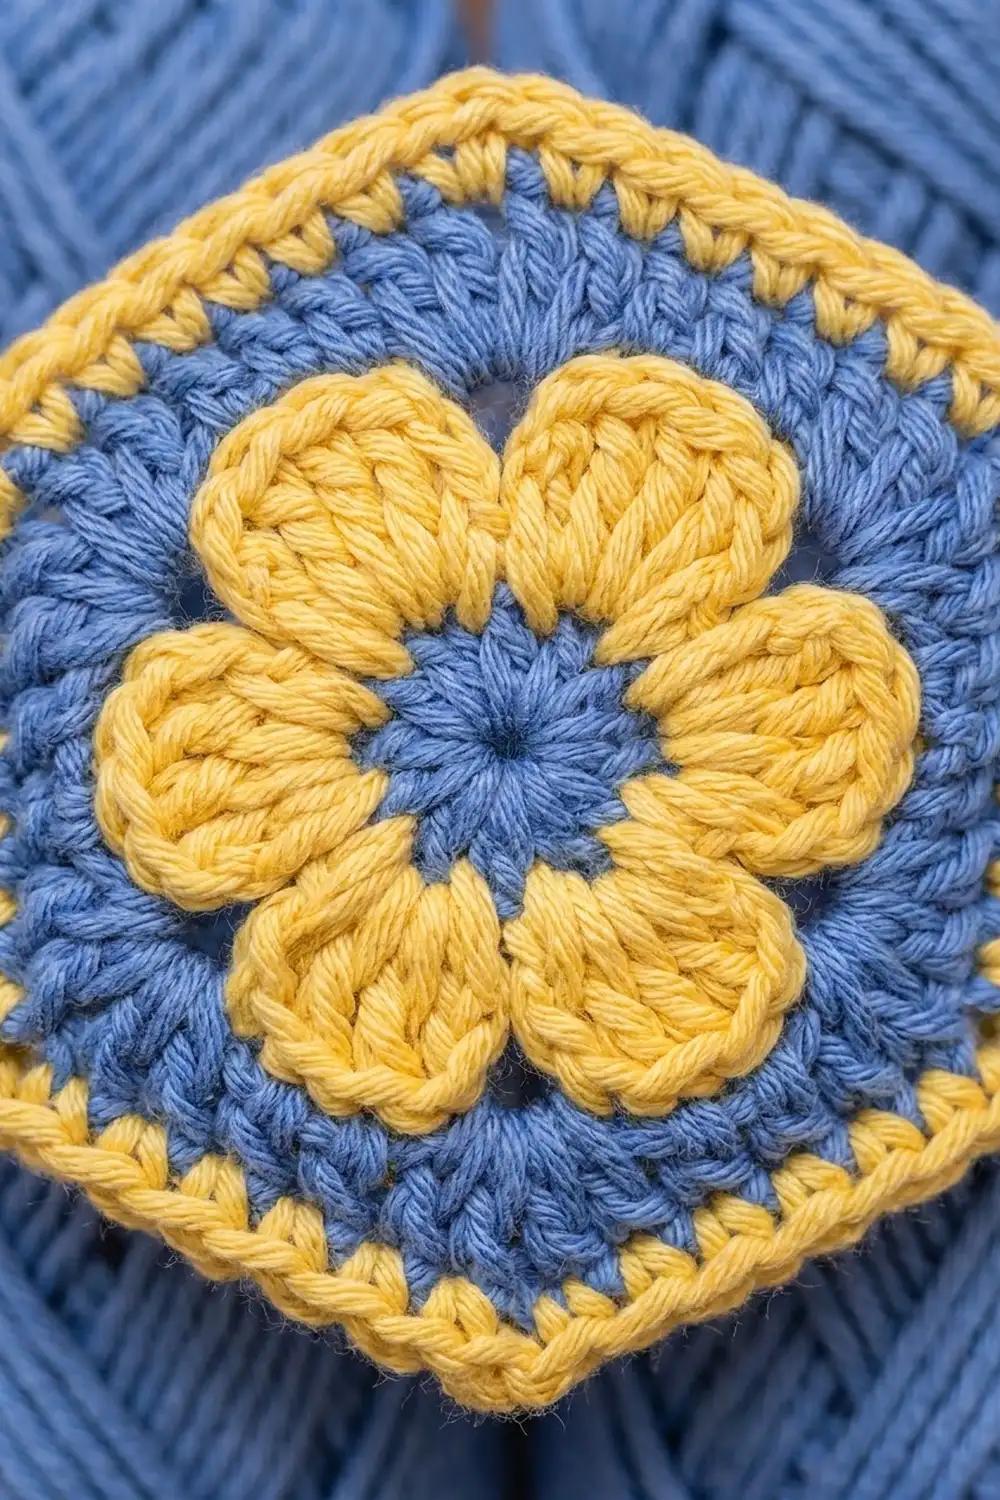
Each pocket has a hexagon flower motif on the front: a blue center, six rounded yellow petals, a blue hexagon surround and a crisp yellow outline. The colors are cornflower blue, sunflower yellow and a soft cream, so it looks bright but not loud in a bathroom.
The pattern uses US crochet terms. The finished holder is 11 in (27.9 cm) wide across the bottom pockets and 13.75 in (34.9 cm) tall from the bottom edge to the panel tip. It measures about 16.5 in (41.9 cm) to the top of the ring. Each pocket is 4.25 in (10.8 cm) deep.
The holder is made in parts. You work three pockets, each with a hexagon base and straight walls, plus three flower motifs, one back panel and one tab. Then you sew the motifs to the pockets, edge the panel, sew the pockets onto the panel and attach the ring.
Finished Size and Construction
- Finished size: 11 in (27.9 cm) wide × 13.75 in (34.9 cm) tall (panel); about 16.5 in (41.9 cm) including the ring
- Skill level: Intermediate
- Terminology: US crochet terms
- Yarn weight: Worsted / medium (#4) cotton
- Hook: US 7 (4.5 mm)
- Number of pieces: 8 (1 panel, 3 pockets, 3 flower motifs, 1 tab)
- Layout: Pyramid: 2 pockets at the bottom, 1 centered above
- Pocket size: 5.5 in (14.0 cm) point-to-point, 4.75 in (12.1 cm) flat-to-flat, 4.25 in (10.8 cm) deep
- Panel size before border: 9.75 in (24.8 cm) × 12.75 in (32.4 cm)
- Border depth: 0.5 in (1.3 cm), 2 rounds
Materials
Use a smooth, firm cotton or cotton blend. Cotton holds its shape when the pockets are full and stands up to bathroom humidity. Avoid splitty or very soft acrylic, because the pockets will sag.
- Color A, cornflower blue: 150 g / 285 m
- Color B, sunflower yellow: 50 g / 95 m
- Color C, pale cream: 10 g / 19 m
All quantities include a safety margin of about 25%.
Tools:
– US 7 (4.5 mm) crochet hook
– Wooden ring, 2.5 in (6.4 cm) across
– Locking stitch markers (at least 6)
– Tapestry needle
– Rust-proof pins
– Scissors
– Measuring tape
Abbreviations (US Terms)
- ch – chain
- sl st – slip stitch
- sc – single crochet
- hdc – half double crochet
- dc – double crochet
- sc2tog – single crochet 2 together
- sc3tog – single crochet 3 together
- BLO – back loop only
- sp – space
- st(s) – stitch(es)
Special stitch: Petal. Work (hdc, 3 dc, hdc) all in the same stitch.
Gauge and Checkpoints
Gauge: 16 sc and 18 rows/rounds = 4 in (10.2 cm) in sc.
Make one complete pocket before you start anything else. The pocket uses the most yarn and tells you whether a roll will fit.
Checkpoints:
– Pocket base, after Rnd 11: 5.5 in (14.0 cm) point-to-point, 4.75 in (12.1 cm) flat-to-flat, with 11 sts on each side.
– Finished pocket: 4.25 in (10.8 cm) deep. A standard roll, about 4.5 in (11.4 cm) wide, should drop in easily.
– Flower motif: 4 in (10.2 cm) point-to-point, 3.5 in (8.9 cm) flat-to-flat.
– Panel, after Row 21: 9.75 in (24.8 cm) wide, about 4.75 in (12.1 cm) tall.
– Panel, after Row 57: about 12.75 in (32.4 cm) tall.
If your work is too big, go down a hook size, or two if the base is still large. If it is too small or a roll won’t fit, go up a hook size. Don’t add stitches, because all the joining positions depend on the counts given here.
Pocket (Make 3)
Use Color A unless stated otherwise. Work in continuous rounds without joining, and move a marker up to the first stitch of each round.
Hexagon base
Rnd 1: 6 sc in a magic ring. (6)
Rnd 2: 2 sc in each st. (12)
Rnd 3: (sc in next st, 2 sc in next st) 6 times. (18)
Rnd 4: (sc in next 2 sts, 2 sc in next st) 6 times. (24)
Rnd 5: (sc in next 3 sts, 2 sc in next st) 6 times. (30)
Rnds 6–11: Keep working the same way. Each round, work 1 more plain sc before each increase, so there are 6 more stitches each time.
- Rnd 6: 36 sts
- Rnd 7: 42 sts
- Rnd 8: 48 sts
- Rnd 9: 54 sts
- Rnd 10: 60 sts
- Rnd 11: (sc in next 9 sts, 2 sc in next st) 6 times. (66)
Because the increases stack, the base forms a flat hexagon with 11 sts on each side. Check the base measurement now.
Walls
Rnd 12 (turning round): sc in BLO of each st. (66) This round sets a crisp fold so the walls stand up.
Rnds 13–28: sc in each st. (66) Work 16 rounds even, keeping the wall straight.
Rnd 29: Change to Color B. sc in each st. (66)
Rnd 30: Change to Color A. sc in each st, then sl st to the first st. (66) Fasten off.
The wall is Rnds 12–30, which is 19 rounds, or 4.25 in (10.8 cm). It has a yellow stripe just below a blue top edge.
Marking the back face: Pick one flat side of the hexagon base. Place markers in the wall stitches directly above its first and last stitch, so the marked face is 11 sts wide. This face will be sewn to the panel. The face directly opposite is the front, where the flower goes.
Flower Motif (Make 3)
Join each round with a sl st to the first stitch.
Rnd 1 (Color A): 12 sc in a magic ring and join. (12 sc) Fasten off.
Rnd 2 (Color B): Join in any st. (Petal in next st, sl st in next st) 6 times. (6 petals, 6 sl sts) Fasten off.
Rnd 3 (Color A): Working behind the petals, join with sc around the post of any sl st from Rnd 2. (Ch 3 behind the next petal, sc around the post of the next sl st) 5 times. Ch 3 and join. (6 sc, 6 ch-3 sps)
Rnd 4 (Color A): Sl st into the first ch-3 sp. Ch 3 (counts as dc), then work (2 dc, ch 2, 3 dc) in the same sp. In each of the remaining 5 ch-3 sps, work (3 dc, ch 2, 3 dc). Join. (36 dc, 6 ch-2 corners; 6 dc per side)
The corners land directly behind the petals, so each petal points at a corner of the hexagon.
Rnd 5 (Color B): Join in any ch-2 corner and work (sc, ch 2, sc) there. Sc in each of the next 6 dc, then (sc, ch 2, sc) in the next corner. Repeat from * around, ending with sc in the last 6 dc, and join. (48 sc, 6 ch-2 corners)
Each side now has 8 sc between corner spaces: 6 sc worked 1 per dc, plus 1 sc from each corner. Leave a 20 in (50.8 cm) tail of Color B for sewing.
Back Panel
The panel is worked in rows with Color A. Ch 1 at the start of each row does not count as a stitch.
Row 1: Ch 40. Sc in the 2nd ch from the hook and in each ch across. (39)
Rows 2–21: Ch 1, turn, and sc in each st. (39)
This straight section will be hidden behind the bottom pockets. Check the width now: 9.75 in (24.8 cm).
Row 22 (decrease row): Ch 1, turn. Sc2tog, sc to the last 2 sts, sc2tog. (37)
Row 23: Ch 1, turn, and sc in each st. (37)
Rows 24–56: Repeat Rows 22–23. Every even row is a decrease row, and every odd row is worked even. Count checkpoints:
- Row 38: 21 sts
- Row 39: 21 sts
- Row 48: 11 sts
- Row 56: 3 sts
Row 57: Ch 1, turn, and sc3tog. (1) Fasten off.
The panel now has a 21-row straight bottom section topped by a sloped point. It measures about 12.75 in (32.4 cm) tall.
Hanging Tab
Row 1 (Color C): Ch 7. Sc in the 2nd ch from the hook and in each ch across. (6)
Rows 2–24: Ch 1, turn, and sc in each st. (6)
Fasten off and leave a long tail. The tab measures 1.5 in (3.8 cm) × 5.25 in (13.3 cm).
Make All Pieces
- Color A: 3 pockets (body), 3 motif centers and surrounds, 1 panel
- Color B: 3 pocket stripes, 3 sets of petals, 3 motif outlines, panel border
- Color C: 1 tab
Layout, as seen from the front:
          (ring)
           [T]
           /\
          /  \
       [Pocket 3]
   [Pocket 1][Pocket 2]
   |_____ panel ______|
Joining
Motifs to pockets: Center each motif on the front face of its pocket with the flat edges at the top and bottom. Its lower edge should sit 0.25 in (0.6 cm) above the base fold, which leaves 0.5 in (1.3 cm) of blue below the stripe at the top. The motif’s 4 in (10.2 cm) width curves slightly around the sides of the pocket.
Pin the motif in place and whipstitch through the back loops of the Rnd 5 sts with the Color B tail. Put a roll inside while you sew so the motif doesn’t pucker.
Panel border first: Work the border (next section) before sewing the pockets on.
Pockets to panel: Use Color A and whipstitch.
The panel and pocket walls have the same row gauge, so the joins match stitch for stitch:
– each pocket round matches 1 panel row on the vertical seams
– each pocket stitch matches 1 panel stitch on the horizontal seams
To find the right columns, count stitches across Row 1 for the bottom pockets and Row 21 for the top pocket.
- Pocket 1 (bottom left): Place its back face over Rows 1–19, sts 4–14, counting from the right-hand edge with the front of the panel facing you.
- Pocket 2 (bottom right): Place its back face over Rows 1–19, sts 26–36.
- Pocket 3 (top): Place its back face over Rows 21–39, sts 15–25, centered on st 20. Row 21 still has all 39 sts, so this count is exact.
For each pocket, sew 3 seams:
– Base edge: the 11 sts along the bottom of the back face to the 11 panel sts in that row (Row 1 for the bottom pockets, Row 21 for the top pocket)
– Sides: both vertical marker lines (19 rounds each) to 19 panel rows
– Rim: the 11 rim sts to the 11 panel sts in the top row of the placement (Row 19 or Row 39)
The bottom pockets’ centers are 22 sts, or 5.5 in (14.0 cm), apart. That equals one pocket’s width, so their sides just touch. Pocket 3’s base rests on their rims across the Row 20 gap.
Tension: Pull each stitch snug but not tight. A seam that’s too tight will pull dimples into the panel.
Size checkpoint: The width across the bottom pockets should be 11 in (27.9 cm).
Border
Work the border on the panel before attaching the pockets. Use Color B and the same gauge: 4 sts per inch along each edge. Each ch-2 corner sp is a corner and is not counted in any side.
Rnd 1: With the right side facing, join at the bottom right corner.
- Bottom edge: sc in each of the 39 foundation chs. (39)
- Bottom left corner: ch 2.
- Left side, going up:
- Rows 1–21 (straight section): sc in each row end, but skip the row ends of Rows 7 and 14. (19 sc)
- Rows 22–57 (slope): sc in each row end, with 2 sc in the row end of Row 40. (37 sc)
- Left side total: 56 sc.
- Tip: ch 2.
- Right side, going down: Work it as a mirror of the left side. (56 sc)
- Bottom right corner: ch 2, then join.
Round total: 151 sc and 3 ch-2 corners.
Rnd 2: Sl st into the corner sp and work (sc, ch 2, sc) in it. Sc in each sc along each side, and work (sc, ch 2, sc) in each corner. Join and fasten off.
Each side gets its existing stitches plus 1 stitch from each corner:
– bottom: 39 + 2 = 41
– each side: 56 + 2 = 58
Round total: 157 sc and 3 ch-2 corners.
Why the math works:
– Bottom edge: 39 sts at 4 per inch is 9.75 in (24.8 cm).
– Straight side section: 21 rows is about 4.67 in, which needs about 19 sc.
– Slope: it rises 8 in (20.3 cm) over 36 rows and moves in 19 sts, or 4.75 in (12.1 cm). That makes the slanted edge about 9.3 in long, which needs 37 sc.
Matching the edge length keeps the border flat, with no ruffling or cupping. With the border on, the panel is 10.75 in (27.3 cm) × 13.75 in (34.9 cm).
Tab: Fold the tab through the ring. Sew both ends to the back of the panel tip, overlapping it by 1.25 in (3.2 cm). The ring should sit about 1 in (2.5 cm) above the tip.
Final Blocking
- Lightly mist the whole holder with water.
- Put a roll in each pocket to shape the walls.
- Lay the holder flat on its back, pin the panel edges straight and the tip sharp, then pat the motifs flat.
- Check the measurements: 13.75 in (34.9 cm) panel height and 11 in (27.9 cm) across the pockets.
- Let it dry completely with the rolls still inside.
- Remove the pins and weave in any remaining ends.
Final Quality-Control Checklist
- Each pocket has 66 sts and is 4.25 in (10.8 cm) deep.
- All three motifs face forward, with flat edges at the top and bottom.
- The bottom pockets touch and sit level with the panel bottom.
- The top pocket is centered on st 20.
- The border lies flat, with 3 sharp corners.
- The tab is secure and the ring hangs straight.
- All ends are woven in at least 2 in (5.1 cm).
Troubleshooting
- The base cups before Rnd 12: Your tension is too tight. Go up a hook size.
- The base ruffles: Your tension is too loose. Go down a hook size.
- The walls flare outward: Check that every wall round has exactly 66 sts.
- The petals flop forward: Keep the Rnd 3 chains firm behind the petals.
- The border ripples: Skip one more row end on each side.
- The border cups: Add one more sc on each side.
- The holder tilts on the hook: Re-sew the tab so it’s centered on the tip.
Care
Hand wash in cool water, press out the water in a towel and dry flat with rolls inside to keep the shape. Don’t tumble dry.
Final Notes
Each measurement leads to the next:
– Gauge: 16 sc × 18 rows = 4 in (10.2 cm).
– Pocket base: 11 sts per side, 5.5 in (14.0 cm) point-to-point.
– Walls: 19 rounds, 4.25 in (10.8 cm) deep.
– Panel: 39 sts wide, 9.75 in (24.8 cm). It’s 57 rows tall, about 12.75 in (32.4 cm).
– Border: brings the panel to 10.75 in (27.3 cm) × 13.75 in (34.9 cm).
– Pocket spacing: 22 sts, so the bottom pockets fill 11 in (27.9 cm).
If you match the gauge, everything else lines up.
Happy crocheting!