

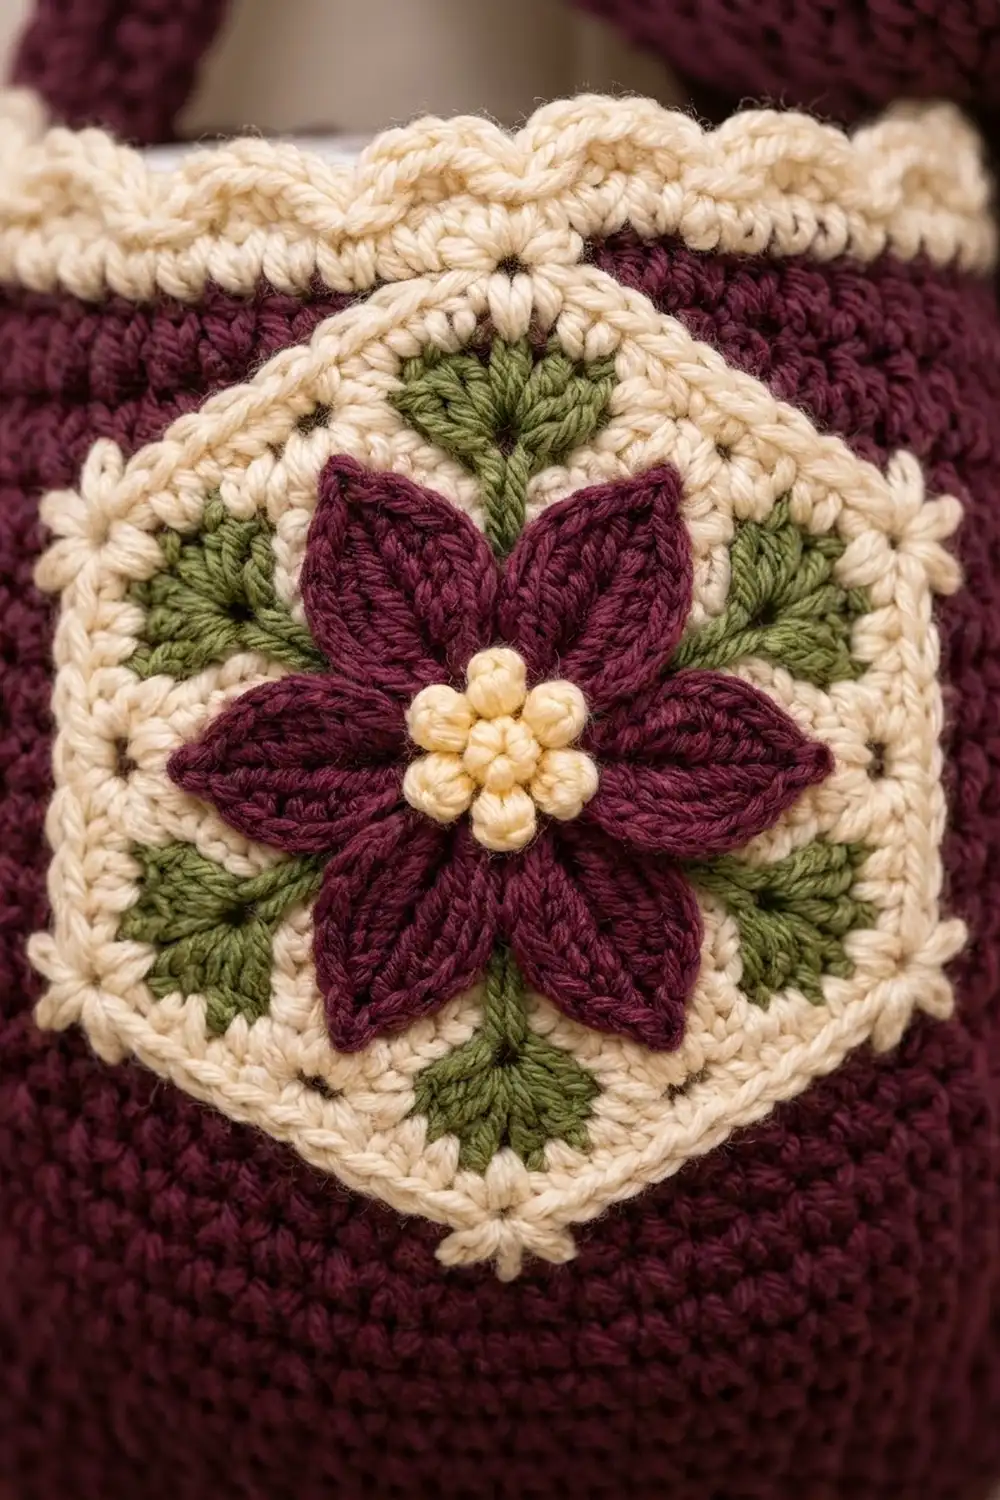
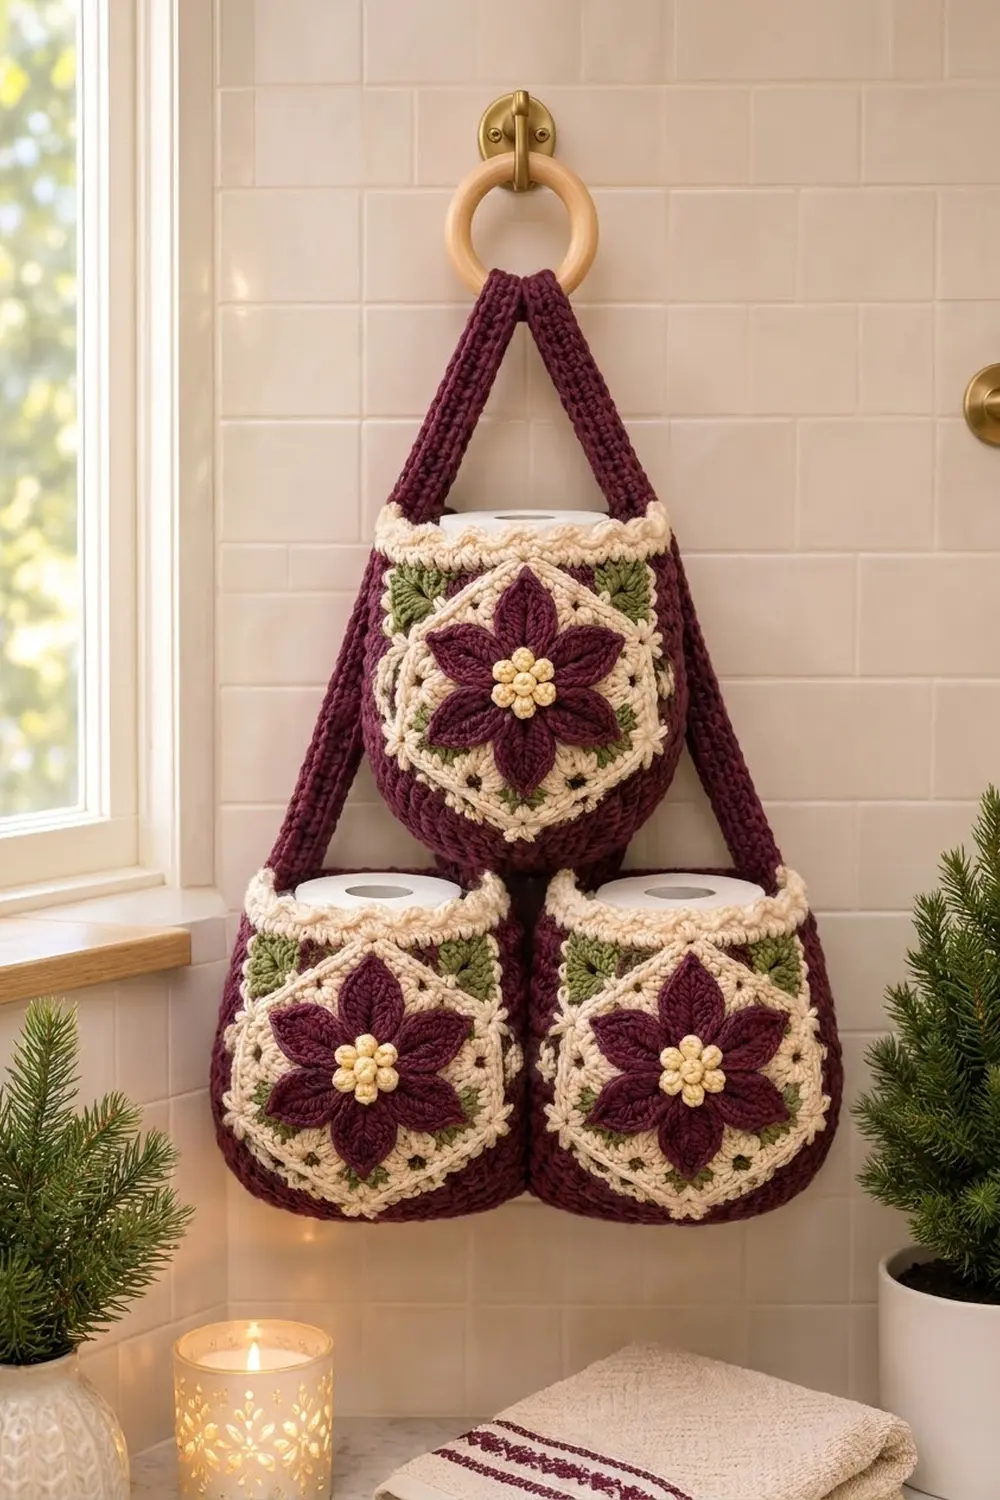
This hanging holder has three round-bottomed baskets: one on top and two side by side below it. Two burgundy straps run up to a wooden ring. Each basket is deep burgundy and carries a cream hexagon on the front with a raised eight-petal poinsettia, a cream bobble center and small green leaf sprigs. A cream scalloped rim finishes each basket.
The colors are burgundy, cream and sage green. That makes it festive for winter while still being a practical bathroom piece. Each basket holds one standard roll.
This pattern uses US crochet terms. Each basket measures 5.5 in (14.0 cm) across and 5.75 in (14.6 cm) tall. The assembled holder is about 11 in (27.9 cm) wide and 17.75 in (45.1 cm) tall, including the 3 in (7.6 cm) ring.
Each basket is worked from the bottom up in continuous single crochet, starting with a flat circle. The rim is added before assembly. The hexagon, flower and leaves are made separately and sewn onto the front in layers. Then you join the baskets and sew on the straps.
Finished Size and Construction
- Finished size (one basket): 5.5 in (14.0 cm) diameter × 5.75 in (14.6 cm) tall
- Assembled holder: 11 in (27.9 cm) wide × 17.75 in (45.1 cm) tall
- Skill level: Intermediate
- Terminology: US
- Yarn weight: Medium / worsted (#4)
- Hook: 5.0 mm (H-8)
- Number of pieces: 3 baskets, 3 hexagons, 3 poinsettias, 18 leaf sprigs, 2 straps, 1 wooden ring
- Layout: Pyramid, with 1 basket on top and 2 below
- Basket size before border: 5.5 in (14.0 cm) diameter × 5 in (12.7 cm) tall
- Border (rim) depth: 0.75 in (1.9 cm)
- Hexagon: 4.5 in (11.4 cm) flat to flat, 5.2 in (13.2 cm) point to point
Materials
Use a smooth worsted yarn. Acrylic or a cotton-acrylic blend works best because it holds its shape and takes steam well. The amounts below assume about 200 m per 100 g.
- Burgundy (Color A): 200 g / 400 m (bases, bodies, petals, straps)
- Cream (Color B): 70 g / 140 m (rims, hexagons, flower centers)
- Sage green (Color C): 25 g / 50 m (leaf sprigs)
These quantities include about 15% extra.
Tools:
– 5.0 mm (H-8) crochet hook
– 1 wooden ring, 3 in (7.6 cm) diameter
– Stitch markers (at least 4)
– Tapestry needle
– Sewing pins or locking markers
– Scissors and measuring tape
Abbreviations (US Terms)
- ch – chain
- sl st – slip stitch
- sc – single crochet
- hdc – half double crochet
- dc – double crochet
- rev sc – reverse single crochet (crab stitch)
- BLO – back loop only
- sk – skip
- sp – space
- st(s) – stitch(es)
- inc – 2 sc in the same st
3-dc bobble: [Yarn over, insert hook in st, pull up a loop, yarn over, pull through 2 loops] 3 times in the same st, then yarn over and pull through all 4 loops.
2-dc bobble: Same as the 3-dc bobble, but work the bracketed step 2 times and finish by pulling through 3 loops.
Rev sc (crab stitch): Work sc from left to right (right-handed), inserting the hook into the next st to the right each time.
Gauge and Checkpoints
Gauge: 14 sc × 16 rounds = 4 in (10.2 cm) in continuous rounds.
Make one complete basket and one hexagon before you make the rest. Every other measurement depends on these two pieces.
Checkpoints:
– Base after Rnd 5 (30 sts): 2.75 in (7.0 cm) across
– Base after Rnd 10 (60 sts): 5.5 in (14.0 cm) across
– Body after 10 body rounds: 2.5 in (6.4 cm) tall
– Finished body (20 rounds): 5 in (12.7 cm) tall, 17.1 in (43.4 cm) around
– Hexagon after Rnd 4: 3.75 in (9.5 cm) flat to flat
– Hexagon after Rnd 6: 4.5 in (11.4 cm) flat to flat
Too big? Switch to a 4.5 mm hook. Too small? Switch to a 5.5 mm hook. Being off by up to 0.25 in (0.6 cm) is fine. Anything more will affect how the roll fits and where the hexagon sits.
Basket (Make 3)
Work in continuous rounds without joining. Put a marker in the first st of each round and move it up as you go.
Base (Color A):
- Rnd 1: Magic ring, 6 sc in ring. (6)
- Rnd 2: Inc in each st around. (12)
- Rnd 3: [Sc, inc] 6 times. (18)
- Rnd 4: [Sc in next 2, inc] 6 times. (24)
- Rnd 5: [Sc in next 3, inc] 6 times. (30)
- Rnd 6: [Sc in next 4, inc] 6 times. (36)
- Rnd 7: [Sc in next 5, inc] 6 times. (42)
- Rnd 8: [Sc in next 6, inc] 6 times. (48)
- Rnd 9: [Sc in next 7, inc] 6 times. (54)
- Rnd 10: [Sc in next 8, inc] 6 times. (60)
Shift where the increases fall from round to round so the circle stays round instead of turning into a hexagon. The base should lie flat and measure 5.5 in (14.0 cm) across.
Body (Color A):
- Rnd 11: Sc in BLO of each st around. (60 worked 1 per st + 0 added = 60) This leaves a ridge that becomes the fold between base and wall.
- Rnds 12–30: Sc in each st around. (60)
That gives 20 body rounds, 5 in (12.7 cm) tall. Sl st in the next st to smooth out the step at the end of the round, then fasten off. Work the rim (see Border) before you assemble anything.
Hexagon Motif (Make 3)
“Per side” means the stitches between two corner ch-2 spaces. The corner spaces themselves are not counted as stitches.
Color B throughout:
- Rnd 1: Magic ring, ch 3 (counts as dc), dc in ring, [ch 2, 2 dc in ring] 5 times, ch 2, sl st to top of ch-3. (12 dc; 2 per side; 6 corner sps)
- Rnd 2: Sl st in next dc and into the corner sp. Ch 3 (counts as dc), ch 2, dc in same sp. [Dc in each dc across, (dc, ch 2, dc) in corner sp] 5 times, dc in each dc across, sl st to join. (24 dc; 4 per side)
- Rnd 3: Repeat Rnd 2. (36 dc; 6 per side)
- Rnd 4: Repeat Rnd 2. (48 dc; 8 per side)
Checkpoint: 3.75 in (9.5 cm) flat to flat.
- Rnd 5: Ch 1. [Sc in each dc across, (sc, ch 2, sc) in corner sp] 6 times, sl st to first sc. (48 worked 1 per st + 12 added at corners = 60 sc; 10 per side)
- Rnd 6: Ch 1. [Rev sc in each sc across, (rev sc, ch 1, rev sc) in corner sp] 6 times, sl st to join. (60 worked 1 per st + 12 added at corners = 72 rev sc; 12 per side)
Fasten off, leaving a 24 in (61.0 cm) tail. The crab stitch gives the frame its raised, beaded edge. Checkpoint: 4.5 in (11.4 cm) flat to flat and 5.2 in (13.2 cm) point to point.
Poinsettia (Make 3)
- Rnd 1 (Color B): Magic ring, ch 1, 8 sc in ring, sl st to first sc. (8)
- Rnd 2 (Color B): Ch 2, 2-dc bobble in same st (counts as first bobble), ch 1, [3-dc bobble in next sc, ch 1] 7 times, sl st to top of first bobble. (8 bobbles, 8 ch-1 sps)
Fasten off Color B. The beaded center measures 1 in (2.5 cm) across.
- Rnd 3 (Color A): Join with sc in any bobble. Sc in next ch-1 sp, then [sc in next bobble, sc in next ch-1 sp] 7 times. Sl st to first sc. (8 bobbles + 8 sps = 16 sc)
- Rnd 4 (Color A, petals): [Ch 6. Starting in the 2nd ch from the hook and working back down the chain: sl st, sc, hdc, dc, hdc. Sk next sc, sl st in next sc] 8 times. The last sl st goes into the joining st. (8 petals)
Each petal comes out 1.25 in (3.2 cm) long, pointed at the tip and widest at the dc. The flower measures 3.75 in (9.5 cm) from tip to tip. Fasten off, leaving a 12 in (30.5 cm) tail.
Leaf Sprigs (Make 18)
Color C: Ch 4. Working into the 4th ch from the hook, make [ch 3, 2-dc bobble, ch 3, sl st] 3 times to form three leaflets. Sl st in each of the remaining 3 ch to make the stem. Fasten off, leaving an 8 in (20.3 cm) tail.
Make All Pieces
- Color A: 3 baskets, 3 petal rounds, 2 straps
- Color B: 3 rims, 3 hexagons, 3 flower centers
- Color C: 18 leaf sprigs (6 per motif)
Straps (make 2, Color A): Ch 5, sc in 2nd ch from hook and across. (4) Rows 2–68: Ch 1, turn, sc in each st. (4) Each strap is 1.1 in (2.8 cm) wide and 17 in (43.2 cm) long.
Layout grid:
        ( RING )
        /      \
       [  TOP  ]
  [ LEFT ][ RIGHT ]
Layering each front: Pin a hexagon point-up and centered on the front of a basket. Put the bottom point on the BLO ridge and the top point touching Border Rnd 1. Whipstitch it on through the back loops of Rnd 6. Sew one leaf sprig into each of the 6 corners with the stems pointing inward. Then center the poinsettia on top. Tack each petal at its base and tip only, so the flower stays raised.
Joining
Method: Whipstitch with Color A through both loops.
Bottom pair: Set the two baskets side by side with the motifs facing forward. Mark the column of stitches where the walls touch, from Rnd 15 to Rnd 26 (12 rounds), on each basket. Sew each round on the left basket to the same round on the right basket, 1 to 1, for a seam 3 in (7.6 cm) long. Pull each stitch just tight enough that the walls meet. Pulling harder will twist the baskets.
Top basket: Set it in the dip between the two bottom rims. Tack the edge of its base to the inner rim of each bottom basket at 2 points, sewing through Border Rnd 1.
Straps: Wrap 2 in (5.1 cm) at one end of each strap over the ring and sew it down. Let each strap run 10 in (25.4 cm) diagonally down the side of the top basket, tacking it to that basket at the rim and at the base ridge. Sew the last 5 in (12.7 cm) straight down the outer wall of a bottom basket, starting at Border Rnd 1.
Size check: The bottom pair should be 11 in (27.9 cm) wide, and the holder 17.75 in (45.1 cm) from the top of the ring to the bottom. Hang it and make sure it sits level before weaving in ends.
Border (Basket Rim)
Each basket gets its rim before joining, so each border starts from that basket’s own 60 stitches. No stitches are added at the seams.
Border gauge: 3 rounds = 0.75 in (1.9 cm).
- Rnd 1 (Color B): Join with sc in any st, sc around, sl st to join. (60 worked 1 per st + 0 added = 60)
- Rnd 2: Ch 1, sc in each st around, sl st to join. (60)
- Rnd 3 (scallops): Ch 1, [sc in next st, sk 2, 5 dc in next st, sk 2] 10 times, sl st to first sc. (10 sc + 50 dc = 60 sts; 10 shells)
Why the math works: Each repeat uses 6 stitches (1 + 2 + 1 + 2), and 60 ÷ 6 = 10, so you get 10 full shells with nothing left over. Each shell puts back 5 stitches, the same number the repeat skips. The round stays at 60, so the rim matches the 17.1 in (43.4 cm) wall without flaring or pulling in.
Final Blocking
- Fill each basket with a roll or a towel rolled to 4.5 in (11.4 cm) across.
- Pin the scallops so they stand up evenly.
- Steam the rims and motifs with the iron held 1 in (2.5 cm) above them. Don’t press down.
- Use your fingers to shape the petal tips into points and open up the bobble center.
- Steam the straps flat and let them cool.
- Let everything dry, about 2 hours, before hanging.
Final Quality-Control Checklist
- Each base has 60 sts and measures 5.5 in (14.0 cm)
- Each body has 20 rounds and is 5 in (12.7 cm) tall
- Each rim has 10 even scallops
- Each hexagon is 4.5 in (11.4 cm) flat to flat and sits point-up
- Each motif has 8 petals and 6 leaf sprigs
- The bottom seam is 3 in (7.6 cm) and lies smooth
- Both straps are the same length and the ring hangs centered
- All ends are woven in on the inside
Troubleshooting
- Base cups or ruffles: Your tension is off. Change the hook size, not the stitch counts.
- Base looks hexagonal: Shift where the increases fall from round to round.
- Hexagon curls: Your dc is too tight. Use a hook one size larger for Rnds 1–4.
- Scallops flare: Check that you skip exactly 2 sts on each side of every shell.
- Holder tilts: Re-tack the strap on the low side.
Care
Hand wash in cool water, roll in a towel to remove water, and dry over a roll so the baskets keep their shape. Don’t tumble dry.
Final Notes
Each measurement leads to the next. At gauge, the base is 5.5 in (14.0 cm) across. The wall adds 5 in (12.7 cm) and the rim adds 0.75 in (1.9 cm), so each basket is 5.75 in (14.6 cm) tall. The 4.5 in (11.4 cm) hexagon runs from the base ridge up to the rim. Two 17 in (43.2 cm) straps hang the finished holder, which is 11 in (27.9 cm) wide. If every checkpoint matches, the holder will come out the right size.
Happy crocheting!