

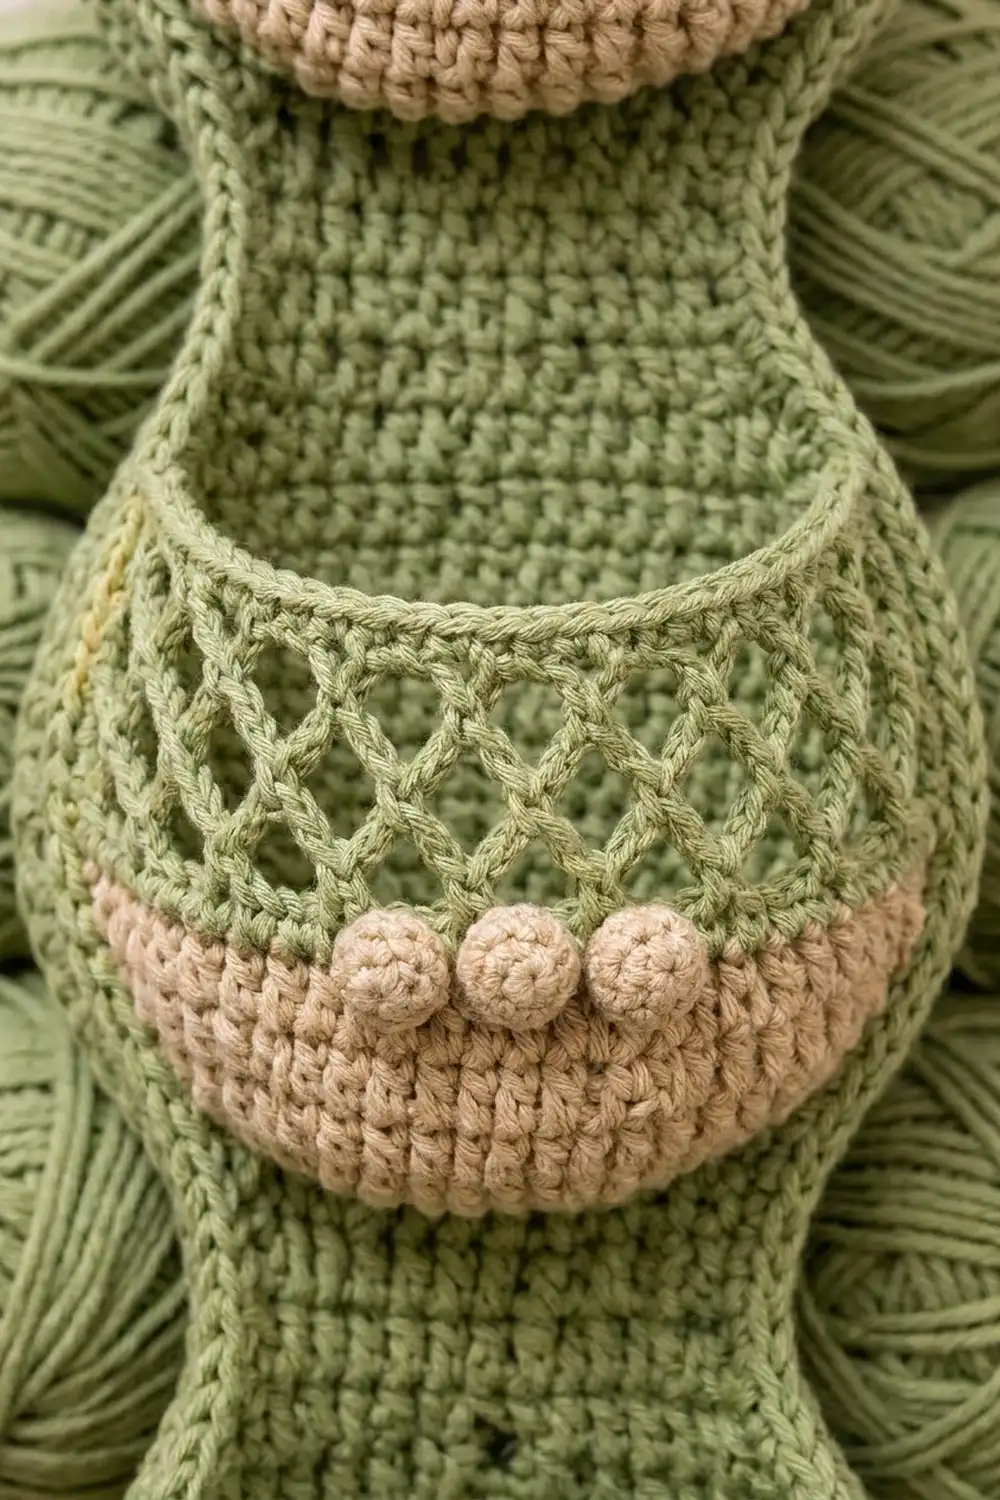
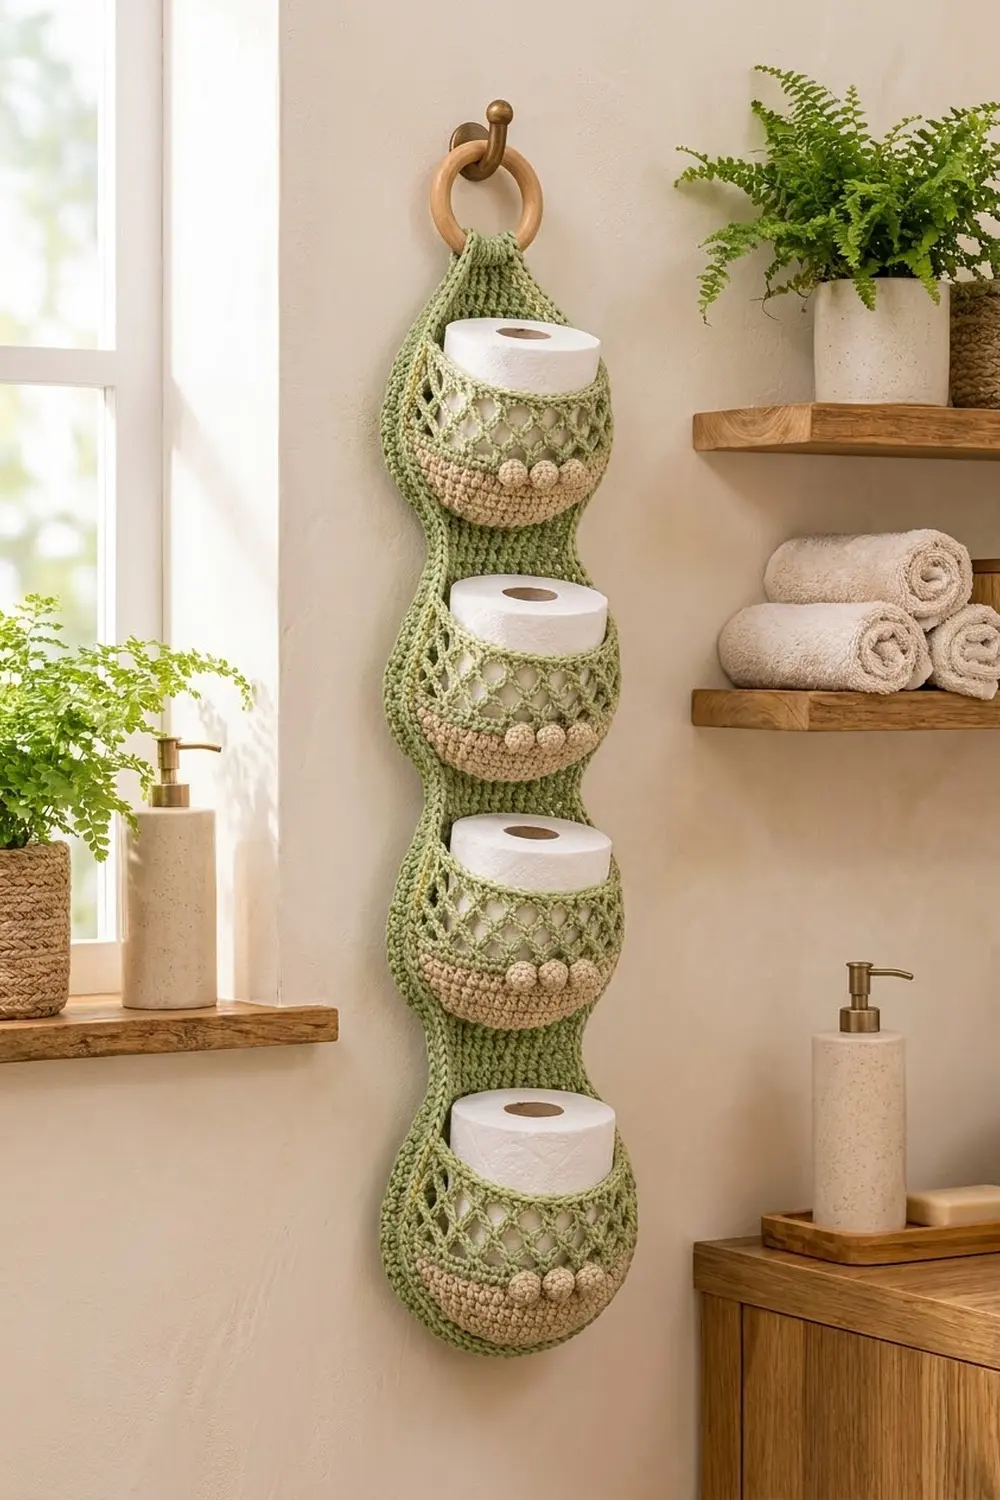
This hanging toilet paper holder holds three spare rolls in a column of rounded pockets. A sage green backing panel has three soft bulges with narrow waists between them and a teardrop-shaped top that hangs from a wooden ring. One pocket sits on each bulge.
Each pocket starts with a solid beige half-bowl base. Above that is an open sage diamond mesh, and the rim is finished with a raised crab-stitch cord. Three small beige balls sit at the center front of every pocket, and a matching cord runs around the whole backing panel.
All instructions use US crochet terms. The finished holder measures about 8 in (20.3 cm) wide and 23.4 in (59.4 cm) tall, not counting the hanging loop. It hangs about 25.5 in (64.8 cm) long overall.
Construction is simple. You crochet the shaped panel in rows from the bottom up, make three half-bowl pockets in turned rows, and add nine small stuffed balls and a hanging tab. Then you sew the pockets onto the panel, work a two-round border, and wrap the tab around the ring.
Finished Size and Construction
- Finished size: 8 in (20.3 cm) wide x 23.4 in (59.4 cm) tall, plus hanging loop
- Skill level: Intermediate
- Terminology: US
- Yarn weight: Worsted (#4) cotton or cotton blend
- Hook: 4.5 mm (US 7)
- Number of pieces: 14 (1 panel, 3 pockets, 9 balls, 1 hanging tab)
- Layout: 1 column of 3 lobes, one pocket per lobe
- Pocket size: 9 in (22.9 cm) rim, about 4 in (10.2 cm) wall height
- Panel size before border: 7 in (17.8 cm) x 22.4 in (56.9 cm)
- Border depth: 0.5 in (1.3 cm) on every edge
Materials
Use a smooth, firm cotton. It holds its shape well and gives the mesh clean diamonds. Choose a yarn of about 170 m per 100 g.
- Sage green: 200 g (about 340 m)
- Beige: 100 g (about 170 m)
These quantities include a margin of about 10–15%.
Tools:
- 4.5 mm (US 7) hook
- Wooden ring, 3 in (7.6 cm) across
- Small amount of fiberfill or yarn scraps for the balls
- Tapestry needle
- Stitch markers
- Blocking pins and a foam mat
Abbreviations (US Terms)
- ch – chain
- sc – single crochet
- dc – double crochet
- sk – skip
- sp – space
- st(s) – stitch(es)
- inc – 2 sc in the same st
- sc2tog – single crochet 2 together
- rev sc – reverse single crochet (crab stitch)
- RS – right side
Special stitch – rev sc: Work from left to right. Insert the hook into the next st to the right, yarn over, and pull up a loop. Yarn over again and draw through both loops. This makes a twisted, raised cord.
Gauge and Checkpoints
Gauge: 16 sc and 18 rows = 4 in (10.2 cm). That works out to 4 sts and 4.5 rows per inch.
Make one pocket before you start the panel. It is small and shows you whether your tension is right.
Checkpoints:
- Pocket Row 12: the straight edge of the half disc is 5.3 in (13.5 cm), and the disc is about 2.7 in (6.9 cm) deep.
- Pocket Row 27: the rim measures 9 in (22.9 cm), and the wall is about 4 in (10.2 cm) tall.
- Panel Row 7: 7 in (17.8 cm) wide.
- Panel Row 34: 7.6 in (19.3 cm) tall.
- Panel Row 101: 22.4 in (56.9 cm) tall.
If your piece comes out too big, go down half a hook size. If it comes out too small, go up half a size. Check again at the next checkpoint.
Backing Panel
Use sage green. Each row starts with ch 1 and a turn, and the ch 1 does not count as a stitch.
Increase rows: work inc in the first and last st. Decrease rows: work sc2tog over the first 2 and last 2 sts.
Lobe 1 (Rows 1–34)
- Row 1: Ch 13. Sc in the 2nd ch from the hook and in each ch across. (12 sts, 3 in / 7.6 cm)
- Row 2: Inc in each of the first 2 sts, sc 8, inc in each of the last 2 sts. (16 sts)
- Row 3: Inc in each of the first 2 sts, sc 12, inc in each of the last 2 sts. (20 sts)
- Rows 4–7: Work an increase row 4 times. (Row 7: 28 sts, 7 in / 17.8 cm)
- Rows 8–26: Sc in each st. (28 sts)
- Rows 27–30: Work a decrease row 4 times. (Row 30: 20 sts)
- Rows 31–34: Sc in each st. (20 sts, 5 in / 12.7 cm waist)
Lobe 2 (Rows 35–66)
- Rows 35–38: Work an increase row 4 times. (Row 38: 28 sts)
- Rows 39–58: Sc in each st. (28 sts)
- Rows 59–62: Work a decrease row 4 times. (Row 62: 20 sts)
- Rows 63–66: Sc in each st. (20 sts)
Lobe 3 and Teardrop Top (Rows 67–101)
- Rows 67–70: Work an increase row 4 times. (Row 70: 28 sts)
- Rows 71–90: Sc in each st. (28 sts)
- Rows 91–101: Work a decrease row 11 times. This takes the stitch count from 26 down to 6, losing 2 sts per row. (Row 101: 6 sts)
Fasten off. Each lobe is 7 in (17.8 cm) wide, and the panel is now 22.4 in (56.9 cm) tall.
Pockets (Make 3)
Each pocket is a half bowl worked in turned rows. The row ends form a U-shaped back edge that you sew to the panel. The last row becomes the open rim.
Each row starts with ch 1 and a turn, and the ch 1 does not count as a stitch.
Base (beige)
- Row 1: Magic ring. Ch 1, then work 3 sc in the ring and pull it closed. (3 sts)
- Row 2: Inc in each st. (6 sts)
- Rows 3–12: On Row n, work sc (n − 2), inc 3 times, for a total of 3 × n sts.
- Row 3: sc 1, inc x3 (9 sts)
- Row 4: sc 2, inc x3 (12 sts)
- Continue the same way through Row 12: sc 10, inc x3 (36 sts)
- Rows 13–16: Sc in each st. (36 sts) The edge now starts to rise into a wall.
Fasten off the beige.
Mesh (sage green)
- Row 17: Join sage green. Sc in each st. (36 sts)
- Row 18: Sc in the first st, then ch 5, sk 4, sc in the next st 7 times. (8 sc, 7 ch-5 loops)
- Row 19: Ch 5 (counts as dc + ch 2). Sc in the first ch-5 sp, then ch 5, sc in the next ch-5 sp 6 times. Ch 2, dc in the last sc. (6 full loops, 2 half loops)
- Row 20: Ch 1, sc in the first dc, then ch 5, sc in the next ch-5 sp 6 times. Ch 5, sc in the 3rd ch of the turning ch. (7 loops)
- Rows 21–24: Repeat Rows 19–20 twice.
Rim (sage green)
- Row 25 (conversion): Sc in the first sc, then 4 sc in the next ch-5 sp, sc in the next sc 7 times. This gives 1 + 35 = 36 sts: 8 sc worked into the existing sc, plus 28 sc worked into the loops.
- Row 26: Sc in each st. (36 sts)
- Row 27: Rev sc in each st. (36 sts)
Fasten off and leave a 40 in (101.6 cm) tail for sewing.
Balls (Make 9)
Use beige and work in a spiral.
- Rnd 1: 6 sc in a magic ring. (6 sts)
- Rnd 2: Inc in each st. (12 sts)
- Rnd 3: Sc in each st. (12 sts)
- Rnd 4: Sc2tog 6 times. (6 sts) Stuff the ball firmly before this round closes up.
Close the hole and leave a tail. Each ball is about 0.75 in (1.9 cm) across.
Hanging Tab
Use sage green.
- Row 1: Ch 7. Sc in the 2nd ch from the hook and across. (6 sts)
- Rows 2–20: Sc in each st. (6 sts)
The tab measures 1.5 in (3.8 cm) x 4.4 in (11.2 cm).
Make All Pieces
Sage green: 1 panel, 1 tab, and Rows 17–27 of all 3 pockets.
Beige: Rows 1–16 of all 3 pockets, plus 9 balls.
Layout (top to bottom):
   [ ring + tab ]
   [ teardrop top ]
[ Lobe 3 | Pocket C ]
   [ waist ]
[ Lobe 2 | Pocket B ]
   [ waist ]
[ Lobe 1 | Pocket A ]
Joining
First, sew 3 balls to each pocket. Place them side by side at the center front of Row 15, touching each other.
Use the pocket tail to whipstitch each pocket to the RS of its lobe. The back edge of a pocket has 54 row ends: 15 up one wall, 24 across the base, and 15 up the other wall.
Base line: Pin the 24 base row ends to the center 20 sts of the lobe’s base row, leaving 4 sts free on each side. Join 12 row ends to 10 sts on each half. To do this, work 2 row ends into the same panel st twice per half.
Walls: Sew each wall straight up the 18 panel rows above the base row.
- The 8 sc-type row ends (Rows 13–17 and 25–27) each take 1 panel row.
- The 7 mesh row ends take 10 panel rows. Give them 1, 2, 1, 2, 1, 2, 1 rows in that order.
Placement:
- Pocket A: base on Row 7, walls on Rows 8–25
- Pocket B: base on Row 39, walls on Rows 40–57
- Pocket C: base on Row 71, walls on Rows 72–89
Keep your tension snug, but don’t let the panel pucker. The extra length of the rim makes the pocket bulge out to about 2.7 in (6.9 cm) deep.
Checkpoint: the panel should still measure 7 in (17.8 cm) x 22.4 in (56.9 cm). A 4.5 in (11.4 cm) roll should sit inside each pocket with its top showing.
Border
The border gauge matches the panel gauge: 1 sc per row end, 1 sc per st, and 3 sc in each corner st.
Rnd 1: Join sage green in the first st of Row 101 with the RS facing. Then work around the panel:
- Top: 3 sc in the first st, sc 4, 3 sc in the last st. (10 sts)
- Side: 1 sc in each of the 101 row ends, with 2 sc in the ends of Rows 2 and 3. (103 sts)
- Bottom: working into the foundation loops, 3 sc in the first st, sc 10, 3 sc in the last st. (16 sts)
- Second side: work it the same way as the first side. (103 sts)
Sl st to the first sc. Total: 10 + 103 + 16 + 103 = 232 sts.
Rnd 2: Ch 1. Rev sc in each st around. (232 sts) Sl st to join and fasten off.
Why the math works: The panel has 4.5 rows per inch, so 1 sc per row end gives slightly more stitches than the 4 sts per inch of gauge. That small extra lets the curved edges lie flat. Rows 2 and 3 slant sharply, so each gets one extra stitch. All corner stitches belong to the top and bottom counts and are counted only once.
The border adds 0.5 in (1.3 cm) on every edge. That brings the finished size to 8 in (20.3 cm) x 23.4 in (59.4 cm).
Final Blocking
- Weave in all ends except the tab tails.
- Mist the panel and the pockets lightly.
- Pin the panel flat at 8 in (20.3 cm) x 23.4 in (59.4 cm), easing the lobes and waists into smooth curves.
- Stuff each pocket with a toilet paper roll or a rolled towel so it dries in shape.
- Open the mesh diamonds gently with your fingers.
- Let everything dry completely.
- Wrap the tab through the ring, then sew both ends to the back of the teardrop top, overlapping by 1 in (2.5 cm). This leaves a loop about 2.2 in (5.6 cm) long.
Final Quality-Control Checklist
- [ ] Panel row counts are 34, 32, and 35 rows per lobe section, for 101 rows in total.
- [ ] Each lobe is 28 sts wide and each waist is 20 sts.
- [ ] Each pocket has 36 sts in Rows 12, 25, and 26.
- [ ] Every mesh row has 7 loop spaces.
- [ ] There are 3 balls per pocket, centered.
- [ ] The border has 232 sts and lies flat.
- [ ] The tab is secure and the ring hangs straight.
Troubleshooting
- Base cups before Row 12: your tension is too tight. Go up a hook size.
- Mesh loops sag: make firmer chains, or change ch 5 to ch 4 in Rows 19–24.
- Border ruffles on the curves: skip 1 row end every 10 along the straight sections.
- Border pulls in at the waists: add 1 sc in every 5th row end there.
- Pocket too shallow for the roll: repeat Rows 19–20 one more time. This adds 2 mesh rows, so place the pocket’s base line 3 panel rows lower.
- Panel twists: check that every row has the correct stitch count.
Care
Hand wash cool and reshape flat to dry. Don’t tumble dry; the heat can distort the mesh.
Final Notes
Each measurement leads into the next. A gauge of 16 sc x 18 rows = 4 in (10.2 cm) gives 7 in (17.8 cm) lobes and a 22.4 in (56.9 cm) panel. Each pocket’s 36-stitch rim fits a standard roll. The 232-stitch border brings the holder to 8 in (20.3 cm) x 23.4 in (59.4 cm). If you check each stage before moving on, the pieces will fit together without trouble.
Happy crocheting!