

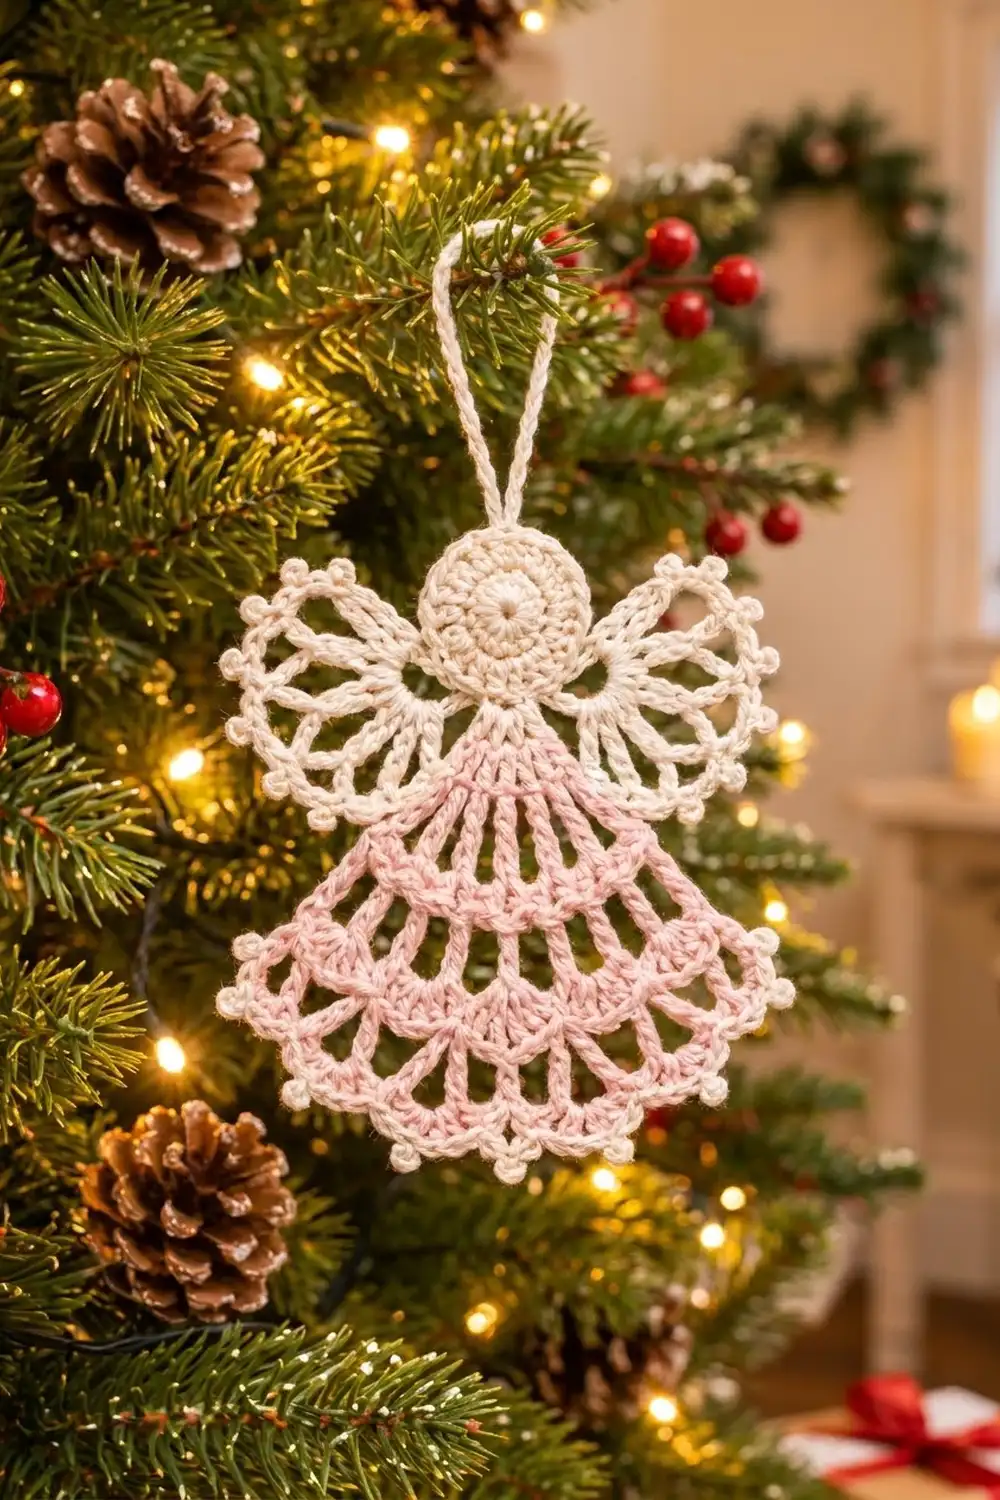
The Rosy Tiered Angel is a small, lacy ornament with a soft vintage look. A blush-pink skirt falls in three scalloped tiers. A round cream head sits on top, with open cream wings on either side. A fine picot edging in cream gives the hem and wings a delicate, beaded outline.
Only two colors are used: blush pink for the skirt and cream for the head, wings, edging, and hanging loop. The look is classic Christmas lace in a lighter weight, so it’s quick to make and sturdy enough to hang on a tree.
This pattern uses US crochet terms. The finished angel measures 4.75 in (12.1 cm) across the wings and 4.25 in (10.8 cm) tall, plus a 2.5 in (6.4 cm) hanging loop.
Construction is simple. You work the skirt flat in 8 rows from the neck down. Next you crochet the head in 2 rounds and stitch it to the top of the skirt. You then work the wings directly into the edge of the head, add the picot border in cream, and finish with the hanging loop.
Finished Size and Construction
- Finished size: 4.75 in (12.1 cm) wide × 4.25 in (10.8 cm) tall, excluding loop
- Skill level: Easy+ (simple stitches, careful counting)
- Terminology: US
- Yarn weight: Sport / #2 cotton
- Hook: 3.25 mm (US D-3)
- Number of pieces: 1 finished ornament (skirt plus head, with the wings worked onto the head)
- Layout: single angel, head centered over the skirt, one wing on each side
- Skirt size: 2.25 in (5.7 cm) at the neck, 4.25 in (10.8 cm) at the hem, 3 in (7.6 cm) tall
- Size before border: 4.5 in (11.4 cm) wide × 4 in (10.2 cm) tall
- Border depth: 0.25 in (0.6 cm) at the hem, 0.125 in (0.3 cm) on each wing edge
Materials
Choose a smooth mercerized or combed cotton in sport weight. Cotton holds the open arches crisply and takes blocking well. Fuzzy or acrylic yarn will soften the lace and make the spokes hard to see.
- Color A, Blush Pink: 8 g, about 25 m (27 yd)
- Color B, Cream: 6 g, about 19 m (21 yd)
These quantities include a margin of about 20% for gauge swatching and weaving in ends.
Tools:
– 3.25 mm (US D-3) crochet hook
– Tapestry needle
– 2 locking stitch markers
– Scissors
– Rustproof pins and a blocking mat or folded towel
– Spray bottle; spray starch (optional)
Abbreviations (US Terms)
- ch – chain
- sl st – slip stitch
- sc – single crochet
- hdc – half double crochet
- dc – double crochet
- sk – skip
- sp – space
- st(s) – stitch(es)
- MR – magic ring
- RS – right side
Special stitches:
– Picot: Ch 3, sl st in the 3rd ch from the hook.
– Standing sc: Start with a slip knot on the hook, insert the hook into the stitch, and complete a sc as usual.
Gauge and Checkpoints
Make the skirt first and measure it before you make anything else. If the skirt is the right size, the head and wings will fit it.
- Gauge: Row 1 of the skirt (13 dc) = 2.25 in (5.7 cm) wide.
- Checkpoint 1: After Row 3, the skirt is 2.75 in (7.0 cm) wide across the loops and 1.25 in (3.2 cm) tall.
- Checkpoint 2: After Row 5, it’s 3.5 in (8.9 cm) wide and 2 in (5.1 cm) tall.
- Checkpoint 3: After Row 8, the hem is 4.25 in (10.8 cm) wide and the skirt is 3 in (7.6 cm) tall.
- Checkpoint 4: The head measures 1.25 in (3.2 cm) across.
- Checkpoint 5: With both wings attached, the angel is 4.5 in (11.4 cm) wide.
If Row 1 is too wide (more than 2.5 in / 6.4 cm), go down to a 3.0 mm hook. If it’s too narrow (under 2 in / 5.1 cm), go up to a 3.5 mm hook. Change the hook rather than the stitch counts, because every later row depends on these counts.

Skirt (Color A, Blush Pink)
You work the skirt flat in turned rows, starting at the neck edge. The turning ch-3 counts as a dc, and the turning ch-4 counts as a dc plus a ch-1 space.
Foundation: With Color A, ch 15.
Row 1 (RS): Dc in the 4th ch from the hook and in each ch across. Turn. (13 dc, counting the skipped ch-3 as the first dc)
Row 2 (spoke row): Ch 4 (counts as dc + ch 1), sk the first st, dc in the next dc, ch 1, dc in the next st across, working the last dc in the top of the turning ch. Turn. (13 dc, 12 ch-1 sps)
Row 3 (Tier 1 arches): Ch 1, sc in the first dc, ch 5, sk the next dc, sc in the next dc 6 times, working the last sc in the 3rd ch of the turning ch. Turn. (7 sc, 6 ch-5 loops)
The sc stitches land on dc 1, 3, 5, 7, 9, 11, and 13, so the 6 arches are evenly spaced.
Row 4 (Tier 2 spokes): Ch 4 (counts as dc + ch 1). (Dc, ch 1, dc) in the next ch-5 loop, ch 1, dc in the next sc, ch 1. Repeat from * to * 6 times, but leave off the final ch 1 on the last repeat. Turn. (19 dc, 18 ch-1 sps)
Count: 1 starting dc + (6 repeats × 3 dc) = 19 dc. The V stitch in each loop fans the spokes outward and makes the skirt flare.
Row 5 (Tier 2 arches): Ch 1, sc in the first dc, ch 5, sk the next dc, sc in the next dc 9 times. Turn. (10 sc, 9 ch-5 loops)
Row 6 (Tier 3 spokes): Work as for Row 4, repeating 9 times. Turn. (28 dc, 27 ch-1 sps)
Count: 1 + (9 × 3) = 28 dc.
Row 7 (hem arches): Ch 1, sc in the first dc, ch 6, sk the next 2 dc, sc in the next dc 9 times. Turn. (10 sc, 9 ch-6 loops)
The sc stitches land on dc 1, 4, 7, and so on through 28, which gives exactly 9 arches.
Row 8 (filled scallops): Ch 1, sc in the first sc, (sc, hdc, 2 dc, hdc, sc) in the next ch-6 loop, sc in the next sc 9 times. Fasten off and weave in the ends. (64 sts)
Count: 10 sc worked into existing sc + (9 loops × 6 sts) = 64 sts.
Check the skirt against Checkpoint 3 now. It should be a smooth trapezoid that lies flat without ruffling.
Head (Color B, Cream)
Rnd 1: MR. Ch 3 (counts as dc), 11 dc in the ring. Pull the ring closed and sl st in the top of the ch-3. (12 dc)
Rnd 2: Ch 1, 2 sc in each st around. Sl st in the first sc. (24 sc)
Fasten off and leave an 8 in (20.3 cm) tail. The head should measure 1.25 in (3.2 cm) across.
Number the stitches: Call the first sc of Rnd 2 st 1 and mark it. Hold the head with st 1 at the bottom center. St 13 is now at the top center. Count to the right for sts 2, 3, 4, and so on, and to the left for sts 24, 23, 22, and so on.
Attach the Head
Lay the skirt RS up with the foundation edge at the top. Place the head so that sts 24, 1, and 2 overlap the center of the foundation edge by about 0.25 in (0.6 cm). St 1 should sit over the 7th dc of Row 1, which is the center stitch.
Use the tail to whipstitch sts 24, 1, and 2 to the skirt. Stitch through both layers 2 or 3 times so the head doesn’t tilt, then weave in the end on the back.
Wings (Color B, Cream)
You work each wing directly into the outer stitches of the head. Each wing has 3 chain loops, from small at the bottom to large at the top, and you fill them on the way back.
Right wing:
- Make the loops: Join Color B with a sl st in st 4 of the head. Ch 5 and sl st in st 5 to make the small loop. Ch 7 and sl st in st 6 to make the middle loop. Ch 9 and sl st in st 7 to make the large loop.
- Fill the loops: Work 15 dc into the ch-9 loop, then sl st in st 6. Work 12 dc into the ch-7 loop, then sl st in st 5. Work 9 dc into the ch-5 loop, then sl st in st 4. (36 dc in total: 15 + 12 + 9)
- Fasten off and leave a 6 in (15.2 cm) tail.
Left wing: Join Color B with a sl st in st 22. Ch 5 and sl st in st 21. Ch 7 and sl st in st 20. Ch 9 and sl st in st 19. Fill the loops the same way, with 15 dc, a sl st in st 20, 12 dc, a sl st in st 21, 9 dc, and a sl st in st 22. Fasten off. (36 dc)
The two wings mirror each other exactly: st 4 matches st 22, and st 7 matches st 19.
Use each tail to tack the bottom edge of the small lobe to the top corner of the skirt with 2 small stitches. The angel should now be 4.5 in (11.4 cm) wide and 4 in (10.2 cm) tall.
Border (Picot Edging, Color B)
Border gauge: 1 picot adds about 0.125 in (0.3 cm) of depth. With the sc beneath it, the hem border is 0.25 in (0.6 cm) deep.
Hem edging: With the RS facing, work across the top of Row 8. Make a standing sc in the first sc, then work 1 picot.
*Sc in the next 3 sts (sc, hdc, dc), picot, sc in the next 3 sts (dc, hdc, sc), sc in the next sc, picot*. Repeat from * to * 9 times. Fasten off.
Count: 64 sc and 19 picots.
The math works because Row 8 has 1 + (9 × 7) = 64 sts. Each scallop gets one picot at its peak, between its 2 dc, and one picot at the sc valley that follows it. With the opening picot, that’s 1 + (9 × 2) = 19 picots. The picots are symmetrical, and both corners of the hem get one.
Wing edging (work on each wing): With the RS facing, make a standing sc in the first dc of the small lobe. Sc in the next 2 dc and work 1 picot. Then work sc in the next 3 dc, picot until you have 11 more picots. Sl st in the head st beside the large lobe (st 7 on the right wing, st 19 on the left) and fasten off.
Count per wing: 36 sc and 12 picots.
The math works because each lobe’s dc count divides evenly by 3. The small lobe gets 3 picots (9 ÷ 3), the middle lobe gets 4 (12 ÷ 3), and the large lobe gets 5 (15 ÷ 3). The last picot of each lobe falls on its outer tip.
Hanging loop: Join Color B with a sl st in st 13 of the head. Ch 30 and sl st in st 13 again. Ch 1 and work 36 sc around the loop, then sl st in st 13. Fasten off. The loop stands about 2.5 in (6.4 cm) tall.
Final Blocking
- Weave in all the remaining ends. Hide pink ends in pink stitches and cream ends in cream stitches.
- Mist the angel with water until it’s evenly damp but not dripping.
- Pin it RS up to 4.75 in (12.1 cm) wide across the wings and 4.25 in (10.8 cm) tall.
- Pin every hem scallop peak so the arches curve evenly.
- Pin each wing lobe open into a rounded fan, and pin out each picot so it stands clear.
- If you want stiffer lace, spray it lightly with starch.
- Let it dry completely, for at least 6 hours, before you unpin it.
Final Quality-Control Checklist
- The skirt has exactly 3 tiers, with 6, 9, and 9 arches.
- Row 8 has 64 sts and 9 even scallops.
- The head is 1.25 in (3.2 cm) across and sits centered.
- Each wing has 36 dc in lobes of 9, 12, and 15.
- The wings are level and mirror each other.
- The hem has 19 picots, and each wing has 12.
- The hanging loop is centered at st 13.
- The finished angel is 4.75 in × 4.25 in (12.1 cm × 10.8 cm).
Troubleshooting
- The skirt ruffles: Your chain spaces are too loose. Go down one hook size, or make the ch-5 and ch-6 loops a little more firmly.
- The skirt cups or curls: Your dc stitches are too tight. Go up one hook size.
- The arches are uneven: You probably missed a skip. Recount using the stitch positions given for Rows 3, 5, and 7.
- The head ruffles: Work Rnd 2 more firmly, or use a hook one size smaller for the head only.
- The wings droop: Tack the small lobes a little higher on the skirt, and block with starch.
- The picots lean or twist: Make each sl st into the 3rd ch from the hook, not into the ch-3 space.
Care
Hand wash in cool water with mild soap, press out the water in a towel, and reshape the angel flat to dry. Store it flat or hanging so the wings and picots keep their shape.
Final Notes
Each measurement depends on the one before it. Row 1 at 2.25 in (5.7 cm) sets the skirt, which grows to a 4.25 in (10.8 cm) hem at 3 in (7.6 cm) tall. Add the 1.25 in (3.2 cm) head and the wings, and the angel measures 4.5 in × 4 in (11.4 cm × 10.2 cm). The picot border then brings it to 4.75 in × 4.25 in (12.1 cm × 10.8 cm). Check each stage as you go, and the finished angel will come out at the right size.
Happy crocheting!