

These curtain panels hang solid crocheted monstera leaves on an open cream mesh. Sage green and cream leaves alternate in a checkerboard, three across and seven down on each panel. Light comes through the mesh and the leaf slits, so the room stays bright while the panels still read as a bold botanical print.
The leaves are heart-shaped, with two rounded top lobes, a pointed tip, an openwork center vein, and three deep open slits along each side. A single crochet outline runs around each leaf and into every slit, so the slits stay crisp after washing.
The pattern uses US crochet terms. Each finished panel measures 26 in (66.0 cm) wide by 76 in (193.0 cm) long, not counting the tabs. The tabs add about 3 in (7.6 cm) above the top edge.
Here is the construction in short. You work each leaf in turned rows from the tip up, with the slits built in, and then add an edging round that also makes the stem. You crochet a double treble mesh for each panel and add a two-round border. Then you work the tabs onto the top edge, sew on the leaves, and block.
Finished Size and Construction
- Finished panel size: 26 in x 76 in (66.0 cm x 193.0 cm), not counting tabs
- Skill level: Intermediate
- Terminology: US
- Yarn weight: DK (3) cotton
- Hooks: 4 mm (G-6) for the leaves; 5 mm (H-8) for the mesh, border, and tabs
- Number of pieces: 2 panels; each panel is 1 mesh plus 21 leaves (11 sage, 10 cream)
- Layout: 3 leaves across x 7 down per panel, in a checkerboard
- Leaf size: 7 in x 7 in (17.8 cm x 17.8 cm), plus a 1.5 in (3.8 cm) stem
- Size before border: 25 in x 75 in (63.5 cm x 190.5 cm), which is 20 squares x 60 rows
- Border depth: 0.5 in (1.3 cm), 2 rounds
Materials
Use a smooth combed or mercerized DK cotton of about 2.3 m per gram (around 115 m per 50 g). Cotton holds the leaf shape and doesn’t stretch much in a long hanging piece.
- Cream: 380 g / 875 m (mesh, borders, and 20 leaves)
- Sage green: 200 g / 460 m (22 leaves and 14 tabs)
These amounts are for the pair of panels and include a margin of about 10%.
Tools
- 4 mm (G-6) and 5 mm (H-8) hooks
- Tapestry needle
- Stitch markers
- Rust-proof pins, blocking mats, and a spray bottle
- Tape measure
Abbreviations (US Terms)
- ch: chain
- sl st: slip stitch
- sc: single crochet
- hdc: half double crochet
- dc: double crochet
- dc2tog: double crochet 2 together
- dtr: double treble (yo 3 times, insert hook, pull up a loop, [yo, draw through 2] 4 times)
- fdc: foundation double crochet
- sp: space; st(s): stitch(es); rep: repeat; RS: right side; WS: wrong side
Foundation double crochet (fdc). First fdc: ch 4, yo, insert hook in the 4th ch from hook, yo and pull up a loop, yo and draw through 1 loop (this makes the base ch), [yo, draw through 2] twice. Each later fdc: yo, insert hook in the base ch of the previous fdc and repeat the same steps. The 3 skipped ch count as the first dc.
Slit start. Ch 4 and work 5 fdc, which gives 6 sts on the flap counting the skipped ch. Skip the first 6 sts of the previous row and dc in the next dc. The flap isn’t attached to the row below, so it leaves an open slit about 1.3 in (3.3 cm) deep.
Gauge and Checkpoints
- Leaf gauge (4 mm): 18 dc and 10 rows = 4 in (10.2 cm)
- Mesh gauge (5 mm), blocked: 4 squares x 4 rows = 5 in (12.7 cm) square, so 1 square = 1.25 in (3.2 cm)
- Border gauge (5 mm): 4 sc = 1 in (2.5 cm)
Make one complete leaf and check it before you make the other 41:
- After Row 8: about 6.4 in (16.3 cm) wide and 3.2 in (8.1 cm) tall
- After Row 16: about 6.4 in (16.3 cm) tall
- After the edging: 7 in x 7 in (17.8 cm x 17.8 cm)
If the leaf is too big, go down a hook size. If it’s too small, go up a size. For the mesh, work 6 rows and pin the swatch out. It should be 25 in (63.5 cm) wide. Change hook size if your squares block larger or smaller than 1.25 in (3.2 cm).
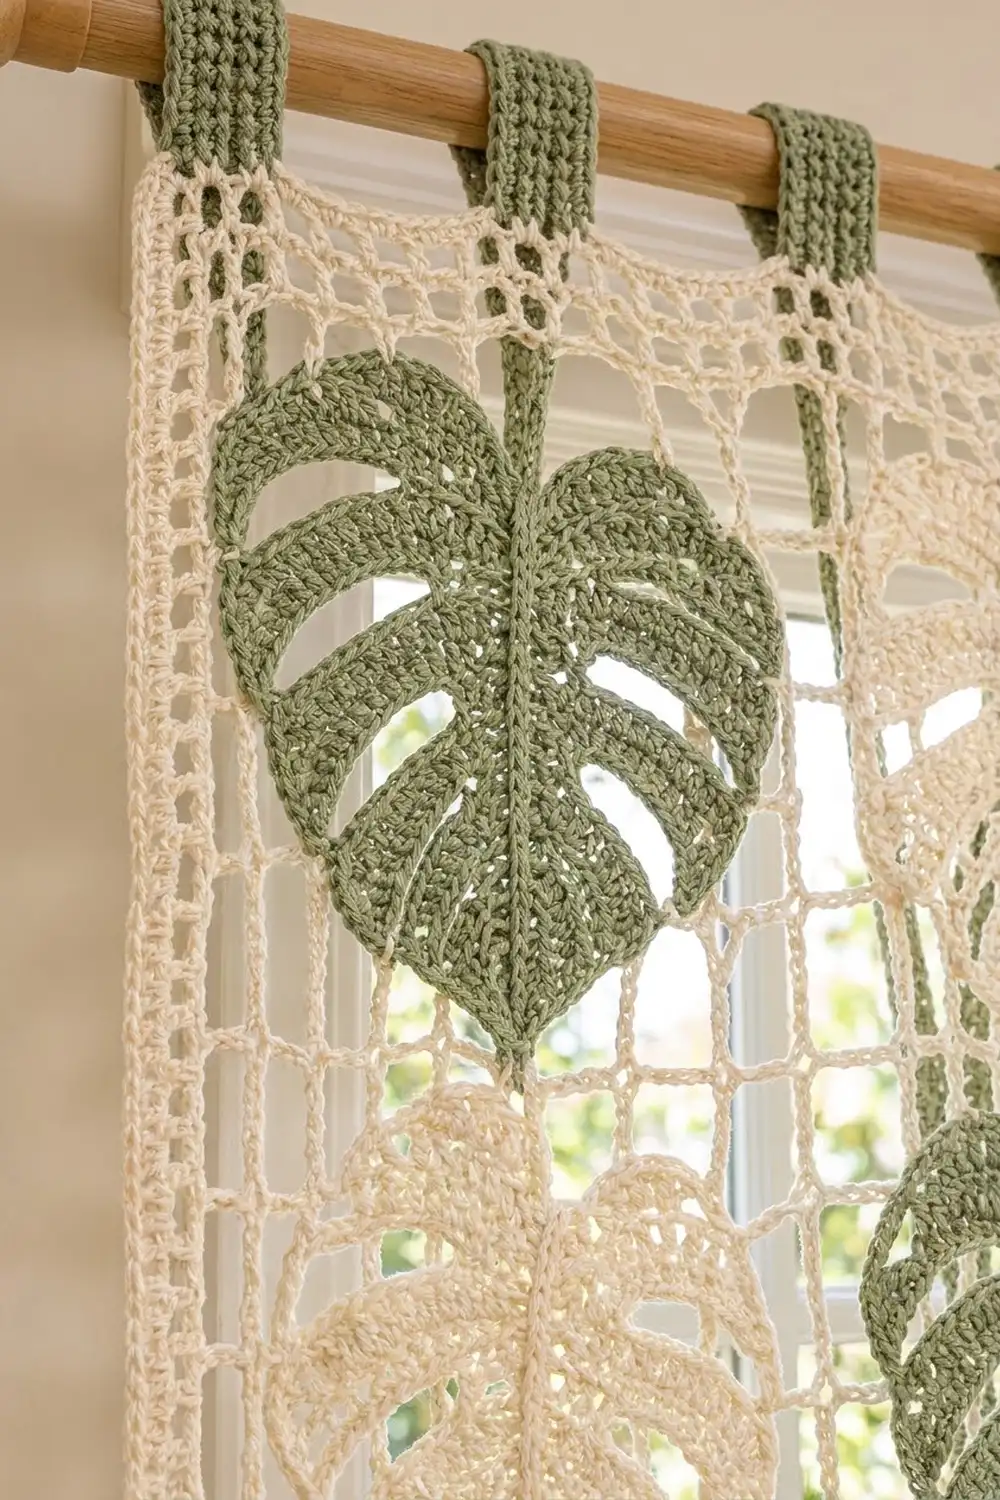
Leaf (Make 42)
Use the 4 mm hook and turn at the end of every row. A ch-1 sp in the middle of each row forms the open center vein, and the counts below are per half. Odd rows begin on side A and even rows begin on side B.
Row 1 (RS): Make a magic ring. Ch 3 (counts as dc), then work (dc, ch 1, 2 dc) in the ring. Pull the ring closed. (2 dc per half)
Rows 2–6: Ch 3 (counts as dc), dc in the first st. Dc in each dc up to the last dc before the ch-1 sp, and work 2 dc in that dc. Ch 1. Work 2 dc in the next dc, dc in each dc to the turning ch, then 2 dc in the top of the turning ch. (Each half grows by 2 sts per row.)
– Row 2: 4 per half (9 sts, counting the ch-1 sp)
– Row 3: 6 per half (13 sts)
– Row 4: 8 per half (17 sts)
– Row 5: 10 per half (21 sts)
– Row 6: 12 per half (25 sts)
Rows 7–8: Ch 3, dc in the first st. Dc in each dc to the ch-1 sp, ch 1, dc in each dc to the turning ch, then 2 dc in the top of the turning ch.
– Row 7: 13 per half (27 sts)
– Row 8: 14 per half (29 sts)
Rows 9–14 (slit rows): Work the Slit start. Then dc in each dc to the ch-1 sp (8 sts after the flap), ch 1, dc in each dc across, and dc in the top of the turning ch. (14 per half; 29 sts per row)
Side A gets slits on Rows 9, 11, and 13, and side B gets slits on Rows 10, 12, and 14. That makes 3 slits per side, about 0.8 in (2.0 cm) apart.
Row 15A: Ch 3 (counts as dc), dc in the next 11 dc, then dc2tog over the last 2 dc before the ch-1 sp. (13 sts)
Row 16A: Ch 1, sc in the first st, hdc in the next st, dc in the next 8 sts, hdc in the next st, sc in the next st, sl st in the last st. (13 sts) Fasten off.
Row 15B: With RS facing, join yarn in the first dc after the ch-1 sp of Row 14. Ch 2 and dc in the next st (together these count as dc2tog). Dc in the next 11 dc, then dc in the top of the turning ch. (13 sts)
Row 16B: Sl st in the first st, sc in the next st, hdc in the next st, dc in the next 8 sts, hdc in the next st, sc in the last st. (13 sts) Don’t fasten off. You now have a V-shaped notch above the vein.
Edging round: Ch 1. Work around the leaf in this order:
– Notch: Sc in the ch-1 sp of Row 14. Ch 9, then sl st in the 2nd ch from hook and in the next 7 ch to make the stem. Sc in the same ch-1 sp. (2 sc)
– Lobe A: Work 4 sc up the inner row ends of Rows 15A–16A, then sc in each of the 13 sts of Row 16A.
– Side A, top to tip: Work 2 sc in each of the 16 row ends (32 sc). At each slit, work the slit outline: 6 sc along one edge of the slit, 1 sc at its base, and 6 sc along the other edge. (39 sc for 3 slits)
– Tip: Work (sc, ch 2, sc) in the ring. (2 sc)
– Side B, tip to top: 32 sc plus 3 slit outlines. (71 sc)
– Lobe B: Sc in each of the 13 sts of Row 16B, then 4 sc down the inner row ends.
Join with a sl st to the first sc. You should have 180 sc plus the tip ch-2 and the stem. Fasten off.
Make All Pieces
For each panel, make 11 sage leaves and 10 cream leaves. For the pair, that’s 22 sage and 20 cream. Block each leaf to 7 in (17.8 cm) square and let it dry before sewing it on.
Row 1:  G  C  G
Row 2:  C  G  C
Row 3:  G  C  G
Row 4:  C  G  C
Row 5:  G  C  G
Row 6:  C  G  C
Row 7:  G  C  G
G = sage, C = cream.
Mesh Panel (Make 2)
Use the 5 mm hook and cream.
Foundation: Ch 106.
Row 1: Dtr in the 11th ch from hook (the skipped ch count as dtr and ch-4 sp). *Ch 4, skip 4 ch, dtr in the next ch; rep from * across. (21 dtr, 20 squares)
Row 2: Ch 9 (counts as dtr and ch 4). Skip the first ch-4 sp and dtr in the next dtr. *Ch 4, dtr in the next dtr; rep from * across, working the last dtr in the 5th ch of the turning ch. (20 squares)
Rows 3–60: Rep Row 2. Don’t fasten off.
Checkpoints: 20 rows should block to 25 in x 25 in (63.5 cm x 63.5 cm). All 60 rows should block to 25 in x 75 in (63.5 cm x 190.5 cm).
Joining (Leaves to Mesh)
Lay the mesh RS up with Row 60 at the top. Number the vertical post lines 0–20 from left to right, and the horizontal lines 0–60 from the top down.
- Place the stems on vertical lines 3, 10, and 17, which are 8.75 in (22.2 cm) apart from center to center.
- Place them on horizontal lines 2, 10, 18, 26, 34, 42, and 50. That spaces the leaves 8 rows, or 10 in (25.4 cm), apart from top to top.
Stitch logic: For each stem, sew through its last sl st and around the dtr at the intersection 3 times, then knot on the WS. Next, tack the leaf to the mesh at three points: the tip ch-2 sp and the widest sc of each lobe. Catch only the back loop of the edging and one mesh chain so the stitches don’t show from the front.
Tension: Pull each tack just snug. If you pull harder, the mesh puckers and the panel narrows.
Checkpoint: With all the leaves on, the panel should still lie at 25 in (63.5 cm) wide. Each outer leaf should be 0.25 in (0.6 cm) in from the side edge, with gaps of about 1.75 in (4.4 cm) between leaves.
Border
Use the 5 mm hook and cream. The gauge is 4 sc = 1 in (2.5 cm). Each side count includes that side’s 2 corner sts, and the corner st is the middle sc of each 3-sc group.
Round 1: Ch 1. Across Row 60: 3 sc in the first dtr, 4 sc in the next ch-4 sp, sc in the next dtr; rep from * across, working 3 sc in the last dtr. Down the side: 5 sc in each of the 60 row ends. Across the foundation: 3 sc at the base of the first dtr, 4 sc in the next ch-4 sp, sc at the base of the next dtr; rep from * across, working 3 sc at the base of the last dtr. Up the other side: 5 sc in each row end. Join.
– Top and bottom: 103 sc each (101 + 2 extra corner sc)
– Long sides: 304 sc each (300 + 2 corner-group sc + 2 corners)
– Total: 810 sc
Round 2: Ch 1, sc in each sc, with 3 sc in each corner st. Join.
– Top and bottom: 105 sc each
– Long sides: 306 sc each
– Total: 818 sc
Why the math works: At 4 sc per inch, 5 sc cover 1.25 in (3.2 cm), which is exactly one mesh square. So 4 sc in each space plus 1 at each post, and 5 sc per row end, both match the mesh, and the edges stay flat. The 105 top sts measure 26 in (66.0 cm), which is the 25 in (63.5 cm) mesh plus 0.5 in (1.3 cm) of border on each side.
Tabs (make 7 per panel): With RS facing, number the 105 top sts from the left corner st. Use sage and the 5 mm hook. Join in st 1, ch 1, and sc in 9 sts. Turn and work 23 more rows of 9 sc, for 24 rows or 6 in (15.2 cm). Fasten off and leave a long tail.
Skip 7 sts and work the next tab the same way. The spacing works out because 7 tabs x 9 sts + 6 gaps x 7 sts = 105. Fold each tab to the WS and whipstitch it along the base of Round 1 to make a loop about 3 in (7.6 cm) tall.
Final Blocking
- Weave in all the ends.
- Lay the panel RS up on the mats.
- Pin the corners to 26 in x 76 in (66.0 cm x 193.0 cm).
- Pin along each side about every 5 in (12.7 cm).
- Square up the mesh with your fingers, and pin the leaf lobes and tips so the slits lie open.
- Spray the panel until it’s evenly damp.
- Let it dry completely, then unpin it and hang it.
Final Quality-Control Checklist
- Each leaf is 7 in (17.8 cm), with 3 open, outlined slits per side.
- The center vein is open all the way from the tip to the notch.
- Each panel has 11 sage and 10 cream leaves in a correct checkerboard.
- The stems sit on the listed grid lines.
- Round 2 counts are 105 sc on the top and bottom and 306 sc on each side.
- There are 7 evenly spaced tabs of the same height.
- The panel blocks to 26 in x 76 in (66.0 cm x 193.0 cm).
Troubleshooting
- Slits closed: The flap was worked into the row below. The fdc must sit above the skipped sts without being attached to them.
- Leaf cups: There are too many edging sc. Keep to 2 sc per row end.
- Lobes ruffle: Use a smaller hook for Rows 15–16.
- Mesh slants: Make sure the last dtr of each row goes in the 5th ch of the turning ch.
- Border waves: Your sc gauge is loose. Work Round 2 with a smaller hook.
- Leaves droop: Add a fourth tack halfway down the center vein.
Care
Hand wash in cool water, roll the panels in a towel, and dry them flat at the blocked measurements. Don’t hang them while they’re wet.
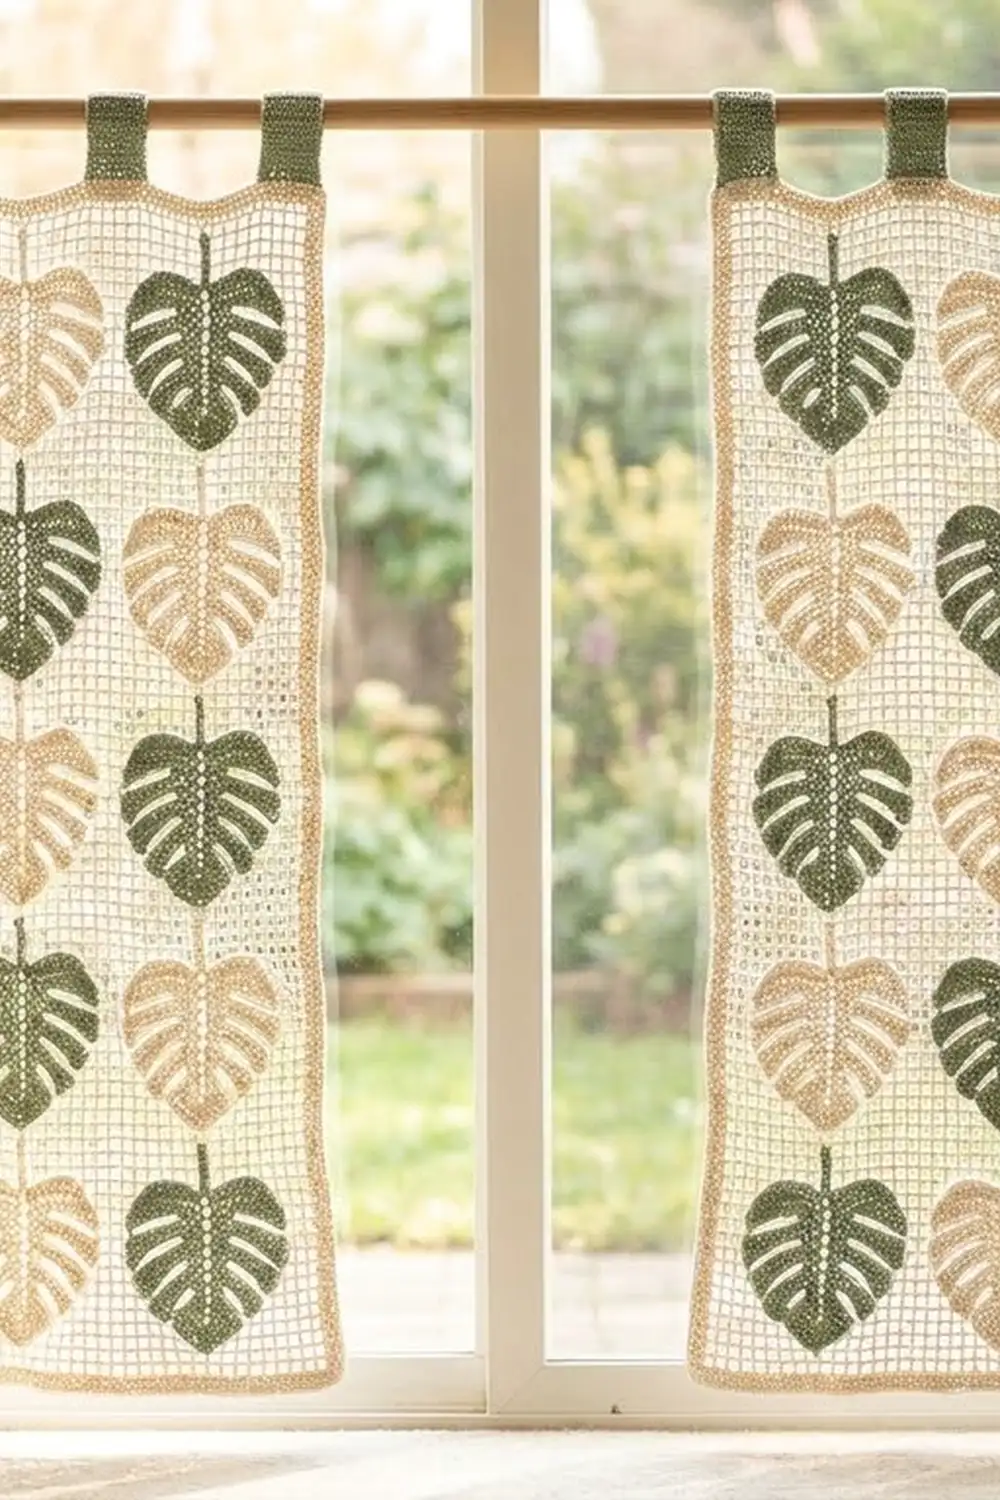
Final Notes
The measurements build on each other. Three leaves of 7 in (17.8 cm) sit across 20 mesh squares of 1.25 in (3.2 cm), for a width of 25 in (63.5 cm). Sixty rows make the panel 75 in (190.5 cm) long. The border adds 0.5 in (1.3 cm) on each side, so the finished panel is 26 in x 76 in (66.0 cm x 193.0 cm). If you check all three gauges, everything fits without fudging.
Happy crocheting!