

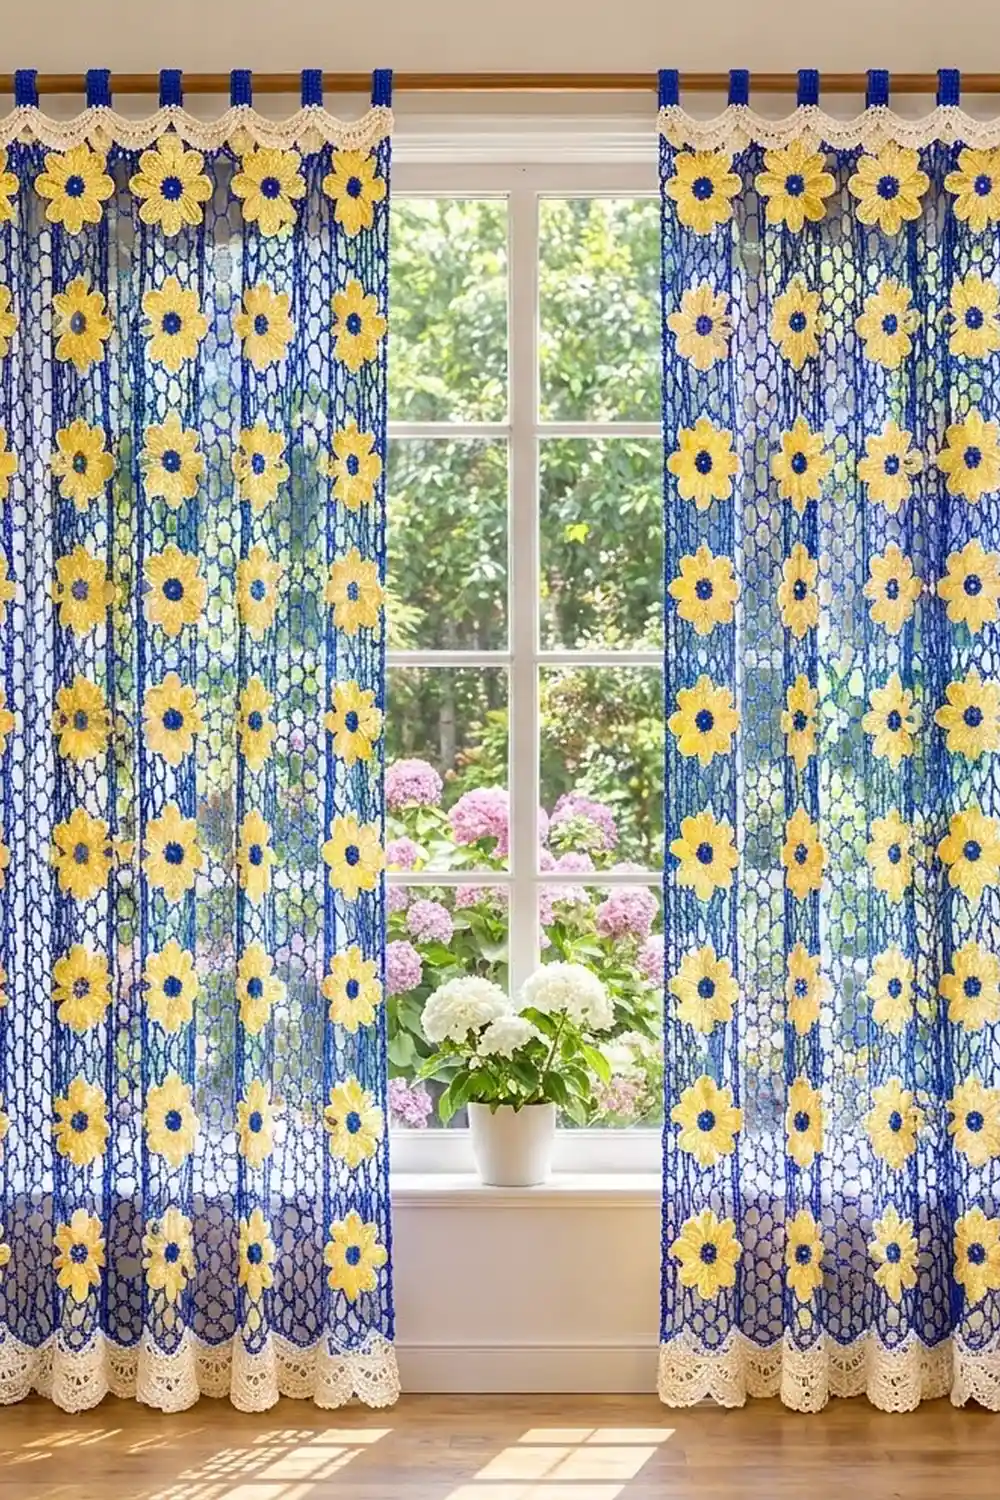
Sunny Bloom is a pair of airy tab-top curtain panels. Each one is an open royal blue chain-loop mesh with rows of bright yellow ten-petal flowers, finished with cream scalloped trim at the top and bottom. Light passes through the net, and the flowers look like they’re floating against the window.
The palette is royal blue, buttery yellow and cream. Each flower has a solid blue center with a small open eye, so the blue of the net shows up again in every bloom. The overall look is cottage-style and cheerful, and it suits a kitchen, sunroom or bedroom window.
This pattern uses US crochet terms. Each finished panel measures 28 in (71.1 cm) wide and 73 in (185.4 cm) long from the bottom scallop tips to the top of the header band. The blue tabs add another 3 in (7.6 cm) above the band.
You’ll work the mesh in one piece from the bottom up. Next you make 45 separate flowers per panel and sew them onto the net in a 5 x 9 grid. Last come the bottom scallop border, the top header band with a downward-facing scallop valance, and eight blue hanging tabs.
Finished Size and Construction
- Finished size (each panel): 28 in (71.1 cm) wide x 73 in (185.4 cm) long, plus 3 in (7.6 cm) tabs
- Skill level: Intermediate
- Terminology: US
- Yarn weight: Worsted (#4), cotton or cotton blend
- Hook: US H-8 (5.0 mm)
- Number of pieces: 2 panels; each panel = 1 mesh + 45 flowers
- Layout: 5 flowers across x 9 flowers down per panel
- Flower size: 4 in (10.2 cm) across
- Mesh size before border: 28 in (71.1 cm) x 70 in (177.8 cm)
- Border depth: bottom 2 in (5.1 cm); top band 1 in (2.5 cm), with the scallops hanging 1.25 in (3.2 cm) over the mesh
Materials
Use a smooth, mercerized or soft cotton. Cotton holds its shape well, the flowers stay crisp, and it copes with sunlight and washing better than most acrylics. For the brightest result, pick a colorfast royal blue so the mesh doesn’t bleed onto the cream trim when you wash it. The amounts below are for the pair of panels and assume about 1.7 m per gram (roughly 85 m per 50 g ball).
- Color A, Royal Blue (mesh, flower centers, tabs): 850 g, about 1,445 m
- Color B, Sunflower Yellow (petals): 450 g, about 765 m
- Color C, Cream (borders): 100 g, about 170 m
All quantities include a margin of about 10-15% for gauge swatches and tails, plus small differences in tension.
Tools:
– US H-8 (5.0 mm) crochet hook
– Tapestry needle
– Locking stitch markers
– About 50 rust-proof pins
– Measuring tape
– Large blocking surface (a bed, carpet with a sheet over it, or foam mats)
– Spray bottle
– Scissors
Abbreviations (US Terms)
- ch – chain
- sl st – slip stitch
- sc – single crochet
- hdc – half double crochet
- dc – double crochet
- tr – treble crochet
- sk – skip
- sp – space
- st(s) – stitch(es)
- BLO / FLO – back loop only / front loop only
- RS – right side
Special stitch – Shell: work 9 dc in the same stitch.
Gauge and Checkpoints
Make one flower and a small mesh swatch before you start the full panel. This takes less than an hour, and it protects a project that uses more than a kilogram of yarn.
- Flower: 4 in (10.2 cm) across after Round 3, laid flat
- Mesh: 4 ch-5 loops and 6 rows = 4 in (10.2 cm) square, lightly stretched
- Single crochet: 16 sc and 20 rows = 4 in (10.2 cm)
Flower checkpoints: Round 1 = 1.25 in (3.2 cm); Round 2 = 1.75 in (4.4 cm); Round 3 = 4 in (10.2 cm).
If the flower comes out bigger than 4.25 in (10.8 cm), go down half a hook size. If it’s smaller than 3.75 in (9.5 cm), go up half a size. The mesh is more forgiving, but if your swatch is more than 0.5 in (1.3 cm) off over 4 in (10.2 cm), change hook size for the mesh only. Every stitch count below depends on the 1 in (2.5 cm) loop and the 4 sc per inch (2.5 cm).
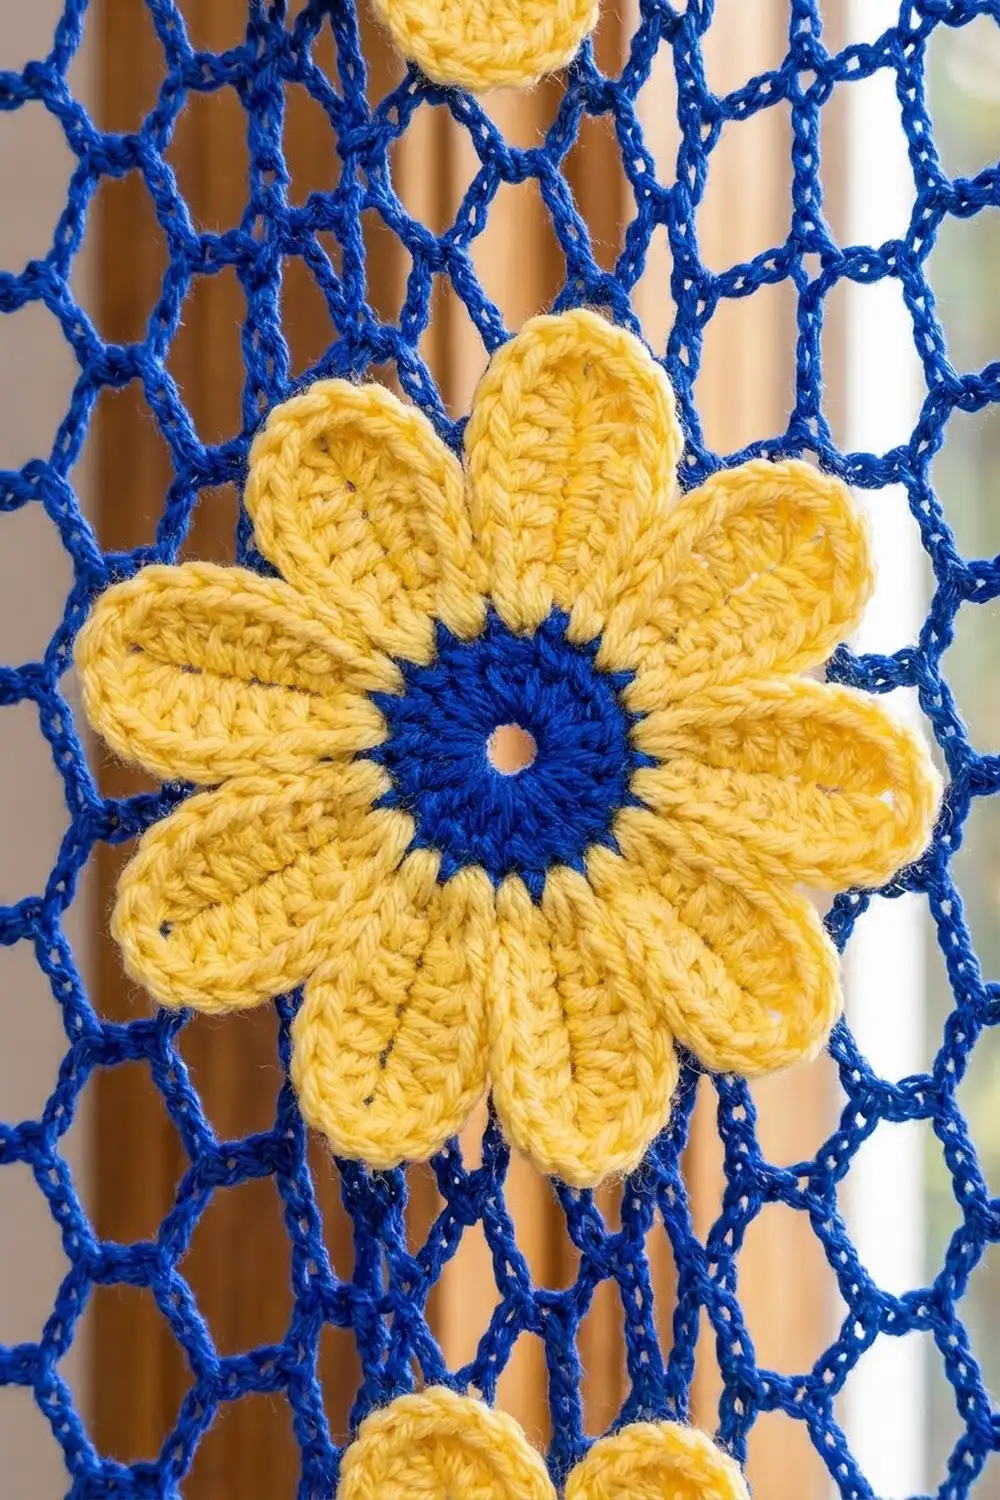
Mesh (Make 2)
Use Color A. The mesh is worked flat, from the bottom edge up.
Foundation: Ch 114.
Row 1: Sc in 2nd ch from hook, ch 5, sk 3 ch, sc in next ch; repeat from * to end. Turn. (28 ch-5 loops, 29 sc)*
Row 2: Ch 5 (counts as dc + ch 2), sc in first ch-5 loop, ch 5, sc in next ch-5 loop; repeat from * across, ending ch 2, dc in last sc. Turn. (27 ch-5 loops + 2 half loops)*
Row 3: Ch 1, sc in first dc, ch 5, sc in next ch-5 loop; repeat from * 26 more times, ch 5, sc in 3rd ch of turning ch-5. Turn. (28 ch-5 loops)*
Rows 4–105: Repeat Rows 2 and 3, ending on a Row 3 repeat. After Row 105 you have 28 full ch-5 loops and 29 sc across the top edge. Fasten off.
The offset loops stack up into the open, honeycomb-like net you see in the photo.
Length checkpoints (lightly stretched):
– Row 30: 20 in (50.8 cm)
– Row 60: 40 in (101.6 cm)
– Row 90: 60 in (152.4 cm)
– Row 105: 70 in (177.8 cm)
Width stays at 28 in (71.1 cm) the whole way. Place a marker every 30 rows so the checkpoints are easy to find.
Flowers (Make 45 per panel)
Round 1 (Color A): Make a magic ring, ch 3 (counts as dc), 19 dc in ring, then sl st to the top of ch-3. Pull the ring snug but leave a small open eye. Fasten off, leaving a 12 in (30.5 cm) tail. (20 dc)
Round 2 (Color B): Join B in any dc. Ch 1, sc in same st, ch 3, sk 1 st, sc in next st, ch 3, sk 1 st; repeat from * 8 more times, then sl st to first sc. (10 sc, 10 ch-3 sps)*
Round 3 (Color B): Sl st into the first ch-3 sp. In the ch-3 sp work (hdc, 2 dc, 2 tr, 2 dc, hdc), then sl st in next sc; repeat from * in each ch-3 sp around. Fasten off, leaving an 18 in (45.7 cm) tail for sewing. (10 petals of 8 sts each = 80 petal sts + 10 sl sts)*
The tr stitches at the middle of each group give every petal a slightly pointed, rounded-oval tip. The sl st between petals pulls the bases in, so the petals stay clearly separate.
Make All Pieces
Per panel: 1 mesh and 45 flowers, each with a Color A center and Color B petals.
For the pair: 2 meshes and 90 flowers (90 centers in Color A and 90 petal rounds in Color B).
Weave in the Round 1 tail along the back of the blue center, leaving about 6 in (15.2 cm) free. You’ll use it later to tack the center down. Keep the long yellow tail too. If you make the flowers in batches of 10, you can measure each batch and catch any drift in your tension early.
Layout for each panel (F = flower, viewed from the front, top edge at the top):
Row 1:  F  F  F  F  F
Row 2:  F  F  F  F  F
Row 3:  F  F  F  F  F
Row 4:  F  F  F  F  F
Row 5:  F  F  F  F  F
Row 6:  F  F  F  F  F
Row 7:  F  F  F  F  F
Row 8:  F  F  F  F  F
Row 9:  F  F  F  F  F
Joining
Lay the mesh flat with Row 105 at the top and stretch it gently to 28 in x 70 in (71.1 cm x 177.8 cm). The flowers are placed as follows:
- Horizontal: flower centers sit at 3 in, 8.5 in, 14 in, 19.5 in and 25 in (7.6, 21.6, 35.6, 49.5 and 63.5 cm) from the left edge. That leaves a 1 in (2.5 cm) margin at each side and 1.5 in (3.8 cm) between flowers.
- Vertical: the first row of centers sits 3 in (7.6 cm) below the top edge. The other rows follow every 8 in (20.3 cm), which is 12 mesh rows, so the last row of centers lands 67 in (170.2 cm) down, 3 in (7.6 cm) from the bottom. That leaves 4 in (10.2 cm) of clear mesh between flower rows.
Pin each flower through its center. Use the yellow tail to sew each of the 10 petal tips to the nearest sc knot in the mesh with 2 small stitches, passing behind the petal between tips. Then use the blue tail to tack Round 1 to the mesh at 4 evenly spaced points around the eye.
Tension: Sew loosely. If you pull the net toward the flower, it puckers, and once you multiply that over 45 flowers the panel loses width. After attaching each row of flowers, check that the panel still measures 28 in (71.1 cm) across.
Checkpoint: After all 45 flowers are attached, the mesh should still measure 28 in x 70 in (71.1 cm x 177.8 cm).
Border
Border gauge: 4 sc = 1 in (2.5 cm). The mesh is 28 loops wide at 1 in (2.5 cm) per loop, so the border uses 4 sts per loop plus 1 closing stitch, for 113 sts. The scallop repeat is 8 sts, which is 2 in (5.1 cm). That gives 14 repeats x 8 sts + 1 = 113 sts, and 14 x 2 in = 28 in (71.1 cm). The border fits the mesh exactly, so the edge neither ruffles nor pulls in.
Bottom Border (Color C)
Row 1: With the foundation edge on top, join C in the free loop of the chain that holds the first sc of Row 1. Ch 1, then work 1 sc in the free loop of each foundation chain across (113 chains, 1 sc in each, 0 added). Turn. (113 sc)
Row 2: Ch 3 (counts as dc), dc in each st across. Turn. (113 dc)
Row 3: Ch 1, sc in first st, sk 3 sts, Shell in next st, sk 3 sts, sc in next st; repeat from * 13 more times. Fasten off. (14 shells + 15 sc = 141 sts)*
Checkpoint: 28 in (71.1 cm) wide and 2 in (5.1 cm) deep.
Top Header Band (Color C)
Row 1: Join C in the first sc of Row 105. Ch 1, work 4 sc in each of the 28 ch-5 loops, then 1 sc in the final sc (112 sc from the loops + 1 extra). Turn. (113 sc)
Row 2: Ch 3 (counts as dc), dc in the BLO of each st across. Turn. (113 dc)
The front loops of Row 1 stay free on the RS.
Row 3: Ch 1, sc in each st across. Fasten off. (113 sc)
Valance row: With the RS facing and the band turned so the mesh hangs below it, join C in the first free front loop of Row 1. Ch 1, sc in the same loop, sk 3 loops, Shell in next loop, sk 3 loops, sc in next loop; repeat from * 13 more times. Fasten off. (14 shells + 15 sc = 141 sts)*
Let the shells fall forward and down over the top of the mesh. This makes the cream scallops that hang below the rod. Their tips should just brush the top row of petals.
Checkpoint: The band is 1 in (2.5 cm) tall and 28 in (71.1 cm) wide, and the scallops hang 1.25 in (3.2 cm) below it.
Tabs (Color A, make 8 per panel)
Work into Row 3 of the header band. Tabs go over sts 1–8, 16–23, 31–38, 46–53, 61–68, 76–83, 91–98 and 106–113. That’s 8 tabs of 8 sts with 7 gaps of 7 sts between them: 64 + 49 = 113.
Each tab: Join A in the first st of the group. Ch 1, sc in the same st and in the next 7 sts. Turn. (8 sc)
Work 29 more rows of 8 sc, for 30 rows total, which is 6 in (15.2 cm). Fasten off with a 12 in (30.5 cm) tail.
Fold the tab to the back and whipstitch its last row along the back of Header Row 1. This makes a 3 in (7.6 cm) loop. Each tab is 2 in (5.1 cm) wide, with 1.75 in (4.4 cm) gaps between tabs.
Final Blocking
- Weave in all remaining ends along the sc knots and inside the flower backs.
- Lay the panel face up on your blocking surface.
- Pin the side edges straight to 28 in (71.1 cm) wide, pinning every 4 in (10.2 cm).
- Pin the length to 73 in (185.4 cm) from the bottom scallop tips to the top of the header band.
- Pin each bottom scallop tip, then smooth the valance shells downward.
- Flatten the petals with your fingers and pin any that curl.
- Mist the panel until damp, not soaked, and leave it to dry completely.
- Unpin and hang. Repeat for the second panel, matching the measurements.
Final Quality-Control Checklist
- Each panel measures 28 in x 73 in (71.1 cm x 185.4 cm), with matching 3 in (7.6 cm) tabs.
- 45 flowers per panel, aligned in 5 columns and 9 rows.
- All 10 petal tips and the center of every flower are secured.
- No puckering around the flowers, and the side edges are straight.
- 14 shells on each scallop edge, centered and even.
- 8 tabs per panel, evenly spaced and sewn securely.
- All ends woven in, with none visible through the mesh.
- The two panels hang at the same length when held side by side.
Troubleshooting
- The panel narrows as you go up: Your ch-5 loops are tightening. Loosen your chains or go up a hook size for the mesh.
- The mesh slants: Check that every Row 2 repeat starts with ch 5 and ends with ch 2, dc.
- Petals cup: Your Round 2 ch-3 is too short. Work it looser, or make it ch 4.
- The flower centers close up completely: Pull the magic ring less tightly, leaving a hole about the size of a pencil.
- The border ruffles or pulls in: Recount Row 1. It must be exactly 113 sts.
- The valance flips up: Steam it gently and pin it facing downward while it dries.
- The tabs stretch: Work them more tightly, or go down one hook size for the tabs only.
Care
Hand wash cool or machine wash on a gentle cycle in a mesh bag, then reshape and dry flat. Don’t tumble dry or hang the panels while wet, because the weight will stretch the mesh.
Final Notes
The whole design comes down to one measurement chain. A 4 in (10.2 cm) flower and a 1 in (2.5 cm) mesh loop give you 28 loops = 28 in (71.1 cm). Those 28 loops take 113 border stitches, which hold 14 scallops of 2 in (5.1 cm), which again fill exactly 28 in (71.1 cm). Vertically, 105 rows = 70 in (177.8 cm), and the borders bring the panel to 73 in (185.4 cm). Check each link as you go, and both panels will hang straight and match.
Happy crocheting!