
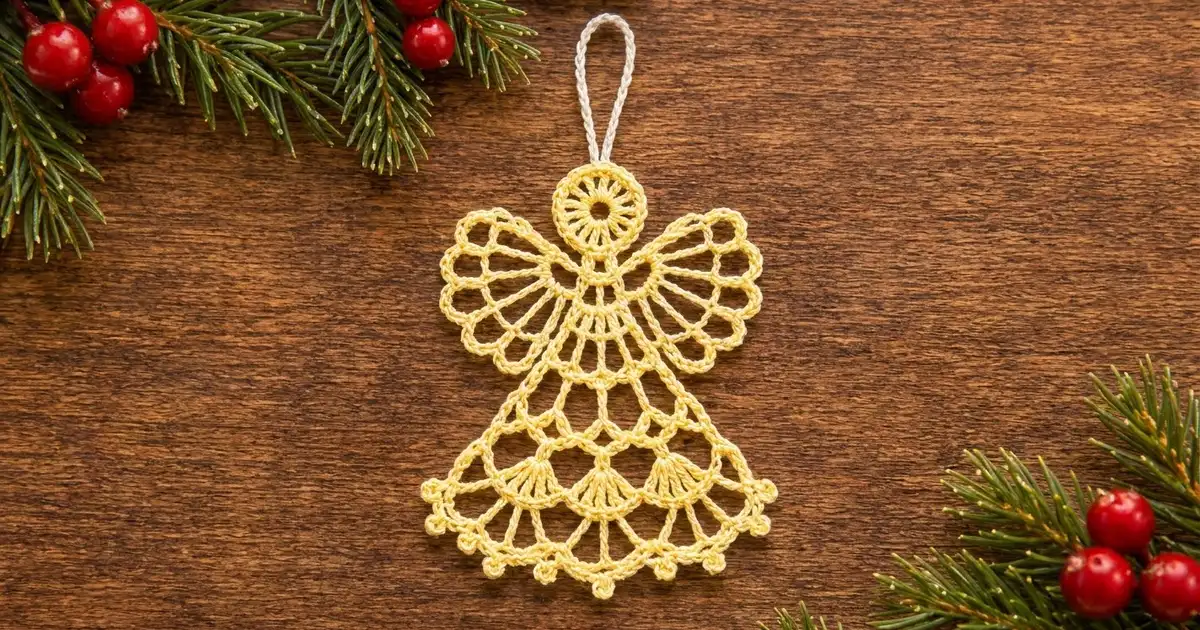
This little lace angel is one of my favorite things to make. She’s a single flat motif in pale buttery yellow thread. She has a round halo-style head, two open fan-shaped wings, and a bell-shaped skirt that ends in a row of tiny picot scallops. A white chain loop at the top of her head lets her hang straight from a tree branch.
The style is classic thread lace: open chain spaces, radiating double crochet spokes and fan shells, with no solid areas at all.
The finished angel is 3.5 in (8.9 cm) wide across the wings and hem, and 4.25 in (10.8 cm) tall without the hanging loop. With the loop she’s 5.75 in (14.6 cm) tall. This pattern uses US crochet terms throughout.
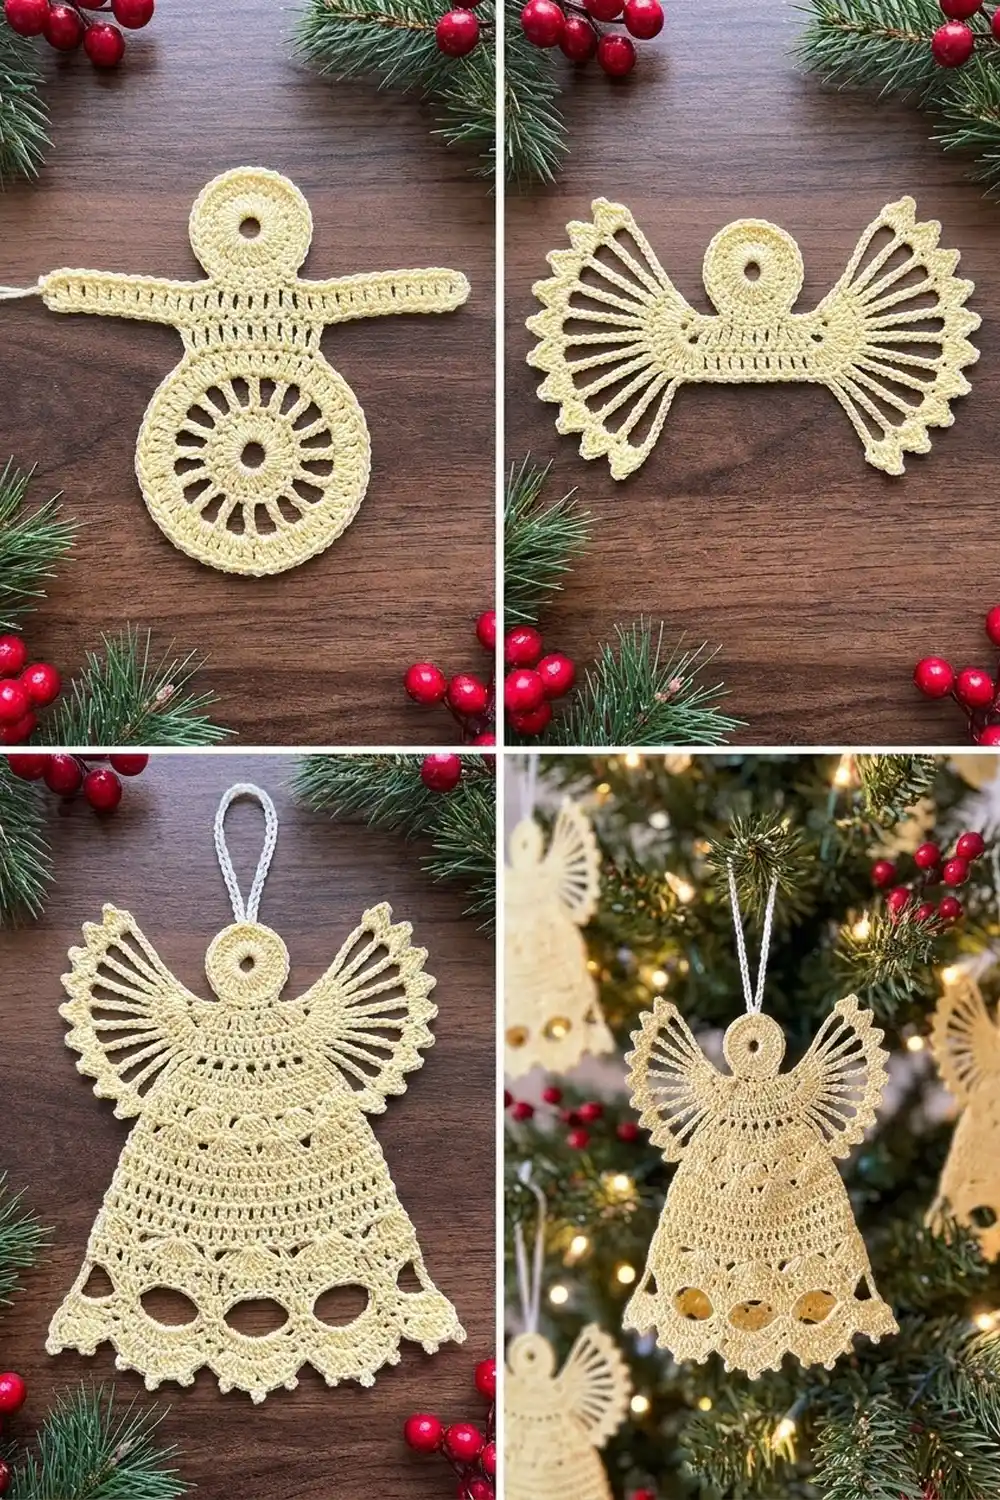
Construction is simple to follow. You work the head in the round, then a small three-row yoke below it, then one wing off each side of the yoke. Last, you work the skirt downward from the yoke in turned rows and finish it with a picot hem border. It’s all one piece, so there’s no sewing.
Finished Size and Construction
- Finished size: 3.5 in (8.9 cm) wide x 4.25 in (10.8 cm) tall, not counting the loop
- Skill level: Intermediate (thread work, stitches worked around a post)
- Terminology: US crochet terms
- Yarn weight: Lace (0), size 3 crochet thread
- Hook: 2.25 mm (B-1)
- Number of pieces: 1
- Layout: Single motif, no assembly
- Piece size: 3.5 in x 4.25 in (8.9 cm x 10.8 cm)
- Size before border: 3 in (7.6 cm) skirt width x 3.75 in (9.5 cm) tall
- Border depth: 0.5 in (1.3 cm), at the hem only
Materials
Choose a smooth, mercerized cotton thread in size 3. Mercerized cotton holds crisp lines after stiffening and gives the finished angel a slight sheen. Avoid fuzzy or textured threads, because they blur the open spaces.
- Pale yellow (main color): 12 g, about 16 m (17.5 yd)
- White or cream (hanging loop): 2 g, about 3 m (3.3 yd)
Tools:
- 2.25 mm (B-1) crochet hook
- Tapestry needle with an eye that fits size 3 thread
- Small sharp scissors
- 1 stitch marker
- Fabric stiffener or homemade starch solution
- Foam blocking board and rust-proof pins
- Plastic wrap to cover the board
Both quantities include a margin of about 20% for testing gauge and weaving in ends.
Abbreviations (US Terms)
- ch – chain
- sl st – slip stitch
- sc – single crochet
- dc – double crochet
- tr – treble crochet
- st(s) – stitch(es)
- sp(s) – space(s)
- sk – skip
- RS – right side
Special stitches:
- V-st: (dc, ch 2, dc) in the same st or sp.
- Shell: (dc, ch 1) 4 times, then dc, all in the same sp. That’s 5 dc and 4 ch-1 sps.
- Picot: ch 3, then sl st in the 3rd ch from the hook.
- Around the post: insert the hook around the whole vertical post of the stitch, not under its top loops.
Gauge and Checkpoints
With thread lace, it’s easiest to check gauge on a real part of the angel, so the head is your test piece. Make it first and measure it before you go on.
- Head after Round 1: 0.75 in (1.9 cm) across
- Head after Round 2: 1 in (2.5 cm) across
- Yoke after Row 3: 1 in (2.5 cm) wide, 9 sc
- Skirt after Row 2: 1.75 in (4.4 cm) wide
- Skirt after Row 3: 2.5 in (6.4 cm) wide
- Skirt after Row 4: 2.75 in (7.0 cm) wide
- Skirt after Row 5 (before border): 3 in (7.6 cm) wide; whole angel 3.75 in (9.5 cm) tall
- After border: 3.5 in (8.9 cm) wide, 4.25 in (10.8 cm) tall
Measure flat and unstretched. Being off by up to 0.125 in (0.3 cm) either way is fine, because blocking will even it out.
If the head is too big, change to a 2.0 mm hook or make your chains a little tighter. If it’s too small, change to a 2.5 mm hook. If your head matches gauge but the skirt cups or flares, the chain loops are the cause, not the dc.
Pattern
Head
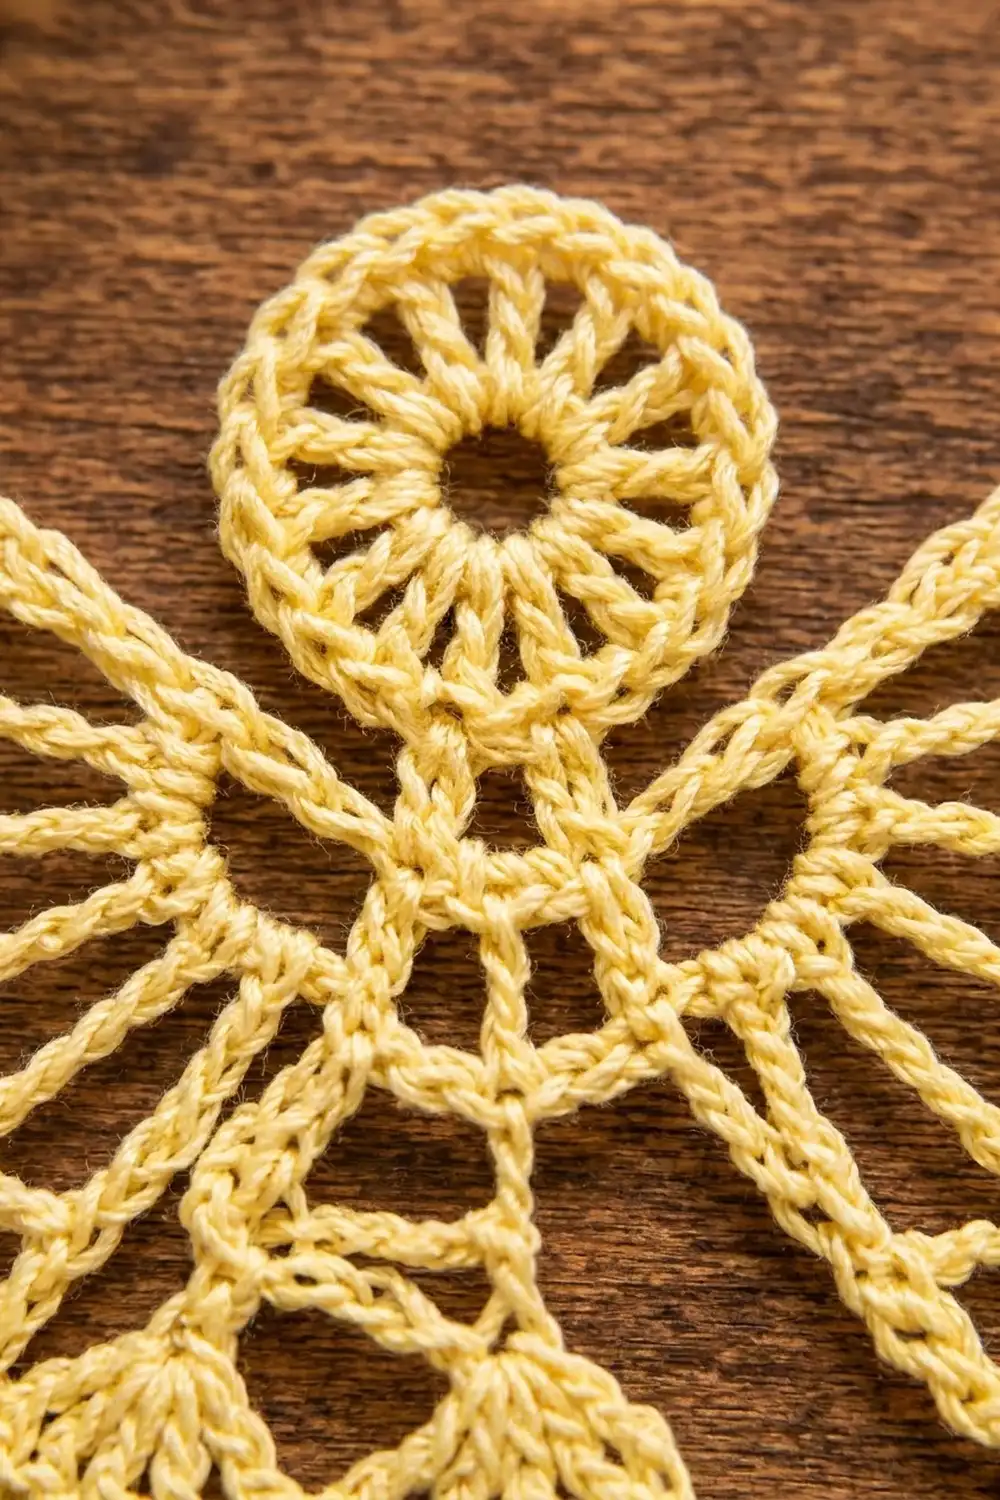
The head is a small wheel. Its center hole and dc spokes give it a halo look.
With pale yellow, ch 6 and sl st in the first ch to form a ring.
Round 1: Ch 3 (counts as dc), 15 dc in the ring, sl st in the top of the beginning ch-3. (16 dc)
Round 2: Ch 1, sc in the same st, 2 sc in the next st, sc in the next st, 2 sc in the next st; repeat from * 6 more times, sl st in the first sc. (24 sc)
Fasten off, leaving a 6 in (15.2 cm) tail. The first sc of Round 2 is st 1, and it marks the top of the head. Counting around, st 13 is the center bottom. Place a marker in st 12.
Checkpoint: the head is 1 in (2.5 cm) across.
Yoke
The yoke is the small trapezoid that connects the head to the wings and the skirt.
Row 1: With RS facing, join pale yellow with a sl st in the marked st 12. Ch 3 (counts as dc), dc in st 13, dc in st 14. (3 dc)
Row 2: Ch 4 (counts as dc + ch 1), turn, dc in the first dc, ch 1, dc in the next dc, ch 1, (dc, ch 1, dc) in the top of the beginning ch-3. (5 dc, 4 ch-1 sps)
Row 3: Ch 1, turn, sc in the first dc, sc in the next ch-1 sp, sc in the next dc; repeat from * 3 more times, working the last sc in the 3rd ch of the turning ch-4. (9 sc)
Don’t fasten off. Put the working loop on a stitch marker so it can’t unravel while you make the wings.
Checkpoint: Row 3 is a straight bar 1 in (2.5 cm) wide. This is the shoulder line under the head.
Wings (make 2, worked directly on the yoke)
Each wing starts around the post of an end stitch of yoke Row 2, so the spokes fan out from the shoulder.
Row 1: With RS facing, join a new length of pale yellow with a sl st around the post of the end stitch of Row 2 on the right-hand edge. Ch 6 (counts as tr + ch 2), tr around the same post, ch 2; repeat from * 4 more times, then tr around the same post. (7 tr, 6 ch-2 sps)
Row 2: Ch 1, turn, sc in the first tr, ch 5, sc in the next tr; repeat from * 5 more times, working the last sc in the 4th ch of the beginning ch-6. (7 sc, 6 ch-5 loops)
Row 3: Ch 1, turn, (2 sc, ch 3, 2 sc) in the next ch-5 loop; repeat from * 5 more times, sl st in the last sc of Row 2. (24 sc, 6 ch-3 points)
Fasten off. Repeat Rows 1–3 around the post of the end stitch on the left-hand edge.
Checkpoint: each wing extends 1.25 in (3.2 cm) past the edge of the yoke, so the total wingspan is 1 in + 1.25 in + 1.25 in = 3.5 in (8.9 cm).
Skirt
Put the working loop from yoke Row 3 back on your hook. You’ll work the skirt downward in turned rows. It widens through V-sts, shells and chain loops.
Row 1: Ch 5 (counts as dc + ch 2), turn, dc in the first sc (first V-st made), ch 1, sk the next sc, V-st in the next sc; repeat from * 3 more times. (5 V-sts in sc 1, 3, 5, 7 and 9; 4 ch-1 sps)
Row 2: Turn, sl st in the first dc and into the first V-st sp. Ch 5 (counts as dc + ch 2), dc in the same sp, ch 3, V-st in the next V-st sp; repeat from * 3 more times. (5 V-sts, 4 ch-3 sps)
Checkpoint: 1.75 in (4.4 cm) wide.
Row 3 (upper shells): Turn, sl st in the first dc and into the first V-st sp. Ch 4 (counts as dc + ch 1), (dc, ch 1) 3 times in the same sp, dc in the same sp (first shell made). Ch 2, sc in the next ch-3 sp, ch 2, shell in the next V-st sp; repeat from * 3 more times. (5 shells = 25 dc; 4 sc between shells)
These are the small fans across the middle of the skirt. Checkpoint: 2.5 in (6.4 cm) wide.
Row 4 (mesh): Ch 1, turn, sc in the first dc, ch 4, sc in the center (3rd) dc of the same shell, ch 4, sc in the next sc, ch 4, sc in the center dc of the next shell, ch 4; repeat from * 3 more times, sc in the 3rd ch of the beginning ch-4. (11 sc, 10 ch-4 loops)
Checkpoint: 2.75 in (7.0 cm) wide.
Row 5 (hem loops): Ch 1, turn, sc in the first ch-4 loop, ch 6, sc in the next ch-4 loop; repeat from * 8 more times. (10 sc, 9 ch-6 loops)
Checkpoint before the border: the skirt is 3 in (7.6 cm) wide, and the angel is 3.75 in (9.5 cm) tall from the top of the head to the bottom of the loops.
Border (Picot Hem)
The border goes along the hem only. The turning chains already give the sides of the skirt smooth edges, so they don’t need one.
Border gauge: 9 scallops across 3.5 in (8.9 cm), which makes each scallop about 0.39 in (1.0 cm) wide. The border adds 0.5 in (1.3 cm) of depth. It also adds 0.25 in (0.6 cm) of width on each side, because the arched sc spread outward.
Border Row 1: Ch 1, turn, sl st in the first sc. Work (4 sc, picot, 4 sc) in the next ch-6 loop; repeat from * 8 more times, sl st in the last sc of Row 5. Fasten off.
Count: 9 loops x 8 sc = 72 sc, plus 9 picots. This edge has no corners, so there are no corner stitches to add.
Why the math works: a ch-6 loop forms an arch, and an arch is longer than 6 chains laid out straight. Eight sc fill that arch snugly without cupping or ruffling. Because 9 is an odd number, the middle (5th) scallop sits exactly at center front with 4 scallops on each side, so the hem is symmetrical.
Hanging Loop
Join the white thread with a sl st in st 1 of head Round 2 (the top center). Ch 25, then sl st in the same st. Fasten off. The loop stands about 1.5 in (3.8 cm) above the head.
Final Blocking
- Weave in all the ends through stitches of the same color, for at least 1 in (2.5 cm). Don’t trim them yet.
- Dampen the angel with stiffener, or soak her in it, then press her gently between paper towels until she’s damp but not dripping.
- Cover the blocking board with plastic wrap and lay the angel on it RS up.
- Pin the head into a circle 1 in (2.5 cm) across, with one pin through the center ring.
- Pin the yoke bar so it’s straight and level.
- Open each wing into a fan and pin every ch-3 point. Check that the wingspan is 3.5 in (8.9 cm).
- Put one pin in each picot so the 9 points form an even curve 3.5 in (8.9 cm) wide. Check that the height is 4.25 in (10.8 cm).
- Leave her to dry completely, at least overnight. Then unpin her and trim the ends close.
Final Quality-Control Checklist
- Head: 16 dc spokes and a 24 sc rim, round and flat
- Yoke: 9 sc in the shoulder bar, centered under the head
- Wings: 7 tr spokes and 6 points each, the same size on both sides
- Skirt: 5 V-sts, 5 shells, 10 ch-4 loops, 9 ch-6 loops
- Border: 9 scallops, 72 sc and 9 picots, with the middle scallop centered
- Size: 3.5 in (8.9 cm) x 4.25 in (10.8 cm)
- Hanging loop exactly at top center, so the angel hangs straight
- No ends visible from the front
Troubleshooting
The head ruffles or cups. If it ruffles, you probably have too many stitches, so recount Round 2 (24 sc). If it cups, your sc are too tight; use a hook half a size larger for that round only.
The yoke is off center. Row 1 has to start in st 12. Count again from st 1 at the top.
The wings are different sizes. Count the tr in Row 1 of each wing (there should be 7). Check that both wings start around the end posts of the same row.
The skirt flares too much. The chains in Rows 4 and 5 are too loose. Make them tighter, or use ch 3 and ch 5 instead of ch 4 and ch 6.
The skirt pulls in at the hem. The chains are too tight. Loosen them a little, or work 1 extra sc in each scallop (5 sc, picot, 4 sc).
Care
Dust her with a soft brush. If she gets dirty, rinse her in cool water, then stiffen and block her again. Store her flat between sheets of tissue paper so the picots and wing points don’t bend.
Final Notes
Everything in this pattern depends on a short chain of measurements. The head is 1 in (2.5 cm) across, and the 9-sc yoke bar is 1 in (2.5 cm) wide. The wings bring the width to 3.5 in (8.9 cm). The skirt grows from 1.75 in (4.4 cm) to 3 in (7.6 cm), and the angel is 3.75 in (9.5 cm) tall before the border. The picot hem brings her to her final size of 3.5 in x 4.25 in (8.9 cm x 10.8 cm). If you check each of these numbers as you go, your angel will come out balanced, symmetrical and ready to hang.
Happy crocheting!