

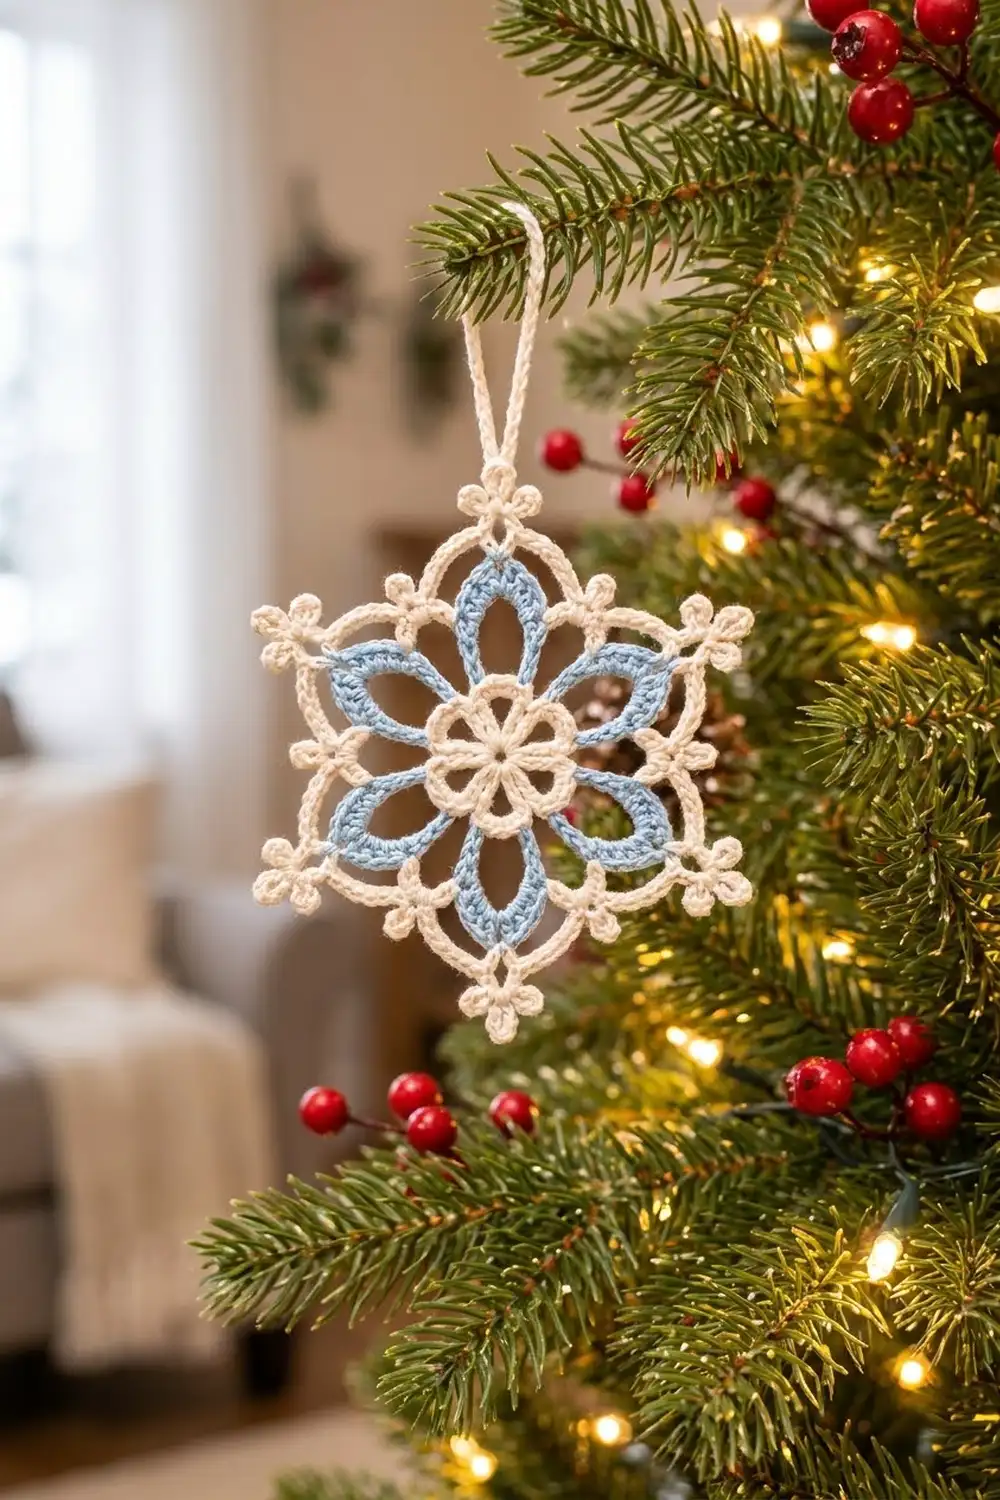
The Frost Lily Snowflake is a lacy six-pointed ornament. Its center is a small cream flower. Six long, icy blue petals open out from it, and a crisp cream frame finishes each point with a tiny three-picot trefoil.
The two colors suit a winter tree well. Cream gives a clean, lacy outline, and light blue adds a frosted look without being too bright. The open teardrop petals let tree lights and branches show through, so the snowflake looks delicate even though it is sturdy.
This pattern uses US crochet terms. The finished ornament is 4.5 in (11.4 cm) from point to point, not counting the hanging loop. The loop adds about 2.5 in (6.4 cm).
The ornament is worked in the round as one single piece. You make the cream center flower first, then add the blue petal loops and cover them with stitches. After that, a cream chain frame goes around the outside and is covered with single crochet. A final round adds the picot trefoils, and a separate loop is added for hanging.
Finished Size and Construction
- Finished size: 4.5 in (11.4 cm) point to point
- Hanging loop: about 2.5 in (6.4 cm) long
- Skill level: Easy–Intermediate
- Terminology: US crochet terms
- Yarn weight: Size 3 mercerized cotton crochet thread (or a light fingering cotton)
- Hook: 2.25 mm (US B-1)
- Number of pieces: 1
- Layout: Single six-pointed motif, worked in the round
- Piece size after Round 5 (blue petals): 3.25 in (8.3 cm) tip to tip
- Size before border (after Round 6 frame): 3.75 in (9.5 cm)
- Border depth (Rounds 7–8): about 3/8 in (1.0 cm) at each point
Materials
Yarn: Use a firmly twisted, mercerized cotton thread. It shows stitch detail clearly, holds starch well, and keeps the points sharp. Soft acrylic will give you a floppier, rounder snowflake.
- Color A – Cream: 10 g / about 30 m (33 yd)
- Color B – Light Icy Blue: 5 g / about 15 m (16 yd)
These quantities include a margin of about 25% for your gauge swatch, yarn tails, and small tension differences.
Tools:
- 2.25 mm (US B-1) crochet hook
- Tapestry needle with a small eye
- Small scissors
- Rust-proof pins and a foam blocking mat
- Fabric stiffener or spray starch
- Ruler or tape measure
Abbreviations (US Terms)
- ch – chain
- sl st – slip stitch
- sc – single crochet
- hdc – half double crochet
- dc – double crochet
- sp – space
- st(s) – stitch(es)
- rep – repeat
- MR – magic ring
Special stitch – Picot: Ch 3, sl st in the 3rd ch from the hook.
Special stitch – Trefoil: (Sc, [picot] 3 times, sc) all in the same ch-3 space. This makes the three-bump cluster at each point.
Gauge and Checkpoints
Exact gauge matters less for an ornament than for a garment. Still, the petal lengths and frame chains are sized to fit each other, so check your work at each stage before you continue.
Test first: Work Rounds 1–3 once as a test swatch.
Checkpoints:
- After Round 1: 0.5 in (1.3 cm) across
- After Round 3: 1.25 in (3.2 cm) across, measured from petal tip to the opposite petal tip
- After Round 5: 3.25 in (8.3 cm) from blue tip to the opposite blue tip
- After Round 6: 3.75 in (9.5 cm) point to point, lightly stretched
- After Round 8 and blocking: 4.5 in (11.4 cm) point to point
If your piece is too big: Change to a 2.0 mm hook, or work the chains more tightly.
If your piece is too small: Change to a 2.5 mm hook. If only the frame looks tight, add 1 chain to each ch-11 in Round 6, and add 1 sc to each 12-sc group in Round 7 to match.
Pattern
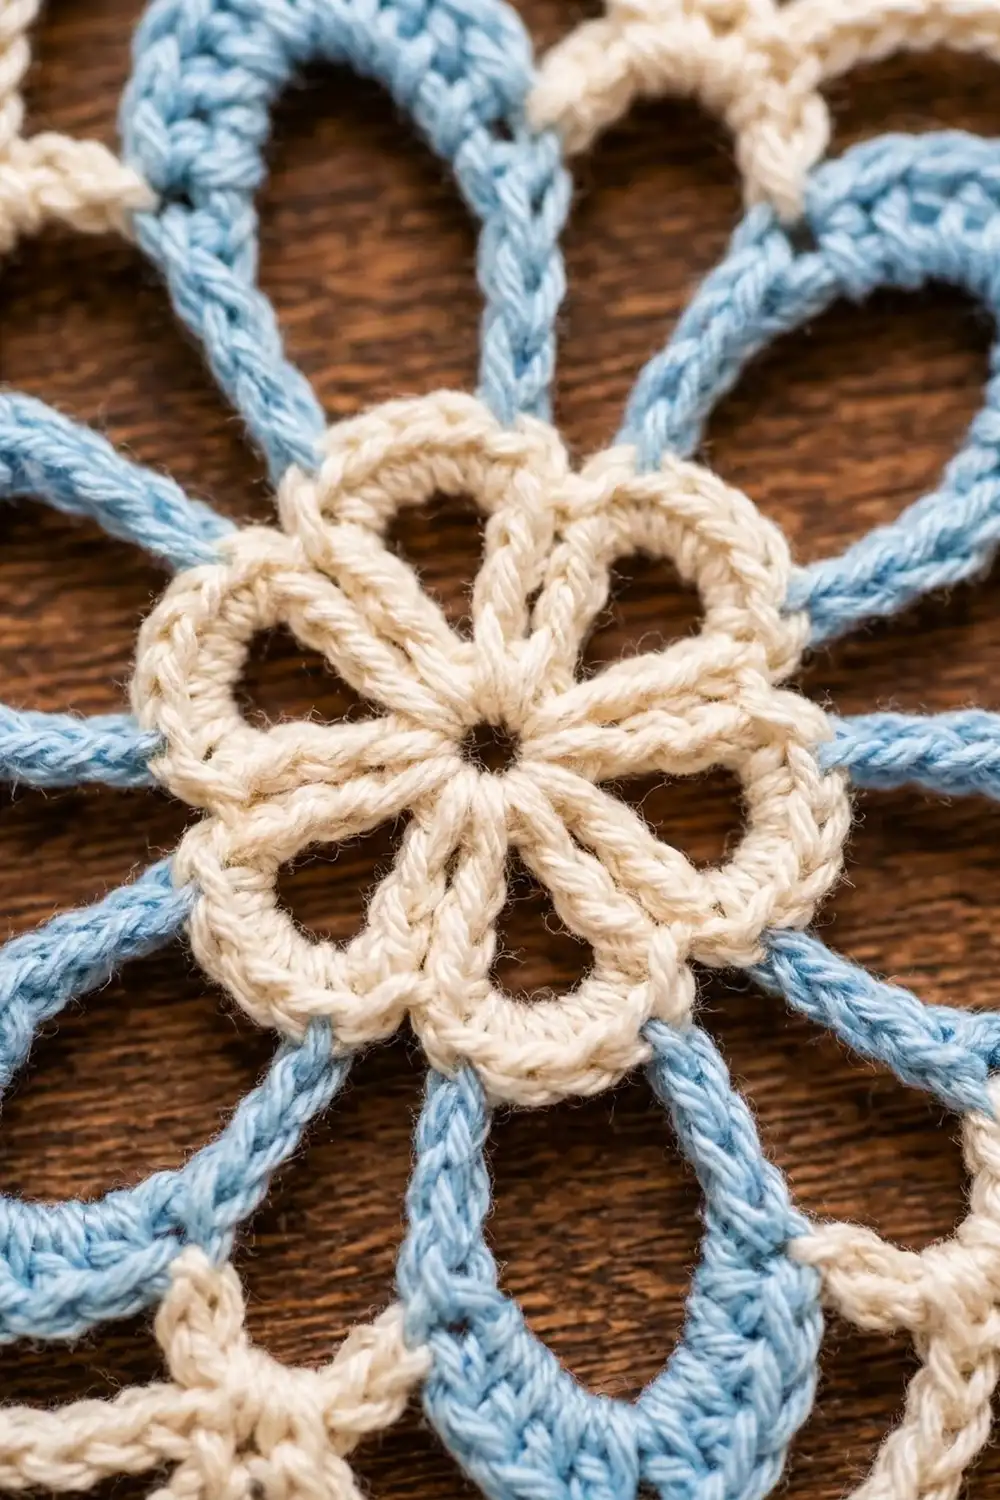
Center Flower (Color A – Cream)
Round 1: Make a magic ring. Ch 1, 12 sc into the ring. Pull the ring closed and sl st to the first sc to join. (12 sc)
Round 2: Ch 1, sc in the same st as the join. Ch 4, skip the next st. Sc in the next st, ch 4, skip the next st. Rep from * to * 4 more times. Sl st to the first sc to join. (6 sc, 6 ch-4 sps)
Round 3: Work the following into each ch-4 sp around: (sc, hdc, 3 dc, hdc, sc). Sl st to the first sc to join. Fasten off. (6 petals; 42 sts total, 7 sts per petal)
The middle dc of each petal (the 2nd of the 3 dc) is that petal’s center dc. Each blue petal will grow from one of these.
Checkpoint: The flower should measure 1.25 in (3.2 cm) across and lie flat. If the petals cup, block them lightly with your fingers before you continue.
Blue Petal Loops (Color B – Light Icy Blue)
Round 4: Join Color B with a standing sc in the center dc of any petal. Ch 12, then sc in the same center dc to make the first petal loop. Ch 3. Sc in the center dc of the next petal, ch 12, sc in the same center dc, ch 3. Rep from * to * 4 more times. Sl st to the first sc to join. (12 sc, 6 ch-12 loops, 6 ch-3 sps)
Each ch-12 loop should stick straight out from its cream petal. Each ch-3 space should sit just behind the gap between two cream petals.
Round 5: Sl st into the first ch-12 loop. Work into the ch-12 loop: (3 sc, 3 hdc, 2 dc, ch 2, 2 dc, 3 hdc, 3 sc). Then work 3 sc in the next ch-3 sp. Rep from * to * 5 more times. Sl st to the first sc to join. Fasten off. (114 sts total: 16 sts per petal + 3 sc between petals, × 6; plus 6 ch-2 tips)
The stitches get taller from sc to hdc to dc and back down. That gives each petal its teardrop shape: narrow near the center, wider in the middle, and pointed at the ch-2 tip. The middle of each loop stays open.
Checkpoint: 3.25 in (8.3 cm) from blue tip to the opposite blue tip. Do not continue until all six petals are about the same length.
Cream Frame (Color A – Cream)
Round 6: Join Color A with a standing sc in the ch-2 tip of any blue petal. Ch 3, sc in the same tip. Ch 11, then sc in the 2nd (center) sc of the 3-sc group between petals. This is the valley sc. Ch 11, then work (sc, ch 3, sc) in the next ch-2 tip. Rep from * to * 5 times in total, omitting the final (sc, ch 3, sc) on the last repeat. Sl st to the first sc to join. (18 sc: 12 at the tips and 6 valley sc; 6 ch-3 tips; 12 ch-11 sps)
The valley sc pulls the frame inward between petals. This makes the V-shaped dips that give the star its outline.
Checkpoint: About 3.75 in (9.5 cm) point to point. The chains should lie close along the blue petals without pulling them out of shape.
Border
The border is Rounds 7 and 8 together. It firms up the frame, sharpens the points, and adds the trefoils.
Border gauge: 12 sc covers one ch-11 sp in about 1.25 in (3.2 cm). Each point-to-point segment has 2 of those spaces, so one segment measures about 2.5 in (6.4 cm) along its edge.
Round 7: Sl st in the next ch, then sl st into the ch-3 tip. Ch 1, (2 sc, ch 3, 2 sc) in the same tip. Work 12 sc in the next ch-11 sp, skip the valley sc, and work 12 sc in the next ch-11 sp. Then work (2 sc, ch 3, 2 sc) in the next ch-3 tip. Rep from * to * 5 times in total, omitting the final tip group on the last repeat. Sl st to the first sc to join. (168 sc total; 28 sc per point segment: 2 + 12 + 12 + 2; 6 ch-3 tips)
Round 8 (Trefoil Round): Ch 1. Sc in each sc around. In each ch-3 tip, work a Trefoil: (sc, [picot] 3 times, sc). Sl st to the first sc to join. Fasten off. (180 sc = 168 worked 1-per-stitch + 12 added at the tips; 30 sc per segment; 18 picots)
Why the math works: Each ch-11 space gets 12 sc. One extra stitch per space keeps the frame from cupping. Skipping the valley sc keeps the dip sharp instead of rounded. Round 8 adds exactly 2 sc per tip and nothing along the sides, so the sides stay flat and only the points grow. Check: 6 segments × 28 sc = 168, and 168 + (6 × 2) = 180.
Hanging Loop (Color A – Cream)
Join Color A with a sl st in the center picot of any Trefoil. Ch 30, then sl st into the same picot. Ch 1, work 36 sc over the ch-30 loop, and sl st into the picot to finish. Fasten off. (36 sc)
The finished loop is about 2.5 in (6.4 cm) long. Working 6 more sc than chains keeps the covered loop smooth and stops it from twisting.
Final Blocking
- Weave in all ends along stitches of the same color. Hide cream tails in the frame and blue tails inside the petal stitches.
- Soak the ornament in fabric stiffener, or dampen it and spray it evenly with starch.
- Gently squeeze out the excess. Do not wring.
- Lay the ornament flat on the blocking mat, right side up.
- Pin the center picot of each Trefoil so the ornament measures 4.5 in (11.4 cm) from point to point.
- Pin the tip of each blue petal so all six are even and point straight out.
- Pin each valley lightly toward the center to sharpen the V-shapes.
- Shape the inside of each blue petal into an open teardrop with a pin or toothpick.
- Let it dry completely, usually 12–24 hours.
- Unpin it. Straighten the hanging loop and let it air out.
Final Quality-Control Checklist
- All six cream center petals are the same size.
- All six blue petals are the same length and have open centers.
- Point to point measures 4.5 in (11.4 cm).
- Each point has exactly 3 picots, and they sit evenly.
- All six valleys are sharp and point toward the center.
- No blue shows through the cream frame stitches.
- All ends are woven in, trimmed, and not visible from either side.
- The hanging loop is about 2.5 in (6.4 cm) long and firmly attached.
- The ornament lies flat and stays stiff when you hold it up by the loop.
Troubleshooting
The center flower ruffles: Your Round 1 stitches are too loose. Close the magic ring tightly, and keep the ch-4 spaces in Round 2 snug.
The blue petals are uneven in length: Count each ch-12 carefully. Work the ch-2 tip in the same place on every petal.
The blue petals twist: You twisted the ch-12 before joining it. Check that each loop lies flat before you work the sc into the center dc.
The frame pulls the petals inward: Your Round 6 chains are too tight. Use a 2.5 mm hook for the chains only, or work ch 12 and put 13 sc in each space in Round 7.
The frame waves or flutters: You may have worked too many sc per space. Check that each space has 12 sc and that you skipped the valley sc.
The points are blunt: Starch more firmly and pin the center picot tightly when blocking.
The picots are uneven: Make all three picots with the same chain tension. Pull up the slip stitch snugly each time.
The ornament hangs crooked: The loop is not attached at a tip’s center picot. Remove it and reattach it there.
Care
Hand wash in cool water with mild soap, then reshape and re-starch as needed. Store the ornament flat, or hang it in a box, so the points do not get crushed.
Final Notes
Each stage builds on the size of the one before. Round 1 is 0.5 in (1.3 cm). The center flower reaches 1.25 in (3.2 cm), and the blue petals take it to 3.25 in (8.3 cm). The cream frame brings it to 3.75 in (9.5 cm), and the border and blocking finish it at 4.5 in (11.4 cm) from point to point, plus a 2.5 in (6.4 cm) hanging loop.
The stitch counts follow the same chain. 12 sc becomes 6 loops, then 6 cream petals and 6 blue petals. The frame has 168 sc, and the trefoil round finishes with 180 sc and 18 picots. If you measure at each checkpoint, every snowflake you make will come out matching.
Happy crocheting!