

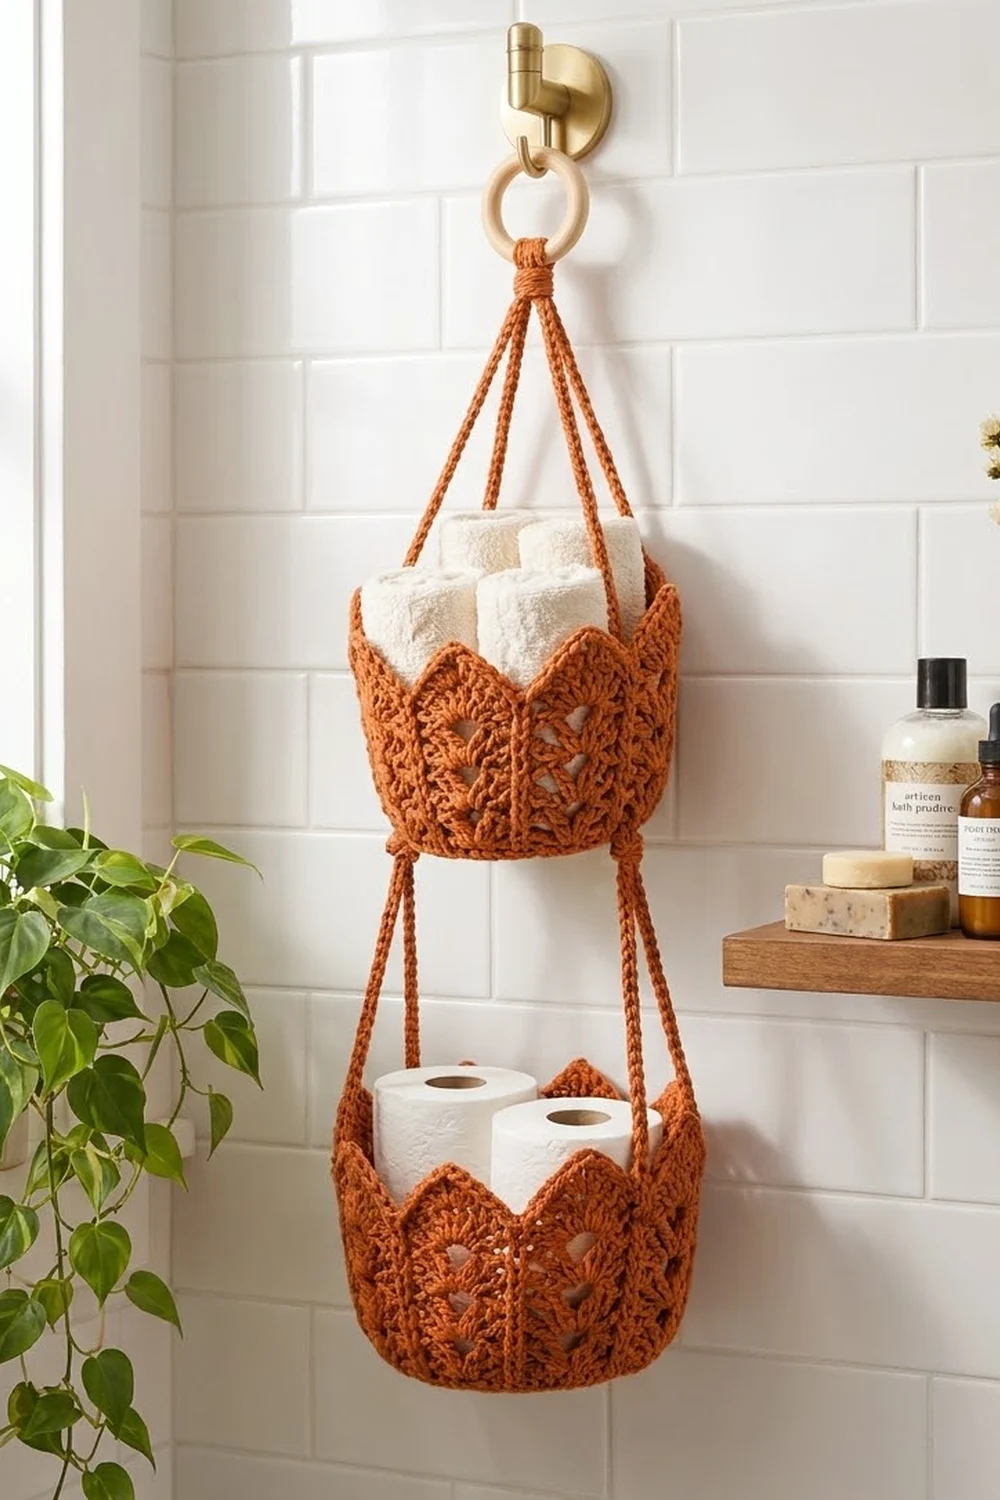
The Terracotta Crown is a two-tier hanging organizer made from two matching lace baskets. Each basket has a firm single-crochet base and openwork walls split into eight panels, and the rim rises into eight crown points.
The whole piece uses one warm terracotta cotton plus a natural wooden ring at the top. It looks good in a bathroom, a nursery or an entryway, holding rolled hand towels, toilet paper, toiletries or small toys.
This pattern uses US crochet terms. Each finished basket is 8.5 in (21.6 cm) across and 5.25 in (13.3 cm) tall at the points. The assembled hanger measures about 30 in (76.2 cm) from the top of the ring to the bottom of the lower basket.
You’ll make the pieces separately: two baskets worked from the base up in joined rounds, then six slip-stitch cords. The upper cords loop through the ring and are sewn inside the upper basket rim. The lower cords are knotted below the upper basket and sewn inside the lower basket rim.
Finished Size and Construction
- Basket size: 8.5 in (21.6 cm) diameter × 5.25 in (13.3 cm) tall at the points
- Total hanging length: about 30 in (76.2 cm)
- Skill level: Intermediate
- Terminology: US
- Yarn weight: Worsted (#4) cotton
- Hook: 5.0 mm (H-8)
- Number of pieces: 2 baskets, 2 long cords, 4 short cords, 1 wooden ring
- Layout: two baskets stacked vertically
- Size before the rim edging: 4 in (10.2 cm) wall height after Rnd 26
- Rim edging (border) depth: 1.25 in (3.2 cm) at the peaks, 0.25 in (0.6 cm) at the valleys
Materials
Choose a smooth, firm 100% cotton or cotton blend in worsted weight. Cotton holds the points crisply and stands up to a damp bathroom. Acrylic works too, but the baskets will be softer.
- Terracotta (one color): 250 g, about 425 m (465 yd), based on yarn of roughly 85 m per 50 g
- One wooden ring, 2.5 in (6.4 cm) diameter
- 5.0 mm (H-8) crochet hook
- Tapestry needle
- 8 stitch markers
- Scissors and a measuring tape
- Spray bottle, rustproof pins and a round form about 8.5 in (21.6 cm) wide for blocking
Each basket uses about 90 g and the cords use about 30 g together, for about 210 g of actual use. The amounts listed include a safety margin for gauge differences and swatching.
Abbreviations (US Terms)
- ch – chain
- sl st – slip stitch
- sc – single crochet
- hdc – half double crochet
- dc – double crochet
- tr – treble crochet
- inc – 2 sc in the same stitch
- BLO – back loop only
- fpdc – front post double crochet: yo, insert the hook from front to back to front around the post of the stitch, then finish as a dc
- sp – space
- st(s) – stitch(es)
Special stitch:
V-st – (dc, ch 1, dc) in the same stitch or space. The ch-1 counts as 1 stitch in the stitch counts.
Round note: All rounds are joined. On sc rounds, start with ch 1 (doesn’t count). On dc rounds, start with ch 2 (doesn’t count). Join every round with a sl st to the first stitch.
Gauge and Checkpoints
- Sc gauge: 14 sc × 15 rounds = 4 in (10.2 cm)
- Dc gauge: 14 dc × 8 rounds = 4 in (10.2 cm)
Make one complete basket before you start the second. Check it at each stage:
- After Rnd 8: 48 sts, base 4.25 in (10.8 cm) across
- After Rnd 16: 96 sts, base 8.5 in (21.6 cm) across
- After Rnd 20: wall 1.3 in (3.3 cm) tall, measured from the fold
- After Rnd 26: wall 4 in (10.2 cm) tall
- After Rnd 28: 5.25 in (13.3 cm) tall at the peaks, 4.25 in (10.8 cm) at the valleys
If the base measures more than 8.75 in (22.2 cm) after Rnd 16, go down to a 4.5 mm hook. If it measures less than 8.25 in (21.0 cm), go up to a 5.5 mm hook. If the base ruffles, your rounds are too short, so loosen the height of your stitches. If it cups, tighten them. Keep the stitch counts exactly as written. Gauge is fixed by changing the hook, not the counts.
Basket (Make 2)
Base
Rnd 1: Make a magic ring, ch 1, 6 sc in the ring, join. (6 sts)
Rnd 2: Ch 1, inc in each st around, join. (12 sts)
Rnd 3: Ch 1, (sc 1, inc) 6 times, join. (18 sts)
Rnd 4: Ch 1, (sc 2, inc) 6 times, join. (24 sts)
Rnd 5: Ch 1, (sc 3, inc) 6 times, join. (30 sts)
Rnds 6–16: Continue the same way. Each round has one more plain sc before each increase than the round before: on Rnd n, work (sc n − 2, inc) 6 times. Each round’s total is 6 × the round number:
- Rnd 6: 36 sts
- Rnd 7: 42 sts
- Rnd 8: 48 sts
- Rnd 9: 54 sts
- Rnd 10: 60 sts
- Rnd 11: 66 sts
- Rnd 12: 72 sts
- Rnd 13: 78 sts
- Rnd 14: 84 sts
- Rnd 15: 90 sts
- Rnd 16: 96 sts
On even-numbered rounds, start with half of the plain stitches, work the increase, and put the other half at the end of the repeat. This staggers the increases so the base stays round rather than hexagonal.
Checkpoint: 96 sts, 8.5 in (21.6 cm) across, lying flat.
Walls
Rnd 17: Ch 1, sc in BLO of each st around, join. (96 sts) This makes the fold line where the base meets the wall.
Rnds 18–19: Ch 1, sc in each st around, join. (96 sts)
Rnd 20: Ch 2, dc in each st around, join. (96 sts)
Place a marker in every 12th st, starting with the first st, so you have 8 markers. Each marker shows where a panel ridge will sit.
Lace Panels
Each repeat covers 12 sts and makes one panel. Every round below has 8 repeats.
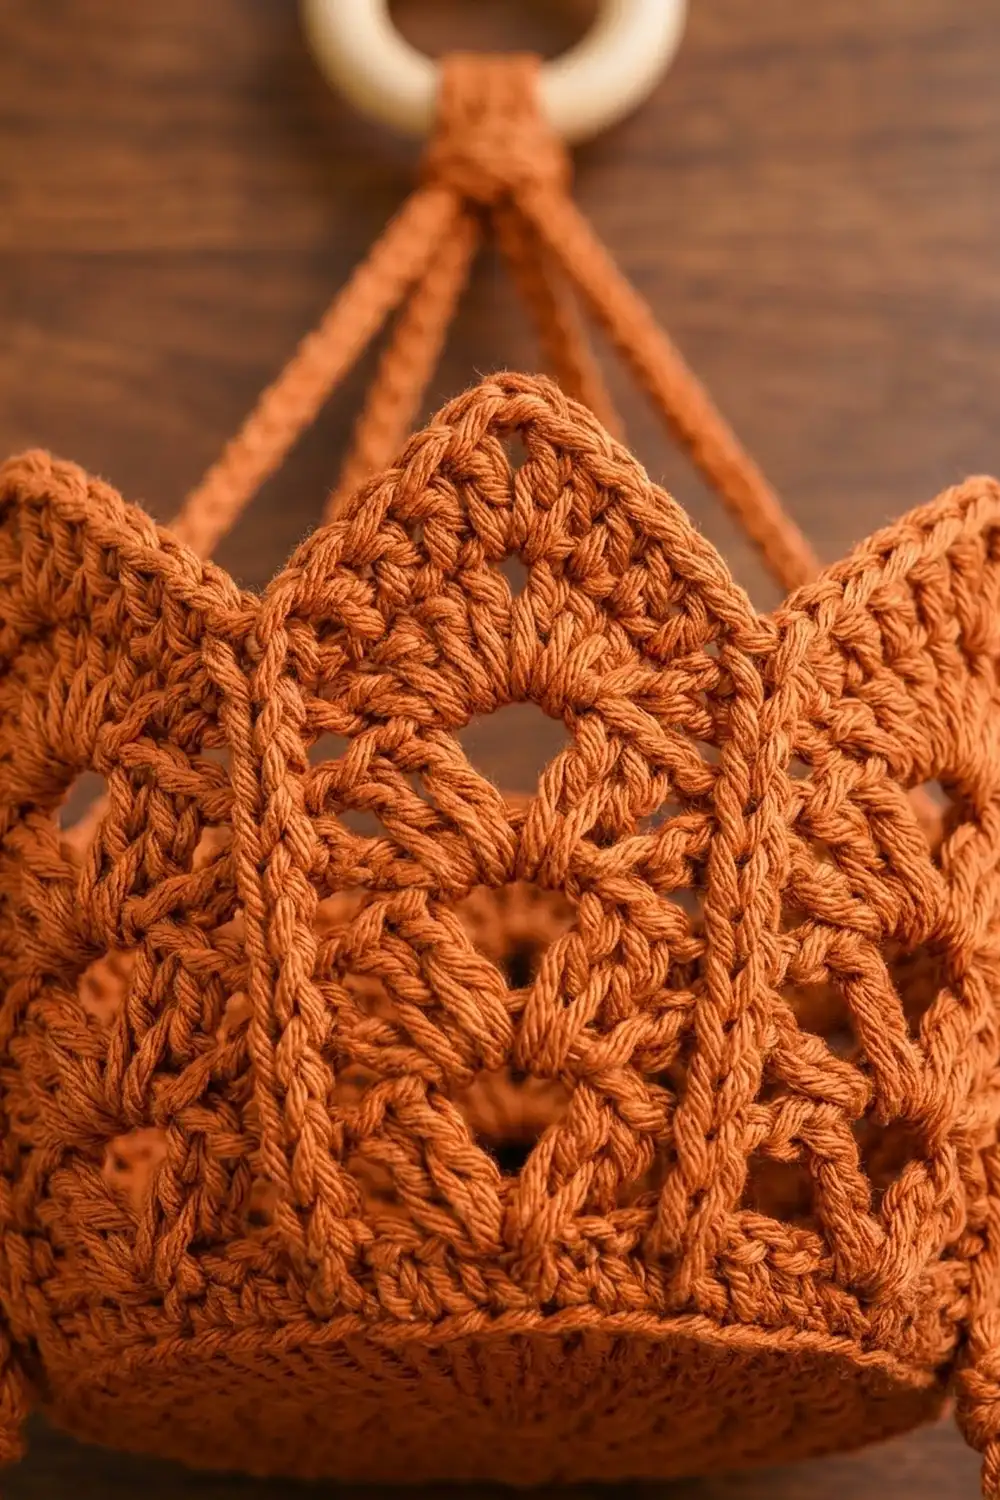
Rnd 21: Ch 2, fpdc around the next st, dc in the next 4 sts, skip 1 st, V-st in the next st, skip 1 st, dc in the next 4 sts, repeat 8 times, join.
Per repeat: 1 + 4 + 3 + 4 = 12. (96 sts)
Rnd 22: Ch 2, fpdc around the fpdc, dc in the next 4 dc, skip the next dc, V-st in the ch-1 sp, skip the next dc, dc in the next 4 dc, repeat 8 times, join. (96 sts)
Rnd 23: Ch 2, fpdc around the fpdc, dc in the next 3 dc, ch 1, skip the next dc, V-st in the ch-1 sp of the V-st, ch 1, skip the next dc, dc in the next 3 dc, repeat 8 times, join.
Per repeat: 1 + 3 + 1 + 3 + 1 + 3 = 12. (96 sts)
Rnd 24: Ch 2, fpdc around the fpdc, dc in the next 3 dc, dc in the next ch-1 sp, ch 3, skip the V-st (3 sts), dc in the next ch-1 sp, dc in the next 3 dc, repeat 8 times, join.
Per repeat: 1 + 3 + 1 + 3 + 1 + 3 = 12. (96 sts) This leaves the triangular opening above the stacked Vs.
Rnd 25: Ch 2, fpdc around the fpdc, dc in the next 4 dc, 3 dc in the ch-3 sp, dc in the next 4 dc, repeat 8 times, join.
Per repeat: 1 + 4 + 3 + 4 = 12. (96 sts)
Rnd 26: Ch 1, sc in each st around, join. (96 sts)
Checkpoint: The wall is 4 in (10.2 cm) tall: 0.8 in (2.0 cm) of sc, 3 in (7.6 cm) of dc rounds, and one 0.27 in sc round. The 8 raised ridges should run straight up from the markers.
Make All Pieces
Baskets: Repeat the basket instructions for a second basket. Both baskets are identical, at about 90 g each.
Long cords (make 2): Ch 151. Sl st in the back bump of the 2nd ch from the hook and in each remaining ch. (150 sl sts) Each cord is about 30 in (76.2 cm) long, at 5 sts per inch. Leave a 10 in (25.4 cm) tail at each end.
Short cords (make 4): Ch 41. Sl st in the back bump of the 2nd ch from the hook and in each remaining ch. (40 sl sts) Each cord is about 8 in (20.3 cm) long. Leave a 10 in (25.4 cm) tail at each end.
Weigh or measure the cords against each other. All the long cords should match, and all the short cords should match, within 0.25 in (0.6 cm).
Layout (top to bottom):
        [ wooden ring ]
        [ wrap binding ]
    /  /         \  \     4 strands (2 long cords folded)
  [   UPPER BASKET    ]
    |  |         |  |     4 short cords, knotted at top
  [   LOWER BASKET    ]
Joining
Mark the attachment points. On each basket, count the 8 panel ridges. Mark ridges 1, 3, 5 and 7, which are 24 sts apart, so the cords are spaced evenly at 4 points.
Upper cords. Fold each long cord in half over the wooden ring, so you have 4 strands of 15 in (38.1 cm). Push the two folds next to each other on the ring.
Cut an 18 in (45.7 cm) length of yarn. Wrap it tightly around all 4 strands just below the ring 10 times, to make a binding about 0.75 in (1.9 cm) long. Pass the tail under the wraps with the needle and bury it.
Attach the upper basket. Take one strand to each marked ridge. Lay the last 1 in (2.5 cm) of the strand against the inside of the wall at Rnd 25, directly above the ridge.
Whipstitch the cord to Rnd 25 using its tail. Match 1 cord st to 1 basket st, which makes 5 stitches of overlap. Before you sew, check that all 4 strands hang at the same length from the binding.
Lower cords. Tie a single overhand knot 1 in (2.5 cm) from the top of each short cord. Hold the knot against the outside of the upper basket at Rnd 18, directly below one of the upper cord points.
Sew the 1 in (2.5 cm) end above the knot flat to Rnds 18–19 on the outside, then secure it through Rnd 17. The knot should sit just below the sewn section.
Attach the lower basket. Sew the bottom 1 in (2.5 cm) of each short cord inside the lower basket at Rnd 25, above ridges 1, 3, 5 and 7. Use the same 1-stitch-to-1-stitch whipstitch.
Tension advice: Sew firmly but don’t pull the cord tight, or the rim will dent. The cords should lie flat against the wall without bunching.
Size checkpoint: Hang the piece before you weave in the ends. The upper rim should hang level. There should be about 6 in (15.2 cm) of exposed cord between the baskets, and the full length should be about 30 in (76.2 cm).
Border (Crown Points)
Work the border on each basket before joining. It’s written here because it sets the final rim shape.
Border gauge: At Rnd 26 the rim is about 27.4 in (69.6 cm) around. Each of the 8 points is 12 sts wide, about 3.4 in (8.6 cm). Each panel ridge (stitch 1 of the repeat) becomes a valley.
Rnd 27: Sl st in the first st (the valley). Sc in the next st, hdc in the next st, dc in each of the next 2 sts, tr in the next st, (tr, ch 2, tr) in the next st, tr in the next st, dc in each of the next 2 sts, hdc in the next st, sc in the next st, sl st in the next st. Repeat from * 8 times. On the last repeat, end with a sl st in the first sl st instead of the next st.
Per point: 1 sl st + 5 + 2 tr + 5 = 13 sts plus 1 ch-2 sp.
Count: 96 sts worked one into each existing st + 8 extra tr (1 per point) = 104 sts plus 8 ch-2 sps.
Rnd 28: Sl st into the next sc. Ch 1. Sc in each of the next 6 sts, (sc, ch 2, sc) in the ch-2 sp, sc in each of the next 6 sts, skip the sl st, repeat 8 times, join to the first sc. Fasten off.
Per point: 6 + 2 + 6 = 14 sc plus 1 ch-2 sp.
Count: 96 sts worked one into each existing st (12 non-sl-st sts × 8) + 16 extra sc (2 per point tip) = 112 sc plus 8 ch-2 sps.
Why the math works: The 96-stitch circle divides evenly into 8 repeats of 12. The base increases put every ridge exactly 12 stitches apart, and the border keeps that division. The graduated stitches (sc → hdc → dc → tr) build each slope evenly. The doubled tr and the ch-2 tip sharpen the peak, and skipping the sl st in Rnd 28 deepens each valley right above a ridge.
Final Blocking
- Weave in all ends inside the baskets, following the stitch columns.
- Turn each basket right side out and spray it until it’s damp, not soaked.
- Set each basket over a round form 8.5 in (21.6 cm) wide, such as a canister or a bowl wrapped in a towel.
- Pull each point straight up and pin the ch-2 tip so all 8 peaks stand 1.25 in (3.2 cm) above the valleys.
- Press the base flat against the form so the Rnd 17 fold stays crisp.
- Let both baskets dry fully, for at least 24 hours.
- Spray the cords lightly and hang them with a small weight so they dry straight.
- Join the pieces only after everything is dry.
Final Quality-Control Checklist
- Both bases are 8.5 in (21.6 cm) across and lie flat.
- Each basket has 96 sts in Rnds 16–26, 104 sts in Rnd 27 and 112 sc in Rnd 28.
- There are 8 ridges and 8 points per basket, evenly spaced.
- The V openings and triangles line up vertically in every panel.
- Both baskets are 5.25 in (13.3 cm) tall at the peaks.
- The long cords match each other, and the short cords match each other.
- The ring binding is tight and its tail is buried.
- Both rims hang level, with no tilting.
- The total length is about 30 in (76.2 cm).
Troubleshooting
- The base ruffles: You have too many stitches for your row height. Use a smaller hook or work slightly taller sc.
- The base cups: Use a larger hook, or make sure you aren’t skipping increases.
- The ridges spiral: You missed the join or added a stitch. Recount the 12-stitch repeats on every lace round.
- The points flop: Use a firmer cotton, block again with more stretch, or lightly starch just the top 1.25 in (3.2 cm).
- The basket hangs crooked: Measure each strand from the binding to the rim, then re-sew the long one to match.
- The rim dents at the cords: You sewed too tightly. Unpick and re-sew with even 1-to-1 tension.
Care
Hand wash in cool water, press out excess water with a towel, and reshape over the form to dry flat. Don’t tumble dry, because heat will relax the points.
Final Notes
The measurement chain is simple. A 96-stitch base of 8.5 in (21.6 cm) gives 8 panels of 12 stitches. The walls rise 4 in (10.2 cm), and the crown points add 1.25 in (3.2 cm) for a basket 5.25 in (13.3 cm) tall. Two baskets, four upper strands and four short cords add up to a hanger about 30 in (76.2 cm) long. Check each stage before moving on and the finished piece will hang straight and even.
Happy crocheting!