

This shooting star ornament combines a lacy five-point star with three curved tails that sweep down and to the side. It’s small, light, and works up quickly, so it’s a good project for tree decorations, gift toppers, or a holiday window.
The colors are soft periwinkle lavender and warm peach. Lavender fills the star center and the open ladder windows in each tail. A thin peach outline goes around every piece, which gives the ornament a clean, drawn look against dark branches.
The pattern uses US crochet terms. The finished ornament is about 2.5 in (6.4 cm) wide across the star and 6 in (15.2 cm) long, with a 1.25 in (3.2 cm) hanging loop on top.
Construction is simple. You crochet one star in rounds and three tails in a single row each, then add a peach border to every piece. Finally, you stitch the tails behind the star and add the lavender loop.
Finished Size and Construction
- Finished size: 2.5 in (6.4 cm) wide x 6 in (15.2 cm) long, plus a 1.25 in (3.2 cm) loop
- Skill level: Easy-intermediate
- Terminology: US crochet terms
- Yarn weight: Fingering / #1 super fine cotton
- Hook: 2.5 mm (US B/1 or C/2)
- Number of pieces: 4 (1 star, 3 tails)
- Layout: Star on top; Tails A, B and C fanned below, left to right
- Piece sizes: Star 2.5 in (6.4 cm) tip to tip; Tail A 3 in (7.6 cm), Tail B 3.5 in (8.9 cm), Tail C 4 in (10.2 cm) long, each 0.6 in (1.5 cm) wide
- Size before border: Star 2.25 in (5.7 cm); tail rows 2.5 in (6.4 cm), 3 in (7.6 cm) and 3.5 in (8.9 cm)
- Border depth: 0.125 in (0.3 cm), one round of peach sc
Materials
Choose a smooth mercerized cotton in fingering weight. Cotton gives crisp points and open windows that hold their shape after blocking. Fuzzy or very soft acrylic will blur the ladder detail.
Yarn (per ornament):
– Color A, Lavender: 8 g / about 27 m
– Color B, Peach: 5 g / about 17 m
These amounts include a margin for gauge swatches and weaving in ends. One 50 g ball of each color makes six or more ornaments.
Tools:
– 2.5 mm crochet hook
– Tapestry needle
– Scissors
– Stitch markers (2–3)
– Blocking mat and rustproof pins
– Spray bottle with water
– Optional: diluted fabric stiffener
Abbreviations (US Terms)
- ch – chain
- sl st – slip stitch
- sc – single crochet
- hdc – half double crochet
- dc – double crochet
- tr – treble crochet
- sp – space
- sk – skip
- rep – repeat
- st(s) – stitch(es)
Special stitch – sc3tog (single crochet 3 together): Insert hook in next st, yarn over, pull up a loop. Repeat in each of the next 2 sts (4 loops on hook). Yarn over, pull through all 4 loops. This makes the deep notch between the star points.
Gauge and Checkpoints
Gauge isn’t critical for an ornament, but it controls how well the tails line up behind the star. Make the star first and check it before starting the tails.
Gauge: 14 foundation ch = 2 in (5.1 cm) with a 2.5 mm hook.
Checkpoints:
– Star after Round 2: 1 in (2.5 cm) across
– Star after Round 4: 2.25 in (5.7 cm) tip to tip
– Star after border: 2.5 in (6.4 cm) tip to tip
– Tail C after Row 1: 3.5 in (8.9 cm) long, 0.375 in (1.0 cm) tall at the middle
– Tail C after border: 4 in (10.2 cm) long, 0.6 in (1.5 cm) wide
If your pieces are too big, go down to a 2.25 mm hook. If they are too small or stiff, go up to a 2.75 mm hook. Keep the same hook for all four pieces so the borders match.
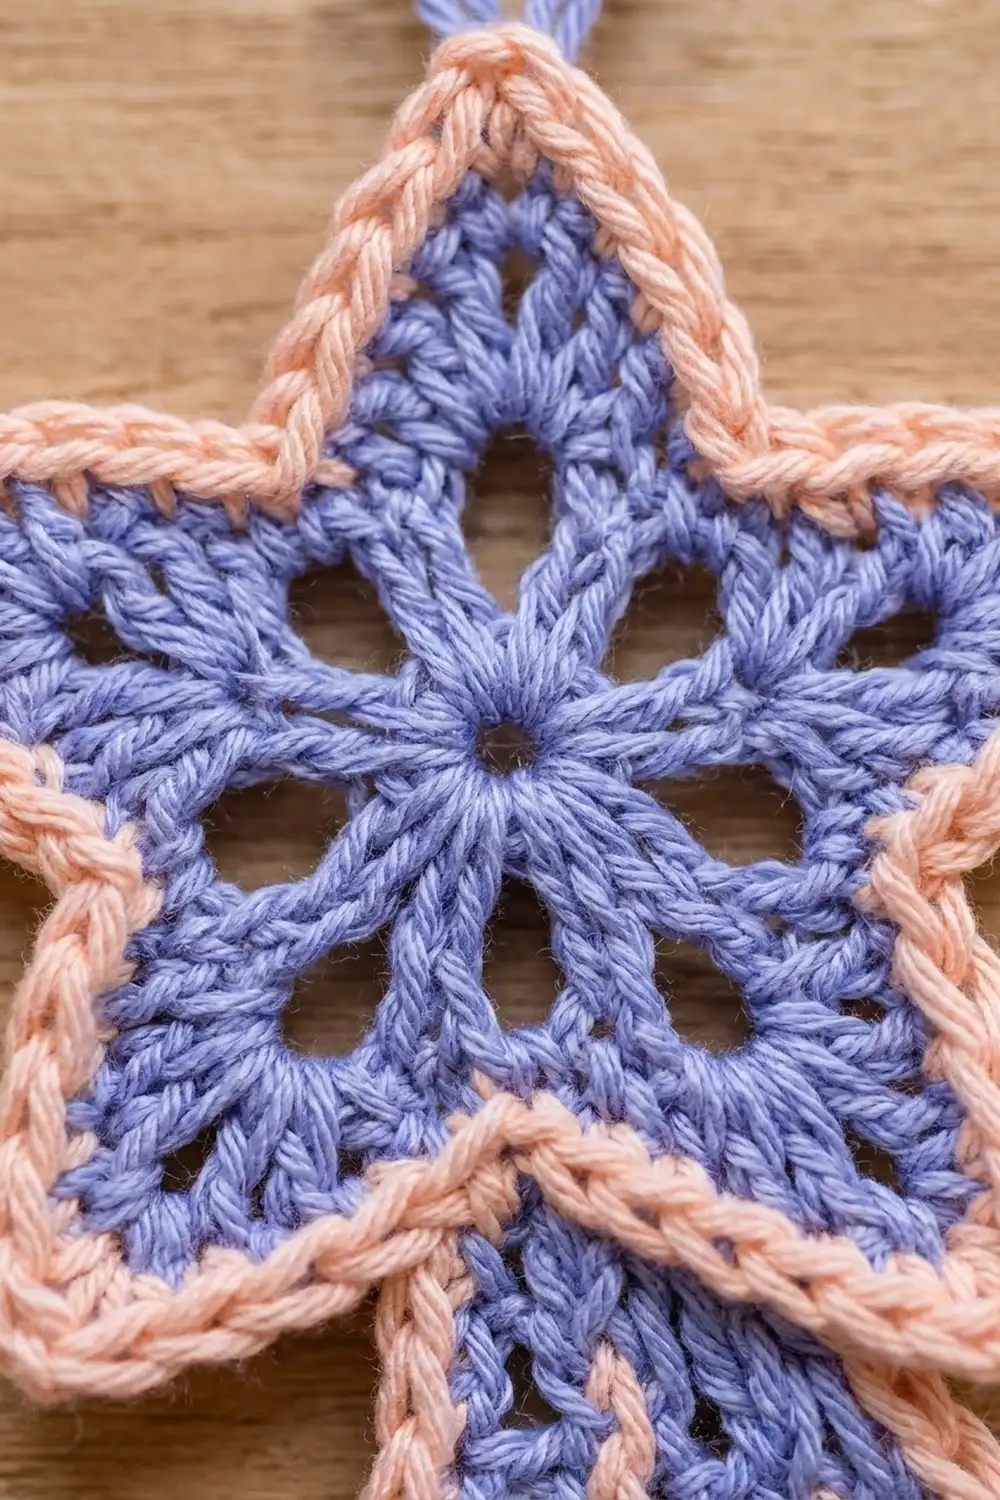
Star (Make 1)
Use Color A (Lavender).
Round 1: Make a magic ring, ch 1, 10 sc in ring, sl st to first sc. (10 sc)
Pull the ring closed tightly. The center should be a small solid disc.
Round 2: Ch 4 (counts as dc + ch 1), dc in next sc, ch 1; rep from * 8 more times, sl st to 3rd ch of beginning ch-4. (10 dc, 10 ch-1 sps)*
This round makes the ring of eyelets around the center. Checkpoint: 1 in (2.5 cm) across.
Round 3 (conversion round): Ch 1, sc in same st, 2 sc in next ch-1 sp, sc in next dc, 2 sc in next ch-1 sp; rep from * 8 more times, sl st to first sc. (10 sc worked in dc + 20 sc worked in spaces = 30 sc)*
This round closes the eyelets into a solid base for the points. It gives you 6 sts for each of the 5 points.
Round 4 (points): *Sl st in next sc, sc in next sc, dc in next sc, (2 tr, ch 3, 2 tr) in next sc, dc in next sc, sc in next sc; rep from * 4 more times, sl st to first sl st. Fasten off.
Each point uses 6 sts from Round 3 and makes: 1 sl st, 1 sc, 1 dc, 2 tr, ch-3 tip, 2 tr, 1 dc, 1 sc. (9 sts + 1 ch-3 sp per point; 45 sts + 5 ch-3 sps total)
The sl st at the start of each repeat sits low and forms the valley. The tr groups rise into the point. Checkpoint: 2.25 in (5.7 cm) tip to tip.
Weave in the lavender tails now, or after the border.
Tails (Make 3: A, B, C)
Use Color A (Lavender). Each tail is a single row worked along a foundation chain. The stitch heights go from sc to dc and back down, so each end tapers to a point and the middle forms an open ladder of ch-1 windows.
Tail C (long)
Foundation: Ch 26.
Row 1: Sc in 2nd ch from hook, hdc in next ch, dc in next ch, *ch 1, sk next ch, dc in next ch; rep from * 9 more times, hdc in next ch, sc in last ch. Do not fasten off yet.
(Count: sc, hdc, 11 dc, hdc, sc = 15 sts, plus 10 ch-1 sps)
Chain check: 3 ch for the opening sts + 20 ch for the 10 repeats + 2 ch for the closing sts = 25 worked ch, + 1 turning ch = 26.
Fasten off lavender. Checkpoint: 3.5 in (8.9 cm) long.
Tail B (medium)
Foundation: Ch 22.
Row 1: Sc in 2nd ch from hook, hdc in next ch, dc in next ch, *ch 1, sk next ch, dc in next ch; rep from * 7 more times, hdc in next ch, sc in last ch. Fasten off.
(sc, hdc, 9 dc, hdc, sc = 13 sts, plus 8 ch-1 sps; 21 worked ch + 1 = 22)
Checkpoint: 3 in (7.6 cm) long.
Tail A (short)
Foundation: Ch 18.
Row 1: Sc in 2nd ch from hook, hdc in next ch, dc in next ch, *ch 1, sk next ch, dc in next ch; rep from * 5 more times, hdc in next ch, sc in last ch. Fasten off.
(sc, hdc, 7 dc, hdc, sc = 11 sts, plus 6 ch-1 sps; 17 worked ch + 1 = 18)
Checkpoint: 2.5 in (6.4 cm) long.
Make All Pieces
Each ornament needs 4 pieces. Finish the lavender center of each piece first. Then work the peach border (see Border below) on each piece before joining.
Per ornament:
– Lavender: 1 star center (Rounds 1–4), 3 tail rows (A, B, C), 1 hanging loop
– Peach: 4 borders (1 star, 3 tails)
Layout (front view):
          ( loop )
         [  STAR  ]
         |   |   |
        [A] [B] [C]
       short med long
All three tails curve the same way, with the inner (shorter) curve facing left. Tail C reaches lowest, on the right.
Joining
Join after all four pieces are bordered and lightly steamed flat.
Method: Whipstitch from the back with a 12 in (30.5 cm) length of peach yarn.
Step 1 – Position. Lay the star face down. Place the tails face down below it, in order A, B, C from your right to left (they’ll read A, B, C from left to right once you turn the ornament over). Slide the wide end of each tail 0.5 in (1.3 cm) under the bottom of the star, between the two lower points.
Step 2 – Stitch. Join each tail through the back loops of its border sc to the back bars of the star’s Round 3 and Round 4 sts. Work one whipstitch into every border sc that overlaps the star, which is about 4 stitches per tail. Don’t stitch through the front of the star, so nothing shows on the right side.
Step 3 – Tack the tails together. Where neighboring tails touch, stitch them together through the border sc for the first 0.75 in (1.9 cm) below the star (about 5 sc). Below that point, leave them free so they can fan out.
Tension: Pull each stitch just snug. If you pull too hard, the star’s lower edge will pucker and the tails will cup. Your stitches should hold the pieces flat without dimpling the front.
Step 4 – Hanging loop. Turn the ornament right side up. Join lavender in the ch-2 sp at the top point of the star. Ch 16, sl st in the same ch-2 sp. Work 22 sc over the loop, sl st in the ch-2 sp, and fasten off.
Size checkpoint: 6 in (15.2 cm) from the top point of the star to the tip of Tail C (2.5 in + 4 in − 0.5 in overlap). The loop adds 1.25 in (3.2 cm).
Border
Use Color B (Peach) on every piece. Border gauge: 7 sc = 1 in (2.5 cm) along a straight edge.
Star Border
Round 5: Join peach in any ch-3 tip sp. Ch 1, (2 sc, ch 2, 2 sc) in same sp, *sc in each of next 2 tr, sc in next dc, sc3tog over (sc, sl st, sc), sc in next dc, sc in each of next 2 tr, (2 sc, ch 2, 2 sc) in next ch-3 sp; rep from * 3 more times, sc in each of next 2 tr, sc in next dc, sc3tog, sc in next dc, sc in each of next 2 tr, sl st to first sc. Fasten off.
Count per point: 4 tip sc + 3 sc down one side + 1 sc3tog + 3 sc up the next side = 11 sts. Total: 55 sts + 5 ch-2 sps.
Why the math works: Between two tips, Round 4 has 9 sts (2 tr, dc, sc, sl st, sc, dc, 2 tr). The border works 3 + 3 of those one-to-one and combines the middle 3 into a single sc3tog. That uses all 9 sts (3 + 3 + 3) and pulls the valley in tight. The ch-2 at each tip keeps the point sharp, and 5 × 9 = 45 matches Round 4 exactly.
Tail Borders
Each tail border goes all the way around in one round. The outer (top) edge gets extra stitches and the inner (foundation) edge gets fewer, so the tail curves into a crescent.
Tail C: Join peach in the last sc of Row 1. Ch 1, (sc, ch 2, sc) in same sc for the tip. Then work along the top edge: sc in hdc, *sc in dc, 2 sc in ch-1 sp; rep from * 9 more times, sc in last dc, sc in hdc. Work (sc, ch 2, sc) in first sc of Row 1 for the second tip. Turn to work along the foundation ch: sc in each of the 23 free loops between the tip sts. Sl st to first sc and fasten off.
- Outer edge: 1 (hdc) + 11 (dc) + 20 (spaces) + 1 (hdc) = 33 sc
- Inner edge: 25 worked ch − 2 tip ch = 23 sc
- Tips: 2 × 2 sc = 4 sc
- Total: 60 sc + 2 ch-2 sps
Tail B: Same method. Outer edge: 1 + 9 + 16 + 1 = 27 sc. Inner edge: 21 − 2 = 19 sc. Tips: 4 sc. Total: 50 sc + 2 ch-2 sps.
Tail A: Outer edge: 1 + 7 + 12 + 1 = 21 sc. Inner edge: 17 − 2 = 15 sc. Tips: 4 sc. Total: 40 sc + 2 ch-2 sps.
Why the math works: On each tail, the outer edge has about 1.4 times as many stitches as the inner edge (for example, 33 vs 23 on Tail C). That difference curves the strip without ruffling it. The single sc in each tip st plus a ch-2 gives a sharp, pointed end.
Final Blocking
- Weave in all ends along same-color stitches on the back.
- Pin the ornament face up on a blocking mat.
- Pin the 5 star tips out to 2.5 in (6.4 cm) tip to tip, putting a pin in each ch-2 sp.
- Pin each tail into a smooth crescent, with one pin in each tip and two along the outer curve.
- Open the ladder windows evenly with a pin tip if needed.
- Mist with water until damp but not soaked. To make it stiffer, brush on diluted fabric stiffener instead.
- Let dry completely, at least 6 hours, before unpinning.
- Check the final length: 6 in (15.2 cm) without the loop.
Final Quality-Control Checklist
- Star Round 4 has 45 sts and 5 ch-3 tips
- Star border has 55 sts and 5 ch-2 tips
- Tail border totals are 60 (C), 50 (B), and 40 (A) sc
- All five star valleys are equally deep
- All tails curve in the same direction
- No joining stitches show on the front
- Loop is centered on the top point and holds firm when tugged
- Ends are woven in and trimmed close
- Finished size is 2.5 in (6.4 cm) x 6 in (15.2 cm)
Troubleshooting
Star points look rounded: Make sure you work the ch-2 at each tip in the border, and pin the tips firmly while blocking.
Star cups or ruffles: Your Round 3 may be too loose. Rework it with a smaller hook, or check that you have exactly 30 sc.
Tails stay straight: Check that you put 2 sc in every ch-1 sp along the outer edge. Pin them into a stronger curve when blocking.
Tails ripple: Your outer-edge sc are too loose. Work them a little tighter, or go down a hook size for the border only.
Windows look slanted: Make sure you skip exactly one ch between dc, and keep your ch-1s even.
Tails twist when hanging: Add one more tacking stitch between neighboring tails, then block again with stiffener.
Care
Hand wash in cool water with mild soap. Press out the water in a towel, then reshape and pin flat to dry. Store flat between layers of tissue so the points and tails keep their shape.

Final Notes
The measurement chain is short and easy to check. The star measures 1 in (2.5 cm) after Round 2, 2.25 in (5.7 cm) after Round 4, and 2.5 in (6.4 cm) after its border. The lavender tail rows measure 2.5 in (6.4 cm), 3 in (7.6 cm) and 3.5 in (8.9 cm), and grow to 3 in (7.6 cm), 3.5 in (8.9 cm) and 4 in (10.2 cm) with their borders. Tucking the tails 0.5 in (1.3 cm) behind the star gives a 6 in (15.2 cm) ornament with a 1.25 in (3.2 cm) loop. Check each stage and the finished star will hang straight with its tails fanned evenly.
Happy crocheting!