

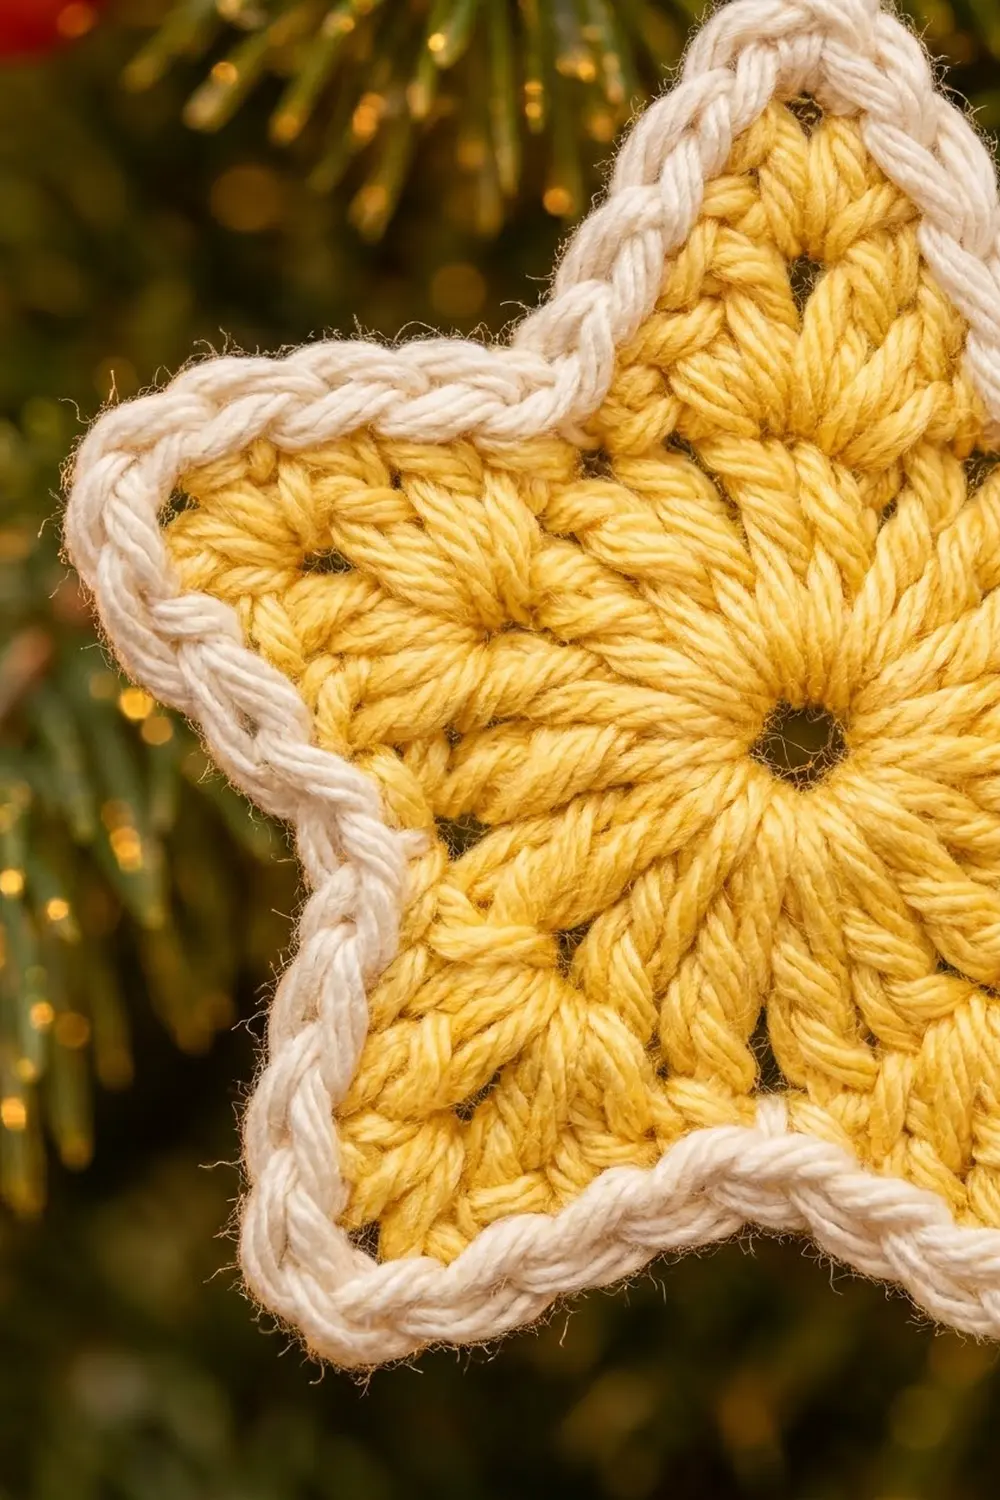
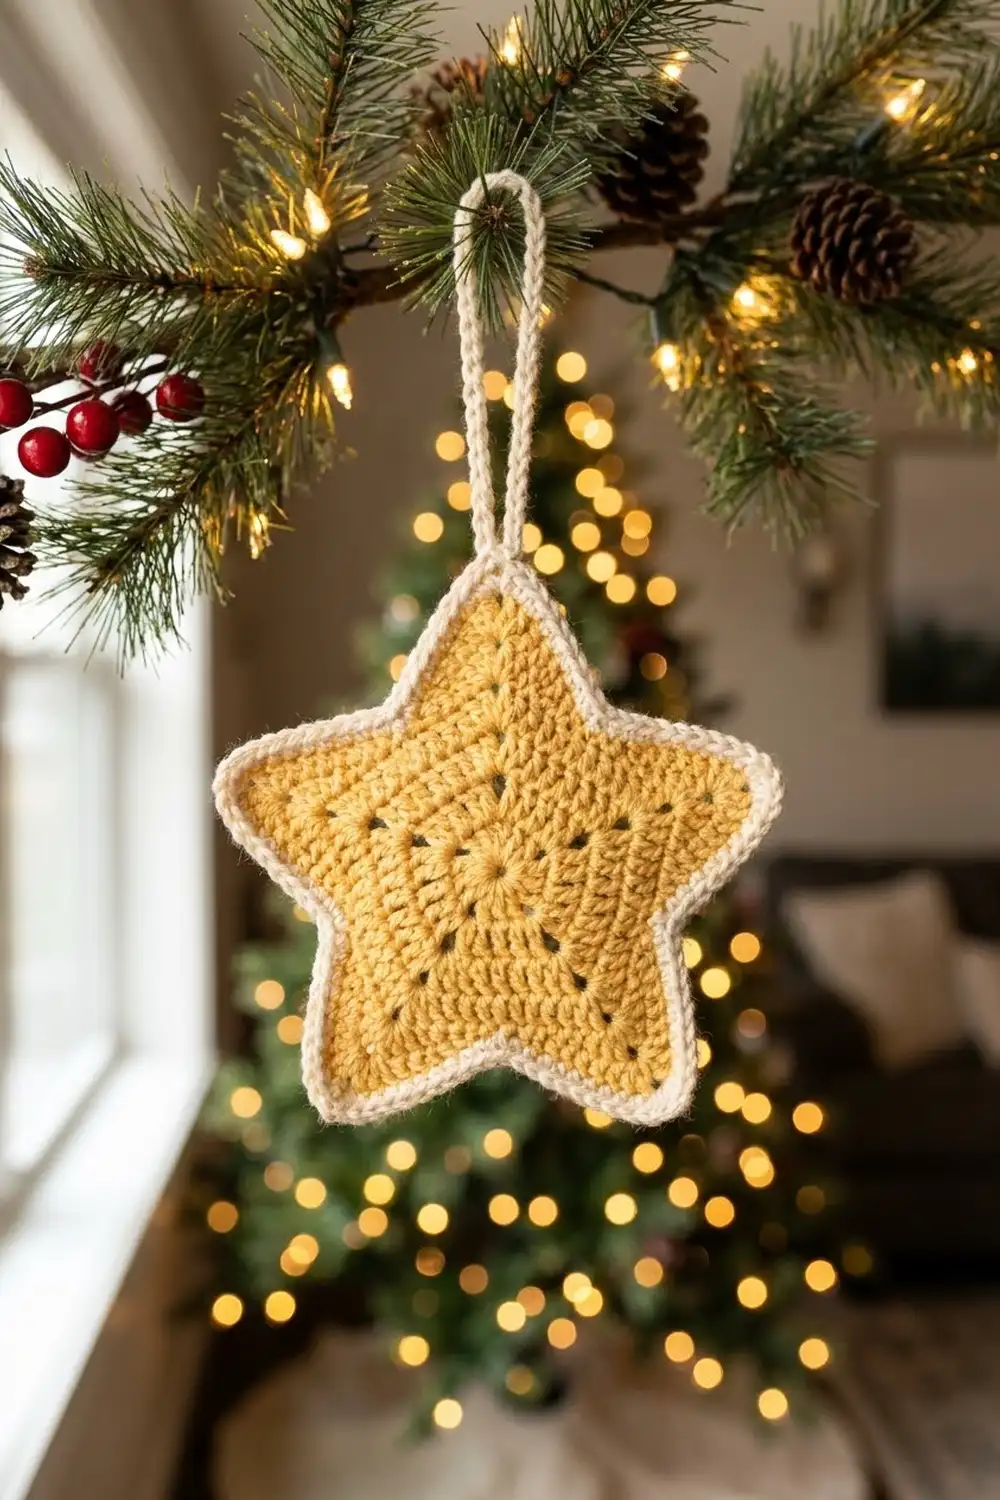
This little star ornament is a quick, cheerful make for the holiday tree. The body is a sunny butter yellow with a small open center and clear double-crochet spokes. A crisp cream outline frames the shape and runs straight into a slim hanging loop.
The style is simple and classic: soft cotton, defined stitches and five short, rounded points that look neat from across the room. Because it lies flat, it also works as a gift-tag topper or a garland charm.
The pattern uses US crochet terms. The finished star measures about 4.25 in (10.8 cm) from tip to tip, plus a 2 in (5.1 cm) hanging loop.
Construction is fully in the round. You work two rounds of double crochet to make a 30-stitch circle, build five points in a single round, then add one cream border round and chain the hanging loop. There is no sewing and no joining, and there are only two ends per color.
Finished Size and Construction
- Finished size: about 4.25 in (10.8 cm) tip to tip, with the border
- Size before border: about 3.75 in (9.5 cm) tip to tip
- Border depth: about 0.25 in (0.6 cm) on each edge
- Hanging loop: about 2 in (5.1 cm) tall
- Skill level: Easy
- Terminology: US
- Yarn weight: Worsted (#4)
- Hook: 5.0 mm (H-8)
- Number of pieces: 1
- Layout: One single star motif (no assembly)
- Piece size: Center circle 2.25 in (5.7 cm) across after Round 2
Materials
Yarn advice: Use a smooth worsted-weight cotton or cotton blend. Cotton keeps the points sharp and the spokes clear. Acrylic works too, but it gives a softer, puffier star that is often slightly larger. Avoid fuzzy or brushed yarns, because they blur the outline.
- Color A – Butter Yellow: 8 g, about 16 m (17.5 yd)
- Color B – Cream: 4 g, about 8 m (8.7 yd)
These quantities include a margin of roughly 30% for your gauge swatch, tails and any frogging. One standard ball of each color will make many stars.
Tools:
– 5.0 mm (H-8) crochet hook
– Tapestry needle
– Scissors
– Stitch marker (optional, for the start of rounds)
– Ruler or tape measure
– Blocking mat and rust-proof pins
– Spray bottle with water
Abbreviations (US Terms)
- ch – chain
- sl st – slip stitch
- sc – single crochet
- hdc – half double crochet
- dc – double crochet
- tr – treble crochet (yo twice, insert, pull up a loop, [yo, pull through 2] three times)
- sc2tog – single crochet 2 together
- sp – space
- st(s) – stitch(es)
- yo – yarn over
- MR – magic ring
Special stitch – sc2tog: Insert the hook in the next st, yo, and pull up a loop. Insert the hook in the following st, yo, and pull up a loop (3 loops on hook). Yo and pull through all 3 loops. This counts as 1 stitch. Here it pulls each valley inward so the star keeps its shape.
Note: The beginning ch 3 counts as the first dc in Rounds 1 and 2. In Rounds 3 and 4, the beginning ch 1 does not count as a stitch.
Gauge and Checkpoints
Gauge isn’t critical for an ornament, but it controls the final size and how crisp the points look. Make one test star first and measure it at each stage below.
Checkpoint 1 – after Round 1: The circle measures about 1.25 in (3.2 cm) across.
Checkpoint 2 – after Round 2: The circle measures about 2.25 in (5.7 cm) across and lies flat without ruffling or cupping.
Checkpoint 3 – after Round 3: The star measures about 3.75 in (9.5 cm) from tip to tip.
Checkpoint 4 – after Round 4: The star measures about 4.25 in (10.8 cm) from tip to tip.
If your star is too big (more than 0.25 in / 0.6 cm over at Checkpoint 2), go down to a 4.5 mm (US 7) hook. If it’s too small, go up to a 5.5 mm (I-9) hook.
If Round 2 ruffles, your stitches are too loose, so drop a hook size. If it cups, your tension is too tight, so go up a hook size or relax your grip.
Pattern
Round 1 – Center (Color A, Yellow)
Make a magic ring with Color A.
Round 1: Ch 3 (counts as first dc), work 14 dc into the ring. Pull the ring closed, leaving a small open center about 0.125 in (0.3 cm) wide. Sl st to the top of the beginning ch 3.
Stitch count: 15 dc.
Don’t pull the ring completely shut. The small hole is part of the look and helps the spokes radiate cleanly.
Round 2 – Pentagon Base (Color A)
Round 2: Ch 3 (counts as first dc), 1 dc in the same st as the join. Work 2 dc in each remaining st around. Sl st to the top of the beginning ch 3.
Stitch count: 30 dc.
Pairs of stitches share each spoke from Round 1, so the spokes continue straight outward. Divide the 30 stitches into 5 groups of 6. Each group becomes one star point. If you like, place a marker in the first stitch of each group. The circle will naturally flatten into a soft pentagon, as in the early progress photo.
Round 3 – Star Points (Color A)
Each point is worked over 6 stitches of Round 2. Within one group, the stitches are numbered 1 to 6.
Round 3: Ch 1 (doesn’t count as a stitch). Then work the following:
Sc in st 1, hdc in st 2, (dc, tr) in st 3, ch 2, (tr, dc) in st 4, hdc in st 5, sc in st 6. Repeat from * to * 4 more times, for 5 points total. Sl st to the first sc. Fasten off Color A and weave in the end.
Stitch count per point: 1 sc + 1 hdc + 2 sts + 2 sts + 1 hdc + 1 sc = 8 sts plus one ch-2 tip sp.
Round total: 40 sts plus 5 ch-2 sps (5 points × 8 sts).
How it builds the shape: The stitch heights rise from sc to hdc to dc to tr, then mirror back down. That gives each point a sloped triangular profile. The ch-2 between the two trebles sharpens the tip. Each point ends with an sc and the next point begins with an sc, so the two short stitches sit side by side and form the valley.
Checkpoint 3: Measure from one tip to the tip opposite it. You should get about 3.75 in (9.5 cm). Before adding the border, gently tug each point outward with your fingers to set the shape.
Border
Border Gauge
With Color B and the same 5.0 mm hook, one sc round adds about 0.25 in (0.6 cm) to each edge, or about 0.5 in (1.3 cm) to the tip-to-tip measurement. That’s how the star grows from 3.75 in (9.5 cm) to 4.25 in (10.8 cm).
Round 4 – Cream Outline (Color B)
Join Color B with a sl st in the ch-2 tip sp of any point. This will be the top point.
Round 4: Ch 1 (doesn’t count as a stitch). Then work the following:
(Sc, ch 2, sc) in the ch-2 tip sp. Down the right side of the point: sc in the next tr, sc in the next dc, sc in the next hdc. In the valley: sc2tog over the next 2 sc (the last sc of this point and the first sc of the next point). Up the left side of the next point: sc in the next hdc, sc in the next dc, sc in the next tr. Repeat from * to * 4 more times. Sl st to the first sc.
Counts per point:
– Tip: 2 sc plus one ch-2 sp
– Descending side: 3 sc
– Valley: 1 sc2tog
– Ascending side of the next point: 3 sc
That’s 9 sts plus one ch-2 sp per point section.
Round total: 45 sts plus 5 ch-2 sps (5 × 9).
Why the Math Works
Round 3 has 8 stitches per point: tr, dc, hdc and sc on one side of the point’s valley, and sc, hdc, dc and tr on the other.
Round 4 uses every one of those stitches exactly once:
– 3 single crochet on each side (tr, dc, hdc), which is 6 stitches
– 1 sc2tog that uses the 2 valley sc
That’s 6 + 2 = 8 stitches used per point section, which matches Round 3 exactly. The ch-2 tip spaces are worked into rather than counted, so no stitches are skipped or doubled.
The stitch adds the extra tip height:
– The (sc, ch 2, sc) at each tip lets the border turn the sharp corner without pulling.
– The sc2tog in each valley tightens the inner corner so the cream line hugs the yellow star instead of flaring.
Hanging Loop (Color B)
After the joining sl st of Round 4, sl st into the next sc and then into the ch-2 tip sp of the top point.
Ch 25. Sl st into the same ch-2 tip sp to close the loop.
Optional firm finish: Sl st in each of the 25 ch around the loop. Then sl st into the tip sp again. This gives a thicker, rope-like loop like the one in the photo.
Fasten off, leaving a 6 in (15.2 cm) tail. Weave the tail down through the top point so it secures the base of the loop.
The loop stands about 2 in (5.1 cm) above the tip. For a longer hanger, add chains in multiples of 5. Each 5 ch adds roughly 0.5 in (1.3 cm) to the height of the loop.
Final Blocking
- Weave in all ends before blocking. Run each tail through stitches of its own color so the cream doesn’t show on the yellow, or the yellow on the cream.
- Mist the star lightly with water until it’s damp but not soaked.
- Lay it flat on the blocking mat, right side up.
- Pin the five tips first, spaced evenly around a 4.25 in (10.8 cm) circle. Put one pin through each ch-2 tip sp.
- Pin the five valleys next, pressing each one gently toward the center. That way the star has crisp inner angles.
- Straighten the hanging loop so it lies flat and centered above the top point.
- Let it dry completely, usually 2–4 hours for cotton.
- Unpin and check the size. It should measure about 4.25 in (10.8 cm) tip to tip.
For extra stiffness, you can brush on a light coat of diluted fabric stiffener before pinning. Use 1 part stiffener to 1 part water.
Final Quality-Control Checklist
- [ ] The magic ring is tight, and the center hole is about 0.125 in (0.3 cm) wide.
- [ ] Round 1 has 15 dc.
- [ ] Round 2 has 30 dc, and the circle measures about 2.25 in (5.7 cm) across.
- [ ] Round 3 has 5 points, each with 8 sts plus a ch-2 tip (40 sts total).
- [ ] The star measures about 3.75 in (9.5 cm) tip to tip before the border.
- [ ] Round 4 has 45 sts plus 5 ch-2 sps, with a clean outline at every tip and valley.
- [ ] The finished star measures about 4.25 in (10.8 cm) tip to tip.
- [ ] The hanging loop is centered on a tip and secure, about 2 in (5.1 cm) tall.
- [ ] All ends are woven in and invisible from the front.
- [ ] The star lies flat with no cupping or ruffling.
Troubleshooting
The center hole is too big. Pull the magic ring tighter before you work the Round 1 join. Then weave the starting tail around the ring once more to close it down.
Round 2 ruffles. Your tension is too loose for 2 dc in every stitch. Go down one hook size, or work slightly tighter dc.
The points look blunt or rounded. Make sure the ch 2 at each tip sits between the two trebles. When blocking, pin firmly through the ch-2 sp.
The points are uneven in size. You probably shifted your count in Round 2. Recount 6 stitches per point, using markers for each group.
The border flares in the valleys. You may have worked 2 separate sc instead of sc2tog. Every valley needs the decrease.
The border puckers at the tips. Check that you worked (sc, ch 2, sc) in each tip sp, not just a single sc.
Cream stitches show on the yellow from the back. Join Color B with the right side facing, and weave cream tails only through cream stitches.
The loop twists. Work the optional sl st round along the chain, then block the loop flat.
Care
Hand wash in cool water with mild soap, press out the water in a towel, and lay the star flat to dry, reshaping the points. Store it flat or hang it, away from direct sunlight so the yellow doesn’t fade.
Final Notes
This star follows a short, reliable measurement chain:
– The 15-stitch center measures 1.25 in (3.2 cm).
– The 30-stitch pentagon base reaches 2.25 in (5.7 cm).
– Five 8-stitch points bring the star to 3.75 in (9.5 cm).
– The 45-stitch cream border finishes it at 4.25 in (10.8 cm), plus a 2 in (5.1 cm) loop.
If your first star hits these checkpoints, every star after it will match. A handful can be finished in an evening, which makes them ideal for tree trimming, gift wrapping or a last-minute stocking surprise.
Happy crocheting!