

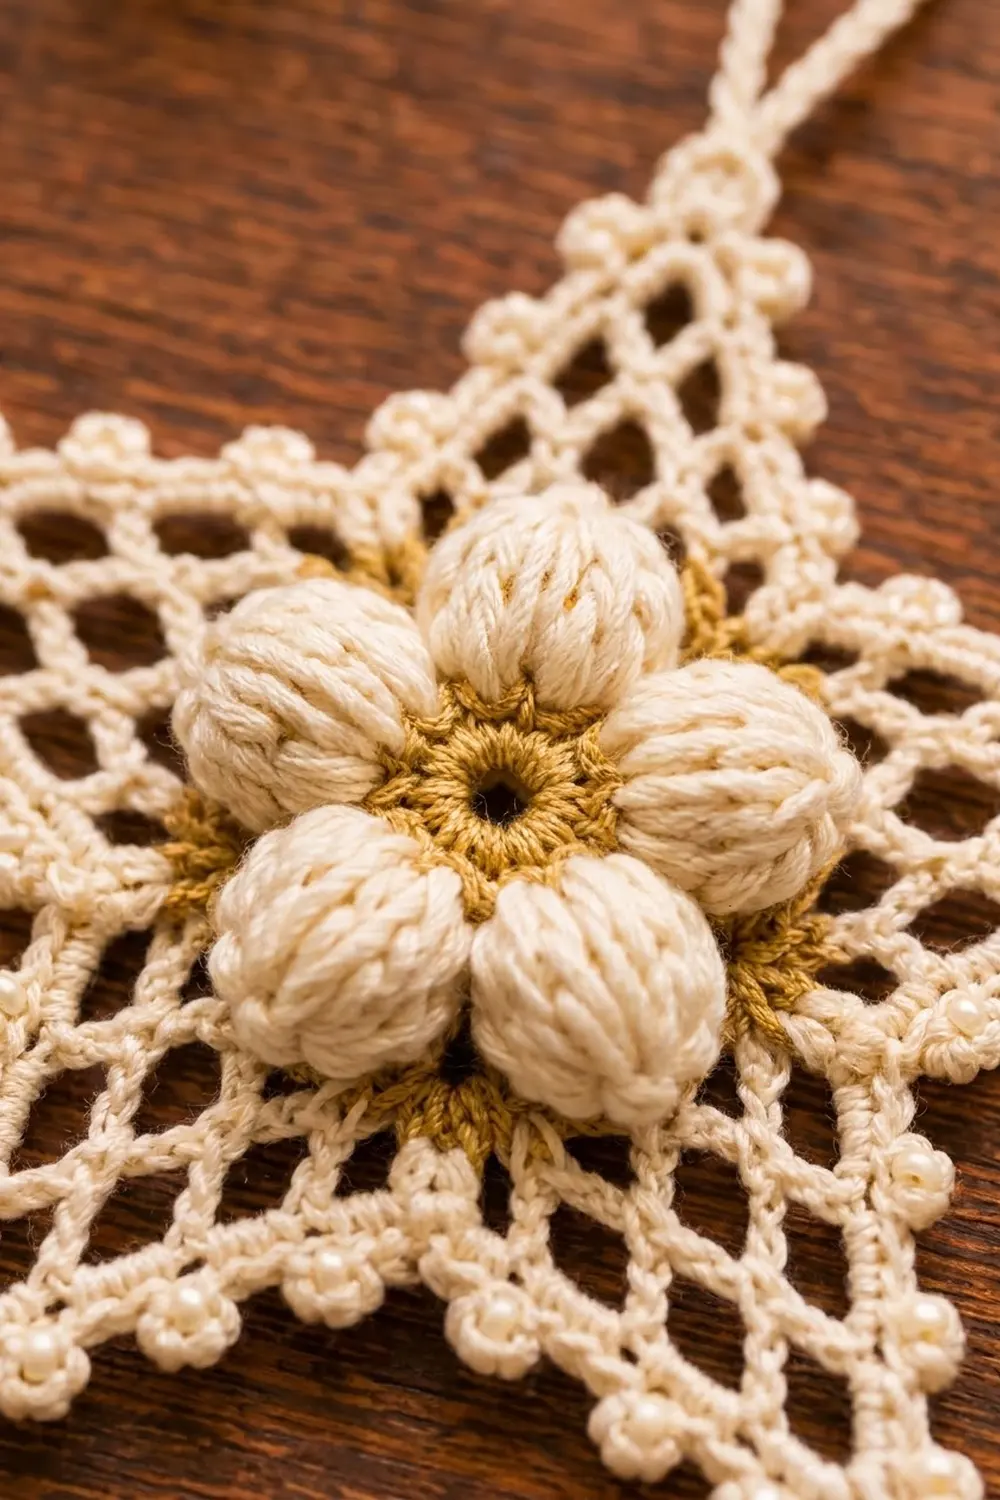
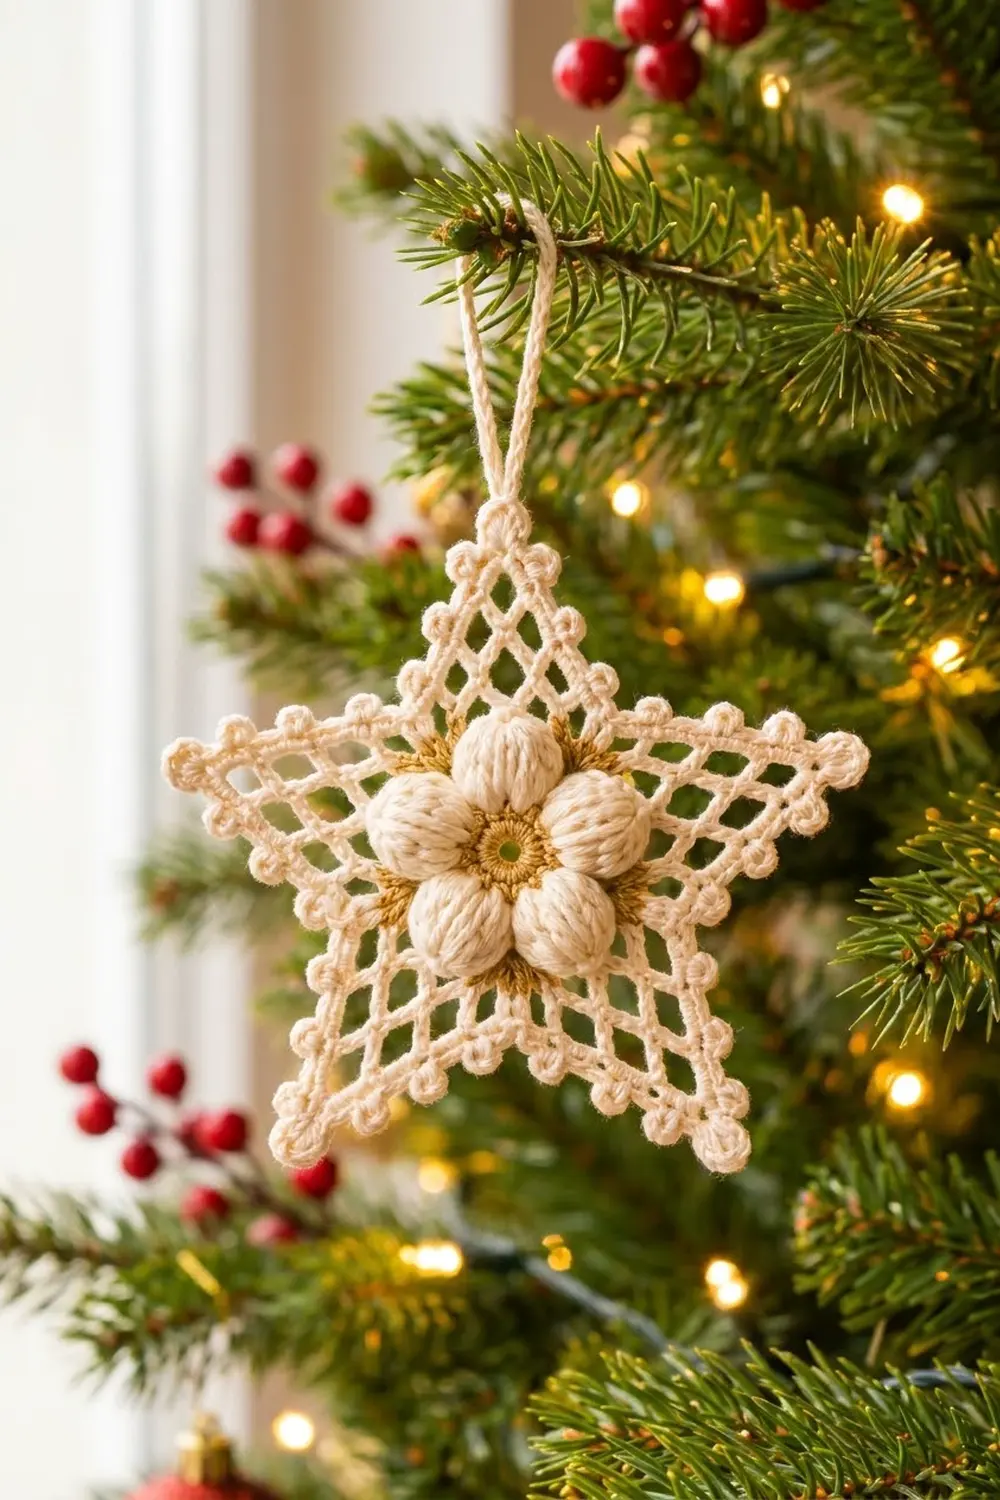
The Snowpuff Lace Star is a single five-pointed hanging ornament with a soft, sculpted flower at its center. Five plump puff petals sit on a small gold ring. Five airy diamond-mesh points spread out from the center, and each point is outlined with a neat row of picots.
The colors are simple and warm: creamy ivory for the petals, mesh, border and hanging loop, with a touch of soft gold around the flower center. It looks like vintage lace on a tree, but it’s quick, sturdy and easy to block. All instructions use US crochet terms.
The finished star measures about 5.8 in (14.7 cm) from tip to tip across. It measures about 5.5 in (14.0 cm) from the top tip to the bottom edge, not counting the 2 in (5.1 cm) hanging loop.
The star is built in pieces:
– One flower center that ends in a pentagon.
– Five small mesh triangles, each joined to one side of the pentagon.
– A two-round picot border worked around the whole star.
– A crocheted loop added at the top tip.
Finished Size and Construction
- Finished size: about 5.8 in (14.7 cm) wide x 5.5 in (14.0 cm) tall, plus a 2 in (5.1 cm) loop
- Skill level: Intermediate
- Terminology: US crochet terms
- Yarn weight: #1 super fine (fingering-weight mercerized cotton or size 3 crochet thread)
- Hook: 2.25 mm (US B-1)
- Number of pieces: 6 (1 flower center + 5 mesh points), joined into one ornament
- Layout: star, with one point joined to each of the 5 pentagon sides
- Piece sizes:
- Flower center: about 2 in (5.1 cm) from a corner to the opposite side, each side 1.3 in (3.3 cm)
- Each point: 1.3 in (3.3 cm) wide at the base and 1.9 in (4.8 cm) tall
- Size before border: about 5.3 in (13.5 cm) wide x 5.0 in (12.7 cm) tall
- Border depth: about 1/4 in (0.6 cm)
Materials
Choose a smooth, tightly plied mercerized cotton. It gives crisp picots, clear mesh and petals that hold their shape. Wool or acrylic will also work, but they block softer and fuzzier. These quantities are based on a yarn with about 170 m per 50 g.
- Cream (Color A): 10 g, about 34 m, for the petals, pentagon round, points, border and loop
- Soft gold (Color B): 2 g, about 7 m, for the flower center ring and back ring
These quantities include a margin of about 20 percent, so leftovers are often enough.
Tools
- 2.25 mm (US B-1) crochet hook
- Tapestry needle
- Scissors
- Stitch markers (2–3)
- Rustproof pins and a blocking mat or folded towel
- Spray bottle or light fabric stiffener (optional)
Abbreviations (US Terms)
- ch: chain
- sc: single crochet
- sc3tog: single crochet 3 together
- sl st: slip stitch
- sk: skip
- sp(s): space(s)
- st(s): stitch(es)
- yo: yarn over
- RS / WS: right side / wrong side
Large Puff Petal (LPP): [Yo, insert hook in st, yo, pull up a loop to about 3/8 in (1.0 cm)] 6 times in the same st (13 loops on hook). Yo, draw through all 13 loops, then ch 1 to lock. This ch-1 is the top of the petal.
Picot: Ch 3, sl st in the 3rd ch from hook.
sc3tog: [Insert hook in next indicated place, yo, pull up a loop] 3 times, yo, draw through all 4 loops.
Gauge and Checkpoints
Gauge: 28 sc = 4 in (10.2 cm), worked flat in rows.
Gauge matters here because each point must fit a pentagon side exactly, stitch for stitch. Before making everything, test by making the flower center and one point, then check them against each other.
Checkpoints:
- After flower Round 1: about 0.5 in (1.3 cm) across
- After flower Round 2: about 1.5 in (3.8 cm) across the petals
- After flower Round 4: each side 1.3 in (3.3 cm), and about 2 in (5.1 cm) from a corner to the opposite side
- Each point: base 1.3 in (3.3 cm), height 1.9 in (4.8 cm) after a light press
- Joined star before border: 5.3 in (13.5 cm) wide x 5.0 in (12.7 cm) tall
- Finished star: 5.8 in (14.7 cm) wide x 5.5 in (14.0 cm) tall
If your pieces are too big, switch to a 2.0 mm hook. If they are too small, switch to a 2.5 mm hook. Don’t change any stitch counts: the 9-stitch pentagon side and the 9-stitch point base must stay the same. A difference of up to 1/8 in (0.3 cm) per piece is fine and will even out in blocking.
Flower Center (Make 1)
Round 1 (Color B): Make a magic ring, ch 1, and work 10 sc into the ring. Sl st to the first sc. Pull the ring snug but leave a small open eye in the middle. Fasten off B. (10 sc)
Round 2 (Color A, petals): Join A with a sl st in any sc. *LPP in next sc, sl st in next sc; repeat from * 4 more times. The last sl st lands in the joining st. Fasten off A. (5 petals + 5 sl sts = 10 sts)
Gently pinch each petal into a rounded oval. The tall loops give the petals their soft, ridged, padded look.
Round 3 (Color B, back ring): Join B with a sl st in any sl st between two petals. Ch 1, then:
*(sc, ch 2, sc) in the same sl st, ch 3, sc in the locking ch-1 at the top of the next petal, ch 3, move to the next sl st between petals; repeat from * 4 more times.
Sl st to the first sc and fasten off B. (15 sc, 5 corner ch-2 sps, 10 ch-3 sps)
The ch-3 sps sit just behind the petals, so a thin gold ring shows around and between them.
Round 4 (Color A, pentagon): Join A with a sl st in any corner ch-2 sp. Ch 1, then:
*sc in next sc, 3 sc in next ch-3 sp, sc in petal-top sc, 3 sc in next ch-3 sp, sc in next sc, ch 2 (this is the new corner; pass over the old corner ch-2 sp); repeat from * 4 more times.
Sl st to the first sc. Fasten off, leaving a 6 in (15.2 cm) tail.
This round changes how the stitches are counted. You work 15 sc, one into each existing sc, plus 30 sc into the ten ch-3 sps, for 45 sc in total. There are also 5 corner ch-2 sps.
Each side has 9 sc between corner ch-2 sps. The corners are chain spaces, not stitches, so they aren’t part of the 9.
Mesh Points (Make 5)
Use Color A for all five points. The mesh looks the same on both sides, so pick one side as the RS and use that side for all five points.
Row 1: Ch 10, sc in 2nd ch from hook and in each ch across. (9 sc)
Row 2: Ch 1, turn, sc in first sc, *ch 5, sk 1 sc, sc in next sc; repeat from * 3 more times. (5 sc, 4 ch-5 loops)
Row 3: Turn, sl st in first 3 ch of first loop, ch 1, sc in same loop, *ch 5, sc in next loop; repeat from * 2 more times. (4 sc, 3 ch-5 loops)
Row 4: Turn, sl st in first 3 ch of first loop, ch 1, sc in same loop, *ch 5, sc in next loop; repeat from * once more. (3 sc, 2 ch-5 loops)
Row 5: Turn, sl st in first 3 ch of first loop, ch 1, sc in same loop, ch 5, sc in next loop. (2 sc, 1 ch-5 loop)
Row 6 (tip): Turn, sl st in first 3 ch of the loop, ch 1, sc in same loop. Fasten off. (1 sc)
Each row has one loop fewer than the row before. Both edges step in by half a loop per row, which forms the open diamond pattern. Weave in the ends now along the side edges, where the border will hide them.
Checkpoint: The base (the foundation chain) has 9 unused ch loops and measures 1.3 in (3.3 cm). Lay it against one side of the pentagon; the two edges should match.
Make All Pieces
Pieces for one ornament:
- Flower center: 1 (Rounds 1 and 3 in Color B; Rounds 2 and 4 in Color A)
- Mesh points: 5, all in Color A
Layout grid (P = point, F = flower center):
        P1
   P5        P2
        F
    P4     P3
P1 is the top point and will carry the hanging loop. Each point attaches to the pentagon side it faces.
Joining
Method: slip stitch seam, worked on the WS with Color A.
- Place the flower center and P1 RS together, lining up one pentagon side with the foundation edge of the point.
- Join A at the right-hand end. Work through one pentagon sc and one foundation ch loop of the point at the same time, and sl st 9 times across. That’s one sl st per pair: 9 pentagon sc to 9 foundation loops.
- Fasten off and open the pieces flat.
- Repeat for P2 through P5, going around the pentagon in order.
Tension: keep the sl sts as loose as the sc around them. A tight seam pulls the points forward and makes the star cup. If needed, use a 2.5 mm hook for the seams only.
The pentagon’s corner ch-2 sps stay open between neighboring points. They become the anchor points for the inner corners (“valleys”) in the border.
Checkpoint: laid flat, the joined star should measure about 5.3 in (13.5 cm) across and 5.0 in (12.7 cm) tall.
Border
Border gauge: each slanted edge of the star is about 2.0 in (5.1 cm) long. At 7 sc per inch, that edge has room for about 14 stitches. Round 1 puts 12 sc along the mesh rows and 1 sc at the tip, and each edge shares a valley decrease with the next point. That adds up to about 14 stitches, so the edge lies flat without ruffling or pulling.
Round 1 (Color A): With RS facing, join A with a sl st in the Row 6 tip sc of P1. Ch 1, (sc, ch 3, sc) in the same tip sc. Then:
*Working down the side edge, work 3 sc evenly into the side of each of Rows 5, 4, 3 and 2 (12 sc).
Sc3tog over the valley: first leg in the side of Row 1 of this point, second leg in the pentagon corner ch-2 sp, third leg in the side of Row 1 of the next point.
Work 3 sc evenly into the side of each of Rows 2, 3, 4 and 5 of the next point (12 sc), then (sc, ch 3, sc) in its tip sc.
Repeat from * 4 more times, skipping the last tip group. Sl st to the first sc.
Per point: 12 + 1 + 12 + 2 tip sc = 27 sts, plus 1 tip ch-3 sp.
Total: 5 x 27 = 135 sts, plus 5 tip ch-3 sps.
The sc3tog pulls each valley into a sharp inner corner, and the ch-3 at each tip keeps the points sharp.
Round 2 (Color A, picots): Sl st into the first tip ch-3 sp. Ch 1, (2 sc, picot, 2 sc) in the same sp. Then:
*Sc in next tip sc, [picot, sc in next 3 sc] 4 times, sc in valley sc3tog, [sc in next 3 sc, picot] 4 times, sc in next tip sc, (2 sc, picot, 2 sc) in next tip ch-3 sp.
Repeat from * 4 more times, skipping the last tip group. Sl st to the first sc. Don’t fasten off.
This round adds stitches, counted as:
– 135 sc, one in each Round 1 stitch
– 20 sc added in the five tip sps (4 each)
– Total: 155 sc, plus 45 picots (9 per point: 4 down each side and 1 at the tip)
The picots line up the same way on both sides of every point, and the valleys stay plain, so each point has a beaded outline.
Why the math works: the pentagon side has 9 sc and each point base has 9 foundation loops, so every seam matches exactly. Each point then gets the same 27 stitches in Round 1 and the same 31 sc in Round 2, so all five points come out identical.
Hanging Loop
Sl st across to the picot at the P1 tip. Ch 30, then sl st into the same picot. Ch 1, work 36 sc over the ch-30 loop, and sl st into the picot. Fasten off and weave in.
The sc worked over the chain make a firm, rounded cord that hangs about 2 in (5.1 cm) above the tip.
Final Blocking
- Weave in any remaining tails along the seam lines or the border.
- Soak the star in cool water, then roll it in a towel to remove extra water.
- Lay it RS up on a blocking mat. Pin the flower center first so the star doesn’t shift.
- Pin each of the five tips about 3 in (7.6 cm) from the center eye. Check that the star measures 5.8 in (14.7 cm) across.
- Pin each valley in toward the center to keep the inner corners sharp.
- Open the mesh diamonds with a pin tip. Pin the picots outward if you want them extra crisp.
- Don’t flatten the petals. Lift and round them with your fingertips.
- Mist lightly with stiffener for a firmer ornament. Let it dry completely before unpinning.
Final Quality-Control Checklist
- Flower has 5 even petals and a small open eye.
- Gold ring shows around and between the petals.
- Pentagon has 45 sc, 9 per side.
- All 5 points have 4 mesh rows plus a single-sc tip.
- Every seam has 9 sl sts and lies flat.
- Border Round 1 has 135 sts. Round 2 has 155 sc and 45 picots.
- Star measures about 5.8 in (14.7 cm) wide x 5.5 in (14.0 cm) tall.
- Hanging loop is centered on the top tip and about 2 in (5.1 cm) long.
- All ends are hidden.
Troubleshooting
Petals look flat or skinny. Pull the puff loops a little taller and keep them even. The lock ch-1 should be firm but not tight.
Pentagon curls or ruffles. If it curls, the Round 3 ch-3 sps are too tight. If it ruffles, they’re too loose. Redo Round 3 with adjusted tension.
Point base is shorter than the pentagon side. Your foundation chain is too tight. Chain with a hook one size larger, then switch back for Row 1.
Points lean sideways. The sl sts at the start of Rows 3–6 must end in the center (3rd ch) of the loop. Recount them.
Valleys look rounded. Make sure the middle leg of the sc3tog goes into the pentagon corner sp, and pin the valleys firmly during blocking.
Star cups instead of lying flat. The seams are too tight. Redo them with a larger hook.
Care
Hand wash in cool water with mild soap, press the water out in a towel, and dry flat with the star reshaped and pinned. Store it flat or hanging, with nothing heavy pressing on it.
Final Notes
Here’s how the measurements build on each other:
– Gauge: 28 sc = 4 in (10.2 cm)
– Flower center: 2 in (5.1 cm) across, with 9-stitch sides of 1.3 in (3.3 cm)
– Five 9-stitch points, each 1.9 in (4.8 cm) tall
– Joined star: 5.3 in (13.5 cm) across
– Picot border: 1/4 in (0.6 cm) deep, bringing the star to 5.8 in (14.7 cm) across
Check each stage as you go and the star will come together cleanly.
Happy crocheting!