

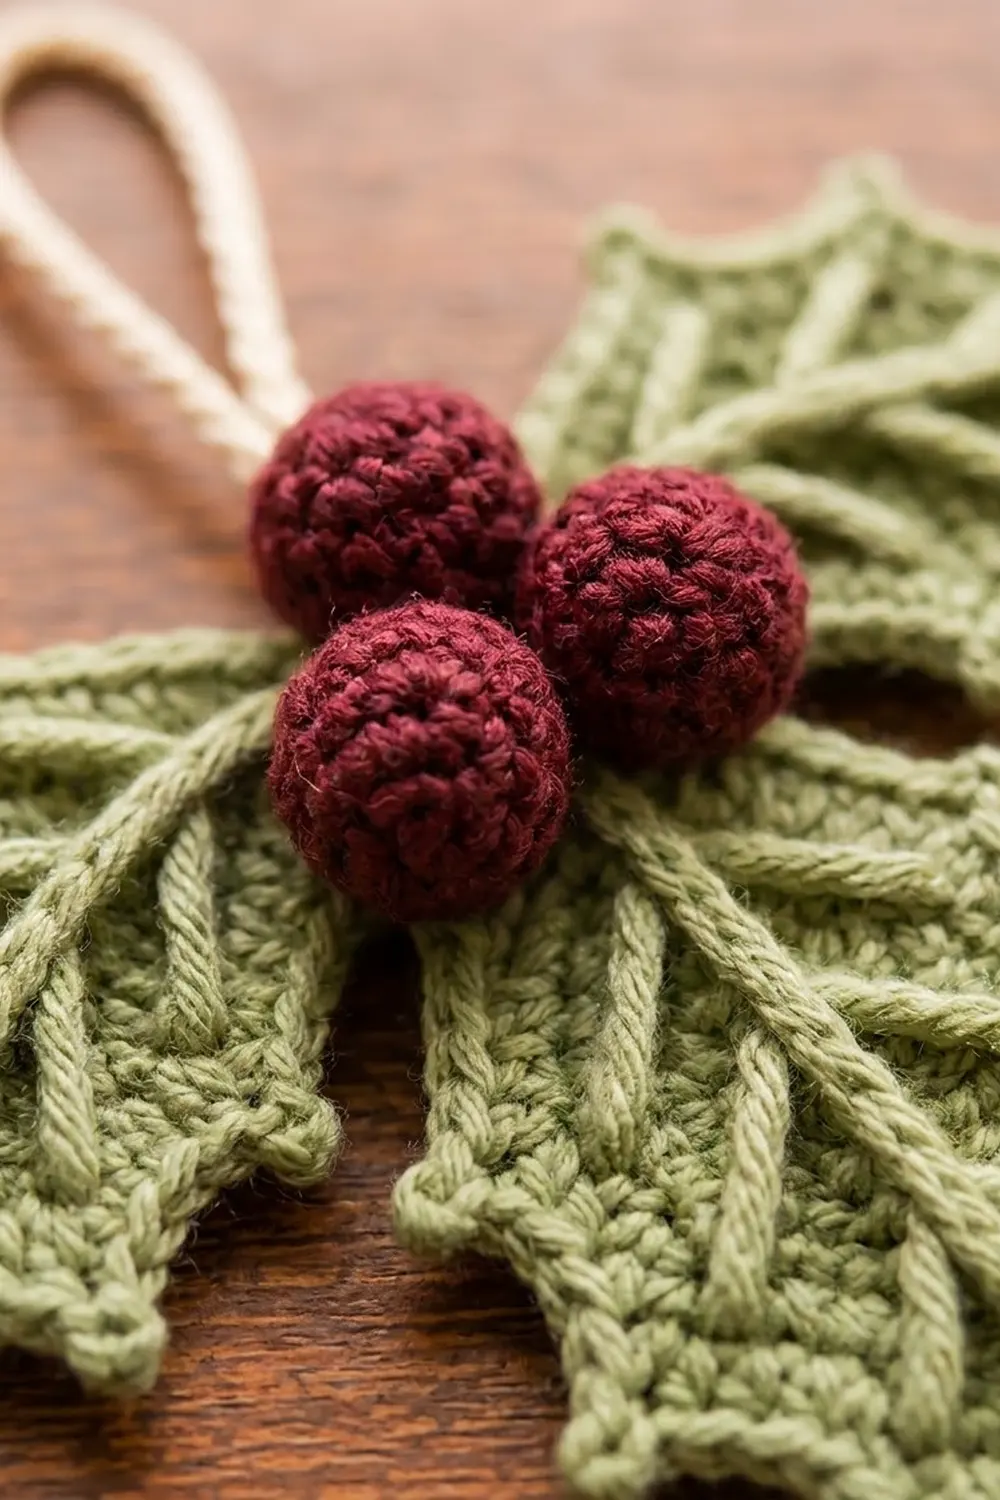
This holly ornament has three sage green leaves and a cluster of three round burgundy berries, and it hangs from a cream cord loop. Each leaf has a raised center vein, short angled side veins, and a pointed edge with small picots, so it reads as holly even from across the room.
The colors are muted on purpose. Sage leaves, wine-red berries, and a soft cream hanger look calm and a little vintage next to bright lights and shiny baubles. You could also use it as a gift tag, a wreath accent, or a package topper.
The pattern uses US crochet terms. The finished ornament measures about 6.5 in (16.5 cm) wide and 5 in (12.7 cm) tall, not counting the loop. The loop adds about 2.5 in (6.4 cm) above the berries.
Construction is simple. Each leaf is worked in rounds around a foundation chain, with changing stitch heights that shape the oval, and the last round adds the holly points. The berries are small stuffed amigurumi balls. The loop is a slip-stitch cord. Everything is sewn together at the center.
Finished Size and Construction
- Finished size: about 6.5 in (16.5 cm) wide x 5 in (12.7 cm) tall, plus a 2.5 in (6.4 cm) loop
- Skill level: Easy-Intermediate
- Terminology: US crochet terms
- Yarn weight: DK / light worsted (#3), cotton or cotton blend
- Hook: 3.5 mm (E-4)
- Number of pieces: 7 (3 leaves, 3 berries, 1 hanging loop)
- Layout: one leaf pointing down, two leaves pointing out to the sides and tilted slightly up, berries in a triangle where they meet
- Leaf size (finished): 3.75 in (9.5 cm) long x 2.25 in (5.7 cm) wide, measured from point to point
- Leaf size before edging: 3.25 in (8.3 cm) x 1.75 in (4.4 cm)
- Edging depth: about 0.25 in (0.6 cm) on each edge
- Berry size: 0.75 in (1.9 cm) across
Materials
Pick a smooth, tightly plied cotton or cotton blend. Crisp stitches make the veins and points stand out, and cotton keeps its shape when you block it. Fuzzy or very splitty yarn will blur the picots.
- Sage green (leaves): 15 g, about 34 m
- Burgundy (berries): 4 g, about 9 m
- Cream (hanging loop): 2 g, about 5 m
These quantities include a margin for your gauge test and for sewing tails.
Tools:
- 3.5 mm (E-4) crochet hook
- Yarn needle
- Small amount of fiberfill, or burgundy scrap yarn for stuffing
- Stitch marker
- Rust-proof pins and a blocking mat or folded towel
- Spray bottle with water
- Scissors and a ruler
Abbreviations (US Terms)
- ch – chain
- sl st – slip stitch
- sc – single crochet
- hdc – half double crochet
- dc – double crochet
- sc2tog – single crochet 2 together
- MR – magic ring
- sp – space
- st(s) – stitch(es)
- rnd – round
Special stitches:
- Picot: ch 3, sl st in the 3rd ch from hook.
- Point (pt): (sc, picot, sc) all in the same st. Each point turns 1 stitch into 2 sc with a picot between them.
- Surface slip stitch: hold the yarn behind the work. Insert the hook from front to back through the fabric, pull up a loop, and draw it through the loop on your hook. This makes a raised chain line on the front.
Gauge and Checkpoints
Gauge: 20 sc and 22 rows = 4 in (10.2 cm) in sc with a 3.5 mm hook.
Make one full leaf before anything else. The leaf is your real gauge test, because all the other measurements depend on it.
Checkpoints for one leaf:
- After Rnd 1: about 2.5 in (6.4 cm) long x 0.5 in (1.3 cm) wide
- After Rnd 2: about 2.75 in (7.0 cm) x 1.25 in (3.2 cm)
- After Rnd 3: about 3.25 in (8.3 cm) x 1.75 in (4.4 cm)
- After Rnd 4: about 3.75 in (9.5 cm) x 2.25 in (5.7 cm), point to point
If your leaf is too big, go down to a 3.25 mm hook. If it is too small, go up to a 3.75 mm hook. Small differences of 0.25 in (0.6 cm) are fine on an ornament, but all three leaves should match each other.
Holly Leaf (Make 3)
With sage green, ch 13.
Rnd 1: Sc in 2nd ch from hook and in next 10 ch (11 sc), 3 sc in last ch (tip), rotate to work in the free loops on the other side of the chain, sc in next 10 ch, 2 sc in the first ch (the same ch as the first sc). Join with sl st to first sc. (26 sts)
Now each end has a 3-st group (the stem-end group is the last 2 sts plus the first st), and each side has 10 sts between the groups.
Rnd 2: Ch 1. Sc in same st as join (1 sc). Side: sc in next 2 sts, hdc in next 2 sts, dc in next 2 sts, hdc in next 2 sts, sc in next 2 sts. Tip: sc in next st, (sc, ch 2, sc) in next st, sc in next st. Side: sc in next 2 sts, hdc in next 2 sts, dc in next 2 sts, hdc in next 2 sts, sc in next 2 sts. Stem: sc in next st, (sc, ch 2, sc) in next st. Join with sl st to first sc. (28 sts and 2 ch-2 sps)
Count check: 26 sts worked 1 per st, plus 1 extra sc at each end = 28. Between the two ch-2 sps, each side now has 14 sts.
Rnd 3: Ch 1. Sc in same st as join, hdc in next 2 sts, dc in next st, 2 dc in next st, dc in next 2 sts, 2 dc in next st, dc in next st, hdc in next 2 sts, sc in next 2 sts. (Sc, ch 2, sc) in tip ch-2 sp. Side: sc in next 2 sts, hdc in next 2 sts, dc in next st, 2 dc in next st, dc in next 2 sts, 2 dc in next st, dc in next st, hdc in next 2 sts, sc in next 2 sts. (Sc, ch 2, sc) in stem ch-2 sp. Sc in last st. Join with sl st to first sc. (36 sts and 2 ch-2 sps)
This is a growth round. Each side grows from 14 sts to 16 sts. Counting the sc on either side of each ch-2 sp, there are now 18 sts per side between the two ch-2 sps. The dc stitches in the middle of each side make the widest part of the leaf. The sc at each end keeps the ends narrow and pointed.
Do not fasten off. The edging comes next.
Holly Edging Border (Rnd 4)
This round is the leaf’s border. It adds the holly points and a firm, slightly rolled outer edge.
Border gauge: keep the same tension, about 5 sc per inch (2.5 cm) along the edge. Don’t work the edging tighter, or the leaf will cup.
Side pattern over 18 sts: sc 1, [sc 4, pt] 3 times, sc 2.
Rnd 4: Ch 1. Sc in same st as join and next 2 sts, pt in next st, sc in next 4 sts, pt in next st, sc in next 4 sts, pt in next st, sc in next 2 sts. In tip ch-2 sp work (2 sc, picot, 2 sc). Side: sc in next st, [sc in next 4 sts, pt in next st] 3 times, sc in next 2 sts. In stem ch-2 sp work (2 sc, picot, 2 sc). Sc in last 2 sts. Join with sl st to first sc. Fasten off, leaving a 10 in (25.4 cm) tail for the veins.
Count: 36 sts worked 1 per st + 6 extra sc (1 from each point) + 8 sc in the two ch-2 sps (4 each) = 50 sc and 8 picots.
Per side: 18 sts become 21 sc with 3 picots. Each end becomes 4 sc with 1 picot.
Why the math works: the edge of a leaf is longer than the round beneath it, so the outer round needs a few extra stitches to lie flat. The 3 points on each side add exactly 3 stitches, which covers that extra length. They are spaced every 5 sts, roughly 1 in (2.5 cm) apart. The ch-2 sps from Rnds 2 and 3 line up at each end, so the tip and stem picots sit right on the leaf’s center line.
Leaf Veins
Use the long sage tail or a new 18 in (45.7 cm) length of sage yarn.
Center vein: with the hook, start at the stem picot and work surface slip stitches along the foundation chain line to the tip picot. Make about 1 sl st per foundation ch, 12 to 13 sl sts in total. Keep them loose enough that the leaf stays flat.
Side veins: with the yarn needle, embroider 4 pairs of angled side veins. Bring the needle up at the center vein and backstitch out toward the edge. Each side vein is about 0.5 in (1.3 cm) long, tilted toward the tip, and stops before the edging round. Space the pairs about 0.5 in (1.3 cm) apart, starting 0.5 in (1.3 cm) above the stem end.
Weave in the ends on the back. Make two more leaves the same way.
Berry (Make 3)
With burgundy, work in a spiral without joining. Use a stitch marker if you need one.
Rnd 1: 6 sc in MR. Pull the ring closed. (6 sts)
Rnd 2: 2 sc in each st around. (12 sts)
Rnd 3: Sc in each st around. (12 sts)
Stuff firmly with a pinch of fiberfill or burgundy scraps.
Rnd 4: Sc2tog 6 times. (6 sts)
Fasten off, leaving an 8 in (20.3 cm) tail. Thread the tail through the front loops of the 6 sts and pull it closed. Keep the tail for sewing.
Checkpoint: each berry should be about 0.75 in (1.9 cm) across.
Hanging Loop (Make 1)
With cream, ch 26.
Row 1: Sl st in the back bump of 2nd ch from hook and in each ch across. (25 sl sts)
Fasten off, leaving a 6 in (15.2 cm) tail at each end. The cord should measure about 5 in (12.7 cm). Folded in half, it gives a 2.5 in (6.4 cm) loop.
Make All Pieces
- Sage green: 3 leaves, each with 50 sc and 8 picots in Rnd 4, plus veins
- Burgundy: 3 berries, 0.75 in (1.9 cm) each
- Cream: 1 hanging cord, 5 in (12.7 cm)
Layout (front view):
               [ LOOP ]
                 (B)
  < [LEAF 2]   (B)(B)   [LEAF 3] >
                [LEAF 1]
                   v
Leaf 1 points straight down. Leaves 2 and 3 point left and right, tilted about 15 degrees upward. The stem ends of all three leaves meet under the berries.
Joining
Method: whipstitch from the back, using the sage tails for the leaves and the burgundy tails for the berries.
- Lay Leaf 1 face up, pointing down.
- Place Leaves 2 and 3 so their stem ends overlap the top of Leaf 1 by about 0.5 in (1.3 cm), with their stem picots almost touching at the center.
- Stitch to stitch: flip the group over. Where each side leaf crosses Leaf 1, whipstitch through the Rnd 4 sc of the side leaf and the matching Rnd 3 stitches of Leaf 1 underneath, about 4 to 5 stitches per leaf. Sew only through the back layer of each leaf so no yarn shows on the front.
- Flip it face up. Sew one berry centered over the junction, slightly above the stem picots. Sew the other two just below it, side by side, so the three berries touch and form a triangle. Pass each burgundy tail through the berry and down into the leaves 4 to 6 times.
- Fold the cream cord in half. Sew both ends to the back of the junction behind the top berry, about 0.25 in (0.6 cm) apart. Weave the tails into the backs of the leaves.
Tension advice: pull each sewing stitch just snug. If you pull too hard, the leaves bunch up at the center and the side leaves droop. If you sew too loosely, the berries roll and flop forward.
Size checkpoint: the joined ornament should measure about 6.5 in (16.5 cm) from side tip to side tip and 5 in (12.7 cm) from the top berry to the bottom tip.
Final Blocking
- Lightly mist the leaves with water. Keep the berries dry so they stay round.
- Lay the ornament face up on a blocking mat or folded towel.
- Pin the tip picot of each leaf first, checking that each leaf is 3.75 in (9.5 cm) long.
- Pin each side point outward so the edge forms clear holly points. Pin through the picots, not the sc.
- Gently press the center vein flat with your fingertips so it sits straight.
- Check the overall size: 6.5 in (16.5 cm) wide x 5 in (12.7 cm) tall.
- Let it dry completely, at least 6 hours, before you unpin it.
Final Quality-Control Checklist
- Each leaf has 50 sc and 8 picots in Rnd 4.
- Each leaf has 3 points per side, plus a tip picot and a stem picot.
- All three leaves are 3.75 in (9.5 cm) x 2.25 in (5.7 cm), within 0.25 in (0.6 cm).
- The center vein runs straight from stem to tip.
- There are 4 pairs of side veins, all angled toward the tip.
- The berries are 0.75 in (1.9 cm), firm, and closed with no stuffing showing.
- The berries sit in a tight triangle covering the stem ends.
- The loop is centered and the ornament hangs level.
- All ends are woven in on the back.
Troubleshooting
Leaf cups or curls: you worked Rnd 4 too tightly. Redo it with a looser hand, or use a hook one size up for that round only.
Edge ruffles: check that there are exactly 3 points per side. An extra point adds stitches and makes the edge wave.
Points look soft: block them again with pins through the picots, and make sure each picot is ch 3, not ch 2.
Leaf is lopsided: count each side in Rnd 3. Both sides must have 18 sts between the ch-2 sps.
Center vein puckers: the surface slip stitches are too tight. Pull them out and work them again more loosely.
Ornament tips forward: move the loop attachment slightly lower on the back, or add a stitch through Leaf 1 to balance the weight of the berries.
Berries look flat: add more stuffing before Rnd 4.
Care
Spot clean with cool water and mild soap, then reshape and dry flat. Store the ornament flat in tissue paper so the points and loop don’t get crushed.

Final Notes
The measurement chain is short. At a gauge of 20 sc = 4 in (10.2 cm), Rnd 3 gives a 3.25 in (8.3 cm) leaf, and the edging brings it to 3.75 in (9.5 cm). Three matching leaves with a 0.5 in (1.3 cm) overlap make an ornament 6.5 in (16.5 cm) wide and 5 in (12.7 cm) tall. Add the 0.75 in (1.9 cm) berries and the 2.5 in (6.4 cm) loop, and it’s ready for the tree.
Happy crocheting!