

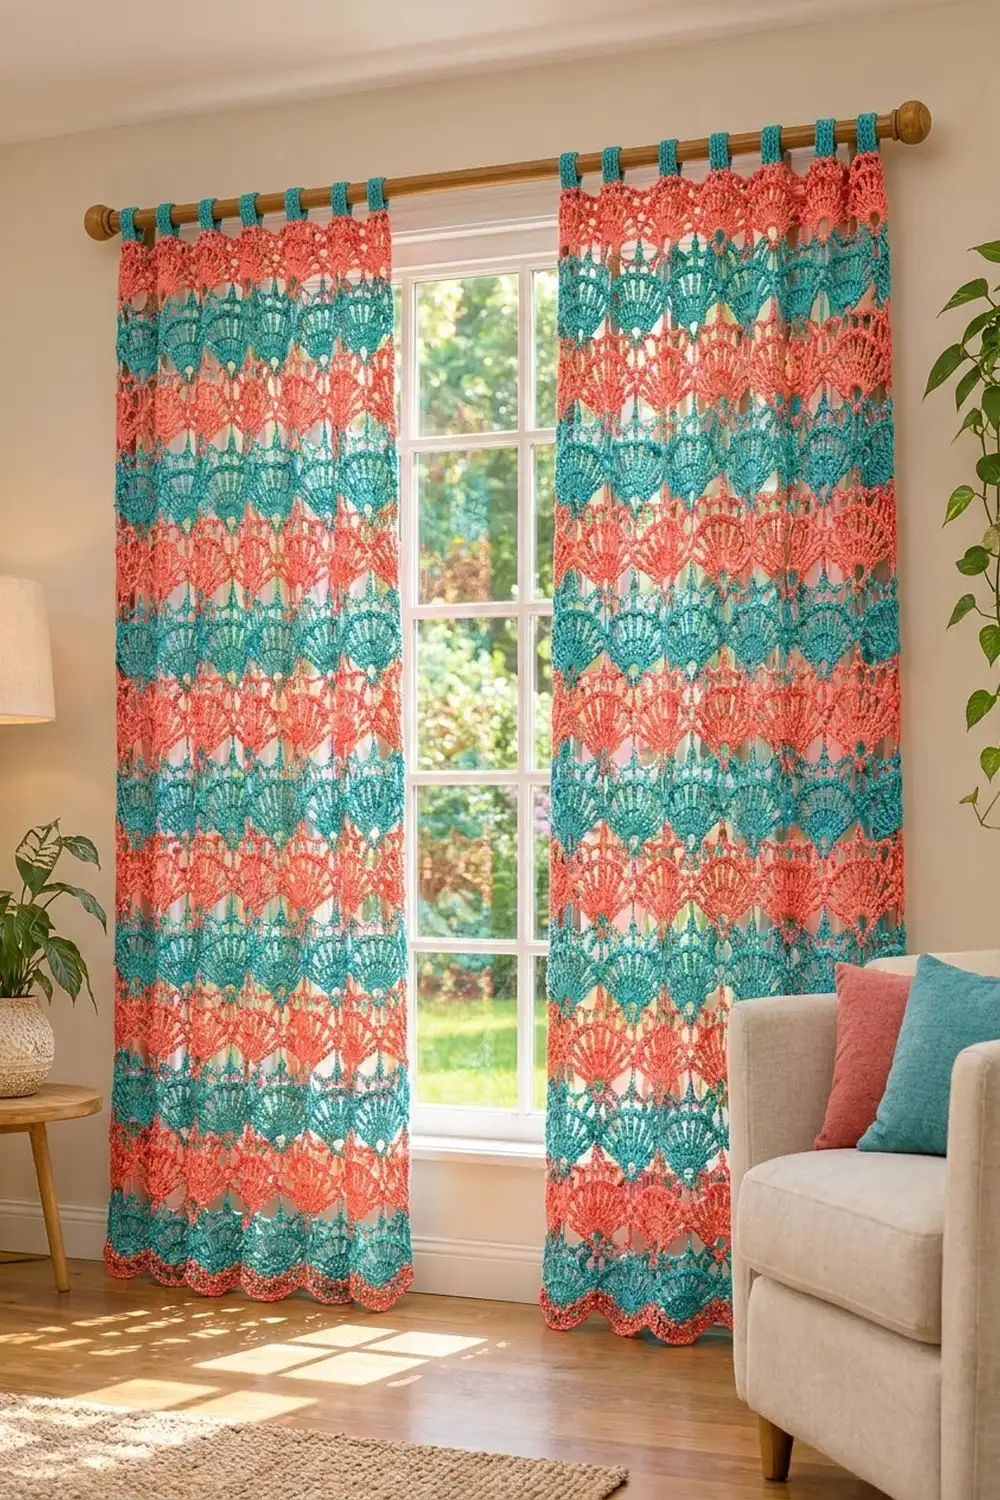
The Seaside Fan Lace Curtain is a tab-top window panel built from openwork fan motifs. Each fan grows from a small open ring into a spray of tall stitches, finished with a picot-trimmed scalloped edge. Rows of fans are offset by half a fan, so every ring sits in the valley between two fans below, creating a lacy fish-scale pattern.
The colors are bright and summery: coral rows alternate with turquoise rows from top to bottom, and the border and hanging tabs are turquoise. Light shines through every fan, so the panel filters sun without blocking the view.
This pattern uses US crochet terms. One finished panel measures 41 in wide x 75.5 in long (104.1 x 191.8 cm), not counting the tab loops, which rise about 3 in (7.6 cm) above the top edge. The photo shows a matching pair, so all yarn amounts are given for two panels.
Construction is join-as-you-go. You work Rows 1–4 of every motif in advance, then work Row 5 of each motif as the joining row, attaching its picots to its neighbors. Half fans make the side edges straight. A turquoise border levels the top scallops, edges the panel, and carries seven tabs.
Finished Size and Construction
- Finished size (one panel): 41 x 75.5 in (104.1 x 191.8 cm), plus 3 in (7.6 cm) tab loops
- Skill level: Intermediate
- Terminology: US
- Yarn weight: Worsted (#4) cotton
- Hook: 5.0 mm (H-8)
- Pieces per panel: 80 coral fans, 64 turquoise fans, 32 turquoise half fans
- Layout: 32 offset rows; odd rows have 5 fans, even rows have 4 fans plus a half fan at each end
- Fan size: 8 in wide x 4.5 in tall (20.3 x 11.4 cm); half fan 4 in (10.2 cm) wide
- Size before border: 40 x 74.25 in (101.6 x 188.6 cm)
- Border depth: 0.5 in (1.3 cm) on sides and bottom; 0.75 in (1.9 cm) above the top fan points
Materials
Choose a smooth mercerized or combed worsted cotton with good stitch definition. Cotton holds the fan shape, resists stretching on the rod, and washes well. Amounts below are for two panels; halve them for one.
- Coral (A): 720 g / 1,350 m (1,476 yd)
- Turquoise (B): 870 g / 1,650 m (1,804 yd)
These amounts assume about 190 m (208 yd) per 100 g and include a margin of about 10 percent for swatching, tails, and gauge variation.
Tools:
– 5.0 mm (H-8) crochet hook
– Tapestry needle
– Stitch markers
– Rustproof pins and blocking mats or a clean sheet on a carpet
– Spray bottle
– Measuring tape
– Curtain rod up to 1.5 in (3.8 cm) in diameter
Abbreviations (US Terms)
- ch – chain
- sl st – slip stitch
- sc – single crochet
- hdc – half double crochet
- dc – double crochet
- tr – treble crochet (yo twice)
- dtr – double treble (yo 3 times)
- qtr – quadruple treble (yo 5 times, then [yo, pull through 2] 6 times)
- quin tr – quintuple treble (yo 6 times, then [yo, pull through 2] 7 times)
- rev sc – reverse single crochet (crab stitch), worked left to right
- BL / FL – back loop / front loop
- st(s) – stitch(es); sp(s) – space(s)
- RS / WS – right side / wrong side
Picot: ch 3.
Joining picot: ch 1, sl st into the target picot or around the bare lower half of the target ring, ch 1. It replaces a picot and keeps the same position.
Gauge and Checkpoints
Border gauge: 14 sc and 16 rows = 4 in (10.2 cm) in turquoise.
Test one fan first. Work a complete fan, including Row 5 with ordinary picots, and check it at each stage:
- After Row 1: ring about 1 in (2.5 cm) across, with dc covering its upper half.
- After Row 3: about 6 in (15.2 cm) wide x 3.25 in (8.3 cm) tall.
- After Row 5: 8 in (20.3 cm) wide x 4.5 in (11.4 cm) from the bottom of the ring to the top picot, with the two outer picots about 2.25 in (5.7 cm) below the top picot.
If your fan is too large, go down 0.5 mm. If it is too small, go up 0.5 mm. A fan that is 0.25 in (0.6 cm) too wide makes the panel 1.25 in (3.2 cm) too wide, so take the test seriously.
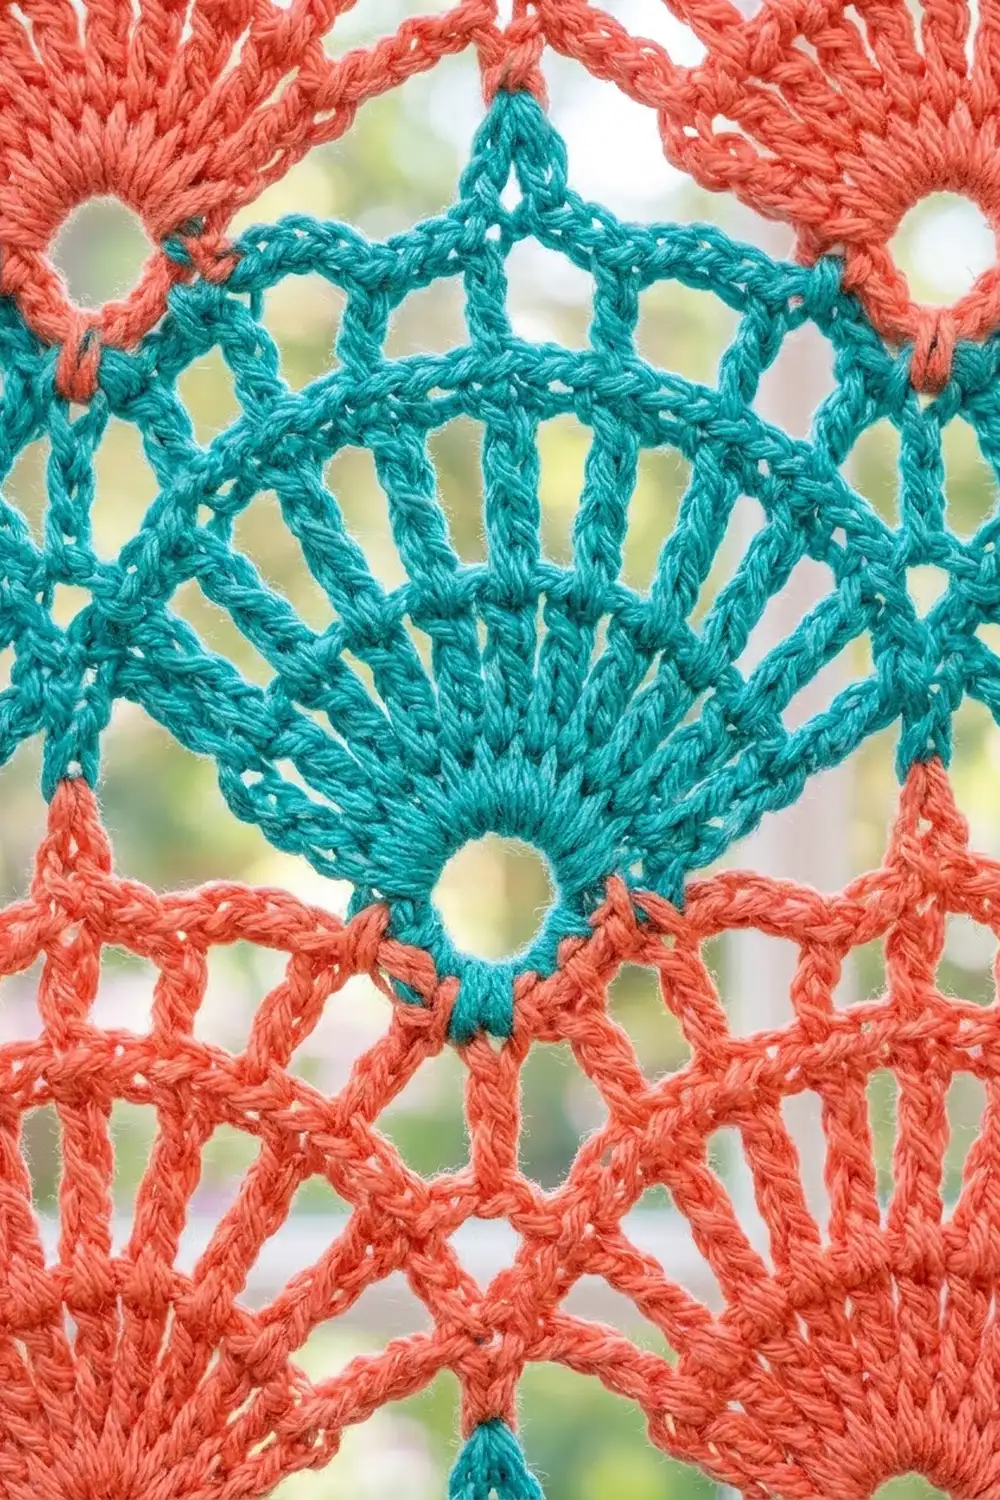
Fan Motif
Rows 1, 3, and 5 are RS rows. With the RS facing, picots are numbered P1 to P11 from left to right, so P6 is the top center.
Ch 8, sl st in first ch to form a ring.
Row 1 (RS): Ch 3 (counts as dc), 11 dc in ring. Turn. (12 dc)
Leave the lower half of the ring bare. Later motifs attach to it.
Row 2 (WS): Ch 5 (counts as dc + ch 2), [dc in next dc, ch 2] 10 times, dc in top of turning ch. Turn. (12 dc, 11 ch-2 sps)
Row 3: Ch 7 (counts as tr + ch 3), [tr in next dc, ch 3] 10 times, tr in 3rd ch of turning ch. Turn. (12 tr, 11 ch-3 sps)
Row 4: Ch 1, sc in first tr, [ch 5, sc in next tr] 11 times, working the last sc in 4th ch of turning ch. Turn. (12 sc, 11 ch-5 arches)
Row 5: Ch 1, [3 sc, picot, 3 sc] in each ch-5 arch across. Fasten off. (66 sc, 11 picots)
This gives a 120-degree wedge with straight sides and a scalloped picot arc.
Motif bodies: For the panel, work Rows 1–4 only and leave a 6 in (15.2 cm) tail. Work Row 5 during joining.
Half Fan Motif
The half fan has one straight side and fills the end of every even row.
Ch 8, sl st to form a ring.
Row 1 (RS): Ch 3 (counts as dc), 6 dc in ring. Turn. (7 dc)
Row 2: Ch 5, [dc in next dc, ch 2] 5 times, dc in top of turning ch. Turn. (7 dc, 6 ch-2 sps)
Row 3: Ch 7, [tr in next dc, ch 3] 5 times, tr in 3rd ch of turning ch. Turn. (7 tr, 6 ch-3 sps)
Row 4: Ch 1, sc in first tr, [ch 5, sc in next tr] 6 times. Turn. (7 sc, 6 ch-5 arches)
Row 5 (joining row): [3 sc, picot, 3 sc] in each arch. (36 sc, 6 picots)
The turning chains stack into the straight side. Number the picots H1 to H6, with H6 at the top of the straight side. For left half fans, work Row 5 with the RS facing so the straight side is on the left. For right half fans, work Row 5 with the WS facing so the straight side is on the right. The stitches look the same on both sides.
Make All Pieces
Per panel, make motif bodies (Rows 1–4) as follows:
- Coral: 80 fans
- Turquoise: 64 fans and 32 half fans
For the pair, make 160 coral fans, 128 turquoise fans, and 64 turquoise half fans.
Layout grid (F = fan, h = half fan, C = coral, T = turquoise):
Row 1  (C):   F   F   F   F   F
Row 2  (T): h   F   F   F   F   h
Row 3  (C):   F   F   F   F   F
Row 4  (T): h   F   F   F   F   h
...repeat Rows 3–4...
Row 31 (C):   F   F   F   F   F
Row 32 (T): h   F   F   F   F   h
Every fan points upward, with the ring at the bottom. Odd rows: 5 x 8 in = 40 in (101.6 cm). Even rows: 4 + (4 x 8) + 4 = 40 in (101.6 cm).
Joining
Lay the motif bodies out RS up and work from the top of the curtain down. Work Row 5 on each new motif. When you reach a joining picot, attach it to a finished motif. All other picots are ordinary ch-3 picots.
Layout Row 1 (coral): On the first fan, work all 11 ordinary picots. For each later fan, join P1 to P11 of the fan on its left.
Layout Row 2 (turquoise):
– Left half fan: H6 joins to P1 of Row 1 Fan 1, which is the top-left corner. H1 joins to the ring of Row 1 Fan 1.
– Full fans 1–4: each sits below the junction of Row 1 fans j and j+1. P1 joins to the ring of fan j, P6 joins to the joined P11/P1 picots, and P11 joins to the ring of fan j+1.
– Right half fan, WS facing: H1 joins to the ring of Row 1 Fan 5, and H6 joins to P11 of Fan 5.
Odd rows from Row 3: Fan k joins P1 to the ring of the Row 2 motif up and to its left, P11 to the ring of the motif up and to its right, and P6 to the ring of Fan k two rows up.
Even rows from Row 4: Full fans join P1 and P11 to the rings of the two coral fans above, and P6 to the ring of the turquoise fan two rows up. Each half fan joins H1 to the ring of the outer coral fan above, and H6 to the ring of the half fan two rows up.
Stitch-to-stitch logic: Each ring receives three joins: two arc ends from the row below and one top picot from two rows below. Each join replaces a picot, so the stitch count of every Row 5 stays at 66 sc (36 sc for half fans).
Tension: Keep the ch 1 on each side of the joining sl st snug but not tight. If the joins are too tight, the fans cup. If they are too loose, the rings sag and the layout looks uneven.
Size checkpoints: Measure the straight side of the panel from the top-left corner down. It should be 4.5 in (11.4 cm) after Row 2, 18 in (45.7 cm) after Row 8, 36 in (91.4 cm) after Row 16, and 72 in (182.9 cm) after Row 32. The width should stay at 40 in (101.6 cm). The panel before the border measures 40 x 74.25 in (101.6 x 188.6 cm), including the 2.25 in (5.7 cm) rise of the top scallops.
Border
All border work uses Turquoise (B) and the 5.0 mm hook. Border gauge is 3.5 sc per inch (2.54 cm).
Row T (top straightening row, RS): Join at P11 of the top-right fan. Ch 8 (counts as quin tr).
Then, for each fan, working toward the left:
ch 3, qtr in P10, ch 3, dtr in P9, ch 2, dc in P8, ch 1, hdc in P7, sc in P6, hdc in P5, ch 1, dc in P4, ch 2, dtr in P3, ch 3, qtr in P2, ch 3, then 1 pillar stitch.
For the pillar, work quin tr in the joined P1/P11 cluster at each valley, and quin tr in P1 of the last fan at the corner. Fasten off.
Each fan section has 9 sts + 18 ch = 27. There are 6 pillars. Total: (5 x 27) + 6 = 141 sts. The stitch heights step up toward the valleys, so the top edge becomes straight.
Round 1 (RS): Join B at the top-right corner pillar, ch 1. Work all four sides as follows:
- Top: Sc in each st and ch of Row T. (141 sc)
- Corner: Ch 2.
- Left side: 8 sc down the corner pillar. Then, for each of the 16 half fans: 1 sc in the edge junction, 2 sc in the Row 5 end, 2 sc in the Row 4 end, 5 sc around the Row 3 tr, 3 sc around the Row 2 dc, and 3 sc around the Row 1 turning ch. That is 16 sc per half fan. (8 + 256 = 264 sc)
- Corner: Ch 2.
- Bottom:
- Left half fan: 3 sc around the bare ring, then 15 sc up its diagonal side (3, 3, 5, 2, 2), then 1 sc in the junction.
- Each of 4 fans: 15 sc down, 5 sc around the ring, 15 sc up, and 1 sc in the junction. That is 36 sc per fan.
- Right half fan: 15 sc down, then 3 sc around the ring.
- (3 + 15 + 1 + 144 + 15 + 3 = 181 sc)
- Corner: Ch 2.
- Right side: Mirror the left side. (264 sc)
- Corner: Ch 2. Sl st to the first sc.
(Round 1 total: 850 sc + 4 corner ch-2 sps)
Round 2: Ch 1. Work rev sc in each sc around, with 2 rev sc in each corner sp. On the top edge, work in the FL only. Sl st to join. Fasten off. (141 + 264 + 181 + 264 + 8 = 858 sts)
Why the math works: At 3.5 sc per inch, 141 sc covers 40.3 in (102.4 cm), which matches the 40 in (101.6 cm) width. Each side has 264 sc over roughly 74.5 in (189.2 cm), about 3.5 sc per inch. Each fan side and half-fan edge gets the same 15 or 16 sc, so the zigzag bottom lies flat without ruffling.
Tabs (make 7): With the RS facing, count the free BL of the 141 Round 1 top sc from the right corner. Place tabs on sts 1–9, 23–31, 45–53, 67–75, 89–97, 111–119, and 133–141. Each tab is 9 sts wide with 13 sts between tabs: 7 x 9 + 6 x 13 = 141.
- Row 1: Join B in the BL of the first st, ch 1, sc in the same BL and the next 8 BL. Turn. (9 sc)
- Rows 2–28: Ch 1, sc in each sc. Turn. (9 sc)
Each tab measures about 2.5 x 7 in (6.4 x 17.8 cm). Fold it to the WS and whipstitch the last row to Row T directly behind the tab base. This leaves a loop about 3 in (7.6 cm) high.
Final Blocking
- Weave in all tails along the stitch posts. Leave them unclipped until after blocking.
- Soak the panel in cool water for 15 minutes. Squeeze out the water gently and roll the panel in towels.
- Lay it flat on mats or a sheet, RS up.
- Pin the top edge straight at 41 in (104.1 cm).
- Pin both sides straight at 75.5 in (191.8 cm).
- Pin the point of each bottom ring and each picot on the outer fans.
- Open each fan so its spokes radiate evenly and its arches are round.
- Let it dry completely. Then clip the tails.
Final Quality-Control Checklist
- Each panel has 80 coral fans, 64 turquoise fans, and 32 half fans.
- All 32 rows alternate in color, starting with coral at the top.
- Each ring holds its three joins, or fewer along the edges.
- No ordinary picot appears where a join belongs.
- Row T has 141 sts, Round 1 has 850 sc, and Round 2 has 858 sts.
- Seven tabs are evenly spaced, each 9 sts wide.
- The panel measures 41 x 75.5 in (104.1 x 191.8 cm).
Troubleshooting
- Fans cup or ripple: Row 3 chains are too tight or too loose. Recheck the 6 in (15.2 cm) checkpoint.
- Side edge is wavy: Recount the 16 sc per half fan. Too many sc around the Row 3 tr is the usual cause.
- Top edge still dips at the valleys: Make the quin tr taller by pulling up the first loop slightly.
- Bottom ruffles: Drop 1 sc around each ring, from 5 to 4, and keep the count the same on every fan.
- Panel is too wide: Undo the newest row and redo it with firmer joining chains.
Care
Hand wash or machine wash on a gentle cycle in cool water. Lay the panel flat to dry and reshape it while damp. Do not hang a wet panel, because the weight will stretch it.
Final Notes
The measurement chain is short and checkable. Each fan measures 8 x 4.5 in (20.3 x 11.4 cm). Five fans per row give 40 in (101.6 cm). Sixteen half-fan edges give 72 in (182.9 cm). The top scallops bring the panel to 74.25 in (188.6 cm), and the border finishes it at 41 x 75.5 in (104.1 x 191.8 cm). If the first fan matches its checkpoints, every later number follows.
Happy crocheting!