

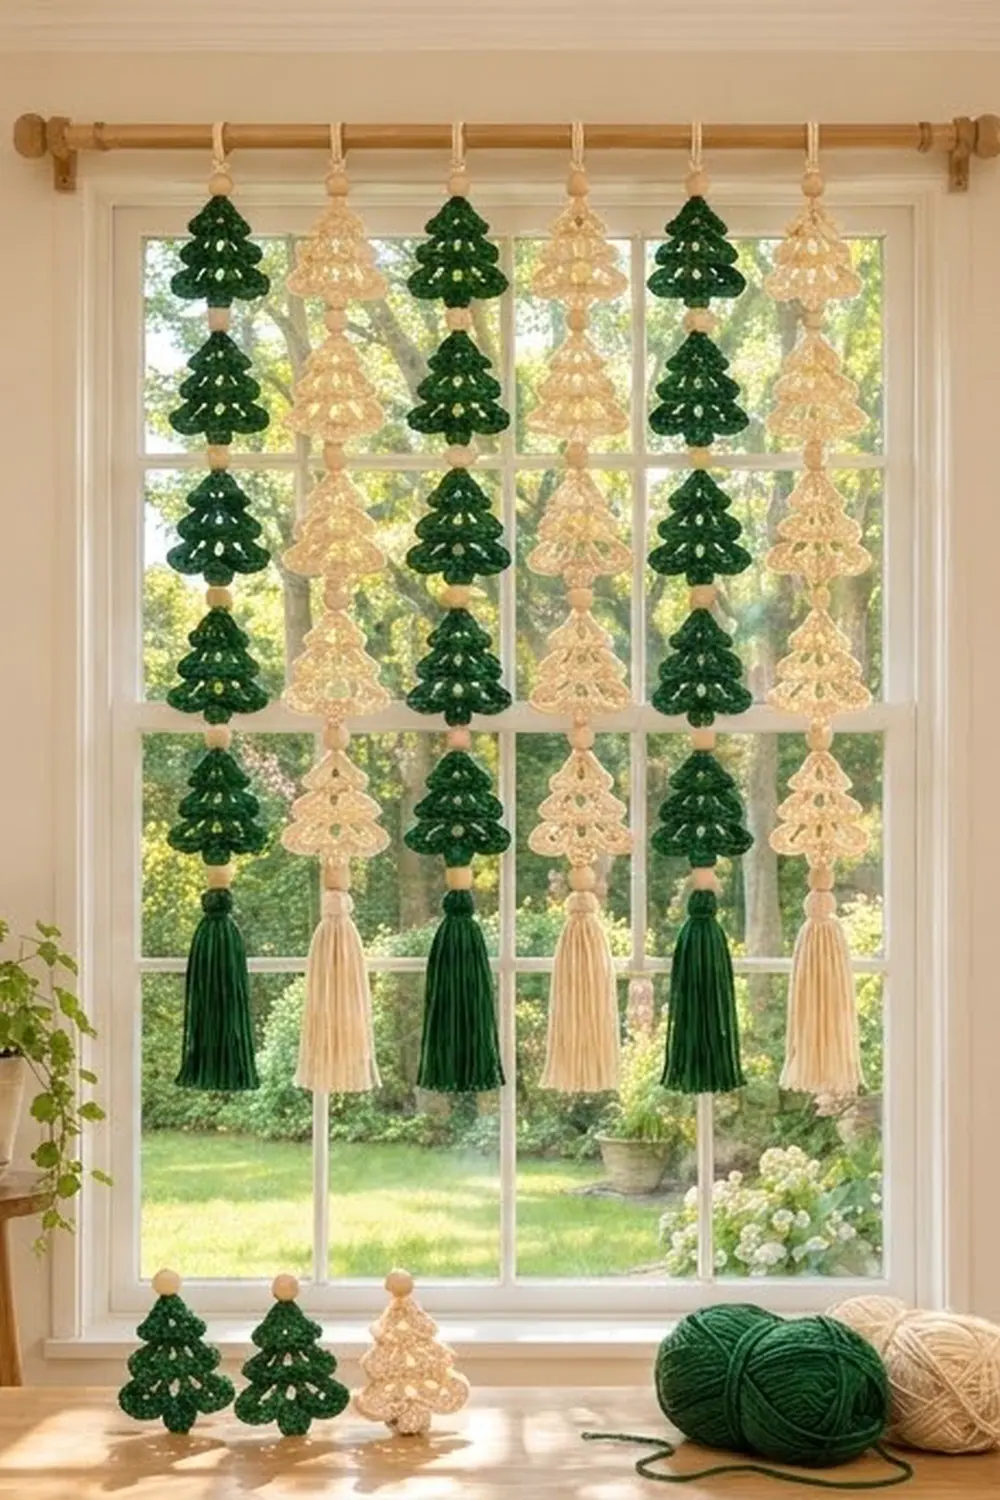
This curtain is made of lacy little Christmas trees hung in long vertical strands. Each tree has three stepped tiers, a few small eyelets, and a scalloped edging that gives every tier a soft, rounded tip. Natural wooden beads sit between the trees, a fluffy tassel finishes each strand, and a crocheted loop slips over a wooden curtain rod.
The palette has just two colors: deep forest green and warm cream. The strands alternate green, cream, green, cream, green, cream, so the window reads as clean stripes of color. The style is Scandinavian and simple, and it works in a window, a doorway, or against a plain wall.
The pattern uses US crochet terms. Each tree measures about 4.75 in wide x 4.5 in tall (12.1 x 11.4 cm). Each finished strand hangs about 36.5 in (92.7 cm) long, and the six strands spaced 5 in (12.7 cm) apart cover about 29.75 in (75.6 cm) of rod.
Construction: each tree is worked flat in turned rows from the tip down, then edged in two rounds. The trees are linked with short beaded chain connectors, a hanging loop is added at the top, and a tassel is tied on at the bottom.
Finished Size and Construction
- Finished size (curtain): about 29.75 in wide x 36.5 in long (75.6 x 92.7 cm)
- Skill level: Easy+ (advanced beginner)
- Terminology: US
- Yarn weight: worsted (#4) cotton
- Hook: 4.0 mm (G-6)
- Number of pieces: 30 trees (15 green, 15 cream), 6 tassels, 36 beads
- Layout: 6 strands x 5 trees, alternating colors strand by strand
- Piece size: 4.75 x 4.5 in (12.1 x 11.4 cm) per tree
- Size before border: 3.75 x 3.5 in (9.5 x 8.9 cm)
- Border depth: about 0.5 in (1.3 cm) at the shells
Materials
Choose a smooth, firm worsted-weight cotton or cotton blend, about 85 m (93 yd) per 50 g. Cotton keeps the scallops crisp and hangs straight in a sunny window without stretching.
- Color A, forest green: 100 g / 170 m (186 yd)
- Color B, cream: 100 g / 170 m (186 yd)
Each color covers 15 trees, 3 hanging loops, 15 connectors, and 3 tassels. These quantities include a margin of about 20% for your test tree and the tassels.
Tools:
– 4.0 mm (G-6) crochet hook
– 36 natural wooden beads, 16 mm, with holes of at least 4 mm
– Stiff cardboard, 6 in (15.2 cm) wide, for tassels
– Tapestry needle and scissors
– Stitch markers
– Blocking mat and rust-proof pins
– Wooden curtain rod or dowel, up to 1.25 in (3.2 cm) thick
Abbreviations (US Terms)
- ch – chain
- sl st – slip stitch
- sc – single crochet
- dc – double crochet
- st(s) – stitch(es)
- sp – space
- tch – turning chain
- RS – right side
Special stitch – Shell: 5 dc in the same stitch.
Turning chain: ch 3 counts as 1 dc throughout; ch 4 counts as 1 dc + ch 1.
Gauge and Checkpoints
Gauge: 16 dc and 8 rows = 4 in (10.2 cm) with a 4.0 mm hook.
The tree is your gauge swatch. Make one tree completely, block it, and measure it before making the other 29.
Checkpoints:
– After Row 2: 1.75 in (4.4 cm) wide, 1 in (2.5 cm) tall
– After Row 4: 2.25 in (5.7 cm) wide, 2 in (5.1 cm) tall
– After Row 6: 2.75 in (7.0 cm) wide
– After Row 7: 3.75 in (9.5 cm) wide, 3.5 in (8.9 cm) tall
– After border: 4.75 x 4.5 in (12.1 x 11.4 cm)
If your tree is too big, go down 0.5 mm in hook size. If it is too small, go up 0.5 mm. A tree that is off by 0.25 in (0.6 cm) is fine. Larger differences change the curtain width and the yarn amount.

Tree (make 30)
Each tree is worked from the tip down. Rows 3 and 5 start a little in from each edge, which creates the stepped tiers.
Tier 1 (top)
Row 1: Ch 4. Work 2 dc in the 4th ch from hook (the 3 skipped ch count as 1 dc). — 3 sts
Row 2: Turn. Ch 3, 2 dc in the same st, dc in the next st, 3 dc in the top of the tch. — 7 sts
Tier 2 (middle)
Row 3: Turn. Sl st in the first 2 sts, ch 4, skip the next st, dc in the next st, ch 1, skip the next st, dc in the next st. Leave the last st unworked. — 5 sts (3 dc + 2 ch-1 sps)
Row 2 now sticks out 1 st past Row 3 at each side. These are the step stitches.
Row 4: Turn. Ch 3, 2 dc in the same st, dc in the ch-1 sp, dc in the next dc, dc in the ch-1 sp, 3 dc in the 3rd ch of the tch. — 9 sts
Tier 3 (bottom)
Row 5: Turn. Sl st in the first 2 sts, ch 4, skip the next st, dc in the next st, (ch 1, skip the next st, dc in the next st) twice. Leave the last st unworked. — 7 sts (4 dc + 3 ch-1 sps)
Row 6: Turn. Ch 3, 2 dc in the same st, (dc in the ch-1 sp, dc in the next dc) twice, dc in the last ch-1 sp, 3 dc in the 3rd ch of the tch. — 11 sts
Row 7: Turn. Ch 3, 2 dc in the same st, dc in each of the next 9 sts, 3 dc in the top of the tch. — 15 sts
Do not fasten off. Check the size against the Row 7 checkpoint, then work the border from the Border section on this tree. Every tree is fully edged before it is joined.
Make All Pieces
- Color A (green): 15 trees, 3 tassels, 3 hanging loops, 15 beaded connectors
- Color B (cream): 15 trees, 3 tassels, 3 hanging loops, 15 beaded connectors
Layout grid (strands left to right, trees top to bottom):
Strand:  1  2  3  4  5  6
Tree 1:  A  B  A  B  A  B
Tree 2:  A  B  A  B  A  B
Tree 3:  A  B  A  B  A  B
Tree 4:  A  B  A  B  A  B
Tree 5:  A  B  A  B  A  B
Tassel:  A  B  A  B  A  B
Each strand uses one color only, from the loop to the tassel.
Tassel (make 3 per color): Wrap yarn 40 times around the 6 in (15.2 cm) cardboard. Slide an 8 in (20.3 cm) tie under the wraps at the top and knot it tightly. Cut the loops at the bottom. Wrap a second piece of yarn around the tassel 0.75 in (1.9 cm) below the top, knot it, and hide the ends inside. Trim to 5.5 in (14.0 cm). Leave the top tie long so you can attach the tassel later.
Joining
The trees are joined into strands with short beaded chain connectors worked in the same color as the strand. Before each connector, thread 1 bead onto the working yarn with the tapestry needle.
The joining points are always the same:
– Top of each tree: the ch-3 picot at the tip (from Border Round 2)
– Bottom of each tree: the 3rd dc of the center shell on the bottom edge (the 3rd of the 5 bottom shells)
Hanging loop and top bead: Thread 1 bead. Join with a sl st in the picot of Tree 1. Ch 1, slide the bead up to the hook, ch 1 to lock it in place, ch 20, then sl st into the ch just above the bead to form a loop. Work 20 sc over the loop and sl st to the first sc. Fasten off. The loop measures about 5 in (12.7 cm) around and fits a rod up to 1.25 in (3.2 cm) thick.
Tree-to-tree connector (4 per strand): Thread 1 bead. Join with a sl st in the bottom center dc of the upper tree. Ch 1, slide the bead up, ch 1, then sl st in the picot of the next tree. Fasten off. Each connector adds about 1 in (2.5 cm).
Bottom connector: Thread 1 bead. Join with a sl st in the bottom center dc of Tree 5. Ch 1, slide the bead up, ch 3. Fasten off, leaving an 8 in (20.3 cm) tail. Tie the tassel’s top tie to this tail with a square knot, then weave both ends into the tassel head.
Each strand uses 6 beads (1 + 4 + 1), and 6 strands use 36 beads.
Tension: Keep the connector chains firm so the bead sits snugly between the trees. Loose chains let the trees twist and spin.
Size checkpoint: Hang one finished strand. From the top of the loop to the tassel tips it should measure about 36.5 in (92.7 cm). If it is off by more than 1 in (2.5 cm), check your tree height before joining the other strands.
Border (worked on each tree)
Work this border on every tree right after Row 7, before joining. Once you turn for Round 1, the side facing you is the RS. Keep it facing you for both rounds.
Border gauge: Round 1 uses 2 sc around each dc row end and 1 sc in each step stitch. Round 2 places a shell on each tier tip and across the bottom edge.
Round 1: Turn, ch 1. Working along the bottom edge (the tops of Row 7): 3 sc in the first st, sc in each of the next 13 sts, 3 sc in the last st. — 19 sc on the bottom
Going up the first side: 2 sc around each of Rows 7, 6, and 5, 1 sc in the step st of Row 4, 2 sc around each of Rows 4 and 3, 1 sc in the step st of Row 2, and 2 sc around each of Rows 2 and 1. — 16 sc on the side
At the tip: (sc, ch 2, sc) in the foundation ch at the base of Row 1. — 2 sc + ch-2 sp
Going down the second side: repeat the side sequence in reverse. — 16 sc
Sl st to the first sc. — 53 sc + 1 ch-2 sp
Round 2: Ch 1.
– Bottom edge: sc in the first sc, shell in the next sc (the corner), skip 1 sc, sc in the next sc, skip 1 sc, shell in the next sc; repeat from * 3 more times, then sc in the next sc. — 31 sts (6 sc + 5 shells)
– First side: sc in each of the next 6 sc, shell in the next sc (Row 4 step), sc in each of the next 4 sc, shell in the next sc (Row 2 step), sc in each of the next 4 sc. — 24 sts
– Tip: sc in the next sc, (sc, ch 3, sc) in the ch-2 sp, sc in the next sc. — 4 sc + ch-3 picot
– Second side: sc in each of the next 4 sc, shell in the next sc, sc in each of the next 4 sc, shell in the next sc, sc in each of the next 6 sc. — 24 sts
Sl st to the first sc and fasten off. — 83 sts (38 sc + 45 dc) + 1 ch-3 picot
Why the math works: The 16 side stitches break down as 6 + 1 + 4 + 1 + 4. That puts the 2 shells exactly on the step stitches, where each tier sticks out. On the bottom edge, the 17 stitches from one corner center to the other fit 4 repeats of 4 stitches plus 1 final shell. That makes 5 evenly spaced scallops, with the corner shells forming the tips of the bottom tier. The center shell also marks the exact middle for the bottom connector.
Final Blocking
- Weave in all tree ends before blocking, but leave the connector tails until the strands are assembled.
- Mist each tree with water until it is evenly damp.
- Pin it flat to 4.75 x 4.5 in (12.1 x 11.4 cm). Pin the tip picot and each shell so the scallops curve evenly.
- Use the grid lines on your mat so the center line runs straight from the tip to the bottom center shell.
- Let the trees dry completely, then unpin them.
- After assembly, hang the strands for a day. Steam lightly from a distance if any tree tilts.
Final Quality-Control Checklist
- 30 trees: 15 green and 15 cream
- Every tree measures 4.75 x 4.5 in (12.1 x 11.4 cm), within 0.25 in (0.6 cm)
- Round 2 counts: 83 sts plus the picot on every tree
- 3 tier tips per side with a shell on each (2 step shells + 1 corner shell)
- 5 shells on every bottom edge
- 6 beads per strand, 36 in total
- Each strand is about 36.5 in (92.7 cm) long
- Tassels are trimmed level at 5.5 in (14.0 cm)
- All ends are woven in and secure
Troubleshooting
- Tiers don’t step in: Check that Rows 3 and 5 start with 2 sl sts and leave the last st unworked.
- Tree curls or cups: Your increase rows are too tight. Loosen up or block more firmly.
- Wavy sides: You’ve worked too many sc around the row ends. Keep it at exactly 2 per row.
- Shells don’t line up with the tiers: Re-count the 16 side sc. The step stitches must be the 7th and 12th sc up from the bottom corner.
- Trees spin on the strand: The connector chains are too loose. Work them firmly.
- Bead won’t slide: Use a bead with a bigger hole, or thread it with a finer needle.
Care
Hand wash cold and lay flat to dry, reshaping each tree and fluffing the tassels. Avoid wringing, which can loosen the beaded connectors.
Final Notes
The measurement chain is simple. Gauge is 16 dc and 8 rows to 4 in (10.2 cm). That gives a 3.75 x 3.5 in (9.5 x 8.9 cm) body, and the border brings each tree to 4.75 x 4.5 in (12.1 x 11.4 cm). Five trees, six beads, a loop, and a tassel make a 36.5 in (92.7 cm) strand. Six strands spaced 5 in (12.7 cm) apart make a 29.75 in (75.6 cm) curtain. Check each link in that chain, and the whole curtain will hang straight and even.
Happy crocheting!