
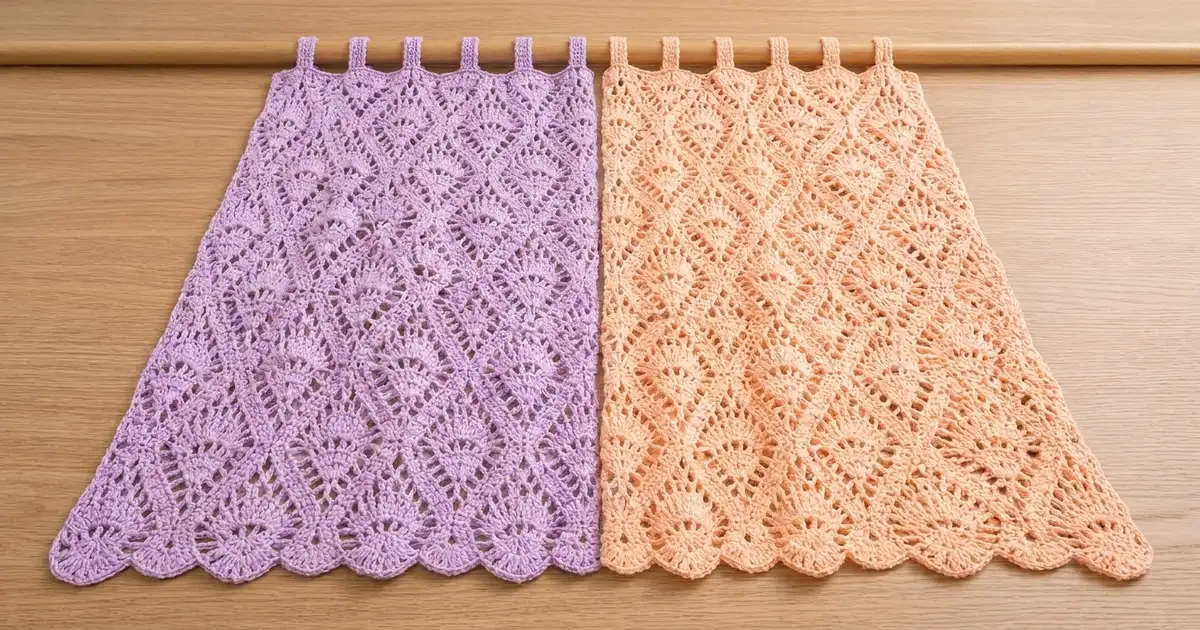
The Sorbet Trellis panels are lace curtains made of solid fans set inside a trellis of chain spaces. Each fan row is offset from the one before, so the lace forms columns of diamond-shaped cells that let light through without looking busy. A row of scallops finishes the bottom edge, and solid tabs at the top slip over a standard curtain rod.
The pair shown is one lavender panel and one peach panel. They hang side by side but are never joined, so you can make one panel, a matching pair, or a mixed pair like this one.
This pattern uses US crochet terms. Each finished panel measures 29.8 in (75.7 cm) wide by 74.5 in (189.2 cm) long without the tabs, and 77.5 in (196.9 cm) from the top of the tab loops to the bottom of the scallops.
Each panel is made in one piece. You work the lace body in rows from the bottom up. Next you work a two-round border all the way around, adding scallops along the bottom on the second round. Last, you work eight tabs off the top edge, fold them over, and sew them down.
Finished Size and Construction
- Finished panel size: 29.8 in x 74.5 in (75.7 cm x 189.2 cm), border included
- Length including tab loops: 77.5 in (196.9 cm)
- Skill level: Intermediate
- Terminology: US
- Yarn weight: DK (3), cotton or cotton blend
- Hook: 4.0 mm (US G-6)
- Number of pieces: 2 separate panels (1 lavender, 1 peach), each worked in one piece
- Layout: the panels hang side by side on one rod and are not joined
- Size before border: 29 in x 73.4 in (73.7 cm x 186.4 cm)
- Border depth: 0.4 in (1.0 cm) at the top and sides, 0.7 in (1.8 cm) at the scalloped bottom
- Tabs: 8 per panel, each 1.8 in (4.6 cm) wide, forming a loop about 3 in (7.6 cm) tall
Materials
Use a smooth DK cotton, either mercerized or combed. Cotton gives you crisp fans, hangs straight, and blocks well. Avoid fuzzy or very stretchy yarns, because the weight of a long panel will pull them out of shape.
- Lavender: 1,100 g, about 2,530 m (twenty-two 50 g / 115 m balls), for one panel
- Peach: 1,100 g, about 2,530 m (twenty-two 50 g / 115 m balls), for one panel
Each panel uses about 980 g. The amounts above include a margin of about 12% to cover your gauge swatch, small differences in tension, and weaving in ends. Buy all the balls for one color from the same dye lot.
Tools:
– 4.0 mm (US G-6) crochet hook
– Yarn needle
– Stitch markers (at least 10)
– Measuring tape
– Rust-proof pins, plus blocking mats or a clean sheet over carpet
– Spray bottle
– Curtain rod no more than 1.5 in (3.8 cm) in diameter
Abbreviations (US Terms)
- ch: chain
- sl st: slip stitch
- sc: single crochet
- dc: double crochet
- sp: space
- st(s): stitch(es)
- rep: repeat
- RS / WS: right side / wrong side
Special stitches:
– Fan: 9 dc in the same stitch.
– Half fan: 5 dc in the same stitch. At the start of a row, ch 3 counts as the first dc.
– Scallop: 7 dc in the same stitch (border only).
Stitch counting: in the frame rows, every chain counts as a stitch, so each ch-2 space counts as 2 sts.
Gauge and Checkpoints
Make a swatch before you start a panel. A panel is 148 rows long, so even a small gauge error adds up over its full length.
Swatch: Ch 38. Work Rows 1–2 below (37 sc, then 31 sts with 3 fans). Then work Rows 3–6 twice.
Gauge targets:
– One 12-st pattern repeat = 2.4 in (6.1 cm) wide
– Swatch width (3 repeats) = 7.2 in (18.3 cm)
– Rows 3–6 (one 4-row repeat) = 2 in (5.1 cm) tall
– Swatch height after 10 rows = 4.8 in (12.2 cm)
– Border sc: 5 sc = 1 in (2.5 cm)
Gently pin the swatch flat, mist it, and let it dry before you measure. If it’s too big, go down 0.5 mm in hook size. If it’s too small, go up 0.5 mm. If the width is right but the height is off, change the height of your dc before you change hooks: pull up a longer or shorter first loop.
Body checkpoints (lightly stretched flat):
– After Row 2: 29 in (73.7 cm) wide
– After Row 6: 2.8 in (7.1 cm) tall
– After Row 42 (10 repeats): 20.8 in (52.8 cm) tall
– After Row 146 (36 repeats): 72.8 in (184.9 cm) tall
– After Row 148: 29 in x 73.4 in (73.7 cm x 186.4 cm)
Body
Work the whole panel in one color. The instructions are the same for lavender and peach.
Foundation: Ch 146.
Row 1: Sc in 2nd ch from hook and in each ch across. Turn. (145 sc)
Row 2 (fan row): Ch 1, sc in first sc, skip 5 sc, fan in next sc, skip 5 sc, sc in next sc; rep from * 11 more times. Turn. (121 sts: 12 fans and 13 sc)
Row 3 (frame row): Ch 5 (counts as dc and ch 2), sc in 3rd dc of next fan, ch 2, sc in 5th dc, ch 2, sc in 7th dc, ch 2, dc in next sc, ch 2; rep from * across, ending the last rep at . Turn. (145 sts: 13 dc, 36 sc, 48 ch-2 sps)*
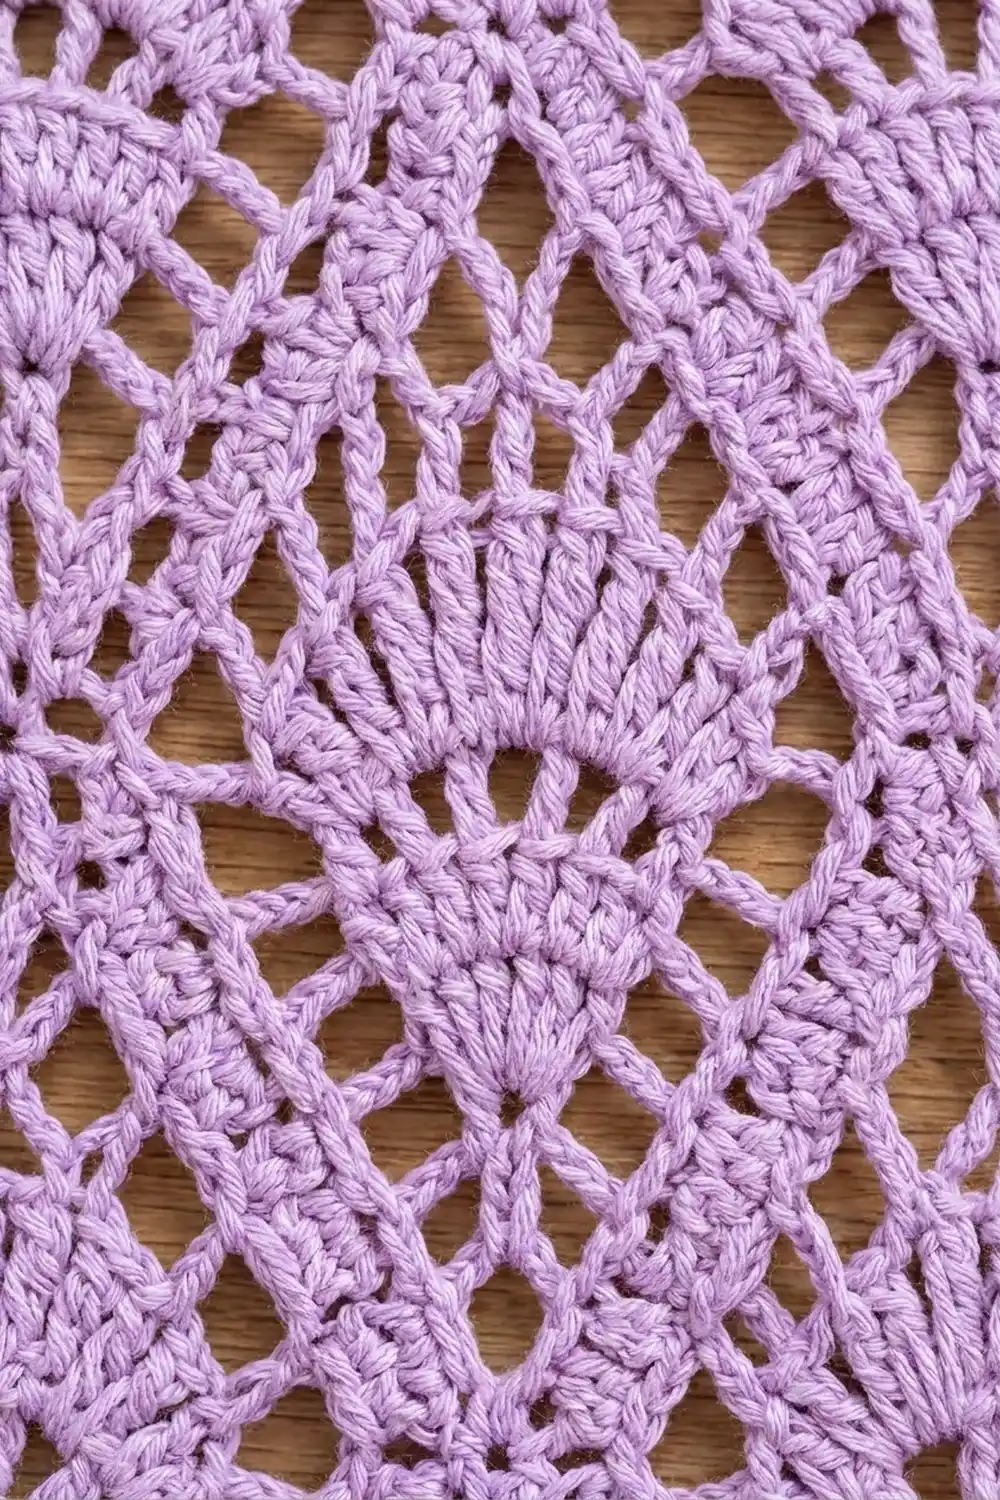
This row turns each fan into the top of a diamond frame. Each 12-st repeat is 3 sc, 1 dc, and four ch-2 sps (3 + 1 + 8 = 12). Twelve repeats plus 1 edge dc gives 145 sts, the same as Row 1.
Row 4 (offset fan row): Ch 3 (counts as dc), 4 dc in first dc (half fan made), sc in center sc of next 3-sc group, fan in next dc; rep from * 10 more times, sc in center sc of last 3-sc group, 5 dc in 3rd ch of turning ch (half fan). Turn. (121 sts: 2 half fans, 11 fans, 12 sc)
Count check: 5 + 12 + 99 + 5 = 121. Each fan sits over a dc of Row 3, which sits directly between two fans of Row 2. This offset creates the diamonds.
Row 5 (offset frame row): Ch 1, sc in first dc, ch 2, sc in 3rd dc of half fan, ch 2, dc in next sc, ch 2, sc in 3rd dc of next fan, ch 2, sc in 5th dc, ch 2, sc in 7th dc, ch 2, dc in next sc; rep from * 10 more times, ch 2, sc in 3rd dc of last half fan, ch 2, sc in top of turning ch. Turn. (145 sts: 12 dc, 37 sc, 48 ch-2 sps)
Count check: 7 sts at the start + (11 x 12) + 6 at the end = 145.
Row 6 (fan row): Ch 1, sc in first sc, fan in next dc, sc in center sc of next 3-sc group; rep from * 10 more times, fan in last dc, sc in last sc. Turn. (121 sts: 12 fans and 13 sc)
Row 6 matches Row 2 exactly, and each fan lines up over a fan from Row 2.
Rows 7–146: Rep Rows 3–6 thirty-five more times, for 36 repeats of Rows 3–6 in all. Check the 20.8 in (52.8 cm) and 72.8 in (184.9 cm) checkpoints as you go.
Row 147: Rep Row 3. (145 sts)
Row 148: Ch 1, sc in each sc and dc, and 2 sc in each ch-2 sp across. (145 sc)
Count check: 13 + 36 + (48 x 2) = 145. The top edge now matches the foundation exactly. Fasten off.
Make Both Panels
- Panel A: 1 panel in lavender
- Panel B: 1 panel in peach
Layout on the rod, as seen from the room:
[ Lavender Panel A ] [ Peach Panel B ]
      8 tabs              8 tabs
There is no joining step. Each panel hangs on its own, so you can open and close them separately.
Border
Border gauge: 5 sc = 1 in (2.5 cm). This rate also matches the 145 sts across the top and bottom (145 ÷ 5 = 29 in).
Side edge rule: work 1 sc into the end of each sc row, 2 sc into the end of each frame row (Rows 3 and 5), and 3 sc into the end of each fan row (Rows 2, 4, and 6). That gives 1 + 3 + (36 x 10) + 2 + 1 = 367 sc down each side. At 5 sc per inch, 367 sc measure 73.4 in (186.4 cm), exactly the body length, so the sides stay straight instead of ruffling or pulling in.
Round 1: With RS facing, join yarn in the first st of Row 148 (top corner). Ch 1, 3 sc in same st, sc in next 143 sts, 3 sc in last st (corner). Work 367 sc down the side. Working in the free loops of the foundation chain: 3 sc in first loop (corner), sc in next 143 loops, 3 sc in last loop (corner). Work 367 sc up the second side. Sl st to first sc.
Counts per side, from one corner center sc to the next, counting both corner centers:
– Top: 147 sts
– Bottom: 147 sts
– Each side: 371 sts
– Round total: 1,032 sts (149 + 149 + 367 + 367)
Round 2: Ch 1, sc in same st, 3 sc in next sc (corner center), sc in next 145 sts, 3 sc in next sc (corner center), sc in next 369 sts, sc in bottom corner center sc. Scallop section: sc in next st, skip 2 sts, scallop in next st, skip 2 sts, sc in next st; rep from * 23 more times (24 scallops). Sc in bottom corner center sc, sc in next 368 sts. Sl st to first sc. Fasten off.
Counts per side for Round 2:
– Top: 149 sts, counting both corner centers
– Each side: 372 sts, counting the top corner center and the bottom corner sc
– Bottom scallop section: uses 145 sts (1 + 24 x 6) and produces 193 new sts
– Round total: 1,084 sts
Why the math works: there are exactly 145 sts between the two bottom corner centers (147 minus 2). Each scallop uses 6 sts, and you need 1 extra sc to start, so the bottom edge needs 6 x 24 + 1 = 145. That makes 2 scallops for every 2.4 in (6.1 cm) body repeat, so the scallops line up under the fan columns. The bottom corners get just 1 sc on this round because the first and last scallops round them off.
Tabs: With RS facing, count the 149 top sts from corner center to corner center. Place markers so the tabs fall on sts 1–9, 21–29, 41–49, 61–69, 81–89, 101–109, 121–129, and 141–149. That’s 8 tabs of 9 sts, with 7 gaps of 11 sts between them (72 + 77 = 149).
For each tab:
– Row 1: Join yarn in first st of tab, ch 1, sc in same st and next 8 sts. Turn. (9 sc)
– Rows 2–30: Ch 1, sc in each sc. Turn. (9 sc)
Each tab measures 1.8 in (4.6 cm) wide by 6 in (15.2 cm) long. Fasten off, leaving a 12 in (30.5 cm) tail. Fold the tab to the WS and whipstitch Row 30 to the back of Border Round 1 directly below the tab. This makes a loop about 3 in (7.6 cm) tall.
Final Blocking
- Weave in all ends through the solid dc of the fans or inside the border, never across an open ch-2 space.
- Soak the panel in cool water with a little wool wash for 15 minutes. Press the water out; don’t wring it.
- Roll the panel in towels to remove excess water.
- Lay it flat. If you’re short on space, block it in two halves, and let the first half dry before moving on.
- Pin the corners to 29.8 in x 74.5 in (75.7 cm x 189.2 cm).
- Pin along the sides every 4 in (10.2 cm) to keep the edges straight.
- Pin the tip of each of the 24 scallops so they open into even curves.
- Gently open each diamond cell with your fingers so the fans sit upright and centered.
- Let the panel dry completely before you unpin it.
Final Quality-Control Checklist
- Body rows alternate 145 / 121 sts. Rows 2 and 6 have 12 fans; Row 4 has 11 full fans plus 2 half fans
- Fans line up in straight vertical columns
- Body measures 29 in x 73.4 in (73.7 cm x 186.4 cm) before the border
- Round 1 has 367 sc along each side
- 24 evenly spaced scallops run along the bottom
- 8 tabs are evenly spaced and all sewn down at the same depth
- Blocked panel measures 29.8 in x 74.5 in (75.7 cm x 189.2 cm)
- Both panels are within 0.4 in (1.0 cm) of each other in length
Troubleshooting
- Fans drift sideways: you’ve skipped the wrong number of sts. On the frame rows, recount the 3rd, 5th, and 7th dc of each fan.
- Row 4 is short by one fan: remember that the row starts and ends with half fans and has only 11 full fans.
- Sides ruffle: you’re working too many sc into the row ends. Recheck the 1 / 2 / 3 rule.
- Sides pull in: go up one hook size for the border only.
- Panel grows while hanging: cotton relaxes over time. Block the panel, hang it for a day, then measure. If it’s still too long, take out one full 4-row repeat before you add the border.
- Panels are different lengths: compare row counts first, then even out the lengths during blocking.
Care
Hand wash in cool water, or machine wash on a delicate cycle inside a mesh laundry bag. Reshape the panel and dry it flat; never hang it wet, because the weight will stretch it.

Final Notes
Everything follows from one measurement chain. A 12-st repeat of 2.4 in (6.1 cm) gives a body 29 in (73.7 cm) wide. Thirty-six 2 in (5.1 cm) repeats plus the edge rows give a body 73.4 in (186.4 cm) long. Two border rounds bring the panel to 29.8 in x 74.5 in (75.7 cm x 189.2 cm), and the tab loops add 3 in (7.6 cm). Check your gauge early, count at every checkpoint, and both panels will hang evenly side by side.
Happy crocheting!