

This valance hangs six layered lotus flowers across a window. Each large flower has a sunny yellow center, a ring of pointed turquoise petals, and an eight-point royal blue star behind them, all framed by an open blue chain-loop lattice. A solid blue header runs across the top and a shell scallop finishes the lower edge. Thirteen chain dangles hang below, each carrying a small three-color flower and a turquoise teardrop.
The colors are royal blue, turquoise, and buttery yellow. The look is bright and garden-style, and the lace lets light through while the flowers stay bold.
The pattern uses US crochet terms. The valance body measures 36 in (91.4 cm) wide by 8 in (20.3 cm) deep. The long dangles bring the total drop to 21.75 in (55.2 cm).
You make six large motifs and join each one to the last as you work its final round. Then you work the header across the top and the scallop edge across the bottom. To finish, you attach 13 small flowers and 13 teardrops on blue chains.
Finished Size and Construction
- Finished size: 36 in (91.4 cm) wide x 8 in (20.3 cm) deep body; 21.75 in (55.2 cm) total drop at the long dangles
- Skill level: Intermediate
- Terminology: US
- Yarn weight: Worsted (#4) cotton
- Hook: 4.5 mm (US 7)
- Number of pieces: 6 large motifs, 13 small flowers, 13 teardrops
- Layout: 6 large motifs in one horizontal row
- Large motif size: 6 in (15.2 cm) across flats, 6.5 in (16.5 cm) point to point
- Size before border: 36 in x 6 in (91.4 cm x 15.2 cm)
- Border depth: header 1.25 in (3.2 cm) above, scallop edge 0.75 in (1.9 cm) below
Materials
Choose a smooth worsted-weight cotton. It holds the pointed petals crisply and doesn’t sag much in window sun. Quantities assume about 85 m (93 yd) per 50 g ball.
- Royal blue (A): 175 g, about 300 m (328 yd)
- Turquoise (B): 75 g, about 130 m (142 yd)
- Yellow (C): 50 g, about 85 m (93 yd)
All quantities include a margin of roughly 20 to 30 percent.
Tools: 4.5 mm (US 7) hook, tapestry needle, stitch markers, scissors, measuring tape, blocking mats, rust-proof pins, spray bottle, and 7 curtain clip rings.
Abbreviations (US Terms)
- ch – chain
- sl st – slip stitch
- sc – single crochet
- hdc – half double crochet
- dc – double crochet
- tr – treble crochet
- dtr – double treble crochet
- MR – magic ring
- FLO / BLO – front loop only / back loop only
- sp – space
- sk – skip
- RS / WS – right side / wrong side
Tip picot: (sc, ch 3, sc) in the same ch-3 sp.
Joined tip picot: sc in tip sp, ch 1, sl st in the matching picot of the previous motif, ch 1, sc in the same tip sp.
Gauge and Checkpoints
Gauge: 16 sc and 16 rows = 4 in (10.2 cm). Chains: 4 ch = 1 in (2.5 cm).
Make one complete large motif first and check it at each stage:
- After Round 4: 2.5 in (6.4 cm) across
- After Round 5: 4.25 in (10.8 cm) turquoise tip to tip
- After Round 7: 3.75 in (9.5 cm) across the blue base circle
- After Round 8: 6.25 in (15.9 cm) blue point to point
- After Round 9: 6.5 in (16.5 cm) point to point, 6 in (15.2 cm) across flats
If the motif is too big, go down 0.5 mm. If it’s too small, go up 0.5 mm. Being 0.25 in (0.6 cm) off per motif changes the valance width by 1.5 in (3.8 cm).
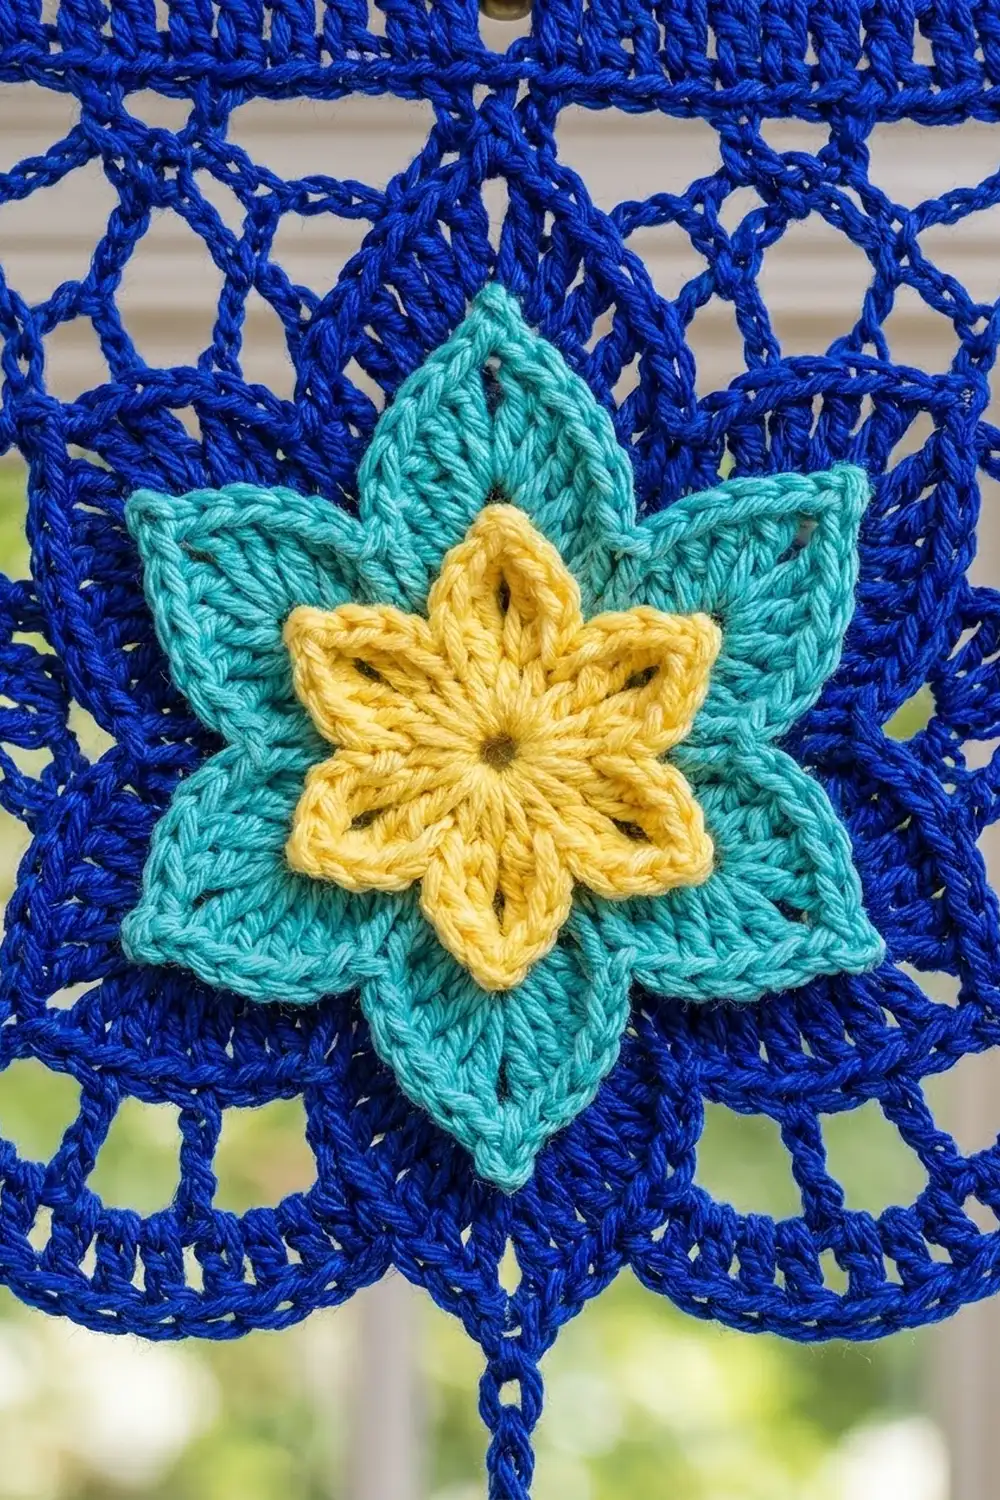
Large Lotus Motif (make 6)
Each petal layer is worked into the front loops of a base round. The next base round then goes into the back loops of that same round, which stacks the layers.
Round 1 (C): MR, ch 1, 8 sc in ring, sl st to first sc. (8 sc)
Round 2 (C): Ch 1, 2 sc in each st around, sl st to first sc. (16 sc)
Round 3 (C, yellow petals, FLO): Working in FLO only, ch 1, *sc in next st, (hdc, dc, ch 2, dc, hdc) in next st; rep from * 7 more times, sl st to first sc. (8 petals: 48 sts and 8 ch-2 sps)
Round 4 (C, BLO of Round 2): Fold the petals forward. Working in the unused back loops of Round 2, ch 1, 2 sc in each st around, sl st to first sc. (32 sc) Fasten off C.
Round 5 (B, turquoise petals, FLO): Join B in the FLO of any st of Round 4. Ch 1, *sc in next st, (hdc, dc) in next st, (tr, ch 3, tr) in next st, (dc, hdc) in next st; rep from * 7 more times, sl st to first sc. (8 petals: 56 sts and 8 ch-3 sps)
Round 6 (B, BLO of Round 4): Fold the turquoise petals forward. Working in the back loops of Round 4, ch 1, *sc in next 3 sts, 2 sc in next st; rep from * 7 more times, sl st to first sc. (40 sc) Fasten off B.
Round 7 (A): Join A in both loops of any st. Ch 1, *sc in next 4 sts, 2 sc in next st; rep from * 7 more times, sl st to first sc. (48 sc) This round hides behind the turquoise petals.
Round 8 (A, blue star points): Ch 1, *sc in next st, hdc in next st, dc in next st, (tr, dtr, ch 3, dtr, tr) in next st, dc in next st, hdc in next st; rep from * 7 more times, sl st to first sc. (8 points: 72 sts and 8 ch-3 tip sps)
Round 9 (A, lattice frame): Sl st in next 5 sts and into the first ch-3 tip sp. Ch 1, *tip picot in tip sp, ch 9; rep from * 7 more times, sl st to first sc. (16 sc, 8 ch-3 picots, 8 ch-9 loops) Fasten off on motif 1. Motifs 2 through 6 join to the previous motif on this round.
Each ch-9 loop runs straight from tip to tip over the blue valleys, forming the lattice. Hold the motif with one loop flat across the top. The octagon then has a flat top, a flat bottom, two vertical side loops, and four diagonal loops.
Make All Pieces
- Large motifs: 6 (C for Rounds 1–4, B for Rounds 5–6, A for Rounds 7–9)
- Small flowers: 13 (C center, B petals, A outline)
- Teardrops: 13 in B
Layout (M = large motif, S = short dangle, L = long dangle):
[============ HEADER BAND: 144 sts ============]
[ M1 ][ M2 ][ M3 ][ M4 ][ M5 ][ M6 ]
[============ SCALLOP EDGE: 150 sts ===========]
S  L  S  L  S  L  S  L  S  L  S  L  S
Small Flower (make 13)
Round 1 (C): MR, ch 1, 8 sc in ring, sl st to first sc. (8 sc)
Round 2 (C, FLO): *(Hdc, dc, hdc) in FLO of next st, sl st in FLO of next st; rep from * 3 more times. (4 petals) Fasten off.
Round 3 (B, BLO of Round 1): Join B in any back loop. Ch 1, *sc in next st, 2 sc in next st; rep from * 3 more times, sl st to first sc. (12 sc)
Round 4 (B): Ch 1, *sc in next st, (hdc, dc, ch 2, dc, hdc) in next st; rep from * 5 more times, sl st to first sc. (6 petals: 36 sts and 6 ch-2 sps) Fasten off.
Round 5 (A, outline): Join A in any sc. Ch 1, *sc in sc, sc in hdc, hdc in dc, (dc, ch 2, dc) in ch-2 sp, hdc in dc, sc in hdc; rep from * 5 more times, sl st to first sc. (42 sts and 6 ch-2 tips) Fasten off.
The small flower measures 2.25 in (5.7 cm) from tip to tip.
Teardrop (make 13, B)
Ch 6. Sl st in 2nd ch from hook, sc in next ch, hdc in next ch, dc in next ch, 6 dc in last ch. Working along the opposite side of the chain: dc in next ch, hdc in next ch, sc in next ch, sl st in next ch, sl st to first sl st. (14 sts) Fasten off. The teardrop is pointed at the top, rounded at the bottom, and 1.5 in (3.8 cm) long.
Joining
Motifs 2 through 6 join to the previous motif on Round 9 at three points: the upper side tip, the middle of the side loop, and the lower side tip.
Work Round 9 as written until only the side facing the previous motif remains. Then:
- In the next tip sp, work a joined tip picot into the previous motif’s upper side tip.
- Ch 4, sl st around the previous motif’s vertical ch-9 loop, ch 4.
- In the next tip sp, work a joined tip picot into the previous motif’s lower side tip.
- Ch 9, sl st to first sc. Fasten off.
Stitch logic: (sc, ch 1, sl st, ch 1, sc) fills the same space as (sc, ch 3, sc), and (ch 4, sl st, ch 4) replaces a ch-9. Nothing is added or lost, so each motif stays 6 in (15.2 cm) wide.
Tension: Keep the joining slip stitches relaxed so the side loops lie flat without bunching. Keep the RS of every motif facing you.
Checkpoint: Laid flat, the joined strip measures 36 in x 6 in (91.4 cm x 15.2 cm).
Border: Header Band and Scallop Edge
Border gauge: 4 sts = 1 in (2.5 cm), the same as the motif gauge.
Header Band
Row 1 (RS, A, leveling): Join A with a sl st (not counted) in the outer upper side tip at the right end. Ch 5 counts as the first dtr. Across each motif, work:
- Rising diagonal loop: dtr, dtr, tr, tr, dc, hdc, sc (7 sts)
- Sc in top tip picot (1 st)
- 8 sc in top loop (8 sts)
- Sc in next top tip picot (1 st)
- Falling diagonal loop: sc, hdc, dc, tr, tr, dtr, dtr (7 sts)
Skip the joined side tips. The dtr stitches fill each V between motifs. Turn. (24 sts per motif; 6 x 24 = 144 sts)
Row 2 (WS): Ch 3 (counts as dc), dc in each st across. Turn. (144 dc)
Rows 3–4: Ch 1, sc in each st across. Turn. (144 sc) Fasten off after Row 4.
Scallop Edge
Row 1 (RS, A): Turn the piece so the lower edge is on top. Join A with a sl st (not counted) in the outer lower side tip of the first motif. Across each motif, work:
- 8 sc in the diagonal loop
- Sc in the bottom tip picot
- 7 sc in the bottom loop
- Sc in the next bottom tip picot
- 8 sc in the next diagonal loop
Skip the joined side tips. Turn. (25 sts per motif; 6 x 25 = 150 sc)
Row 2 (WS): For each motif: sc in first st, *sk 2 sts, 5 dc in next st, sk 2 sts, sc in next st; rep from * 3 more times. (1 + 4 x 6 = 25 sts per motif; 150 sts and 24 shells) Fasten off.
Why the Math Works
The header starts at exactly 6 x 24 = 144 sts, with nothing added at the seams. At 4 sts per inch, 144 sts is 36 in (91.4 cm), which matches the joined strip. On the scallop edge, each motif has 25 sts: 1 starting sc plus four 6-st shell repeats. So every motif gets four full shells.
Dangles
The dangles hang from sc stitches in Scallop Row 2:
- Short dangles (7): sc #1 of M1 and sc #25 of every motif
- Long dangles (6): sc #13 of every motif
Short dangle: Join A at the anchor, ch 14, sl st into any ch-2 tip of a small flower, and fasten off. Join A in the opposite tip (3 tips away), ch 8, sl st into the point of a teardrop, and fasten off. Drop: 9.25 in (23.5 cm).
Long dangle: Work as the short dangle, but with ch 30 above the flower and ch 10 below it. Drop: 13.75 in (34.9 cm).
Final Blocking
- Weave in all ends along stitches of the same color.
- Lay the valance RS up on blocking mats.
- Pin the header straight at 36 in (91.4 cm) wide and the body to 8 in (20.3 cm) deep.
- Pin out every blue point and every turquoise petal tip.
- Pin each shell open at its center dc, then pin the dangles straight.
- Mist until damp and let dry completely before unpinning.
Final Quality-Control Checklist
- Six motifs, each 6 in (15.2 cm) across flats
- Three joins on every seam
- 144 sts in every header row
- 150 sts and 24 shells on the scallop edge
- 7 short and 6 long dangles, alternating
- Body measures 36 x 8 in (91.4 x 20.3 cm)
- All ends secured
Troubleshooting
- Petals cup: The front and back loops got mixed up. Every base round (Rounds 4 and 6) goes into back loops only.
- Blue points hidden: Round 8 is too tight. Go up one hook size for that round only.
- Header ripples: You worked into the joined tips. Recount to 24 sts per motif.
- Header pulls in: Work the Row 1 dtr stitches looser.
- Scallops flare: Check that Row 1 has 25 sts per motif.
- Dangles twist: Block them hanging, with a light weight on each teardrop.
Care
Hand wash in cool water with mild soap, roll it in a towel to remove water, and dry flat with the points pinned. To reduce fading, keep it out of direct midday sun for long periods.

Final Notes
Every measurement follows from the motif size. Each motif is 6 in (15.2 cm) across, so six motifs make 36 in (91.4 cm), which gives 144 header stitches at 4 per inch. Add 1.25 in (3.2 cm) of header and 0.75 in (1.9 cm) of scallop for an 8 in (20.3 cm) body. The 13.75 in (34.9 cm) long dangles bring the total drop to 21.75 in (55.2 cm). Hang the valance with a clip ring at each end and above each of the five seams, about 6 in (15.2 cm) apart.
Happy crocheting!