

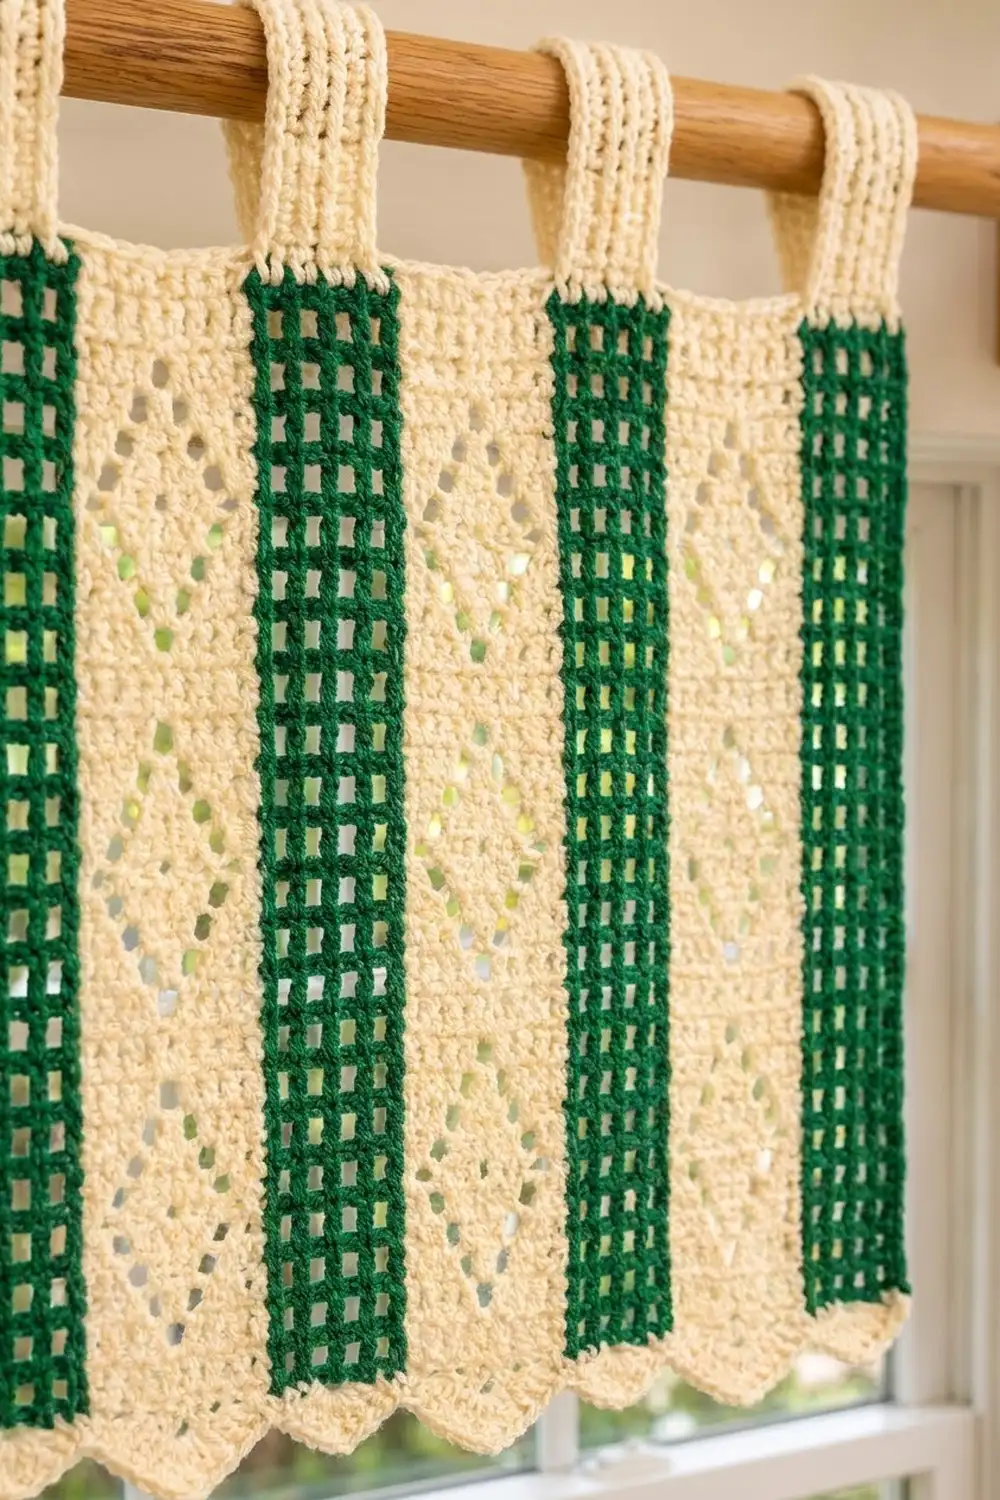
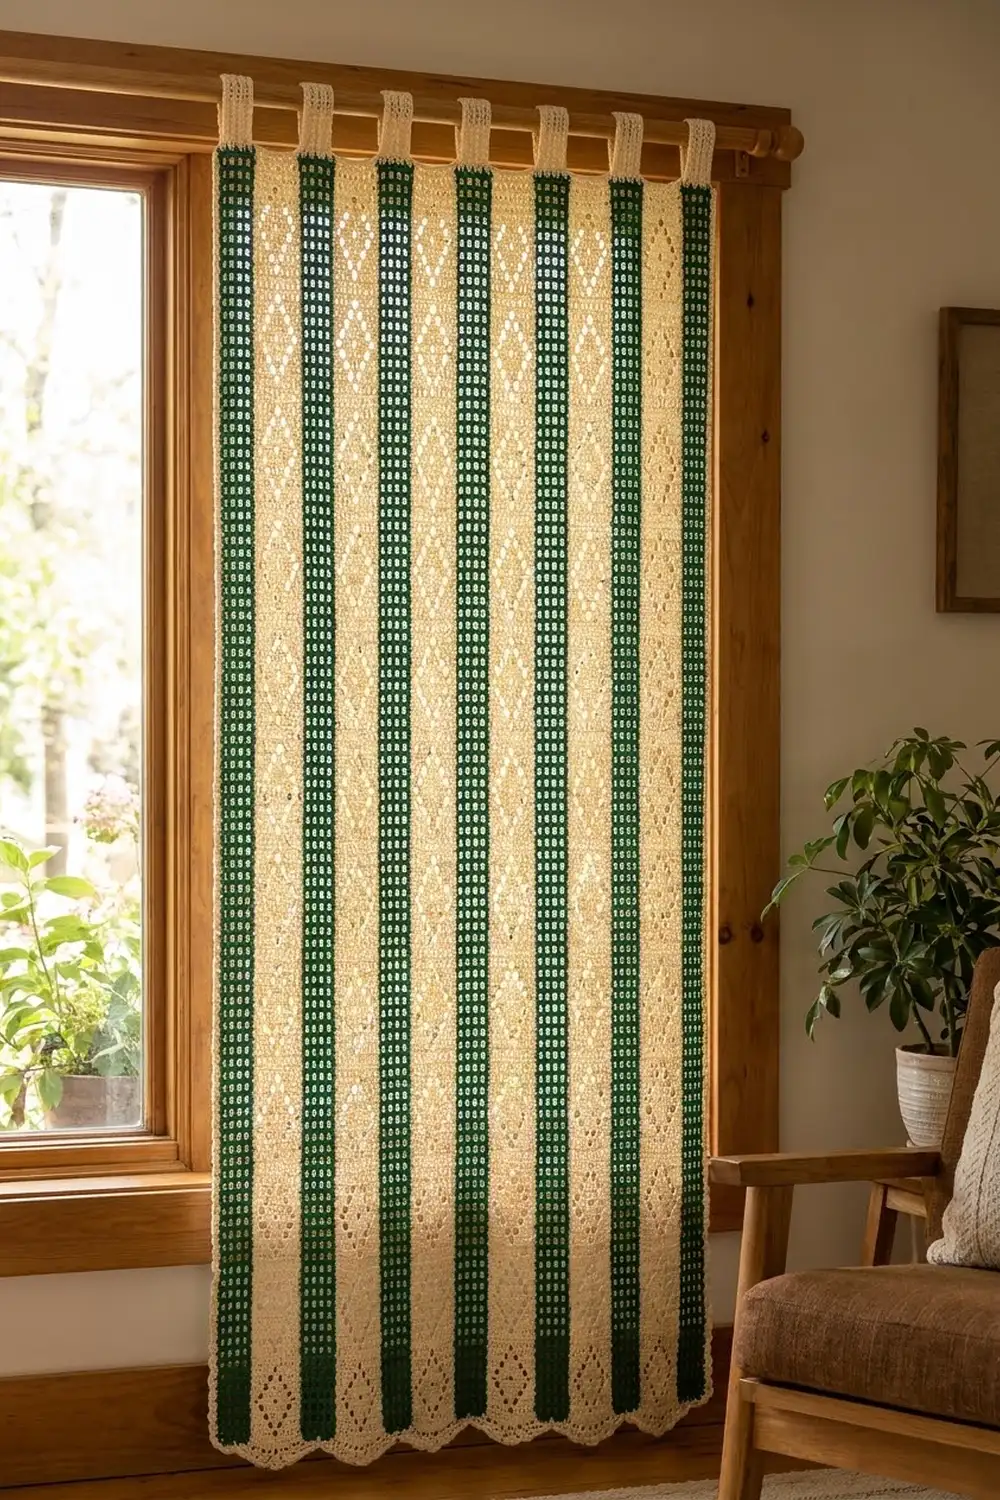
The Evergreen Lattice Curtain is a tall, airy tab-top panel with vertical stripes. Narrow forest-green filet mesh strips alternate with wider cream strips, and each cream strip has a column of open diamond eyelets. Light comes through both the mesh and the diamonds, so the panel softens sunlight without blocking it.
Only two colors are used. Cream also forms the narrow single crochet border, the nine ribbed hanging tabs, and the row of shell scallops along the bottom. The overall look is fresh and cottage-style, with a strong graphic stripe.
The pattern uses US crochet terms. The finished panel is 52.25 in (132.7 cm) wide and 62.25 in (158.1 cm) tall, measured from the top border to the scallop tips. The tabs add a 3.5 in (8.9 cm) loop above the top edge, so the panel hangs 65.75 in (167.0 cm) tall in total.
You make 15 long strips in short double crochet rows and join them side by side with slip stitch seams. Then you work two rounds of single crochet border, add a scalloped row along the bottom, and crochet the tabs straight off the top edge.
Finished Size and Construction
- Finished size: 52.25 in (132.7 cm) wide x 62.25 in (158.1 cm) tall, plus 3.5 in (8.9 cm) tab loops
- Skill level: Intermediate
- Terminology: US crochet terms
- Yarn weight: Worsted (#4) cotton or cotton blend
- Hook: 5.0 mm (US H-8)
- Number of pieces: 15 strips (8 green mesh, 7 cream diamond lace)
- Layout: One row of 15 vertical strips, with green at both outer edges
- Green strip size: 9 sts = 2.25 in (5.7 cm) wide x 121 rows = 60.5 in (153.7 cm) long
- Cream strip size: 19 sts = 4.75 in (12.1 cm) wide x 121 rows = 60.5 in (153.7 cm) long
- Size before border: 205 sts = 51.25 in (130.2 cm) wide x 60.5 in (153.7 cm) tall
- Border depth: 0.5 in (1.3 cm) on the top and sides; 1.25 in (3.2 cm) along the bottom, including the scallops
Materials
Choose a smooth mercerized or matte cotton in worsted weight. Cotton keeps the open mesh crisp, hangs straight, and stands up to sunlight and washing better than acrylic. Fuzzy or splitty yarns will blur the eyelets.
- Color A, Cream: 1,500 g, about 3,000 m (3,281 yd), based on 100 g / 200 m skeins (15 skeins)
- Color B, Forest Green: 600 g, about 1,200 m (1,312 yd), based on 100 g / 200 m skeins (6 skeins)
The quantities include a margin of about 10% for swatching, joining, and gauge differences. Buy all skeins of each color from the same dye lot.
Tools:
– 5.0 mm (US H-8) crochet hook
– Tapestry needle
– Stitch markers (at least 20)
– Measuring tape
– Rust-proof pins and a large blocking surface
– Curtain rod, up to 1.5 in (3.8 cm) in diameter
Abbreviations (US Terms)
- ch: chain
- sl st: slip stitch
- sc: single crochet
- dc: double crochet
- st(s): stitch(es)
- sk: skip
- sp: space
- tch: turning chain
- BLO: back loop only
- RS / WS: right side / wrong side
Special stitch – Eyelet: Ch 1, sk next st. Each eyelet counts as 1 st. On the next row, work 1 dc into the ch-1 sp.
Note: The ch 3 at the start of every dc row counts as the first dc. Work the last dc of each row into the top of the tch.
Gauge and Checkpoints
Gauge: 16 dc and 8 dc rows = 4 in (10.2 cm). In sc, 16 sts and 16 rows = 4 in (10.2 cm).
Make one cream strip first as your test. Work Rows 1–13 (two full diamonds), then measure:
- Width: 19 sts should measure 4.75 in (12.1 cm).
- Length: 13 rows should measure 6.5 in (16.5 cm). Each 6-row diamond repeat is 3 in (7.6 cm).
If your strip is too wide or too long, go down one hook size. If it’s too narrow or too short, go up one hook size. Width matters most: a cream strip that is 0.25 in (0.6 cm) too wide adds 1.75 in (4.4 cm) across all seven cream strips.
Further checkpoints:
– After Row 61 of any strip: 30.5 in (77.5 cm) long
– Finished strip: 60.5 in (153.7 cm) long
– Joined panel: 51.25 in (130.2 cm) wide
Measure the strips lying flat and unstretched.
Green Mesh Strip (Make 8)
With Color B, ch 11.
Row 1 (RS): Dc in the 4th ch from hook (the skipped ch 3 counts as the first dc), (ch 1, sk 1 ch, dc in next ch) 3 times, dc in last ch, turn. (9 sts: 6 dc + 3 ch-1 sps)
Row 2: Ch 3, dc in next dc, (ch 1, sk ch-1 sp, dc in next dc) 3 times, dc in top of tch, turn. (9 sts)
Rows 3–121: Repeat Row 2. (9 sts in every row)
Every row has a solid edge of 2 dc on each side, with 3 square mesh holes between them. Over 121 rows, these stack into the three columns of open squares in each green stripe.
The strip measures 2.25 in (5.7 cm) x 60.5 in (153.7 cm). Fasten off, leaving a 6 in (15.2 cm) tail.
Cream Diamond Lace Strip (Make 7)
With Color A, ch 21.
Row 1 (RS): Dc in the 4th ch from hook and in each ch across, turn. (19 sts)
In Rows 2–7, work one dc into each dc and into each ch-1 sp.
Row 2: Ch 3, dc in next 8 sts, eyelet, dc in next 8 sts, dc in top of tch, turn. (19 sts: 1 eyelet at st 10)
Row 3: Ch 3, dc in next 6 sts, eyelet, dc in next 3 sts, eyelet, dc in next 6 sts, dc in top of tch, turn. (19 sts: eyelets at sts 8 and 12)
Row 4: Ch 3, dc in next 4 sts, eyelet, dc in next 7 sts, eyelet, dc in next 4 sts, dc in top of tch, turn. (19 sts: eyelets at sts 6 and 14)
Row 5: Repeat Row 3. (19 sts)
Row 6: Repeat Row 2. (19 sts)
Row 7: Ch 3, dc in each st across, dc in top of tch, turn. (19 sts)
Rows 2–7 make one diamond repeat. The eyelets go from 1 hole to 2, reach their widest point at sts 6 and 14, then narrow back to 1. Together they outline a diamond 2.5 in (6.4 cm) tall. The solid Row 7 separates each diamond from the next one.
Rows 8–121: Repeat Rows 2–7 nineteen more times. (20 diamonds total; 19 sts in every row)
Row 121 is solid, so the strip starts and ends with solid dc. The strip measures 4.75 in (12.1 cm) x 60.5 in (153.7 cm). Fasten off, leaving a 6 in (15.2 cm) tail.
Make All Pieces
- Color B (Forest Green): 8 mesh strips, 9 sts x 121 rows each
- Color A (Cream): 7 diamond lace strips, 19 sts x 121 rows each
Lay out the strips RS up, with all foundation chains at the bottom:
| G | C | G | C | G | C | G | C | G | C | G | C | G | C | G |
  1   2   3   4   5   6   7   8   9  10  11  12  13  14  15
Place a marker every 20 rows on every strip so the rows stay aligned while you join.
Joining
Method: Slip stitch seam with Color B.
Hold strip 1 (green) and strip 2 (cream) with WS together, row-end edges aligned and foundation ends at the bottom. Join Color B at the bottom corner, through both layers.
Stitch-to-stitch logic: Each dc row-end is one tall post. Work 2 sl sts into each matching pair of row-ends, one around the lower half and one around the upper half. That makes 242 sl sts per seam (121 rows x 2). Match the markers as you go. If they drift, ease the difference over the next 10 rows.
Tension advice: Keep the slip stitches loose, about as tall as a dc row-end. A tight seam puckers the strips and shortens the panel. If you need to, go up one hook size for seaming only.
Join strip 3 to strip 2, and keep going until all 15 strips are connected (14 seams). Each seam sits on the WS as a slim ridge and adds no stitches to the width.
Size checkpoint: The top edge has 8 x 9 + 7 x 19 = 72 + 133 = 205 sts. The joined panel measures 51.25 in (130.2 cm) x 60.5 in (153.7 cm).
Border
Border gauge: 16 sc = 4 in (10.2 cm), the same as the dc stitch gauge. Each side row-end is 0.5 in (1.3 cm) tall and gets 2 sc, which also works out to 4 sc per inch. All four edges pick up stitches at the same rate, so the border lies flat.
In this section, a side’s count means the number of sc between two corner ch-2 sps.
Round 1 (RS): With Color A, join with a sl st in the first st of the last row at the top right corner. Ch 1, then:
– Top: sc in each st across, ch 2.
– First side: 2 sc in each row-end going down, ch 2.
– Bottom: sc in each foundation ch, ch 2.
– Second side: 2 sc in each row-end going up, ch 2.
Join with a sl st to the first sc.
(Top 205 sc, sides 242 sc each, bottom 205 sc; 894 sc + 4 ch-2 corner sps)
Round 2: Ch 1, sc in each sc around, working (sc, ch 2, sc) in each corner ch-2 sp. Join.
(Each side = 1 sc per existing st + 2 corner sc. Top 205 + 2 = 207, sides 242 + 2 = 244 each, bottom 205 + 2 = 207; 902 sc + 4 ch-2 sps.) Fasten off.
Row 3 – Scallop Hem (bottom only): With RS facing, join Color A in the first sc after the bottom right corner sp. Ch 1, sc in the first 2 sc, sk 2 sc, 7 dc in next sc, sk 2 sc, sc in next sc; repeat from * 33 more times, sc in last sc. Fasten off.
(34 scallops. Stitches used: 2 + 34 x 6 + 1 = 207. Stitches made: 3 sc + 34 x (7 dc + 1 sc) = 275 sts.)
Why the math works: Each scallop repeat uses 6 sts, and 34 x 6 = 204. The bottom edge has 207 sts, which leaves exactly 3 extra: 2 at the start and 1 at the end. That way both corners finish with a flat sc. Each scallop is 1.5 in (3.8 cm) wide and about 0.75 in (1.9 cm) deep.
Tabs (make 9, worked off Round 2): The 207 top sts divide into 9 tabs of 7 sts and 8 gaps of 18 sts: 9 x 7 + 8 x 18 = 63 + 144 = 207.
With RS facing, count from the right corner and place a marker in sts 1, 26, 51, 76, 101, 126, 151, 176, and 201 of the top edge. Each marker shows the first st of a tab.
Tab Row 1: Join Color A in a marked st, ch 1, sc in the same st and in the next 6 sts, turn. (7 sc)
Tab Rows 2–28: Ch 1, sc in BLO of each st across, turn. (7 sc)
Working in the BLO gives the tabs their ridged texture. Each tab is 1.75 in (4.4 cm) wide and 7 in (17.8 cm) long. Fasten off, leaving a 10 in (25.4 cm) tail.
Fold the tab to the WS and whipstitch its last row to the WS of Round 1, directly behind Tab Row 1. This makes a 3.5 in (8.9 cm) loop. Repeat for all 9 tabs. The gaps between tabs are 4.5 in (11.4 cm).
Final Blocking
- Weave in all ends along the seams or inside the border, at least 2 in (5.1 cm) in each direction.
- Soak the panel in cool water with a gentle wash for 15 minutes.
- Press out the water without wringing, then roll the panel in towels.
- Lay it flat, RS up, on towels or blocking mats.
- Pin the corners to 52.25 in (132.7 cm) wide and 62.25 in (158.1 cm) tall.
- Pin the side edges straight every 6 in (15.2 cm).
- Pin the tip of each scallop so all 34 points line up.
- Open each mesh hole and eyelet with your fingertips.
- Let it dry completely, which takes 24–48 hours, then hang it.
Final Quality-Control Checklist
- 8 green strips and 7 cream strips, each 121 rows long
- 9 sts in every green row; 19 sts in every cream row
- 20 diamonds in each cream strip, lined up at the same heights across strips
- 14 flat seams with no puckering
- Round 1: 205 / 242 / 205 / 242 sc
- Round 2: 207 / 244 / 207 / 244 sc
- 34 scallops, with a sc at both bottom corners
- 9 tabs, each 7 sts x 28 rows, with 18-st gaps between them
- Blocked size: 52.25 in (132.7 cm) x 62.25 in (158.1 cm)
Troubleshooting
Diamonds don’t line up across strips. One strip is probably 1 row off. Recount the rows, then add or remove a solid row at the top before seaming.
Mesh holes look slanted. On green rows, work each dc into a dc, not into a ch-1 sp.
Seams pucker. The slip stitches are too tight. Rework them with a larger hook.
Border ripples or pulls in. Make sure you’re working exactly 2 sc per row-end. Each side should have 242 sc in Round 1.
Scallops don’t fit. Check that the bottom edge has 207 sts after Round 2.
Care
Machine wash cold on a gentle cycle inside a laundry bag, or wash by hand. Dry the panel flat and re-pin the scallops if needed.
Final Notes
Every measurement in this curtain comes from your gauge. At gauge, each green strip is 2.25 in (5.7 cm) wide and each cream strip is 4.75 in (12.1 cm) wide. The 15 strips add up to 205 sts, or 51.25 in (130.2 cm), and 121 rows give a length of 60.5 in (153.7 cm).
The two border rounds bring the width to 52.25 in (132.7 cm). The scallop hem and the nine tabs each fit their 207-stitch edge exactly. If you check your swatch and count at each checkpoint, the panel will hang straight and even.
Happy crocheting!