

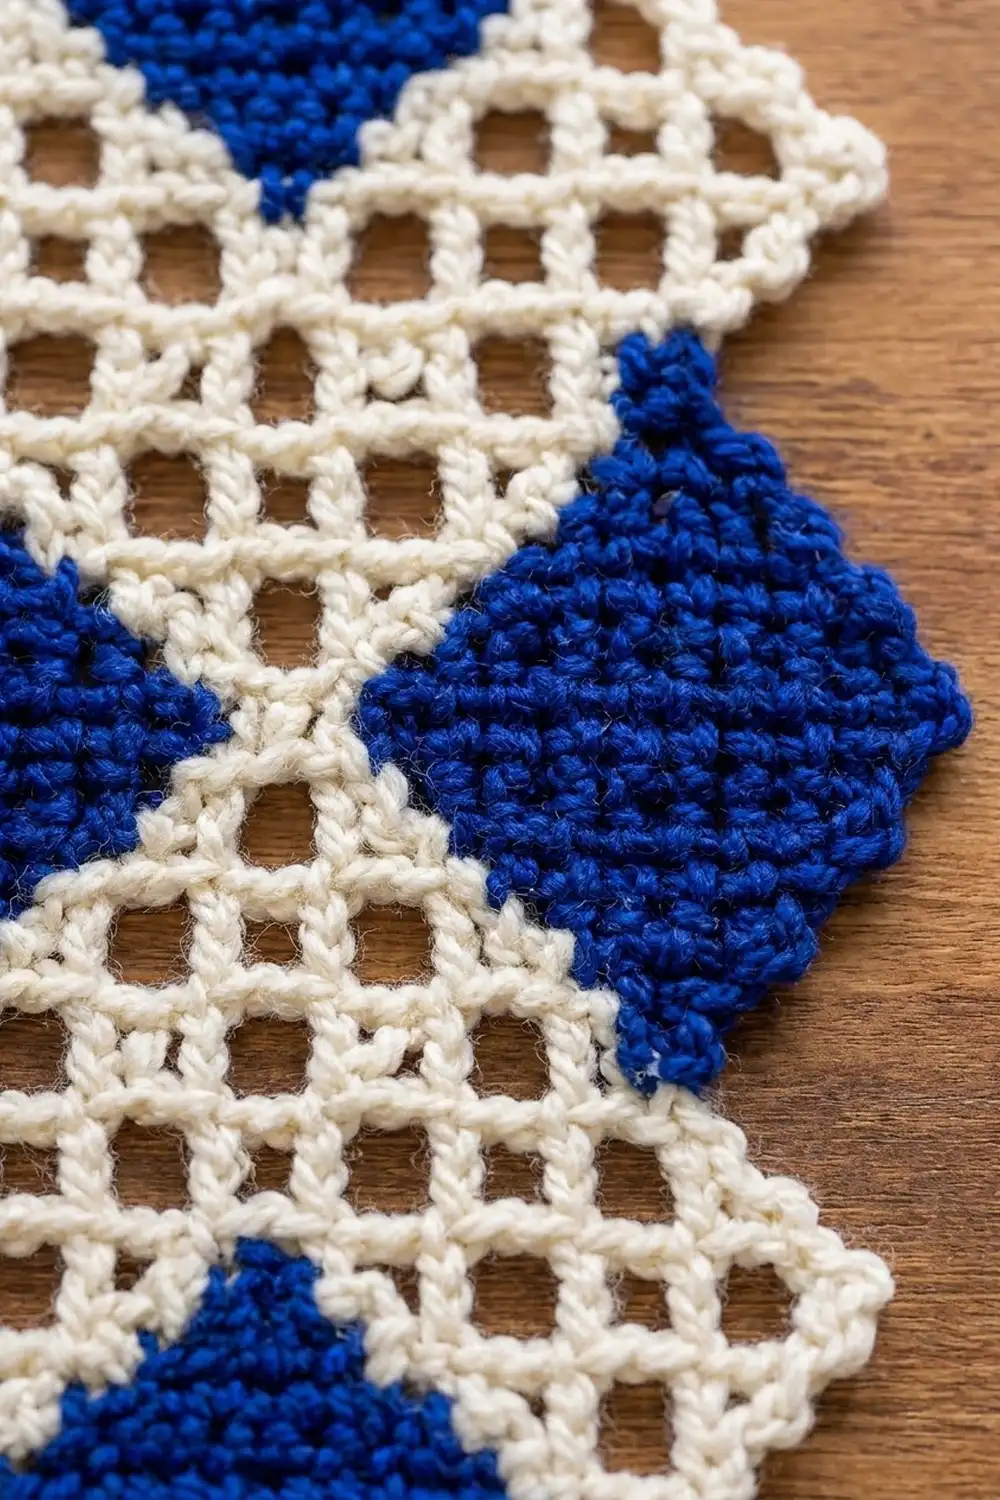
This panel puts four solid cobalt diamonds into an airy cream lattice. A full blue diamond sits at each pointed end, and a blue half-diamond meets each long side and finishes in a small point. The open cream mesh between them forms a soft hourglass shape.
The look is classic filet crochet with a bold harlequin twist. Solid blocks are worked in blue and open spaces in cream, using simple intarsia color changes. The piece works as a table mat, a wall hanging or a test panel for larger projects.
The finished panel measures 8 in (20.3 cm) point to point across the middle and 12 in (30.5 cm) tall, with a body width of 7 in (17.8 cm). All terms are US crochet terms.
Construction overview: You work one piece from the center outward. A two-color foundation chain becomes the widest row. You work the upper half from it, then rotate the panel and work the lower half into the underside of the chain. All shaping is done with simple edge decreases. A color-matched single crochet edging finishes the piece.
Finished Size and Construction
- Finished size: 7 in (17.8 cm) body width, 8 in (20.3 cm) at the side points, 12 in (30.5 cm) tall
- Skill level: Intermediate (filet plus intarsia)
- Terminology: US
- Yarn weight: DK (#3), cotton or cotton blend
- Hook: 3.5 mm (E-4)
- Number of pieces: 1
- Layout: Single panel; 23 filet rows, 15 cells at the widest
- Cell size: 0.5 in (1.3 cm) square
- Size before border: 6.5 in (16.5 cm) body width, 7.5 in (19.1 cm) at the side points, 11.5 in (29.2 cm) tall
- Border depth: 0.25 in (0.6 cm) on every edge
Materials
Choose a smooth, mercerized or matte cotton DK. Cotton gives crisp mesh holes and sharp diamond points. Avoid fuzzy yarns, which blur the lattice.
- Color B (cobalt blue): 30 g, about 65 m
- Color W (cream): 25 g, about 55 m
These quantities include a margin for swatching, intarsia tails and the border.
Tools:
– 3.5 mm (E-4) hook
– Tapestry needle
– Scissors
– 3–4 yarn bobbins or butterflies per color
– 2 locking stitch markers
– Blocking mat, rustproof pins, spray bottle
Abbreviations (US Terms)
- ch – chain
- sl st – slip stitch
- sc – single crochet
- dc – double crochet
- sk – skip
- sp – space
- st(s) – stitch(es)
- RS / WS – right side / wrong side
- B / W – blue / white (cream)
Special stitches and terms:
- Cell: One filet square, made of 3 sts plus the post before it. A row of N cells has 3N + 1 sts. The beginning ch 3 counts as the first post.
- Block (blue): Dc in each of the next 3 sts. Over a space, work 2 dc in the ch-2 sp, then dc in the next dc.
- Space (cream): Ch 2, sk 2 sts, dc in the next dc.
- Decrease cell (dec): At the start of the row, sl st in each of the next 3 sts, then ch 3. At the end of the row, leave the last cell (3 sts) unworked.
- Color change: Work the last dc before a new color until 2 loops remain on the hook, then pull the new color through. Each post takes the color of the cell it closes.
Gauge and Checkpoints
Gauge: 8 cells and 8 rows = 4 in (10.2 cm) in filet. That equals 6 sts per 1 in (2.5 cm), and each cell is 0.5 in (1.3 cm) square.
Swatch: Ch 27. Dc in the 4th ch from the hook and in each ch across, for 25 sts (8 blocks). Alternate rows of blocks and spaces for 8 rows, then measure.
Checkpoints:
– After Row U1: 7.5 in (19.1 cm) wide
– After Row U2: 6.5 in (16.5 cm) wide
– After Part 1: 6 in (15.2 cm) tall
– After Part 2: 11.5 in (29.2 cm) tall
– After the border: 8 × 12 in (20.3 × 30.5 cm)
If the panel is too big, go down a hook size. If it is too small, go up a hook size.
If your cells are wider than they are tall, pull up the first loop of each dc slightly. Square cells keep the diamonds square on point instead of squat.
Part 1: Foundation and Upper Half
Wind bobbins as you need them. Let unused strands hang at their color boundary on the WS.
Foundation: With B, ch 15. Change to W and ch 15. Change to a second B strand and ch 18. (48 ch: 15 B, 15 W, 18 B.)
Row U1 (RS): With B, dc in the 4th ch from the hook and in each of the next 14 ch (5 blocks). Change to W. Work 5 spaces across the cream chains, working each dc into the chain 3 sts along. Change to the first B strand. Dc in each of the last 15 ch (5 blocks). Turn.
(15 cells: 5 B, 5 W, 5 B; 46 sts.)
Place a marker in each end of the foundation chain. These mark where Part 2 begins.
Row U2 (dec): With B, dec at the start. Work 3 blocks B, 7 spaces W and 3 blocks B. Leave the last cell unworked. Turn.
(13 cells; 40 sts.)
The cream strand moves one cell outward on each side. Carry it inside the blue dc for one cell to bring it into position.
Row U3: Ch 3 (counts as dc). Work 2 blocks B, 9 spaces W and 2 blocks B, ending with dc in the top of the turning ch. Turn.
(13 cells; 40 sts.)
Row U4: Ch 3. Work 1 block B, 11 spaces W and 1 block B. Turn.
(13 cells; 40 sts.)
Row U5: Ch 3 in W. Work 13 spaces W. Cut both side B strands, leaving 6 in (15.2 cm) tails. Turn.
(13 cells; 40 sts.)
Row U6: Ch 3. Work 6 spaces W. Join a new B strand and work 1 block B. Join a second W strand and work 6 spaces W. Turn.
(13 cells; 40 sts.)
Row U7 (dec): Dec at the start (sl st in W). Work 4 spaces W, 3 blocks B and 4 spaces W. Leave the last cell unworked. Turn.
(11 cells; 34 sts.)
Row U8 (dec): Dec. Work 2 spaces W, 5 blocks B and 2 spaces W. Leave the last cell unworked. Turn.
(9 cells; 28 sts.)
Row U9 (dec): Dec with W, then change to B for the ch 3. Work 7 blocks B. Cut both W strands. Turn.
(7 cells; 22 sts.)
Row U10 (dec): Dec. Work 5 blocks B. Turn.
(5 cells; 16 sts.)
Row U11 (dec): Dec. Work 3 blocks B. Turn.
(3 cells; 10 sts.)
Row U12 (dec): Dec. Work 1 block B. Fasten off.
(1 cell; 4 sts.)
Checkpoint: Part 1 should measure 6 in (15.2 cm) from the foundation to the tip. The blue tip diamond should look square on point, at 3.5 in (8.9 cm) across its widest row. The side blue blocks should step inward one cell per row from Row U1 to Row U4.
Part 2: Lower Half
Rotate the panel so the foundation chain is at the top, with the RS still facing you. You will work into the 46 base loops on the underside of the chain. These are the 45 chains under the Row U1 stitches plus the chain at the base of the turning ch. Each cell uses 3 base loops.
Row L1 (RS, dec): Skip the first 3 base loops (one cell). Join B in the 4th base loop and ch 3. Work into the base loops as follows: 3 blocks B, 7 spaces W and 3 blocks B. Leave the last 3 base loops unworked. Turn.
(13 cells; 40 sts.)
The chain colors are 5/5/5 cells, so one cream cell sits on a blue chain section at each boundary. This is hidden once blocked.
Rows L2–L11: Work exactly as Rows U3–U12, in order, with the same cell sequences, decreases and color changes.
| Part 2 row | Same as | Cells | Sts |
|---|---|---|---|
| L2 | U3 | 13 | 40 |
| L3 | U4 | 13 | 40 |
| L4 | U5 | 13 | 40 |
| L5 | U6 | 13 | 40 |
| L6 | U7 | 11 | 34 |
| L7 | U8 | 9 | 28 |
| L8 | U9 | 7 | 22 |
| L9 | U10 | 5 | 16 |
| L10 | U11 | 3 | 10 |
| L11 | U12 | 1 | 4 |
Fasten off after Row L11.
Cell check: The finished panel has 23 rows and 217 cells: 84 blue and 133 cream.
- Blue: two 25-cell tip diamonds plus two 17-cell side half-diamonds (25 + 25 + 17 + 17 = 84)
- Cream: 69 cells in Part 1 plus 64 cells in Part 2 = 133
Checkpoint: The panel should measure 11.5 in (29.2 cm) tall, 6.5 in (16.5 cm) across the body and 7.5 in (19.1 cm) across the side points.
Weave in all intarsia tails now. Run each tail back through stitches of its own color only.
Border
Border gauge:
– Vertical edges (row ends): 2 sc per dc row-end = 4 sc per 1 in (2.5 cm)
– Horizontal steps: 3 sc per cell = 6 sc per 1 in (2.5 cm)
Rule for every edge:
– Work 2 sc around each row-end post.
– Work 3 sc across each exposed step: the outer post top plus its 2 middle sts.
– Work 4 sc across each tip cell: 1 in each of its 4 top sts.
Each sc is worked in the color of the cell it covers.
Round 1 (RS): Join B at the top tip. Work the edging all the way around the panel, changing color at each section boundary. Sl st to the first sc. Fasten off.
The round has 8 color sections. Cut and rejoin at each change, because carrying blue under cream sc shows through.
| Section | Color | Row-end sc | Step sc | Tip sc | Total |
|---|---|---|---|---|---|
| Top tip (both sides) | B | 2 × 8 | 2 × 9 | 4 | 38 |
| Upper sides (each) | W | 8 | 9 | – | 17 |
| Middle sides (each) | B | 14 | 6 | – | 20 |
| Lower sides (each) | W | 8 | 9 | – | 17 |
| Bottom tip (both sides) | B | 2 × 8 | 2 × 9 | 4 | 38 |
Per long side (tip to tip): 46 row-end sc (23 rows × 2) + 42 step sc (14 steps × 3) = 88 sc.
Round total: 88 + 88 + 4 + 4 = 184 sc (116 B, 68 W).
Why the math works:
– A DK dc row is about two sc tall, so 2 sc per row-end lies flat.
– A cell is 3 sts wide, so 3 sc per step matches it exactly.
– Each side has 23 row-ends, plus 14 steps: 6 on the upper slope, 6 on the lower slope and 2 at the side point.
– The border adds 0.25 in (0.6 cm) on every edge, giving 7 × 12 in (17.8 × 30.5 cm) and 8 in (20.3 cm) at the side points.
Final Blocking
- Weave in the border tails, each into its own color.
- Spray the panel evenly until damp, without soaking it.
- Lay it RS up on the blocking mat.
- Pin the top and bottom tips 12 in (30.5 cm) apart.
- Pin the side points 8 in (20.3 cm) apart, centered between the tips.
- Pin the body edges 7 in (17.8 cm) apart.
- Pin each step corner so the zigzag edges stay crisp and each diagonal stays straight.
- Gently square up each mesh hole with a fingertip.
- Let it dry completely before unpinning.
Final Quality-Control Checklist
- [ ] Every row’s cell count matches the pattern.
- [ ] All four blue diamonds are symmetrical.
- [ ] The tip diamonds measure 3.5 in (8.9 cm) across.
- [ ] Each diagonal steps exactly one cell per row.
- [ ] No cream shows inside blue blocks, and no blue shows inside mesh.
- [ ] The border has 184 sc, and each section is the correct color.
- [ ] Size: 7 × 12 in (17.8 × 30.5 cm), 8 in (20.3 cm) at the side points.
- [ ] The panel lies flat with no rippling.
- [ ] All tails are woven in invisibly.
Troubleshooting
Diamonds look short and wide: Your cells are not square. Lengthen your dc slightly, or go down a hook size for width.
A diagonal jumps two cells: You decreased or changed color one cell early. Recount against the stitch totals.
The other color peeks through at boundaries: Complete each color change on the last yo of the post before the new color, and keep both strands on the WS.
The decrease edge is bulky: Work the sl sts loosely and do not ch 1 before the ch 3.
The border ruffles: You may have 3 sc per row-end instead of 2. Recount each section.
The border cups: Use a larger hook for the border only.
Mesh holes collapse: The ch-2 is too tight. Chain loosely.
Care
Hand wash in cool water with mild detergent. Press out the water in a towel and dry flat, re-pinning the points if needed.

Final Notes
The measurement chain is simple:
- Square 0.5 in (1.3 cm) cells give a 15-cell foundation row of 7.5 in (19.1 cm).
- The body is 13 cells wide: 6.5 in (16.5 cm).
- The panel is 23 rows tall: 11.5 in (29.2 cm).
- The 184-stitch color-matched border adds 0.25 in (0.6 cm) on every edge.
- The finished panel is 7 × 12 in (17.8 × 30.5 cm), with 8 in (20.3 cm) side points.
Check your gauge, count your cells, and the diamonds will fall into place.
Happy crocheting!