

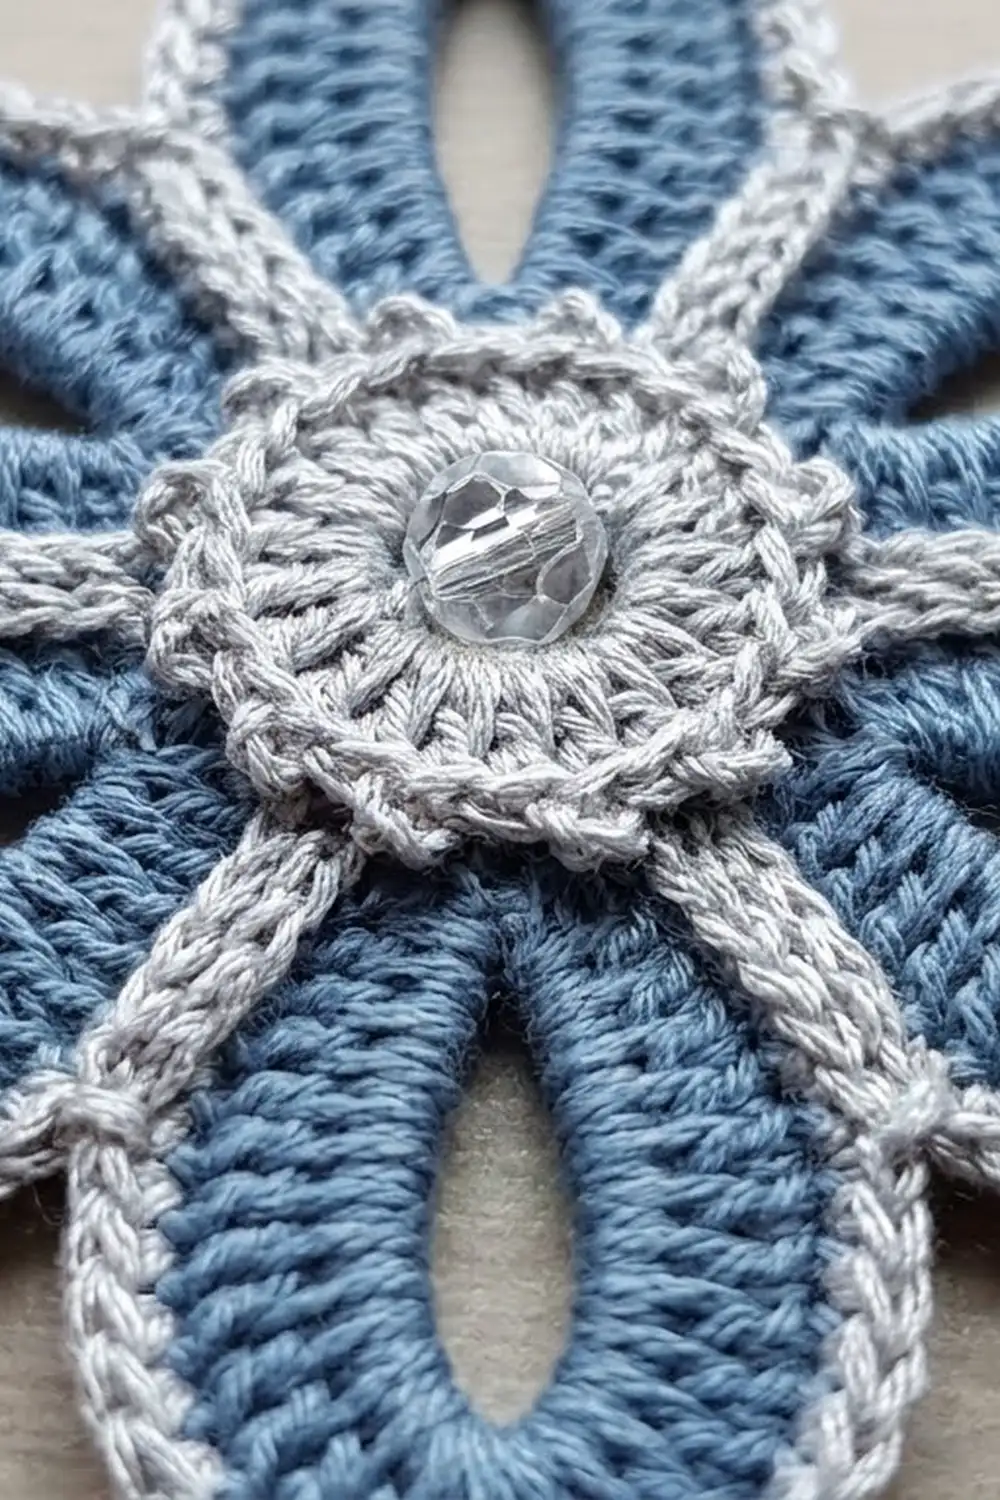
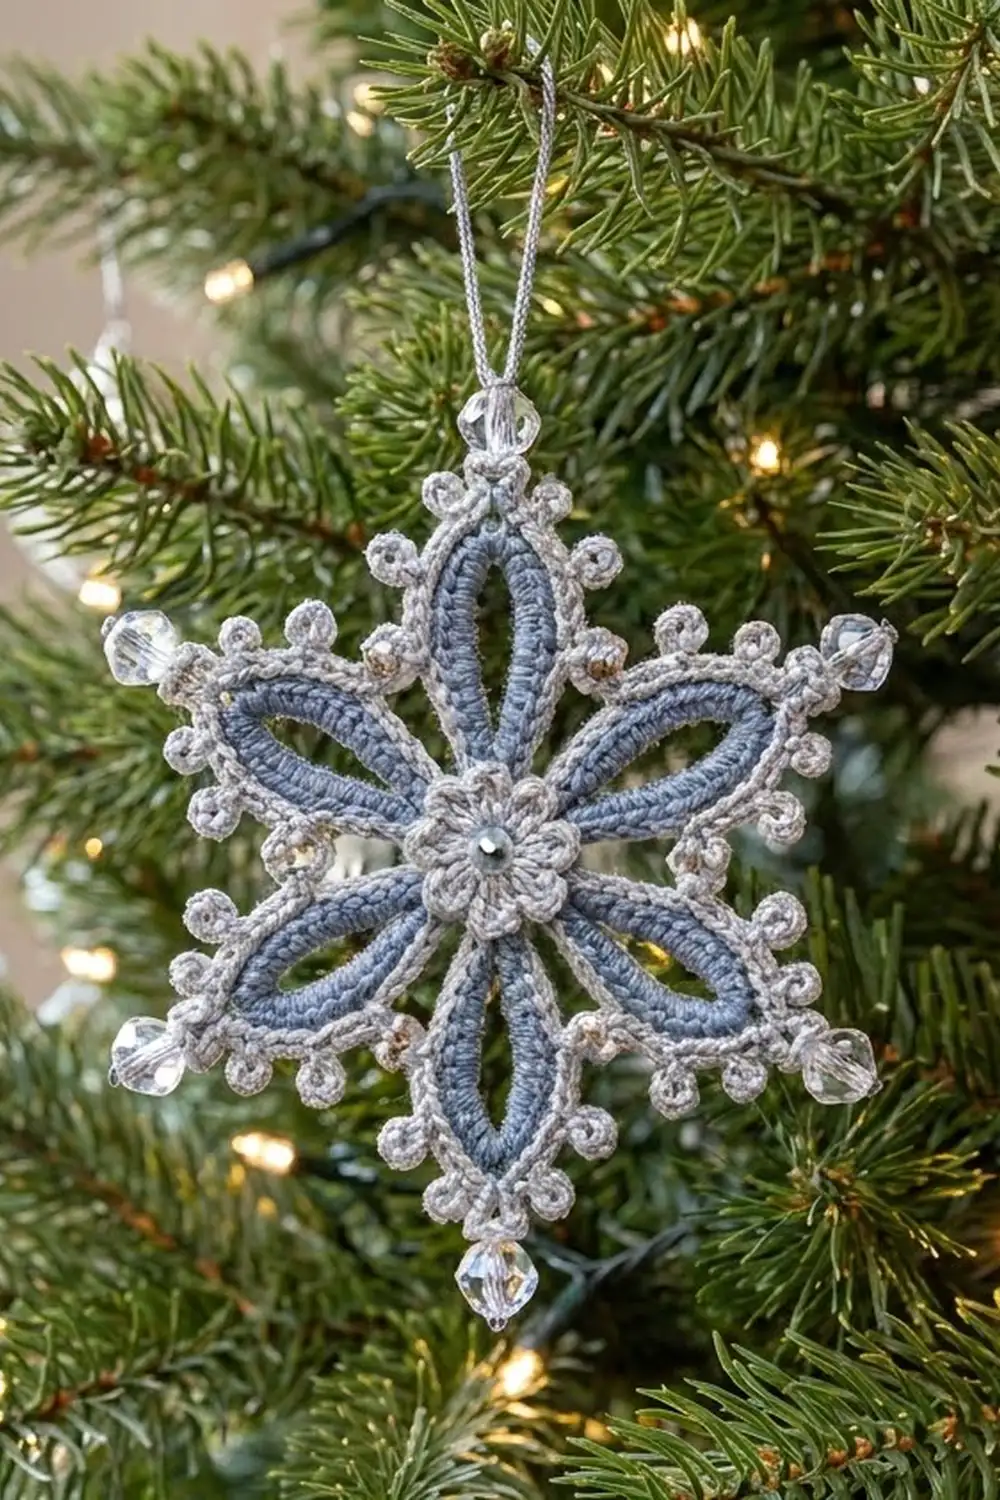
The Frost Lily Snowflake is a six-pointed crochet motif made of six long, open blue petals around a small silver-gray center. A silver-gray picot edging outlines every petal, pinches into a sharp valley between them, and ends in a clear faceted bead at each of the six points. One more bead sits in the middle of the center ring.
The palette is quiet and wintry: dusty denim blue for the petals and a soft silver-gray for the center and edging. The beads add a little sparkle without making it look busy. It works as a tree ornament, a gift-tag topper, or a flat appliqué.
This pattern uses US crochet terms. The finished snowflake measures 4.75 in (12.1 cm) from point to point without beads, and about 5.25 in (13.3 cm) with the tip beads. Measured from valley to opposite valley, it is 3.5 in (8.9 cm).
Construction is worked in the round as one single piece. You make a small picot center in silver-gray, add six blue chain loops and fill them with a graduated band of stitches to form the open petals, then work one beaded picot edging round in silver-gray. You need no sewing, apart from adding the center bead.
Finished Size and Construction
- Finished size: 4.75 in (12.1 cm) point to point; 5.25 in (13.3 cm) including beads
- Skill level: Intermediate
- Terminology: US crochet terms
- Yarn weight: Sport / #2 fine, mercerized cotton or cotton blend
- Hook: 2.75 mm (US C/2)
- Number of pieces: 1 (single motif)
- Layout: one six-pointed snowflake, 6 petals radiating from a center ring
- Piece size: 4.75 in (12.1 cm) point to point
- Size before border (after Rnd 4): 4.25 in (10.8 cm) petal tip to petal tip
- Border depth: 0.25 in (0.6 cm) on each side
Materials
Choose a smooth, tightly plied mercerized cotton. It gives you crisp picots and clean petal outlines, and it holds a shape well after blocking. Fuzzy or loosely spun yarns will hide the open petal centers.
- Color A – Silver Gray: about 10 g (31 m)
- Color B – Dusty Blue: about 6 g (19 m)
- Beads: 7 clear faceted beads, 6–8 mm, with holes large enough to slide onto your yarn (6 for the tips, 1 for the center)
Tools:
- 2.75 mm (US C/2) crochet hook
- Fine beading needle, big-eye needle, or dental floss threader, for stringing beads
- Tapestry needle
- Scissors
- Blocking mat, rustproof pins, spray bottle
- Optional: fabric stiffener for an ornament that holds its shape
The yarn amounts include about a 25% margin, so you have enough for a gauge swatch and weaving in ends.
Abbreviations (US Terms)
- ch – chain
- sl st – slip stitch
- sc – single crochet
- hdc – half double crochet
- dc – double crochet
- sc2tog – single crochet 2 together
- MR – magic ring
- sp – space
- st(s) – stitch(es)
- rep – repeat
Special stitches:
- Picot: ch 3, sl st in the first ch made (the third ch from hook).
- Bead-ch: slide 1 pre-strung bead right up to the hook, then ch 1 around it so the bead is locked in that chain.
- Valley sc2tog: insert hook in the next st, yo, pull up a loop; skip the 2 sl sts at the petal base; insert hook in the first st of the next petal, yo, pull up a loop; yo and draw through all 3 loops.
Gauge and Checkpoints
Exact gauge doesn’t matter much for an ornament, but it does control the shape of the petals and the sharpness of the points. Make one test motif before you commit to a full set.
- After Rnd 2: the center measures 1 in (2.5 cm) across, not counting picots.
- After Rnd 4: petal tip to opposite petal tip is 4.25 in (10.8 cm). Each petal is about 1.625 in (4.1 cm) long from the center ring to the tip and 0.75 in (1.9 cm) wide at its widest point.
- After Rnd 5: point to point is 4.75 in (12.1 cm) without beads.
If your motif is too big: go down to a 2.5 mm hook, or chain more tightly on Rnd 3. Loose ch-16 loops are the most common cause of oversized, floppy petals.
If your motif is too small or the petals cup: go up to a 3.0 mm hook. If only the petals cup, loosen your tension on the ch-16 loops a little.
Pattern
Center (Color A)
Rnd 1: With A, MR, ch 1, 12 sc in ring, pull ring closed, sl st in first sc to join. (12 sc)
Rnd 2: Ch 1, 2 sc in next sc, picot, 2 sc in next sc; rep from * 5 more times, sl st in first sc to join. (24 sc, 6 picots)*
There are 4 sc between neighboring picots. Fasten off A.
Checkpoint: the center is 1 in (2.5 cm) across and lies flat.
Petal Loops (Color B)
On this round you skip over the picots and push them toward the front. Each picot then peeks into the open middle of a petal.
Rnd 3: Count the 4 sc between two picots, and join B with sc in the 3rd of those sc. *Ch 16, skip next 2 sc (the picot falls between them), sc in next sc, sc in next sc; rep from * 5 more times, omitting the final sc on the last rep. Sl st in first sc to join.
(12 sc, 6 ch-16 loops)
Each loop is anchored by 1 sc on either side and spans 2 skipped sc. Between loops you have 2 sc side by side.
Petal Fill (Color B)
Every stitch in this round goes into the ch-16 loop, not into individual chains. That leaves the chain itself as the open inner edge of the petal.
Rnd 4: *In next ch-16 loop work [3 sc, 3 hdc, 6 dc, dc, ch 3, dc, 6 dc, 3 hdc, 3 sc]; sl st in next 2 sc; rep from * 5 more times. The last sl st lands in the joining sl st. Fasten off B.
(Each petal: 26 sts plus 1 ch-3 tip sp; round total 156 sts, 12 sl sts, 6 ch-3 sps)
Each petal side counts 13 sts from the base to the tip: 3 sc, 3 hdc, 6 dc, and 1 tip dc. The graduated height gives the petal its pointed, almond shape. Spread the stitches evenly along the loop as you go.
Checkpoint: the motif is 4.25 in (10.8 cm) from petal tip to opposite petal tip. Each petal has a clear slit-shaped opening down the middle.
Stringing the Beads
Before you start Rnd 5, use a beading needle or floss threader to string 6 beads onto Color A. Push them down the ball out of the way, then slide one up each time a bead-ch comes up.
Border: Beaded Picot Edging (Color A)
The border is the round that makes the star shape. It outlines every petal with sc and picots, draws two petals together at each valley, and puts a bead at every point.
Border gauge: 8 sc = 1 in (2.5 cm) along the edge. Each petal side of 12 sc measures about 1.5 in (3.8 cm), which matches the length of the petal side underneath.
Rnd 5: Join A with sc in any ch-3 tip sp, ch 2, bead-ch, ch 2, sc in same sp.
*Down the side of this petal: sc in next 2 sts, picot, sc in next 3 sts, picot, sc in next 3 sts, picot, sc in next 4 sts. Valley sc2tog, picot.
Up the next petal: sc in next 4 sts, picot, sc in next 3 sts, picot, sc in next 3 sts, picot, sc in next 2 sts.
In ch-3 tip sp work (sc, ch 2, bead-ch, ch 2, sc).
Rep from * 5 more times. On the last repeat, stop after the final “sc in next 2 sts” and sl st in the first sc to join. Fasten off.
Counts per point (tip to next tip): 2 sc at the tip, 12 sc down, 1 sc2tog, 12 sc up = 27 sts, plus 7 picots and 1 beaded tip loop.
Round total: 162 sts, 42 picots, 6 beaded tips.
Why the math works:
- Each petal side has 13 sts. You work 12 of them one-for-one with sc, and the 13th becomes half of the valley sc2tog. That covers every petal stitch exactly once, so the edging lies flat with no ruffling or pulling.
- The two base sl sts are skipped. That makes the valley sc2tog pull the petals together and form a sharp inner point.
- Picots add texture without adding length, so the sides keep the same measurement. Each side has 3 picots, at the same distances from the tip on both sides, so every point is symmetrical.
- The border adds 0.25 in (0.6 cm) at each end of the diameter, taking 4.25 in (10.8 cm) up to 4.75 in (12.1 cm).
Center Bead
Thread a 6 in (15.2 cm) strand of A on the tapestry needle and sew the 7th bead into the center of the Rnd 1 ring. Pass through the bead twice, then weave in on the back.
Optional Hanging Loop
Cut an 8 in (20.3 cm) strand of A. Thread it through the bead loop at one point, tie the ends with an overhand knot, and trim. That makes a loop of about 3.5 in (8.9 cm).
Final Blocking
- Weave in all ends on the back. Run them through stitches of the same color.
- Wet the motif in cool water, gently squeeze out the extra, and roll it in a towel.
- Lay it face up on a blocking mat. Pin the center flat first.
- Pin each of the 6 points out to a 2.375 in (6.0 cm) radius from the center. That gives 4.75 in (12.1 cm) point to point. Pin just below the bead, not through it.
- Pin each valley in to a 1.75 in (4.4 cm) radius. That gives 3.5 in (8.9 cm) valley to valley.
- Open each petal slit with a pin so it dries as an even almond shape.
- Ease every picot outward with a fingertip.
- For an ornament, brush or spray on fabric stiffener while it’s pinned.
- Let it dry completely, at least 12 hours, before you unpin.
Final Quality-Control Checklist
- [ ] Exactly 6 petals, each with an open center slit
- [ ] 6 center picots, each visible inside a petal opening
- [ ] Each petal side has 12 sc and 3 picots in the edging
- [ ] 6 valleys, each with 1 sc2tog and 1 picot
- [ ] 6 tip beads locked firmly in their chains, plus 1 center bead
- [ ] Point to point measures 4.75 in (12.1 cm) without beads
- [ ] Valley to valley measures 3.5 in (8.9 cm)
- [ ] Motif lies flat, with no cupping or ruffling
- [ ] All ends woven in invisibly on the back
Troubleshooting
Petals cup or curl forward: The ch-16 loop is too tight for 26 stitches. Rework Rnd 3 with looser chains, or chain 17 and keep the Rnd 4 stitches the same.
Petals look floppy or too wide: The chains are too loose. Go down a hook size for Rnd 3 only.
Edging ruffles: You’ve added extra sc. Count 12 per petal side and check the tip groups.
Edging pulls and the points bend backward: Your tension on Rnd 5 is too tight. Go up a hook size for the border only.
Bead slides around or droops: Work the bead-ch snugly and keep the ch 2 on either side firm.
Center picots are hidden: Push them to the front as you work Rnd 3, then pull them through with a pin during blocking.
Valleys look rounded instead of sharp: Check that you skipped both base sl sts in the valley sc2tog.
Care
Hand wash in cool water with mild soap, press it flat in a towel, and reshape it while damp. If you stiffened the motif, wash it gently or just spot-clean, and add stiffener again if needed.
Final Notes
The measurement chain is short and easy to check:
- 1 in (2.5 cm) center after Rnd 2
- 4.25 in (10.8 cm) petal span after Rnd 4
- A 0.25 in (0.6 cm) border on each side, for 4.75 in (12.1 cm) point to point, or about 5.25 in (13.3 cm) with beads
If each checkpoint matches, the finished snowflake will too. Make one, block it well, and then make a whole flurry for the tree.
Happy crocheting!