

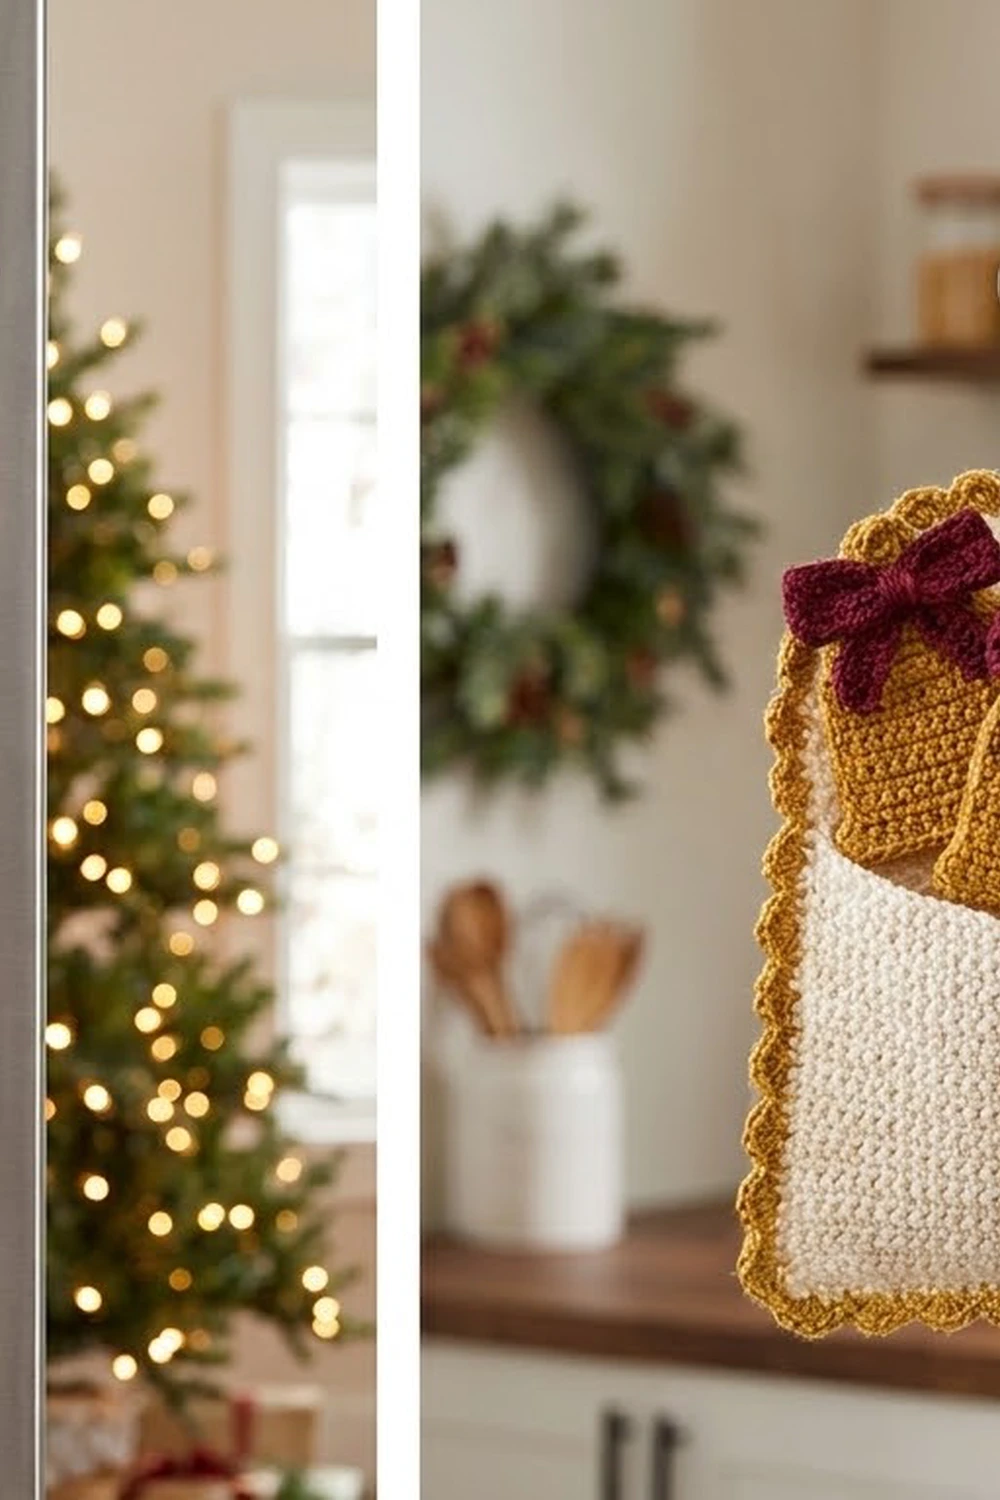
This little holiday set adds some color to the fridge door. It has mustard-gold bell magnets with burgundy bows and small round clappers, plus a cream pocket holder that hangs from the fridge handle and stores the spare bells. A row of gold swags across the pocket front works like a tiny garland.
The palette is mustard gold, deep burgundy and warm cream. The fabric is dense single crochet, so the pieces stay flat and firm. This pattern uses US crochet terms throughout.
Each finished bell measures about 3 in (7.6 cm) wide and 3.2 in (8.1 cm) tall, including the clapper. The finished pocket measures 6.5 in (16.5 cm) wide by 4.25 in (10.8 cm) tall, plus a 2 in (5.1 cm) hanging loop.
Construction overview: Each bell has a gold front and a cream back worked in rows from the top down. You join the two layers with a gold sc round, then add a clapper, a bow and a magnet. The pocket has a back panel and a shorter front panel. You add gold surface slip-stitch swags to the front, join the panels with one cream sc round, and finish with a loop.
Finished Size and Construction
- Bell size: 3 in (7.6 cm) wide x 3.2 in (8.1 cm) tall, including the clapper
- Pocket size: 6.5 in (16.5 cm) x 4.25 in (10.8 cm), plus a 2 in (5.1 cm) loop
- Skill level: Easy
- Terminology: US
- Yarn weight: #4 worsted, cotton or cotton blend
- Hook: 4.0 mm (G-6)
- Number of pieces: 4 bell magnets (each with a front, back, clapper and bow) and 1 pocket (back panel and front panel)
- Layout: Separate pieces; the pocket holds 3 bells, overlapping slightly
- Bell size before border: 2.75 in (7.0 cm) wide x 2.4 in (6.1 cm) tall
- Pocket size before border: back panel 6.25 in (15.9 cm) x 4 in (10.2 cm); front panel 6.25 in (15.9 cm) x 3.1 in (7.9 cm)
- Border depth: about 0.125 in (0.3 cm) per edge
Materials
Use a smooth worsted cotton or cotton blend. Cotton gives crisp stitch definition and does not stretch out on a hanging loop. Pick a soft, warm cream rather than bright white so it suits the gold.
- Mustard gold: 20 g, about 38 m (bell fronts, joining rounds, clappers, swags)
- Cream: 35 g, about 67 m (bell backs, pocket)
- Burgundy: 15 g, about 29 m (bows)
These quantities include a margin of about 15–20% for swatching and tails.
Tools:
– 4.0 mm (G-6) crochet hook
– Tapestry needle
– 4 round disc magnets, 0.75 in (1.9 cm) across
– Strong craft glue or E6000-type adhesive
– Stitch markers
– Scissors, ruler and rustproof pins
Abbreviations (US Terms)
- ch: chain
- sl st: slip stitch
- sc: single crochet
- BLO: back loop only
- MR: magic ring
- st(s): stitch(es)
- inc: 2 sc in the same st
Surface sl st: Hold the yarn behind the fabric. Insert the hook from front to back between stitches, pull up a loop and draw it through the loop on the hook. Each surface sl st moves to the next position along your path.
Gauge and Checkpoints
Gauge: 16 sc and 18 rows = 4 in (10.2 cm) in sc. That works out to 4 sts and 4.5 rows per inch.
Make one bell front first. It works as your gauge test.
- After bell Row 5: 1.25 in (3.2 cm) wide x 1.1 in (2.8 cm) tall
- After bell Row 11: 2.75 in (7.0 cm) wide at the rim x 2.4 in (6.1 cm) tall
- After pocket back Row 18: 6.25 in (15.9 cm) x 4 in (10.2 cm)
- After pocket front Row 14: 6.25 in (15.9 cm) x 3.1 in (7.9 cm)
If your piece is too big, go down to a 3.75 mm hook. If it is too small, go up to a 4.5 mm hook. Don’t change the stitch counts. The border math depends on them.
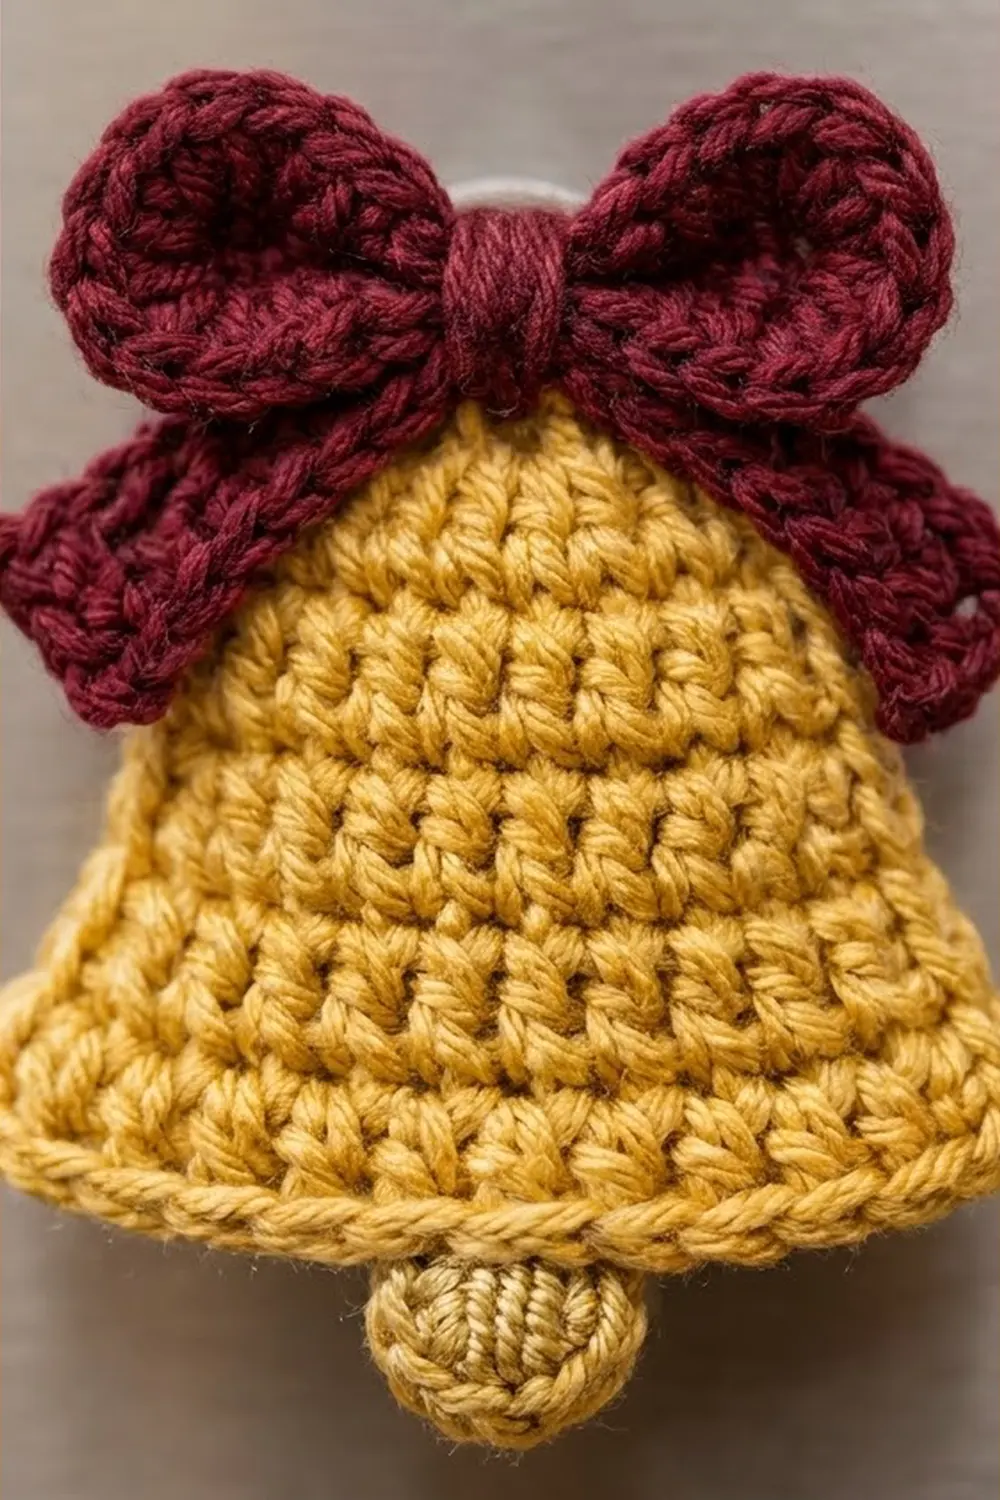
Bell Front (make 4, gold)
Each row begins with ch 1, turn. The ch 1 does not count as a stitch.
Row 1: Ch 4, sc in 2nd ch from hook and in each of the next 2 ch. (3 sc)
Row 2: Inc in first st, sc in next st, inc in last st. (5 sc)
Rows 3–5: Sc in each st across. (5 sc)
Checkpoint: 1.25 in (3.2 cm) wide. This narrow section is the rounded crown.
Row 6: Inc, sc in next 3 sts, inc. (7 sc)
Rows 7–8: Sc in each st across. (7 sc)
Row 9: Inc, sc in next 5 sts, inc. (9 sc)
Row 10: Inc, sc in next 7 sts, inc. (11 sc)
Rows 9 and 10 increase back to back, which gives the bell its flare.
Row 11 (rim): Sc in BLO of each st across. (11 sc)
The unworked front loops leave a horizontal ridge on the right side, and that ridge forms the rim. Fasten off with a short tail and weave it in.
Checkpoint: 2.75 in (7.0 cm) wide x 2.4 in (6.1 cm) tall.
Bell Back (make 4, cream)
Work Rows 1–10 exactly as for the bell front.
Row 11: Sc in each st across, working through both loops. (11 sc)
Fasten off and weave in the ends. Lay the back on the front. The two should match exactly.
Clapper (make 4, gold)
Rnd 1: 6 sc in MR, then pull the ring closed. Sl st to the first sc. (6 sc)
Fasten off, leaving an 8 in (20.3 cm) tail. The clapper is a flat disc about 0.5 in (1.3 cm) across.
Bow (make 4, burgundy)
Loop strip:
1. Ch 16. Sc in 2nd ch from hook and in each ch across. (15 sc)
2. Work 2 more rows of 15 sc, starting each row with ch 1, turn. (3 rows total)
3. Sew the short ends together to make a ring.
4. Flatten the ring with the seam at the center back. It measures about 1.9 in (4.8 cm) wide x 0.7 in (1.8 cm) tall.
Tails: Ch 13. Sc in 2nd ch from hook and in each ch across. (12 sc) The tail strip is about 3 in (7.6 cm) long. Fold it into an upside-down V and place it behind the flattened ring.
Center wrap: Pinch the center of both layers. Wrap burgundy yarn tightly around the middle 6–8 times, then knot it at the back. Leave a long tail for sewing.
Bell Joining Round (Border)
Place the cream back behind the gold front with wrong sides together and edges aligned. Use gold yarn and work through both layers.
Border gauge: 1 sc per st along the rim and top, and 1 sc per row-end along the sides.
Joining Rnd: Join gold yarn in the first rim st, working through both layers.
- Rim: 3 sc in the first st, sc in the next 9 sts, 3 sc in the last st. (15 sc)
- First side: Work 1 sc in each row-end from Row 10 to Row 2. (9 sc)
- Top: Working into the opposite side of the foundation ch, 2 sc in the first st, sc in the next st, 2 sc in the last st. (5 sc)
- Second side: Work 1 sc in each row-end from Row 2 to Row 10. (9 sc)
- Sl st to the first sc. (38 sc total)
Why the math works: The rim and top count 1 sc per stitch, with 3 sc at each rim corner and 2 sc at each top corner. The 2-sc corners keep the crown rounded rather than square. Row-ends 1 and 11 are covered by the corner groups, so each side gets 9 sc. That gives 15 + 9 + 5 + 9 = 38.
Fasten off. The bell now measures 3 in (7.6 cm) wide x 2.7 in (6.9 cm) tall.
Finishing the bell:
1. Clapper: The rim center is the 8th sc of the 15 rim sc. Join gold there and ch 2. Sew the clapper disc to the end of the ch so it hangs just below the rim. The bell is now 3.2 in (8.1 cm) tall.
2. Bow: Sew the bow centered over the crown so it overlaps the top edge by about 0.25 in (0.6 cm).
3. Magnet: Glue a magnet to the center of the cream back. Let it cure fully.
Pocket Back Panel (cream)
Each row begins with ch 1, turn. The ch 1 does not count as a stitch.
Row 1: Ch 26. Sc in 2nd ch from hook and in each ch across. (25 sc)
Rows 2–18: Sc in each st across. (25 sc)
Checkpoint: 6.25 in (15.9 cm) x 4 in (10.2 cm). Fasten off.
Pocket Front Panel (cream)
Row 1: Ch 26. Sc in 2nd ch from hook and in each ch across. (25 sc)
Rows 2–14: Sc in each st across. (25 sc)
Checkpoint: 6.25 in (15.9 cm) x 3.1 in (7.9 cm). Fasten off.
Gold Swags
With the right side facing, divide the 25 stitch columns into 5 groups of 5 and mark them. Each swag uses 5 surface sl sts, 1 per stitch column:
- Column 1: in Row 12
- Column 2: in Row 11
- Column 3: in Row 10 (the low point)
- Column 4: in Row 11
- Column 5: in Row 12
Work the path continuously across all 5 groups. The finished swags hang like a garland. (25 surface sl sts) Fasten off on the wrong side.
Pocket Joining Round (Border)
Place the front panel on the back panel with both right sides facing you. Line up the foundation edges. The back panel will extend 4 rows above the front. Use cream yarn.
Border gauge: 1 sc per st along the top and bottom, and 1 sc per row-end along the sides.
Joining Rnd: Join cream yarn in the first st of back Row 18.
- Top (back only): 3 sc in the first st, sc in the next 23 sts, 3 sc in the last st. (29 sc)
- First side: Work 1 sc in each row-end from Row 17 to Row 2. (16 sc)
- For Rows 17–15, work through the back only. (3 sc)
- For Rows 14–2, work through both layers. (13 sc)
- Bottom (both layers): Working into the foundation ch, 3 sc in the first ch, sc in the next 23 ch, 3 sc in the last ch. (29 sc)
- Second side: Work 1 sc in each row-end from Row 2 to Row 17. (16 sc)
- For Rows 2–14, work through both layers. (13 sc)
- For Rows 15–17, work through the back only. (3 sc)
- Sl st to the first sc. (90 sc total)
Per side, counting both corner sc: the top and bottom have 27 sts each, and each side has 20 sts.
Why the math works: The 25 stitches along the top and bottom get 1 sc each. The corner sc is the center of each 3-sc group, which adds 4 corner sts. Row-ends 1 and 18 sit under the corner groups, so each side gets 16 sc. Unique total: 25 + 25 + 16 + 16 + 4 = 90. Counting corners on both adjoining sides gives 27 + 27 + 20 + 20 = 94. Subtract the 4 corners counted twice and you get 90 again.
Don’t fasten off yet.
Checkpoint: 6.5 in (16.5 cm) x 4.25 in (10.8 cm). The pocket front should stand about 3.2 in (8.1 cm) tall.
Hanging Loop
- Sl st along the top edge to the 13th sc of the 27 top-edge sts. That is the center stitch.
- Sl st back 1 st to the 12th, then ch 18.
- Skip the center st and sl st into the 14th st.
- Turn and work 24 sc into the ch-18 space.
- Sl st into the 12th st.
Fasten off. The loop stands about 2 in (5.1 cm) tall.
Final Blocking
- Weave in all ends except the clapper and bow tails until those pieces are sewn on.
- Lightly mist each bell and the pocket with water.
- Pin each bell to its final size: 3 in (7.6 cm) wide at the rim, with the crown curved smoothly.
- Pin the pocket at 6.5 in (16.5 cm) x 4.25 in (10.8 cm). Keep the side edges straight and the corners gently rounded.
- Pin the loop upright.
- Let everything dry completely.
- Glue the magnets on only after blocking.
Final Quality-Control Checklist
- Each bell front has 11 sts at Row 11 and a visible rim ridge.
- Each bell joining round has 38 sc, and the clapper hangs from the rim center (the 8th of 15 rim sc).
- Each bow is centered and sits flat over the crown.
- The pocket joining round has 90 sc, with 29 on the top and bottom and 16 on each side.
- The 5 swags are even, each dipping to Row 10 and rising to Row 12.
- The front pocket opening is free across the top, with the joining sc attached only at the sides and bottom.
- The pocket holds 3 bells with only a slight overlap.
Troubleshooting
- The bell is lopsided: Make sure each increase is in the first and last st, not in the second.
- The bell edge ruffles: Check that you skipped row-ends 1 and 11 on the sides. Try a smaller hook for the joining round.
- The bell edge cups: You’ve likely missed corner sc. Recount the rim and top groups.
- The swags pucker: Loosen your surface sl sts, or use a hook one size larger for them.
- The pocket gapes at the top: Check that the 3 back-only sc are on Rows 15–17 and not lower.
- The loop sags: Pack the sc tightly into the ch-18 space and use cotton yarn.
- The magnet is weak: Use a stronger magnet or glue on two stacked magnets.
Care
Spot clean with mild soap and cool water, then lay flat to dry. Remove the pocket from the fridge before cleaning, and don’t soak the bells, because the glued magnets may come loose.
Final Notes
The measurement chain is simple:
- Gauge: 16 sc and 18 rows = 4 in (10.2 cm)
- Bell: 11 sts = 2.75 in (7.0 cm) wide. The 38-sc joining round brings it to 3 in (7.6 cm), and the clapper takes the height to 3.2 in (8.1 cm).
- Pocket: 25 sts = 6.25 in (15.9 cm) wide. The 90-sc joining round brings it to 6.5 in (16.5 cm) x 4.25 in (10.8 cm), with room for 3 bells.
If you match the gauge and stitch counts, everything fits together. Happy crocheting!