

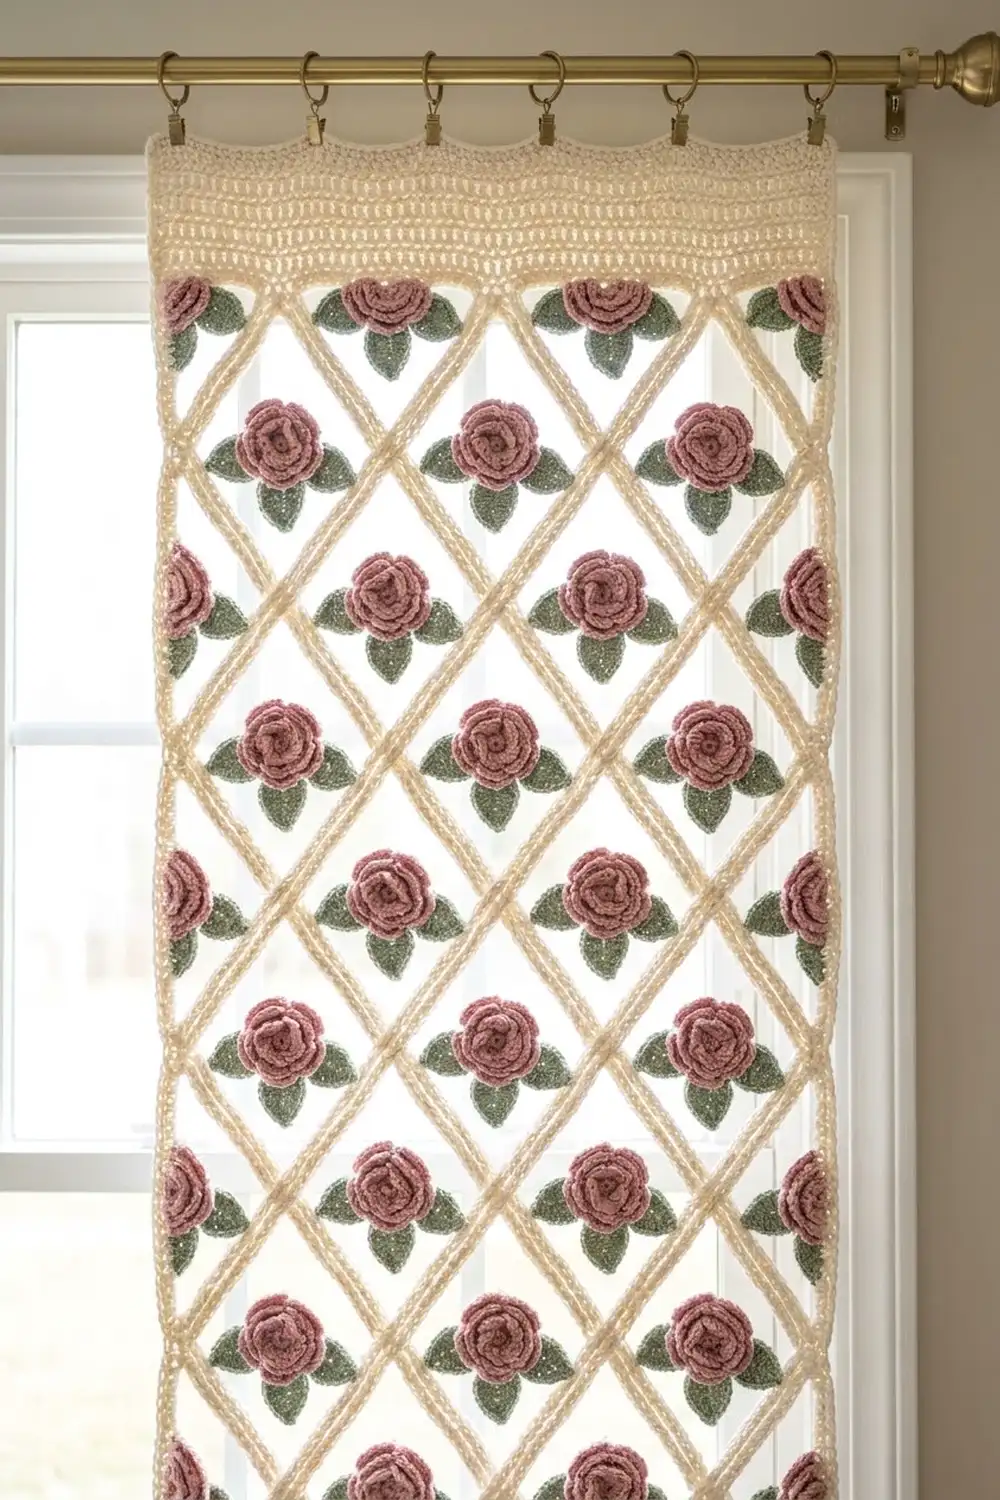
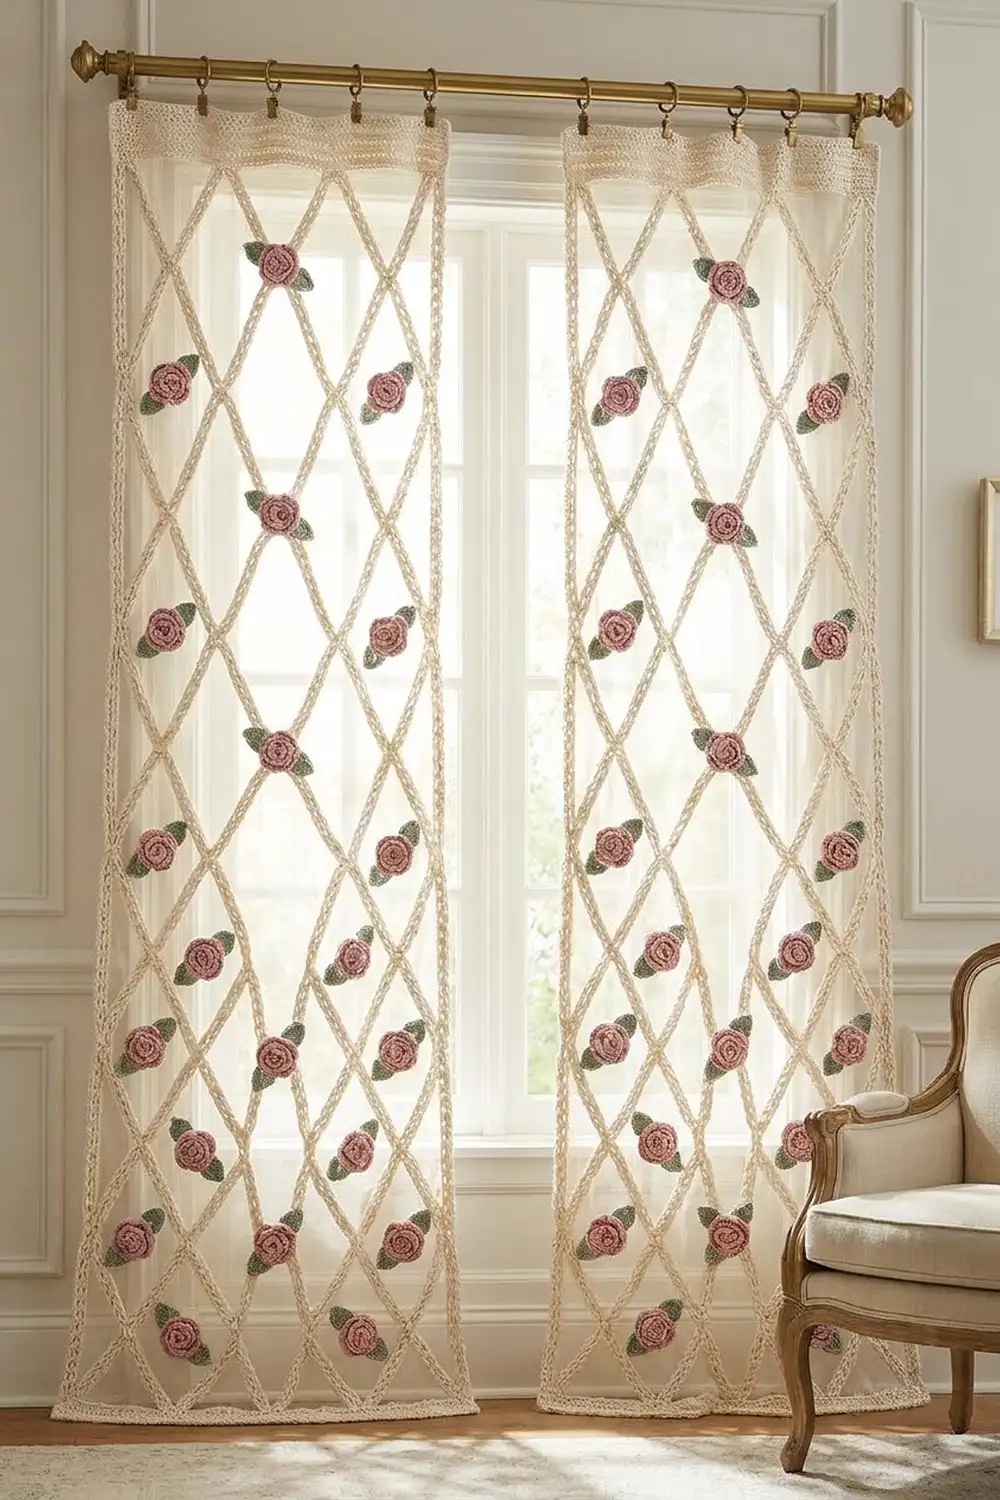
The Rose Trellis Curtain Panel is a long, airy cream lattice with dusty pink roses set inside the diamond openings. Each rose has two sage green leaves below it, so it looks like a climbing rose on a garden trellis. With light behind it, the lattice reads as a soft, braided net.
The palette has three colors: cream for the lattice, header and border; dusty rose for the rolled roses; sage green for the leaves. The style is romantic cottage, and it suits a bright window with brass hardware.
This pattern uses US crochet terms. One finished panel measures 42.5 in wide x 84.5 in long (108.0 cm x 214.6 cm). The photo shows two matching panels hung as a pair. This pattern makes one panel, so work it twice for a pair.
Construction is simple. You crochet the lattice in one piece from the bottom up, with cream held double, so the chain lines come out thick and braided. A leveling row and a solid header band finish the top, and two rounds of single crochet border the panel. Last, you sew small rolled roses and leaves into a staggered set of diamonds.
Finished Size and Construction
- Finished size: 42.5 in x 84.5 in (108.0 cm x 214.6 cm)
- Skill level: Intermediate
- Terminology: US crochet terms
- Yarn weight: Worsted (#4) cotton or cotton blend
- Hooks: 6.5 mm (K-10.5) for the panel, 5 mm (H-8) for roses and leaves
- Number of pieces: 1 lattice panel, plus 142 roses and 284 leaves sewn on as appliqués
- Layout: 10 diamonds across, 44 lattice rows tall, roses in 15 staggered tiers
- Lattice repeat: 4 in wide x 3.5 in tall (10.2 cm x 8.9 cm) per diamond
- Size before border: 40.5 in x 82.5 in (102.9 cm x 209.6 cm)
- Border depth: 1 in (2.5 cm) on every side
Materials
Choose a smooth worsted cotton or cotton blend. It drapes well, keeps the lattice crisp and washes easily. Avoid fuzzy yarns, because they blur the braided look. All amounts below are for one panel and are based on about 200 m per 100 g.
- Cream (lattice, header, border): 450 g, about 900 m. This is held double for the panel, and the amount covers both strands.
- Dusty rose (roses): 850 g, about 1,700 m
- Sage green (leaves): 250 g, about 500 m
These quantities include a margin of roughly 10 to 25 percent. Double everything for a pair of panels.
Tools:
– 6.5 mm (K-10.5) and 5 mm (H-8) hooks
– Tapestry needle
– Scissors
– Stitch markers
– Tape measure
– Blocking mats or a clean towel-covered floor, plus rust-proof pins
– Spray bottle
– Curtain rod with 9 clip rings (optional, for hanging as shown)
Abbreviations (US Terms)
- ch – chain
- sl st – slip stitch
- sc – single crochet
- hdc – half double crochet
- dc – double crochet
- tr – treble crochet
- dtr – double treble crochet (yarn over 3 times, then work off 2 loops at a time)
- sp – space
- st(s) – stitch(es)
- RS – right side
Special stitch – V-stitch (V-st): (dc, ch 1, dc) in the same stitch.
Center ch: the 7th chain of a ch-13 loop. Place a marker there while you learn the pattern.
Gauge and Checkpoints
Make a test swatch with the 6.5 mm hook and cream held double before you start the panel.
Swatch: Ch 18. Work a base row of 17 sc. Then work Rows 2–7 of the lattice with 2 repeats across instead of 10. Block it by pinning the diamonds open.
- Base row: 17 sc = 8.5 in (21.6 cm), so 8 sc = 4 in (10.2 cm)
- Each diamond: 4 in wide x 3.5 in tall (10.2 cm x 8.9 cm)
- 6 lattice rows: 10.5 in (26.7 cm)
- Header dc: 8 dc = 4 in (10.2 cm), 1 dc row = 1 in (2.5 cm)
Next, test one rose and one leaf with the 5 mm hook. A rolled rose should be 2.5 in (6.4 cm) across. A leaf should be 1.5 in (3.8 cm) long.
Checkpoints:
– After the base row: 40.5 in (102.9 cm) wide
– After Row 13 (12 lattice rows): lattice portion 21 in (53.3 cm) tall, gently stretched
– After Row 45: lattice portion 77 in (195.6 cm) tall
– After Row 51: 40.5 in x 82.5 in (102.9 cm x 209.6 cm)
If the swatch is too big, go down one hook size. If it is too small, go up one size. If the diamonds are the right width but too short, hang the swatch for a day before you measure it again, since lattice relaxes lengthwise.
Part 1: Lattice Panel
Use the 6.5 mm hook and hold 2 strands of cream together.
Foundation: Ch 82.
Row 1 (base row): Sc in 2nd ch from hook and in each ch across, turn. (81 sc)
Row 2 (A-row): Ch 1, sc in first sc, *ch 13, skip 7 sc, sc in next sc; repeat from * 9 more times, turn. (10 ch-13 loops, 11 sc)
Row 3 (B-row): Ch 8 (counts as dtr + ch 3), sc in center ch of first ch-13 loop, *ch 13, sc in center ch of next loop; repeat from * 8 more times, ch 3, dtr in last sc, turn. (9 full ch-13 loops, 10 anchor sc, 2 edge half-loops)
Row 4 (A-row): Ch 1, sc in first dtr, *ch 13, sc in center ch of next ch-13 loop; repeat from * 8 more times, ch 13, sc in 5th ch of turning ch-8, turn. (10 ch-13 loops, 11 sc)
Rows 5–44: Repeat Rows 3–4 twenty more times.
Row 45: Repeat Row 3.
That gives 44 lattice rows (Rows 2–45). Each pair of rows makes one diamond height of 3.5 in (8.9 cm), so 22 pairs = 77 in (195.6 cm).
Every B-row closes 9 diamonds, with a half-diamond at each edge. Every A-row closes 10 diamonds.
Part 2: Leveling Row
The last B-row has arches with high points at the loop centers and low points at the anchor sc. This row fills the low points with taller stitches so the top comes out straight.
Row 46: Ch 4 (counts as tr), 3 dc in ch-3 half-loop sp, *tr in next anchor sc, (dc, hdc, 3 sc, hdc, dc) in next ch-13 loop; repeat from * 8 more times, tr in last anchor sc, 3 dc in last half-loop sp, tr in 5th ch of turning ch-8, turn.
Count: 1 + 3 + (9 x 8) + 1 + 3 + 1 = 81 sts. This matches the base row exactly. The row is about 1 in (2.5 cm) tall.
Part 3: Header Band
The solid header gives the clip rings a firm place to grip.
Row 47: Ch 1, sc in each st across, turn. (81 sc)
Rows 48–50: Ch 3 (counts as dc), dc in each st across, turn. (81 dc)
Row 51: Ch 1, sc in each st across. (81 sc) Do not fasten off.
The header is 4 in (10.2 cm) tall: 0.5 in + 3 in + 0.5 in (1.3 cm + 7.6 cm + 1.3 cm). The panel now measures 40.5 in x 82.5 in (102.9 cm x 209.6 cm).
Part 4: Rolled Rose (make 142)
Use the 5 mm hook and dusty rose.
Foundation: Ch 25.
Row 1: V-st in 5th ch from hook, *skip 1 ch, V-st in next ch; repeat from * across, turn. (11 V-sts)
Row 2: Ch 1, (sc, 5 dc, sc) in ch-1 sp of each of the next 5 V-sts, (sc, 7 dc, sc) in ch-1 sp of each of the last 6 V-sts. (11 petals, 89 sts)
Fasten off and leave an 18 in (45.7 cm) tail. Start rolling from the beginning of Row 2 so the small petals form a tight center. Keep the base of the strip level as you roll and the larger petals wrap around the outside. Stitch through all layers at the base 4 to 5 times. The rose should measure 2.5 in (6.4 cm) across. Keep the tail for sewing.
Part 5: Leaf (make 284)
Use the 5 mm hook and sage green.
Ch 7. Sc in 2nd ch from hook, hdc in next ch, dc in next 2 ch, hdc in next ch, (sc, ch 2, sc) in last ch for the tip. Working along the opposite side of the foundation, hdc in next ch, dc in next 2 ch, hdc in next ch, sc in last ch, sl st to first sc. (12 sts plus ch-2 tip)
Fasten off and leave a 10 in (25.4 cm) tail. The leaf is 1.5 in (3.8 cm) long.
Part 6: Appliqué Placement Map
Roses go into the diamonds closed by every third lattice row, so the tiers stagger, as in the photo.
- B-row tiers (9 roses each): Rows 3, 9, 15, 21, 27, 33, 39, 45 = 8 tiers x 9 = 72 roses
- A-row tiers (10 roses each): Rows 6, 12, 18, 24, 30, 36, 42 = 7 tiers x 10 = 70 roses
- Total: 142 roses and 284 leaves
The tiers are 5.25 in (13.3 cm) apart vertically. Each tier is shifted 2 in (5.1 cm) sideways from the one before. Sew the appliqués on after blocking (see Final Blocking).
Border
Border gauge: 8 sc = 4 in (10.2 cm) along every edge, the same as the base row.
Side edge rate: Along each side, work 7 sc for each pair of lattice rows: 6 sc around the dtr + ch-3 edge and 1 sc in the A-row edge sc. That is 7 sc per 3.5 in (8.9 cm), or 2 sc per inch.
Round 1: With RS facing and still holding cream double, ch 1. Work 81 sc across the top, ch 1. Down the side, work 1 sc in Row 51, 2 sc in each of Rows 50–48, 1 sc in Row 47, 2 sc in Row 46, 154 sc along Rows 45–2 (7 per row pair), and 1 sc in Row 1, for 165 sc, then ch 1. Work 81 sc in the free loops of the foundation chain, ch 1. Work 165 sc up the second side, mirroring the first side, then ch 1. Join with a sl st to the first sc. (492 sc: 81 / 165 / 81 / 165, plus 4 ch-1 corner sps)
Round 2: Ch 1, sc in each sc, and work (sc, ch 1, sc) in each corner sp. Join. (500 sc: 83 / 167 / 83 / 167, plus 4 ch-1 corner sps) Fasten off.
Why the math works: The top and bottom have 81 sc each, the same as the panel’s 81 sts, and at 2 sc per inch that is 40.5 in (102.9 cm). Each side has 1 + 154 + 2 + 8 = 165 sc, which is 82.5 in (209.6 cm), exactly the panel height before the border. Every row gets the number of sc its height calls for, so the edges do not ruffle or pull in. Round 2 adds 1 sc at each end of every side, which covers the 0.5 in (1.3 cm) added by Round 1. Together the two rounds add 1 in (2.5 cm) on each edge, so the finished panel is 42.5 in x 84.5 in (108.0 cm x 214.6 cm).
Final Blocking
- Weave in all cream ends along the lattice lines, never across an open diamond.
- Lay the panel flat on mats or a towel-covered floor, right side up.
- Pin the header and border straight. Check that the panel is 42.5 in (108.0 cm) wide.
- Pin each diamond open, top and bottom points first, to 4 in x 3.5 in (10.2 cm x 8.9 cm). Work up the panel one tier at a time.
- Mist the panel thoroughly and let it dry completely.
- Unpin. Sew one rose into each diamond on the placement map, tacking the rose to all 4 sides of the diamond. Sew 2 leaves below each rose, angled down along the two lower lattice lines.
- Hang the panel with clip rings about 5 in (12.7 cm) apart on the header and let it relax for 24 hours.
Final Quality-Control Checklist
- Base row, leveling row and header all have 81 sts
- Each A-row has 11 sc and 10 loops; each B-row has 10 anchor sc and 9 full loops
- 44 lattice rows, finishing with a B-row
- Border Round 2 counts are 83 / 167 / 83 / 167
- 142 roses, each 2.5 in (6.4 cm), and 284 leaves, each 1.5 in (3.8 cm)
- Rose tiers are on the correct rows and staggered
- Finished panel is 42.5 in x 84.5 in (108.0 cm x 214.6 cm)
- No ends are visible inside any opening
Troubleshooting
- Diamonds lean to one side: You are anchoring off-center. Mark the 7th ch of each loop.
- Edges are shorter than the middle: Make the dtr edge stitches taller, or pull the turning chain up to full height.
- Top edge is wavy: Check that the leveling row has a tr at every anchor sc.
- Border ruffles: Use 6 sc per row pair instead of 7, but only if your row pairs measure under 3.5 in (8.9 cm).
- Roses are too flat: Roll them more tightly and stitch through every layer.
- Roses droop: Tack each one at all 4 diamond sides, not just at the bottom.
Care
Hand wash in cool water or machine wash on a gentle cycle in a mesh bag, then lay flat to dry. Re-pin the diamonds if they need it, and keep the panel out of the dryer.
Final Notes
The measurement chain is straightforward. Each repeat of 8 sc = 4 in (10.2 cm), so 10 repeats plus 1 sc = 40.5 in (102.9 cm). Each pair of lattice rows = 3.5 in (8.9 cm), so 22 pairs = 77 in (195.6 cm). The base row, leveling row and header add 5.5 in (14.0 cm), for 82.5 in (209.6 cm) before the border. The border adds 1 in (2.5 cm) on every edge, for a finished panel of 42.5 in x 84.5 in (108.0 cm x 214.6 cm). If you match the swatch to these numbers, the panel will match too.
Happy crocheting!