

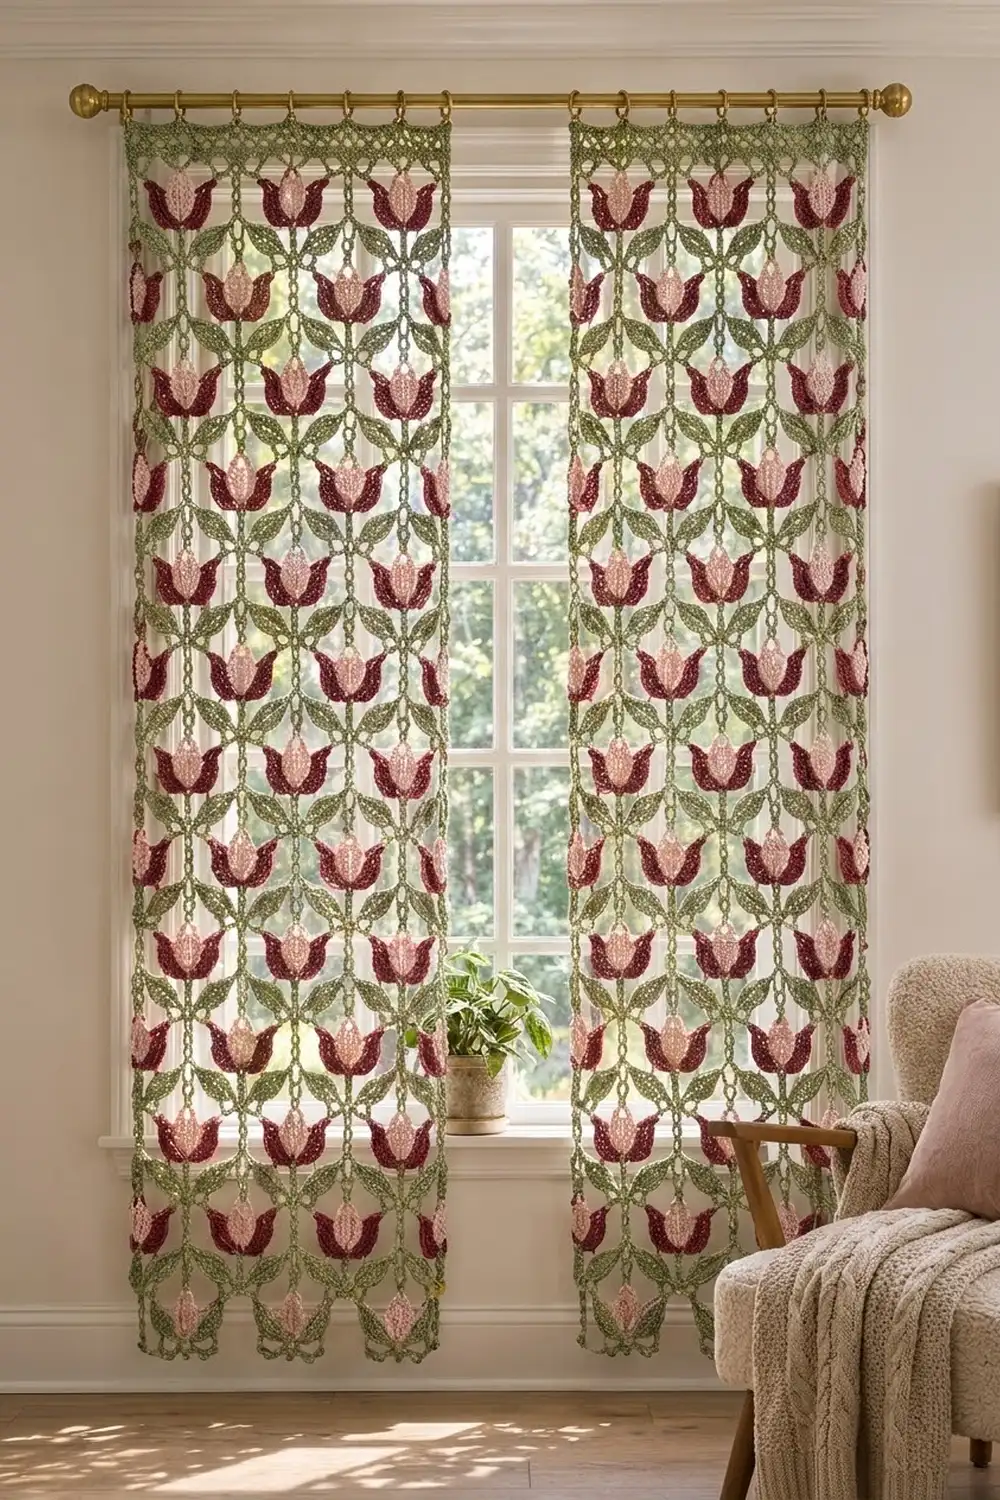
The Tulip Trellis Curtain Panel is an open, airy lattice of crocheted tulips. Each flower has a soft pink inner petal with a raised center line, cupped in deep burgundy outer petals that flare into two pointed tips. Below each bloom, a sage green stem carries two veined leaves. The leaf tips link to the neighboring column, so the leaves form a diamond trellis between the flowers.
The palette is burgundy, blush pink, and sage green. The look is cottage-garden and vintage, and it lets light through when hung in a window. This pattern uses US crochet terms throughout.
One finished panel measures 36 in wide x 82.5 in tall (91.4 cm x 209.6 cm), including a 2.5 in (6.4 cm) mesh header. The photographed window uses two matching panels, so make the panel twice for a pair.
Construction is simple and repeatable. You make 60 identical tulip motifs per panel, each with its stem and leaves attached. You join them into 6 vertical columns of 10, link the columns with short leaf-tip bridges, and then work a mesh header across the top for curtain rings.
Finished Size and Construction
- Finished panel size: 36 in x 82.5 in (91.4 cm x 209.6 cm)
- Skill level: Intermediate
- Terminology: US crochet terms
- Yarn weight: DK (light worsted, #3), cotton or cotton blend
- Hook: 4.0 mm (G-6)
- Number of pieces: 60 tulip motifs per panel (120 for a pair)
- Layout: 6 columns x 10 rows
- Motif size (on centers): 6 in wide x 8 in tall (15.2 cm x 20.3 cm)
- Size before header: 36 in x 80 in (91.4 cm x 203.2 cm)
- Header depth: 2.5 in (6.4 cm)
Materials
Choose a smooth, mercerized or matte cotton DK. Cotton holds the petal points and leaf tips crisply and doesn’t stretch much when the panel hangs. Avoid fuzzy yarns, because they blur the lattice.
Quantities for a pair of panels (halve for one panel):
- Color A, Burgundy (outer petals): 540 g / about 1,240 m
- Color B, Blush Pink (inner petal): 280 g / about 645 m
- Color C, Sage Green (stems, leaves, joins, header): 680 g / about 1,565 m
Tools:
- 4.0 mm (G-6) crochet hook
- Tapestry needle
- Scissors
- Stitch markers
- Rust-proof pins and a large blocking surface
- Spray bottle
- Measuring tape
- 22 curtain clip rings (11 per panel) and a curtain rod
These quantities include a margin of about 10% for gauge swatches and tails.
Abbreviations (US Terms)
- ch – chain
- sl st – slip stitch
- sc – single crochet
- hdc – half double crochet
- dc – double crochet
- tr – treble crochet
- sk – skip
- sp – space
- st(s) – stitch(es)
- rep – repeat
Special stitches
- Picot: ch 3, sl st in 3rd ch from hook.
- Petal point: (tr, picot, tr) all in the same stitch.
- Surface vein: working on the right side, insert the hook between the two sides of the leaf along the foundation chain, then sl st, pulling the loop to the front.
Gauge and Checkpoints
- Gauge: 18 sc and 20 rows = 4 in (10.2 cm) in sc. 9 ch = 2 in (5.1 cm). One dc row is 0.5 in (1.3 cm) tall.
Make one complete motif before anything else, then check it against these measurements:
- After Rnd 2 (pink petal): 1.75 in x 2.75 in (4.4 cm x 7.0 cm)
- After Rnd 4 (tulip head): 3.25 in wide x 3.5 in tall (8.3 cm x 8.9 cm)
- Each leaf: 2.5 in long x 1 in wide (6.4 cm x 2.5 cm)
- Upper stem: 2 in (5.1 cm)
- Lower stem plus end loop: 2.5 in (6.4 cm)
- Full motif, tip loop to end loop: 8 in (20.3 cm)
If your motif is too big, go down a hook size (3.75 mm). If it’s too small, go up a size (4.5 mm). Don’t change stitch counts, because the header math depends on them.
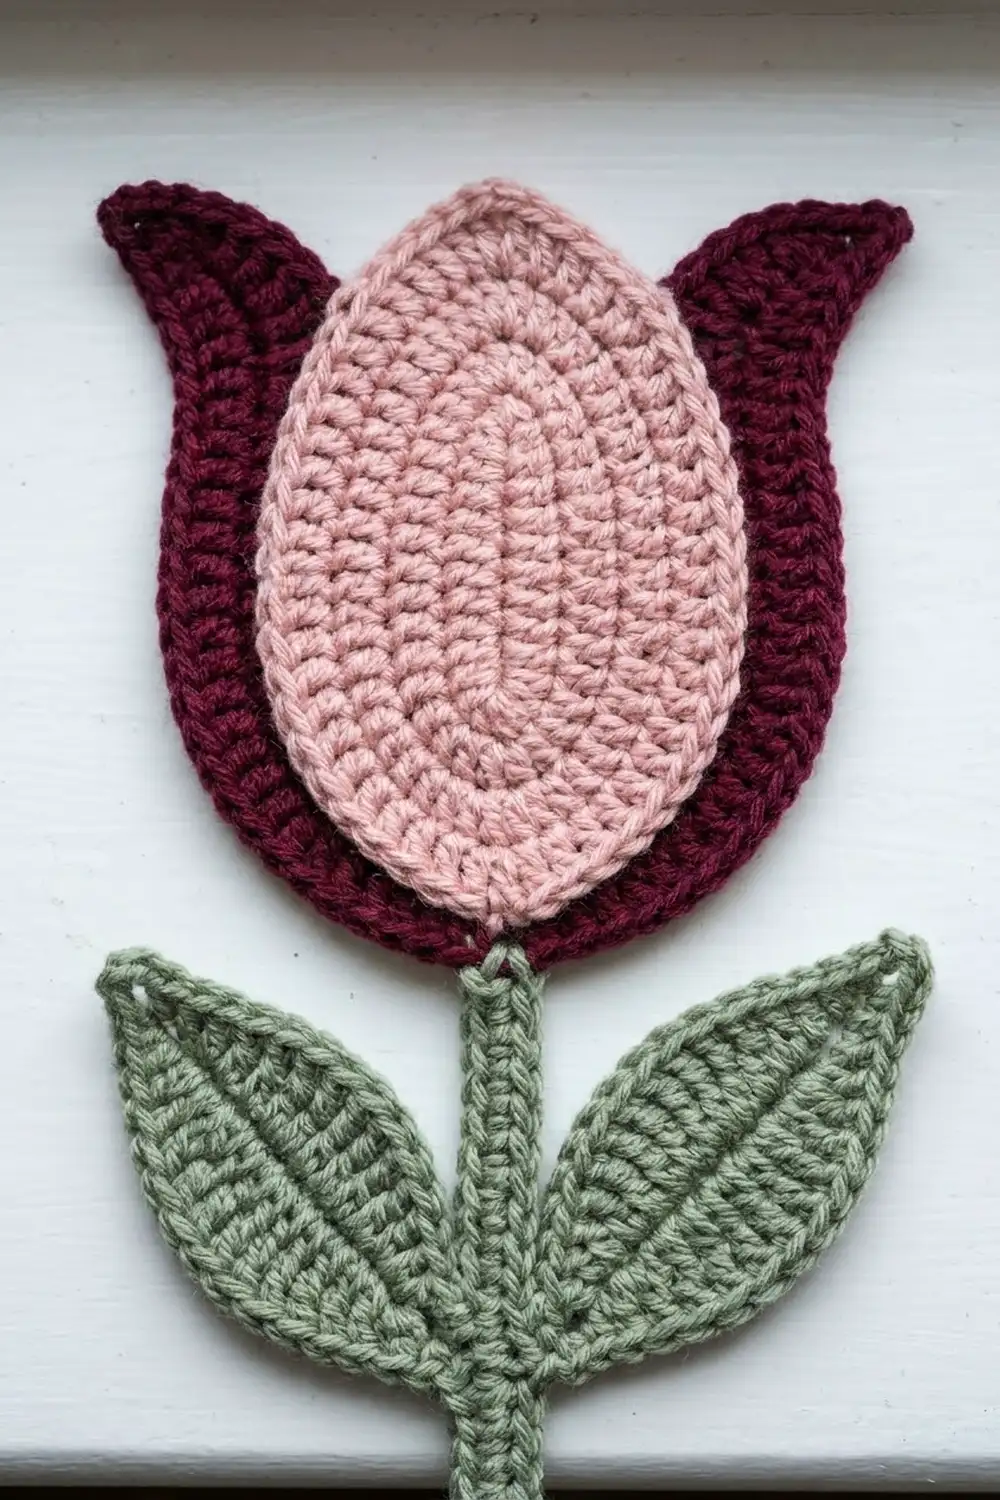
Tulip Motif (make 60 per panel)
Inner Petal (Color B)
Ch 11.
Rnd 1: Sc in 2nd ch from hook (base), hdc in next ch, dc in next 6 ch, hdc in next ch, (sc, ch 2, sc) in last ch (tip). Working along the opposite side of the foundation, hdc in next ch, dc in next 6 ch, hdc in next ch, sc in same ch as first sc. Sl st to first sc. (20 sts + ch-2 tip sp)
The two halves meet along the foundation chain, which forms the raised center line of the petal.
Rnd 2: Ch 1. Sc in each of next 10 sts, (sc, ch 2, sc) in ch-2 sp, sc in each of next 10 sts. Sl st to first sc. (22 sc + ch-2 tip sp; 11 sc per side)
Fasten off B.
Outer Petals (Color A)
Rnd 3: Join A with a sl st in the first sc of Rnd 2 (base). Ch 1, 2 sc in same st, sc in next 10 sts, (sc, ch 2, sc) in tip sp, sc in next 10 sts, 2 sc in last st. Sl st to first sc. (26 sc + ch-2 tip sp; 13 sc per side)
Rnd 4 (petals): Ch 1.
- First side: sc in first 2 sts, hdc in next 3 sts, dc in next 4 sts, 2 dc in next st, petal point in next st, sl st in next 2 sts.
- Tip: (sl st, ch 4, sl st) in tip sp. This makes the top loop.
- Second side: sl st in next 2 sts, petal point in next st, 2 dc in next st, dc in next 4 sts, hdc in next 3 sts, sc in last 2 sts.
Sl st to first sc. (32 sts + 2 picots + ch-4 top loop; 15 sts per side + 2 sl sts at the tip)
The graded stitches build a cupped burgundy base. The petal points rise on each side of the pink tip, and the sl sts keep the top open so the pink shows. Fasten off A.
Stem and Leaves (Color C)
Join C with a sl st in the Rnd 4 joining st at the center base of the tulip.
Upper stem: Ch 9. The last ch is the node; mark it.
Leaf 1 (points left):
- Ch 11. Sc in 2nd ch from hook (tip), hdc in next ch, dc in next 5 ch, hdc in next ch, sc in next ch, sl st in last ch. (10 sts)
- Working along the opposite side of the leaf foundation, skip the ch nearest the node. Sc in next ch, hdc in next ch, dc in next 5 ch, hdc in next ch, (sc, picot, sc) in tip ch. (10 sts + picot; leaf total 20 sts + picot)
- Work 9 surface-vein sl sts down the center back to the base, then sl st in the node.
Leaf 2 (points right): Work as for Leaf 1, ending with a sl st in the node.
Lower stem: Ch 13, sl st in 4th ch from hook to form the end loop (9 stem ch remain).
Reinforce: Sl st in the back bump of each of the 9 lower-stem ch, sl st in the node, sl st in the back bump of each of the 9 upper-stem ch, sl st in the tulip base. (18 reinforcing sl sts + 1 at the node) Fasten off and weave in the ends.
This doubled sl-st stem is firm enough to carry the weight of the column below it.
Make All Pieces
For one panel, make 60 motifs. For a pair, make 120.
Color use per motif: Rnds 1–2 in B, Rnds 3–4 in A, stem and leaves in C. Block the motifs lightly in batches of 10 so the leaves sit at about 30 degrees above horizontal.
Layout for one panel (T = one tulip motif; each column hangs straight down):
Header (mesh band)
T  T  T  T  T  T    Row 1
T  T  T  T  T  T    Row 2
T  T  T  T  T  T    Row 3
...                  Rows 4–9
T  T  T  T  T  T    Row 10
Joining
Do all of the joining with C.
Vertical joins (stem to tulip): Lay out one column. Overlap the end loop of the upper motif with the ch-4 top loop of the motif below. Join C through both loops together, ch 1, work 3 sc through both loops, and fasten off.
Each column of 10 motifs takes 9 vertical joins, so one panel has 54. The top loops of Row 1 stay free for the header.
Horizontal bridges (leaf to leaf): Join C with a sl st in the picot of a right-pointing leaf. Ch 5, then sl st in the picot of the left-pointing leaf in the next column. Turn, sl st in each of the 5 ch, and sl st in the first picot. Fasten off.
Each row of 6 motifs has 5 bridges, so one panel has 50. The outer leaves of columns 1 and 6 stay free.
Tension: Keep the bridge chains the same size as your stem chains. Tight bridges pull the columns together and pucker the leaves; loose ones make the lattice sag.
Checkpoint: Lay the panel flat and check these measurements:
- Column centers: 6 in (15.2 cm) apart, which puts 30 in (76.2 cm) between the centers of columns 1 and 6.
- Width: 36 in (91.4 cm) once you include half a motif on each side.
- Height: 80 in (203.2 cm) from the Row 1 top loops to the Row 10 end loops.
- Leaf reach: about 2.25 in (5.7 cm) per leaf.
- Bridges: 1.25 in (3.2 cm) each.
Header Border (Color C)
Border gauge: 18 sts = 4 in (10.2 cm), so 4.5 sts per inch. One motif is 6 in wide, which equals 27 sts per motif. Six motifs x 27 sts = 162 sts, which is 36 in (91.4 cm).
Row 1 (foundation): With the right side facing, make a slipknot. Ch 13, then sc in the top loop of the first Row 1 motif. Ch 26, sc in the top loop of the next motif; rep from * 4 more times. Ch 13. (13 ch + 6 sc + 130 ch + 13 ch = 162 sts)
Each motif owns 13 ch + 1 sc + 13 ch = 27 sts. Each ch-26 between motifs is made of two motifs’ 13-ch halves, so nothing is counted twice.
Row 2: Turn, ch 1, sc in each st across. (162 sc)
Row 3 (mesh): Turn, ch 3 (counts as dc), dc in next st. Ch 2, sk 2, dc in next 2 sts; rep from * 39 more times. (2 + 40 x 4 = 162 sts; 41 dc pairs, 40 ch-2 sps)
Row 4: Turn, ch 1. Sc in each dc and 2 sc in each ch-2 sp. (82 sc in dc + 80 sc in sps = 162 sc)
Rows 5–8: Rep Rows 3–4 twice. (162 sts per row)
Fasten off.
Depth: Row 1 (0.2 in) + 4 sc rows (0.8 in) + 3 dc rows (1.5 in) = 2.5 in (6.4 cm).
Why the math works: 162 sts divide into one starting dc pair plus 40 repeats of 4, so the mesh closes evenly at both edges. Row 4 adds no stitches, so every row stays at 162 sts, and the header stays at 36 in.
The sides and bottom have no separate border. The free leaf tips and stem loops are part of the trellis look. Clip rings through Row 7 at ch-2 sps 1, 5, 9, 13, 17, 21, 25, 29, 33, 37, and 40. (11 rings per panel)
Final Blocking
- Weave in all remaining ends along the stems or the back of the petals.
- Lay the panel face down on a large blocking surface or on towels on the floor.
- Mist it until it’s evenly damp, but not soaked.
- Pin the header straight at 36 in (91.4 cm).
- Pin each column straight down so the centers are 6 in (15.2 cm) apart.
- Pin every bridge flat and every leaf at about 30 degrees.
- Pin each pair of petal points outward, and shape the burgundy cups around the pink petals.
- Check that the panel is 82.5 in (209.6 cm) tall, then let it dry completely before unpinning.
Final Quality-Control Checklist
- 60 motifs per panel, in 6 columns x 10 rows
- Every tulip has 2 burgundy petal points and a visible pink tip
- All 54 vertical joins and 50 bridges are present
- The header has 162 sts in every row and 40 mesh spaces
- 11 rings are evenly placed
- The panel measures 36 in x 82.5 in (91.4 cm x 209.6 cm)
- All ends are secured and trimmed
Troubleshooting
- The pink petal curls: Rnd 1 is too tight. Go up a hook size for B only.
- The petal points flop: Make sure both tr and the picot go into the same st, then pin them while blocking.
- The leaves twist: Check that the vein sl sts are worked on the right side, then steam block.
- The columns drift apart: One or more bridges are loose. Rework them with exactly 5 ch.
- The header ruffles: Recount Row 1. It must have exactly 162 sts.
- The panel stretches when it hangs: Use cotton rather than acrylic, and redo the reinforcing sl sts firmly.
Care
Hand wash cool or machine wash on a gentle cycle in a mesh bag. Reshape and dry flat, and never hang the panel to dry while it’s wet.
Final Notes
The measurement chain is short and easy to check. A 3.25 in x 3.5 in (8.3 cm x 8.9 cm) tulip head plus its stem makes an 8 in (20.3 cm) motif that is 6 in (15.2 cm) wide on centers. Ten motifs per column give 80 in (203.2 cm), and six columns give 36 in (91.4 cm). The 2.5 in (6.4 cm) header uses 27 sts per motif for exactly 162 sts. Check your first motif carefully, and the rest of the panel will follow.
Happy crocheting!