

This little set brings a cozy, starry touch to the kitchen. It has two parts: a soft lilac wall pocket and four round moon-and-star magnets that tuck inside it. The pocket hangs from a magnetic hook by a crocheted loop, and the magnets can be pulled out and used one at a time.
The palette is lilac, butter yellow, cream, holly green and berry red. Each magnet has a yellow crescent moon, a raised cream star and five tiny embroidered stars. The pocket has a cream picot rim and a cream chain bow over two holly leaves and three red berries.
This pattern uses US crochet terms. Each magnet measures 3 in (7.6 cm) across. The finished pocket measures about 7 in (17.8 cm) wide and 3.25 in (8.3 cm) tall, not counting the hanging loop.
The magnet base is a flat single crochet circle worked in joined rounds. The appliqués are sewn on top, and a disc magnet is glued to the back. The pocket is worked in the round around a foundation chain, which gives you a flat, seamless pouch with a front and a back. A two-round cream trim finishes the top edge.
Finished Size and Construction
- Magnet size: 3 in (7.6 cm) across
- Pocket size: 7 in (17.8 cm) wide x 3.25 in (8.3 cm) tall
- Skill level: Easy-intermediate
- Terminology: US
- Yarn weight: Worsted (#4)
- Hook: 4.0 mm (G-6)
- Number of pieces: 5 separate main pieces (4 magnets and 1 pocket). They are never joined to each other.
- Layout: The pocket hangs on its own. The magnets sit inside it or are used alone.
- Magnet size before edge round: 2.75 in (7.0 cm)
- Pocket size before trim: 7 in (17.8 cm) x 2.75 in (7.0 cm)
- Border depth: Magnet edge round is 0.2 in (0.5 cm). Pocket trim is 0.5 in (1.3 cm).
Materials
Use a smooth worsted-weight cotton or acrylic with about 200 m per 100 g. A soft, low-fuzz yarn shows the stitches clearly, so the moon and star appliqués stand out cleanly.
- Lilac (main color): 40 g / 80 m
- Butter yellow (moons): 10 g / 20 m
- Cream (stars, trim, bow, embroidery): 10 g / 20 m
- Holly green (leaves): 3 g / 6 m
- Berry red (berries): 3 g / 6 m
These quantities include a margin of about 15%.
Tools:
- 4.0 mm (G-6) crochet hook
- Tapestry needle
- 4 round disc magnets, 1.25 in (3.2 cm) across
- Strong craft glue that works on metal and fiber
- 1 magnetic hook to hang the pocket
- Stitch markers
- Scissors and a ruler
Abbreviations (US Terms)
- ch – chain
- sl st – slip stitch
- sc – single crochet
- hdc – half double crochet
- dc – double crochet
- st(s) – stitch(es)
- inc – 2 sc in the same stitch
- MR – magic ring
Picot: Ch 2, then sl st in the 2nd ch from the hook. A picot is never counted as a stitch.
Gauge and Checkpoints
Gauge: 18 sc and 20 rounds = 4 in (10.2 cm) in sc.
Make one complete magnet base before anything else. The circle works as a quick, reliable gauge swatch.
Checkpoints:
- Magnet base after Rnd 4 (24 sts): 1.5 in (3.8 cm) across
- Magnet base after Rnd 7 (42 sts): 2.75 in (7.0 cm) across
- Finished magnet after Rnd 8 (48 sts): 3 in (7.6 cm) across
- Pocket after Rnd 1 (64 sts): 7 in (17.8 cm) long, laid flat
- Pocket after Rnd 14: 7 in (17.8 cm) x 2.75 in (7.0 cm)
- Pocket after Rnd 16: 7 in (17.8 cm) x 3.25 in (8.3 cm)
Too big? Go down to a 3.75 mm hook. Too small? Go up to a 4.5 mm hook.
If the circle ruffles, your stitches are too loose. If it cups, they’re too tight. Settle on the right hook size before you make the rest of the pieces.
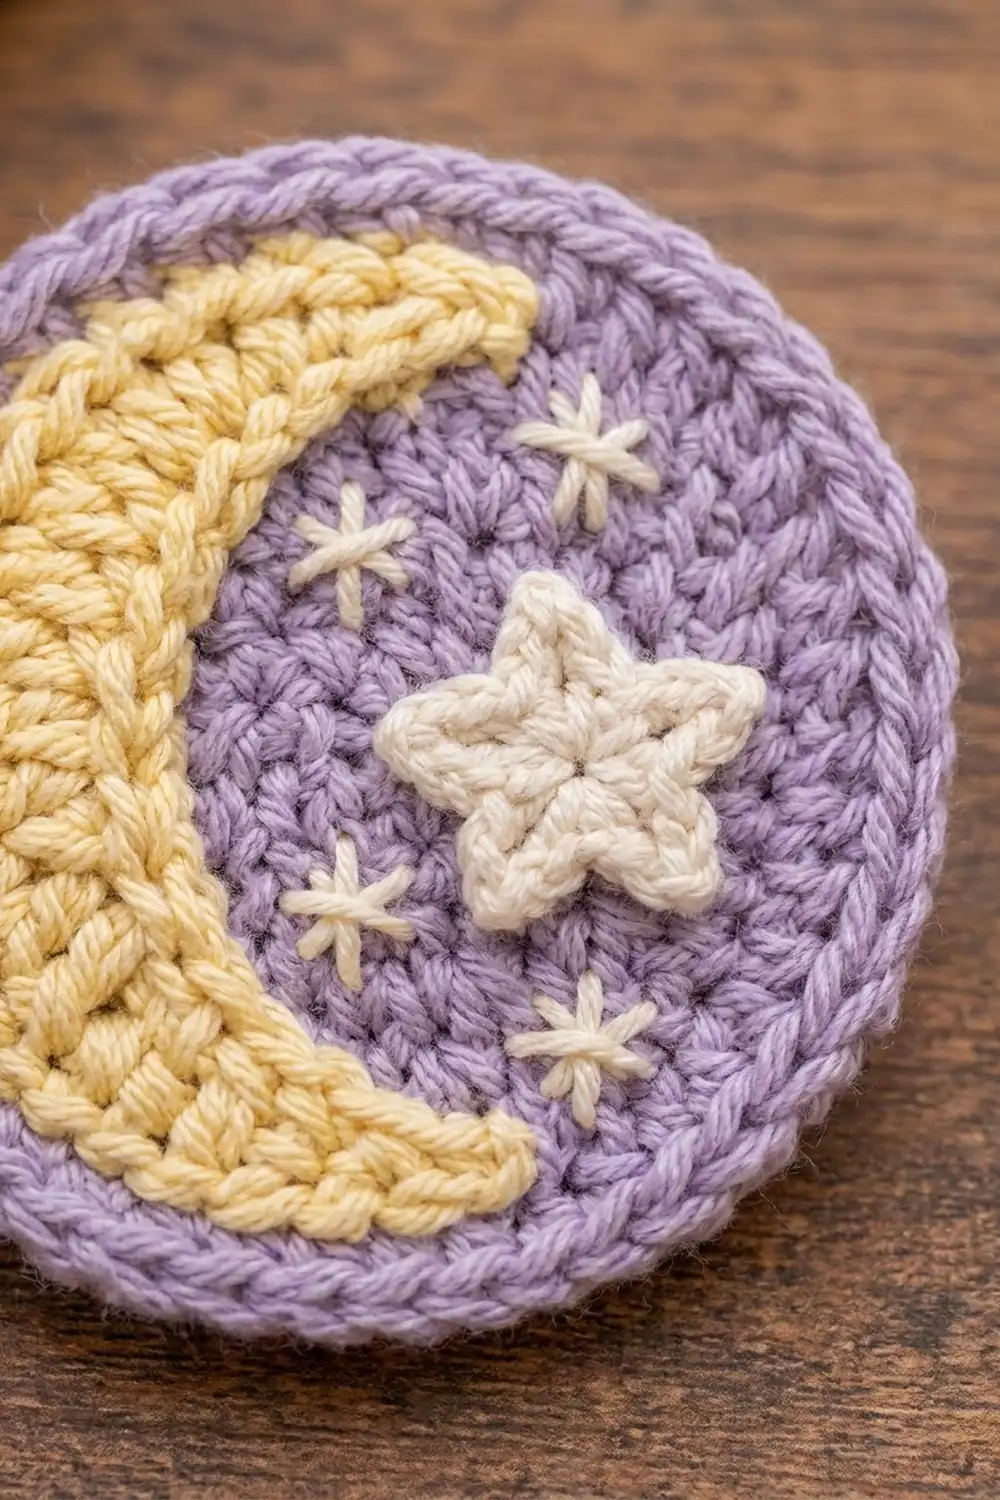
Moon Magnet
Base Circle (Lilac)
Start every round with ch 1. It does not count as a stitch. Join every round with a sl st to the first sc.
- Rnd 1: MR, 6 sc in ring, join. (6 sts)
- Rnd 2: Inc in each st around, join. (12 sts)
- Rnd 3: Sc in next st, inc in next st 6 times, join. (18 sts)
- Rnd 4: Sc in next 2 sts, inc in next st 6 times, join. (24 sts)
- Rnd 5: Sc in next 3 sts, inc in next st 6 times, join. (30 sts)
- Rnd 6: Sc in next 4 sts, inc in next st 6 times, join. (36 sts)
- Rnd 7: Sc in next 5 sts, inc in next st 6 times, join. (42 sts)
Check that the circle is 2.75 in (7.0 cm) across. Then work Rnd 8 from the Border section.
Crescent Moon (Butter Yellow)
Ch 14. This gives you 13 working chains.
- Row 1: Sl st in 2nd ch from hook, sc in next ch, hdc in next 2 ch, dc in next ch, 2 dc in each of next 3 ch, dc in next ch, hdc in next 2 ch, sc in next ch, sl st in last ch. Turn. (13 chains worked 1 each + 3 extra = 16 sts)
- Row 2: Ch 1, sc in first 4 sts, 2 sc in each of next 8 sts, sc in last 4 sts. (16 + 8 = 24 sts)
Fasten off and leave a 12 in (30.5 cm) tail. All the extra stitches sit on the outer edge, so the strip curls into a crescent. It ends up about 2.25 in (5.7 cm) tall and 0.6 in (1.5 cm) wide at its widest point.
Star (Cream)
- Rnd 1: MR, 10 sc in ring, join. (10 sts)
- Rnd 2: Ch 3, sc in 2nd ch from hook, hdc in next ch, skip next sc, sl st in next sc 5 times. (5 points)
Fasten off and leave a tail. The star measures about 1 in (2.5 cm) from point to point.
Assembling One Magnet
- Place the moon on the left half of the circle with its inner curve facing right. Keep its outer edge 0.25 in (0.6 cm) inside the rim. Whipstitch both edges down with the yellow tail.
- Center the star in the curve of the moon, a little below the middle. Sew around its center ring, then tack down each point.
- With cream yarn, embroider 5 tiny stars around the large star. For each one, cross 3 straight stitches about 0.25 in (0.6 cm) wide.
- Weave in all ends on the back.
- Glue a 1.25 in (3.2 cm) magnet to the center back. Let the glue cure completely.
Body (Lilac)
Ch 32. This gives you 31 working chains.
- Rnd 1: Sc in 2nd ch from hook and in next 29 ch (30 sts). Work 3 sc in last ch. Rotate the piece and work along the free loops of the chain: sc in next 29 ch, then 2 sc in the first ch, which already holds 1 sc. Join. (30 + 3 + 29 + 2 = 64 sts)
- Rnds 2–14: Ch 1, sc in each st around, join. (64 sts)
The foundation chain becomes a closed, flat bottom, and the turns at each end form the rounded corners. Each face has 32 sts. Place a marker at each side fold.
Checkpoint: Laid flat, the pocket should measure 7 in (17.8 cm) x 2.75 in (7.0 cm).
Hanging Loop (Lilac)
Ch 17.
- Row 1: Sc in 2nd ch from hook and in each ch across. (16 sts)
Fasten off and leave a long tail. The strip is about 3.5 in (8.9 cm) long. Fold it in half. Sew both ends side by side to the inside of the back face at center, overlapping each end by 0.5 in (1.3 cm). The loop should stand about 1.25 in (3.2 cm) above the rim.
Bow (Cream)
Ch 31.
- Row 1: Sc in 2nd ch from hook and in each ch across. (30 sts)
This makes a cord about 6.75 in (17.1 cm) long. Shape it into two loops of about 2 in (5.1 cm) of cord each, with two tails of about 1.25 in (3.2 cm). Wrap the center 4 times with cream yarn and knot it at the back. The bow is about 1.75 in (4.4 cm) wide.
Holly Leaves (Green, Make 2)
Ch 8. This gives you 7 working chains.
- Rnd 1: Sl st in 2nd ch from hook, sc in next ch, hdc in next ch, picot, dc in next ch, picot, hdc in next ch, sc in next ch, then (sc, ch 2, sc) in last ch for the tip. Continue along the other side of the chain: sc in next ch, hdc in next ch, picot, dc in next ch, picot, hdc in next ch, sc in next ch, sl st in last ch.
Fasten off. Each leaf has 4 side picots and a pointed tip, and is about 1.25 in (3.2 cm) long.
Berries (Red, Make 3)
- Rnd 1: MR, 6 sc in ring, join. (6 sts)
Fasten off and leave a tail. Weave the tail through the front loops and pull it tight to form a ball about 0.4 in (1.0 cm) across.
Decorating the Front
- Center the bow on the front face with its top 0.25 in (0.6 cm) below the trim. Tack down the center and both loops.
- Tuck the leaves under the bow so their bases meet at center and they angle down and out to each side. Whipstitch them flat.
- Sew the 3 berries in a tight cluster where the leaves meet.
Make All Pieces
- Lilac: 4 magnet bases, 1 pocket body, 1 hanging loop
- Butter yellow: 4 moons
- Cream: 4 stars, 1 bow, 20 embroidered tiny stars, pocket trim
- Green: 2 holly leaves
- Red: 3 berries
Display layout:
          [ loop ]
 [ M ]  [ M ]  [ M ]     <- 3 magnets, overlapping
 [ ====== POCKET ====== ]

 [ M ]                   <- 4th magnet, used alone
Joining
The five main pieces stay separate. All the sewing in this set is appliqué work.
Use matching yarn. Whipstitch through the outer loops of the appliqué and one strand of the base fabric. Space the stitches about 2 base sts apart, which is roughly 0.45 in (1.1 cm). Pull each stitch snug, but stop before the base puckers.
Size checkpoint: After sewing, each magnet should still be 3 in (7.6 cm) across and lie completely flat.
Border
Border gauge: Same as the main gauge: 18 sts and 20 rounds = 4 in (10.2 cm).
Magnet Edge Round (Lilac)
- Rnd 8: Ch 1, sc in next 6 sts, inc in next st 6 times. Finish with an invisible join. (42 worked 1-per-stitch + 6 extra = 48 sts)
Why the math works: A flat sc circle needs 6 extra stitches every round. Keeping that rhythm makes the edge lie flat and brings the diameter from 2.75 in (7.0 cm) to 3 in (7.6 cm). Work this round before you sew on the appliqués.
Pocket Trim (Cream)
Join cream at a side marker.
- Rnd 15: Ch 1, sc in each st around, join. (64 sts, 32 per face)
- Rnd 16: Ch 1, sc in next st, (sc, picot) in next st 32 times, join. (64 sts + 32 picots, so 32 sts and 16 picots per face)
Why the math works: 64 sts divide evenly into 32 repeats of 2. Because you start at a side fold, each face gets exactly 16 picots, about 0.45 in (1.1 cm) apart. No stitches are added, so the opening stays 7 in (17.8 cm) wide. The two rounds add 0.5 in (1.3 cm) of height.
Final Blocking
- Lightly mist the magnets before you glue on the magnets. Mist the pocket after it’s fully decorated.
- Pin each magnet into a 3 in (7.6 cm) circle on a blocking mat.
- Slide a piece of card inside the pocket. Pin it flat to 7 in (17.8 cm) x 3.25 in (8.3 cm).
- Shape the picots and the leaf points with your fingertips.
- Let everything dry completely, then glue on the magnets.
Final Quality-Control Checklist
- [ ] Each magnet has 48 sts and measures 3 in (7.6 cm) across
- [ ] Each moon has 24 sts along its outer edge and a smooth curve
- [ ] Each large star has 5 even points
- [ ] The pocket has 64 sts per round and measures 7 in (17.8 cm) x 3.25 in (8.3 cm)
- [ ] There are 16 picots on each face of the pocket
- [ ] The loop is centered on the back and stands 1.25 in (3.2 cm) tall
- [ ] The bow, leaves and berries are centered on the front
- [ ] All ends are woven in and the glue has fully cured
Troubleshooting
- The circle cups: Your stitches are too tight. Go up a hook size, or work the increases more loosely.
- The circle ruffles: Your stitches are too loose, or you added extra increases. Count every round.
- The moon lies straight: Make sure all 8 increases in Row 2 fall in the middle 8 sts.
- The star points flop: Pull the sl sts between the points snug, then tack down each tip.
- The pocket feels too tight for 3 magnets: Overlap the magnets, or check your gauge on the pocket body.
- The picots lean: Steam them lightly and pinch them upright while they dry.
Care
Spot clean with a damp cloth and mild soap, then let the pieces air dry. Don’t soak the magnets, because water can loosen the glue.

Final Notes
Here’s the measurement chain. A 2.75 in (7.0 cm) base becomes a 3 in (7.6 cm) magnet after one edge round. The 64-stitch pocket body measures 7 in (17.8 cm) x 2.75 in (7.0 cm), and two cream trim rounds bring it up to 3.25 in (8.3 cm). If your first magnet matches gauge, the rest of the set will too.
Happy crocheting!