

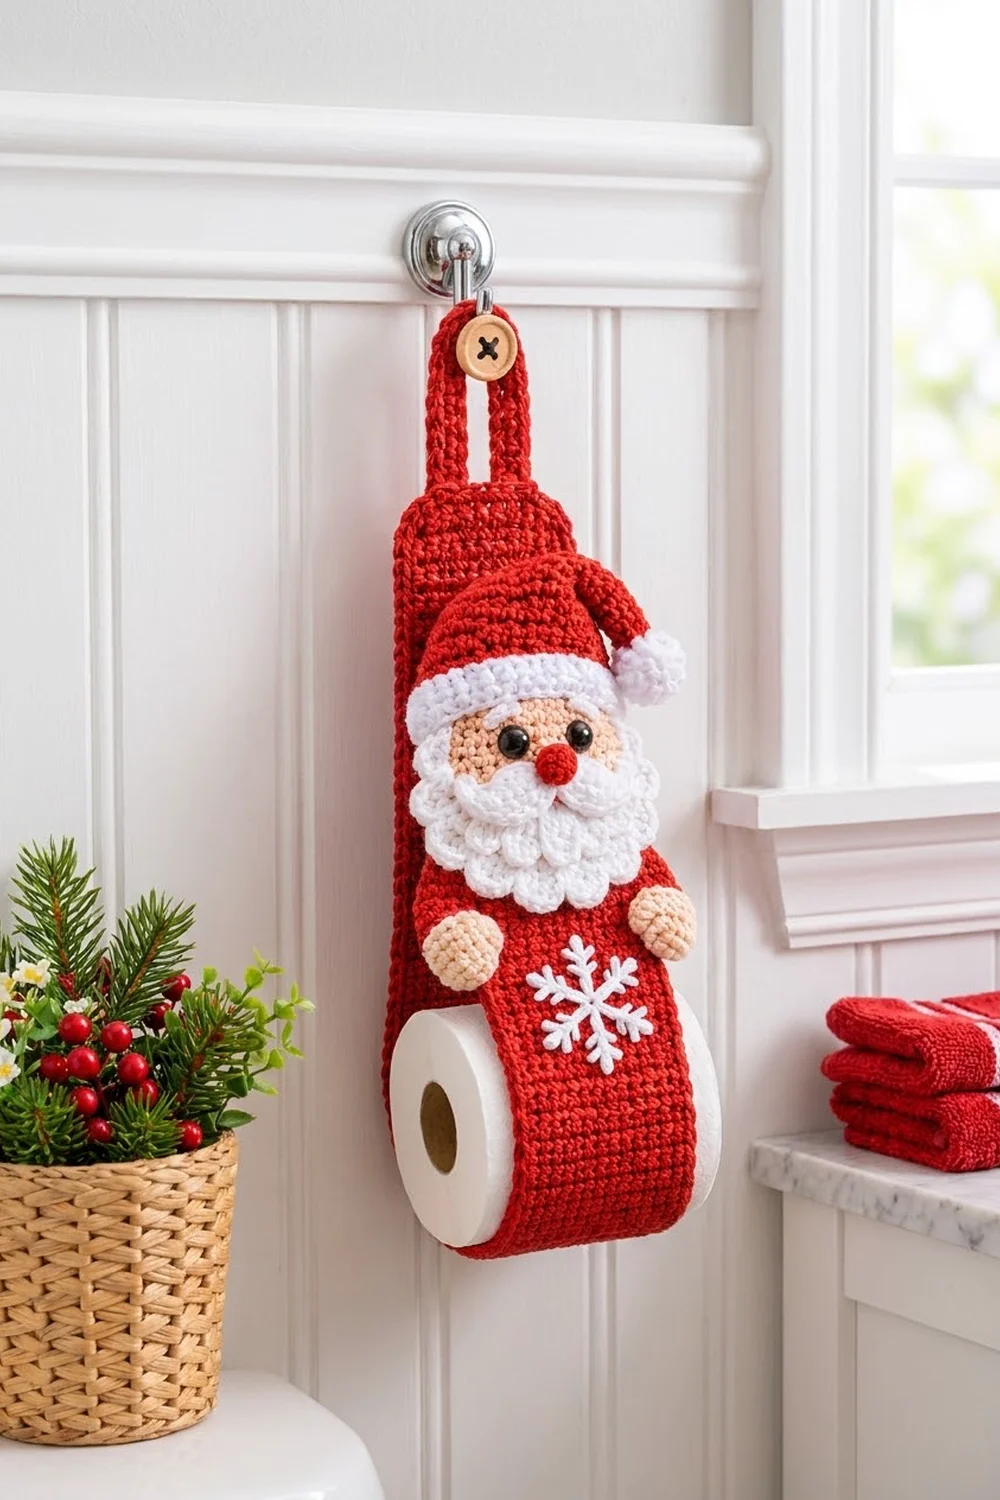
This cheerful Santa holder hangs from a hook or towel ring and holds one spare toilet roll in a soft sling. A long red strip makes the body. Santa’s face, hat, beard, hands and a snowflake are sewn onto the front, so the roll looks like it is tucked under Santa’s arms.
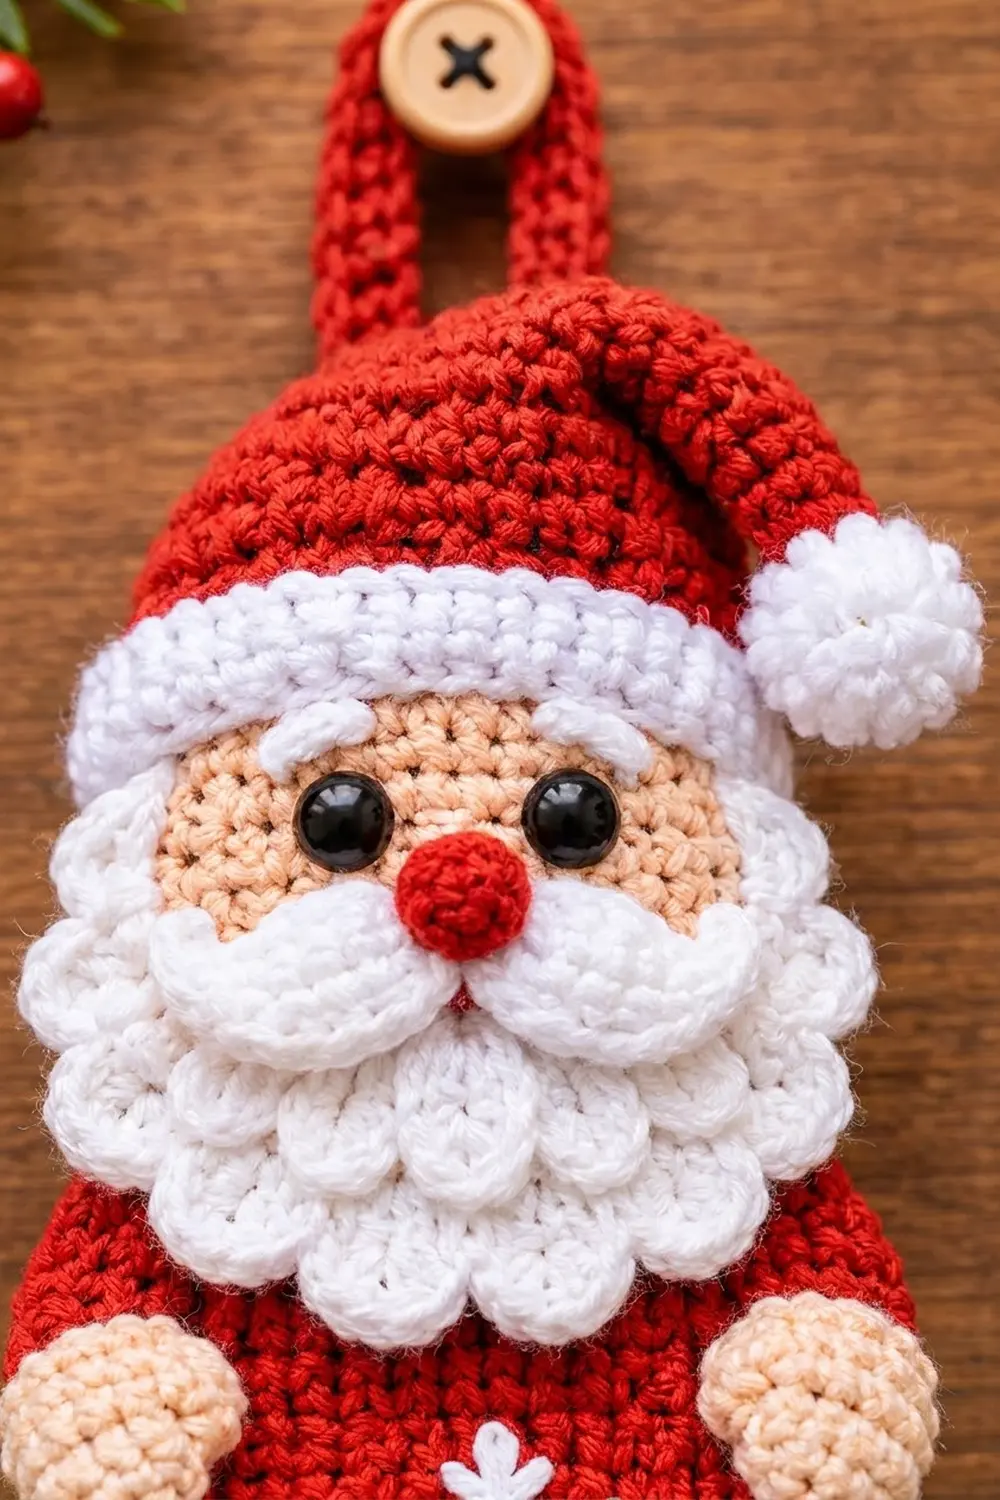
The colors are classic Christmas: bright red, snowy white and warm peach. Black safety eyes and a round red nose finish the face. The beard is made of layered scalloped shells, and the hands are small stuffed balls.
The pattern uses US crochet terms. The strip measures 4.5 x 19.5 in (11.4 x 49.5 cm) flat. Folded and hung, the holder is 4.5 in (11.4 cm) wide and 12.5 in (31.8 cm) long, plus a 3 in (7.6 cm) loop.
You work the strip in single crochet rows and add one border round. Then you make the loop and the appliqués, sew them on, and fold the bottom 7 in (17.8 cm) up behind the strip to form the sling.
Finished Size and Construction
- Finished size (flat strip): 4.5 x 19.5 in (11.4 x 49.5 cm)
- Hanging size: 4.5 x 12.5 in (11.4 x 31.8 cm), plus a 3 in (7.6 cm) loop
- Skill level: Easy-intermediate
- Terminology: US
- Yarn weight: Worsted (#4)
- Hooks: 4.5 mm (US 7) for the strip and loop; 4.0 mm (US G-6) for the appliqués
- Number of pieces: 1 strip, 1 loop and 12 appliqué pieces, sewn into one holder
- Layout: One vertical strip with the appliqués stacked down the front
- Strip size before border: 4 x 19 in (10.2 x 48.3 cm)
- Border depth: 1 round, 0.25 in (0.6 cm) on each edge
Materials
Choose a smooth worsted cotton blend or acrylic. Cotton holds its shape well in a damp bathroom. Acrylic is softer and lighter.
- Red: 45 g / 90 m (strip, border, loop, hat, nose)
- White: 15 g / 30 m (brim, pompom, beard, mustache, eyebrows, snowflake)
- Peach: 10 g / 20 m (face, hands)
Tools: 4.5 mm and 4.0 mm hooks, two 10 mm black safety eyes, one 1 in (2.5 cm) wooden button, a little fiberfill, a tapestry needle, pins, scissors and a tape measure.
These quantities include a margin of about 20% for swatching and sewing tails.
Abbreviations (US Terms)
- ch: chain
- sl st: slip stitch
- sc: single crochet
- hdc: half double crochet
- dc: double crochet
- sc2tog: single crochet 2 together
- inc: 2 sc in the same stitch
- BLO: back loop only
- MR: magic ring
- st(s): stitch(es)
Shell: a group of 5 or 7 dc worked into the same stitch, as stated in the row.
Gauge and Checkpoints
- Strip gauge: 16 sc and 20 rows = 4 in (10.2 cm) with the 4.5 mm hook
- Appliqué gauge: 18 sc and 20 rows = 4 in (10.2 cm) with the 4.0 mm hook
Make the face first as your test piece. It should measure 3.5 x 2.5 in (8.9 x 6.4 cm). The strip is your second test.
Checkpoints:
– Strip after Row 20: 4 x 4 in (10.2 x 10.2 cm)
– Strip after Row 95: 4 x 19 in (10.2 x 48.3 cm)
– Strip after border: 4.5 x 19.5 in (11.4 x 49.5 cm)
If a piece comes out too big, go down one hook size. If it is too small, go up one size. A strip that is too narrow won’t cover the roll, so match the width carefully.
Strip (Red, 4.5 mm hook)
Ch 17.
Row 1: Sc in 2nd ch from hook and in each ch across. (16 sc)
Rows 2–95: Ch 1, turn, sc in each st across. (16 sc)
Do not fasten off. Always work into the first and last stitch so the edges stay straight.
Border (Red, 4.5 mm hook)
Border gauge: 4 sc per inch along every edge.
Round 1: Ch 1. Do not turn.
– Top edge (Row 95): 3 sc in first st, sc in next 14 sts, 3 sc in last st.
– First long side: 76 sc evenly in the row ends (sc in 4 row ends, skip 1; do this 19 times).
– Bottom edge (foundation chain): 3 sc in first ch, sc in next 14 ch, 3 sc in last ch.
– Second long side: 76 sc in the row ends, the same way.
– Sl st to first sc. (192 sts)
Counts per side: The middle sc of each 3-sc group is the corner stitch. Counting both corner stitches, each short side has 18 sts (1 + 1 + 14 + 1 + 1) and each long side has 80 sts (1 + 1 + 76 + 1 + 1). Each corner belongs to two sides, so the total is 18 + 18 + 80 + 80 − 4 = 192.
Why the math works: Each long edge is 95 rows at 5 rows per inch, which is 19 in. 76 sc at 4 sc per inch is also 19 in, so the edge lies flat without ruffling. Each short edge is 16 sts, or 4 in, and the corner groups keep the corners square. The border adds 0.25 in (0.6 cm) to each edge, so the strip finishes at 4.5 x 19.5 in (11.4 x 49.5 cm).
Fasten off and weave in the end.
Hanging Loop (Red, 4.5 mm hook)
Ch 41.
Row 1: Sc in 2nd ch from hook and in each ch across. (40 sc)
Rows 2–3: Ch 1, turn, sc in each st across. (40 sc)
Fasten off and leave a 12 in (30.5 cm) tail. The loop strip measures 10 x 0.6 in (25.4 x 1.5 cm).
Santa Appliqués (4.0 mm hook)
Face (Peach)
Ch 8.
Rnd 1: Sc in 2nd ch from hook, sc in next 5 ch, 3 sc in last ch. Working along the opposite side of the chain: sc in next 5 ch, 2 sc in the same ch as the first sc. Join. (16 sts)
Rnd 2: Ch 1, inc in first st, sc in next 5, inc in each of next 3, sc in next 5, inc in each of last 2. Join. (22 sts)
Rnd 3: Ch 1. Around each curved end, (sc 1, inc) 3 times. Sc in each of the 5 sts on each side. Join. (28 sts)
Rnd 4: Ch 1. Around each end, (sc 2, inc) 3 times. Sc in each side st. Join. (34 sts)
Fasten off and leave a long tail. Insert the safety eyes between Rnds 2 and 3 on the upper long side, with 4 sts between them.
Beard (White)
Ch 22.
Row 1: Sc in 2nd ch from hook and in each ch across. (21 sc)
Row 2: Ch 1, turn, sc in first st, skip 1, 5 dc in next st, skip 1, sc in next st; repeat from * 4 more times. (5 shells, 6 sc; 31 sts)
Row 3: Ch 3 (counts as dc), turn, 3 dc in first sc, sc in center dc of next shell, 7 dc in next sc; repeat from * 3 more times, sc in center dc of last shell, 4 dc in last sc. (4 full shells, 2 half shells of 4 dc, 5 sc; 41 sts)
Row 4: Ch 1, turn, sc in first dc, 7 dc in next sc, sc in center dc of next shell; repeat from * 3 more times, 7 dc in last sc, sc in top of turning ch. (5 shells, 6 sc; 41 sts)
The three shell rows make the stacked scallop tiers. The beard is about 5.5 in (14.0 cm) wide and 3 in (7.6 cm) tall.
Mustache (White)
Ch 12.
Rnd 1: Working in the back bumps: sc in 2nd ch from hook, hdc in next ch, dc in next 2 ch, hdc in next ch, sl st in next ch (the center), hdc in next ch, dc in next 2 ch, hdc in next ch, sc in last ch. Rotate and work the same sequence along the opposite side of the chain. Join. (22 sts)
This makes two plump lobes about 2.5 in (6.4 cm) wide. Curl the outer tips upward as you sew it on.
Eyebrows (White, make 2)
Ch 5. Sl st in 2nd ch from hook, sc in next ch, hdc in next ch, sc in last ch. (4 sts) Fasten off.
Nose (Red)
Rnd 1: 6 sc in MR. (6)
Rnd 2: Inc in each st. (12)
Rnd 3: Sc in each st. (12)
Rnd 4: Sc2tog 6 times. (6)
Stuff lightly and close. The nose is about 0.75 in (1.9 cm) across.
Hat Body (Red)
Ch 19.
Row 1: Sc in 2nd ch from hook and in each ch across. (18 sc)
Row 2: Ch 1, turn, sc across. (18)
Row 3: Ch 1, turn, sc2tog, sc to last 2 sts, sc2tog. (16)
Row 4: Ch 1, turn, sc across. (16)
Row 5: Repeat Row 3. (14)
Row 6: Repeat Row 4. (14)
Row 7: Repeat Row 3. (12)
Row 8: Repeat Row 4. (12)
Rows 9–12: Repeat Row 3 on every row. (10, 8, 6, 4)
Row 13: Ch 1, turn, sc2tog twice. (2)
Row 14: Ch 1, turn, sc2tog. (1)
Fasten off. The hat body is 4 in (10.2 cm) wide and 2.8 in (7.1 cm) tall. Fold the top 1 in (2.5 cm) of the point to the right and tack it down so the tip flops sideways.
Hat Brim (White)
Ch 23.
Row 1: Sc in 2nd ch from hook and in each ch across. (22 sc)
Rows 2–5: Ch 1, turn, sc in BLO across. (22 sc)
The brim measures 4.9 x 1 in (12.4 x 2.5 cm), and the back-loop rows form ridges.
Pompom (White)
Rnd 1: 6 sc in MR. (6)
Rnd 2: Inc in each st. (12)
Rnds 3–4: Sc in each st. (12)
Rnd 5: Sc2tog 6 times. (6)
Stuff and close. The pompom is about 1.25 in (3.2 cm) across.
Hands (Peach, make 2)
Rnd 1: 6 sc in MR. (6)
Rnd 2: Inc in each st. (12)
Rnd 3: (Sc 1, inc) 6 times. (18)
Rnds 4–5: Sc in each st. (18)
Rnd 6: (Sc 1, sc2tog) 6 times. (12)
Stuff lightly.
Rnd 7: Sc2tog 6 times. (6)
Close. Each hand is about 1.5 in (3.8 cm) across.
Snowflake (White)
Rnd 1: 12 sc in MR. Join. (12)
Rnd 2: Sl st in next st, ch 8. Sl st in 2nd ch from hook (the tip). Sl st in next 2 ch, then (ch 3, sl st in same ch) twice for a branch pair. Sl st in next 2 ch, then (ch 3, sl st in same ch) twice. Sl st in last 2 ch, then sl st in next st of Rnd 1. Repeat from * 5 more times. (6 arms, 2 branch pairs each)
Fasten off. The snowflake is about 2.75 in (7.0 cm) across.
Make All Pieces
- Red: 1 strip, 1 loop, 1 hat body, 1 nose
- White: 1 brim, 1 pompom, 1 beard, 1 mustache, 2 eyebrows, 1 snowflake
- Peach: 1 face, 2 hands
Placement on the front, measured from the top edge:
        [ loop + button ]
   +---------------------+  0 in
   |   HAT  (tip -> pom) |
   |  ===== BRIM =====   |  2 in (5.1 cm)
   |    ( FACE o o )     |
   |   ~~ MUSTACHE ~~    |
   | (H) BEARD tiers (H) |  6 in (15.2 cm)
   |                     |
   |     * SNOWFLAKE *   |  9 in (22.9 cm)
   |                     |
   +---------------------+  12.5 in (31.8 cm) fold
Joining and Assembly
Sew every appliqué to the front layer only. Whipstitch through the outer loops of each piece and one strand of the strip so the back stays neat.
- Center the beard with its lower edge 6 in (15.2 cm) below the top edge.
- Sew the face so its lower half overlaps Row 1 of the beard.
- Sew the brim with its lower edge 2 in (5.1 cm) below the top edge, curved slightly over the top of the face.
- Sew the hat body above the brim, then sew the pompom to the tip.
- Add the eyebrows, nose and mustache.
- Sew one hand at each side of the beard, with their centers 6 in (15.2 cm) down.
- Center the snowflake 9 in (22.9 cm) below the top edge.
- Fold the loop into a U. Sew each end 1.5 in (3.8 cm) down onto the back of the top edge, with the legs 1 in (2.5 cm) apart. Sew the button to the center front of the loop.
- Fold the bottom 7 in (17.8 cm) up behind the strip. Whipstitch the 18 border sts of the bottom edge across the back, 5.5 in (14.0 cm) below the top edge. Leave the sides open.
Tension: Keep your sewing stitches snug but not tight. Pulling hard will pucker the strip.
Size checkpoint: The folded holder hangs 12.5 in (31.8 cm) long. The sling is a 14 in (35.6 cm) loop, which fits a standard roll about 4.5 in (11.4 cm) across.
Final Blocking
- Before folding, pin the strip flat to 4.5 x 19.5 in (11.4 x 49.5 cm).
- Pin the beard and snowflake to shape separately, before sewing them on.
- Mist all pieces until damp.
- Let everything dry completely, at least 12 hours.
- Unpin, then assemble and fold.
Final Quality-Control Checklist
- The strip is 4.5 x 19.5 in (11.4 x 49.5 cm) with square corners
- The border has 192 sts and lies flat
- The face is 3.5 x 2.5 in (8.9 x 6.4 cm) and the eyes are locked firmly
- The beard shows three clear scallop tiers
- The hat tip flops right and the pompom is secure
- The loop holds a full roll without stretching
- The sling sides are open and the roll slides in easily
Troubleshooting
- Long edges ruffle: You worked too many border sc. Count 76 per long side.
- Edges pull in: You skipped too many row ends. Work 4 of every 5.
- Beard curls: Block it flat, or loosen your dc tension.
- Roll is loose: Fold up 0.5 in (1.3 cm) less.
- Roll is tight: Fold up 0.5 in (1.3 cm) more.
- Strip is narrow: Go up one hook size and remake it.
Care
Hand wash in cool water and lay flat to dry. Don’t wring, so the beard and hands keep their shape.
Final Notes
Sixteen sc at gauge make a 4 in (10.2 cm) strip, and 95 rows make it 19 in (48.3 cm) long. The 192-stitch border brings it to 4.5 x 19.5 in (11.4 x 49.5 cm). A 7 in (17.8 cm) fold then gives a 12.5 in (31.8 cm) holder that hugs one roll. Check each stage and Santa will hang straight all season.
Happy crocheting!