

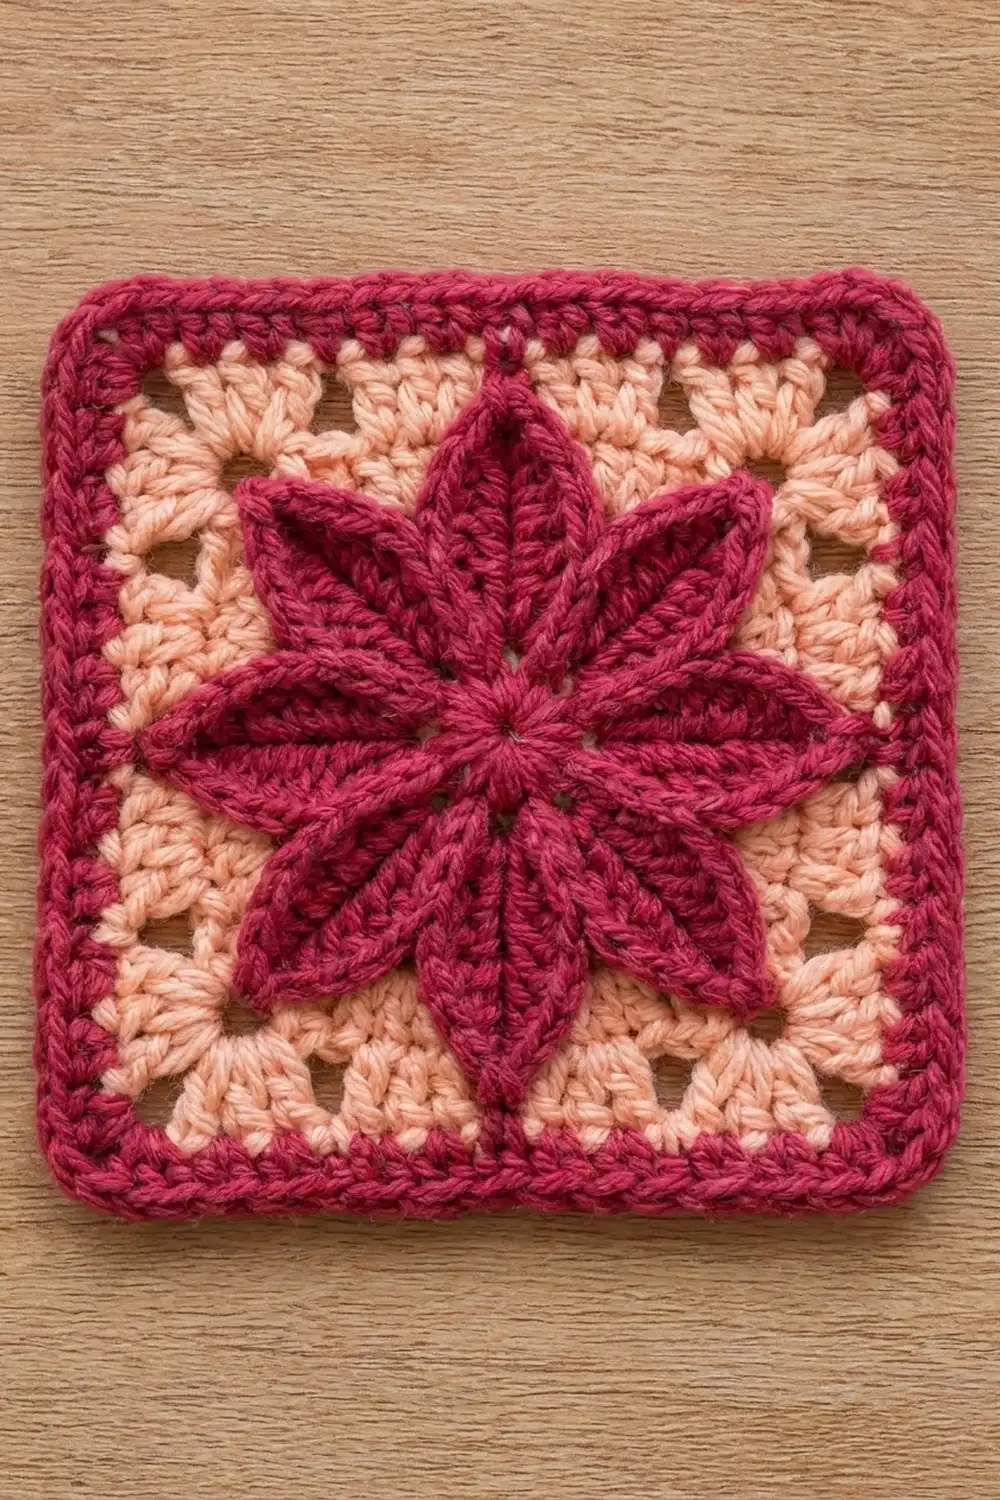
The Raspberry Star Bloom Granny Square is a single 8 in (20.3 cm) square with a bold, raised eight-petal flower in the middle. Each petal is long and pointed, with a ridge down its center, so the bloom looks like a stylized star against a soft background.
The square uses two colors: deep raspberry for the flower and the border, and warm peach for the background. The peach rounds are solid double crochet broken by a ring of small eyelets. The eyelets keep the square light and give the flower room to stand out.
This pattern uses US crochet terms. The finished square measures 8 in x 8 in (20.3 cm x 20.3 cm) after blocking. Before the border it measures 7 in (17.8 cm).
You work in the round from the center out. First you make a small sc center and work eight petals around it. Then peach rounds turn the round flower into a square. Three raspberry border rounds finish it, ending in a rope-like reverse single crochet edge.
Finished Size and Construction
- Finished size: 8 in x 8 in (20.3 cm x 20.3 cm)
- Skill level: Intermediate
- Terminology: US crochet terms
- Yarn weight: Worsted (#4)
- Hook: 5 mm (H-8)
- Number of pieces: 1
- Layout: Single square motif, no joining
- Flower size: 5 in (12.7 cm) tip to tip
- Size before border: 7 in x 7 in (17.8 cm x 17.8 cm)
- Border depth: 0.5 in (1.3 cm) on each side
Materials
Choose a smooth worsted yarn with good stitch definition. Acrylic, cotton blends and soft wool all work. A slightly plump, plied yarn shows the petal ridges best. Avoid fuzzy or splitty yarns, because they blur the petal tips.
If you substitute yarn, check that the label recommends a 4.5–5.5 mm hook. Then test your gauge on the flower before you commit to the background.
Yarn:
- Color A, Raspberry: 25 g (about 50 m), for the flower and border
- Color B, Peach: 15 g (about 30 m), for the background
Quantities include a margin of roughly 20 percent for gauge testing and tails.
Tools:
- 5 mm (H-8) crochet hook
- Tapestry needle
- Scissors
- 4 locking stitch markers
- Ruler or tape measure
- Blocking mat and rust-proof pins
- Spray bottle with water
Abbreviations (US Terms)
- ch: chain
- sl st: slip stitch
- sc: single crochet
- hdc: half double crochet
- dc: double crochet
- tr: treble crochet
- sk: skip
- sp(s): space(s)
- st(s): stitch(es)
- rep: repeat
- rev sc: reverse single crochet
Special Stitches
Petal:
1. Ch 9. Sc in 2nd ch from hook and in each of the next 7 ch (8 sc stem). Ch 1, turn.
2. Work along the tops of the stem sts, from the base toward the tip: sc in first sc, hdc in next sc, dc in next sc, tr in next 2 sc, dc in next sc, hdc in next sc (7 sts).
3. In the last sc at the tip, work (hdc, ch 2, hdc).
4. Rotate and work down the free loops of the foundation chain. Sk the loop directly under the tip sc. Then work hdc, dc, 2 tr, dc, hdc, sc in the next 7 free loops (7 sts). You are now back at the base.
Each petal has 16 sts plus a ch-2 tip. The sc stem forms the raised center vein.
Reverse single crochet (rev sc): Work from left to right (right to left if you are left-handed). Insert hook in the next st to the right, yarn over, pull up a loop, yarn over, pull through both loops.
Gauge and Checkpoints
Gauge: 14 dc and 7 dc rows = 4 in (10.2 cm). Gauge is not critical for a single square, but it controls the final size.
Make the flower first and measure it before you add the background. Use these checkpoints:
- After Round 1: about 1 in (2.5 cm) across.
- After Round 2: 5 in (12.7 cm) from one petal tip to the opposite tip.
- After Round 4: about 6 in (15.2 cm) across, measured side to side through the middle.
- After Round 5: 7 in (17.8 cm) square.
- After the border: 8 in (20.3 cm) square.
If your square is more than 0.25 in (0.6 cm) too big at Round 5, go down one hook size (4.5 mm). If it is more than 0.25 in (0.6 cm) too small, go up one size (5.5 mm). If only the flower is off and the dc rounds match, keep your hook and adjust only your petal tension.
Flower (Color A)
Round 1: With A, make a magic ring. Ch 1, work 16 sc in the ring. Sl st to first sc. Pull the ring closed, leaving a small center hole about 0.125 in (0.3 cm) wide. (16 sc)
Round 2: Sl st in next sc, work Petal, sl st in next sc; rep from * 7 more times. Sl st to first sl st. Fasten off. (8 petals, each over 2 sc of Round 1)*
Each petal starts from one sc and anchors into the next, so all 16 sc are used and the petals sit evenly spaced. Keep the ch 9 at an even, relaxed tension. If the chains are tight, the petals will curve instead of lying straight.
Lay the flower flat and gently pull each petal straight out from the center. Then pick one petal to point straight up:
- The petals pointing up, down, left and right are side petals.
- The four diagonal petals are corner petals.
Place a marker in the ch-2 tip of each corner petal.
Checkpoint: 5 in (12.7 cm) from tip to opposite tip.
Background (Color B)
Round 3:
1. Join B with sc in the ch-2 tip of any side petal.
2. *Ch 7, (tr, ch 3, tr) in ch-2 tip of next corner petal, ch 7, sc in ch-2 tip of next side petal.
3. Rep from * 3 more times, leaving out the final sc on the last rep.
4. Sl st to first sc.
(4 sc, 8 tr, 8 ch-7 sps, 4 ch-3 corner sps)
The tr stitches lift the corners above the side tips, which starts to square off the round flower.
Round 4 (conversion round):
1. Ch 3 (counts as dc).
2. *7 dc in next ch-7 sp, dc in next tr, (2 dc, ch 2, 2 dc) in ch-3 corner sp, dc in next tr, 7 dc in next ch-7 sp, dc in next sc.
3. Rep from * 3 more times, leaving out the final dc on the last rep (the starting ch-3 takes its place).
4. Sl st to top of ch-3.
Count: 12 sts worked one per existing st (4 sc + 8 tr) + 72 sts worked into spaces (8 x 7 in the ch-7 sps + 4 x 4 in the corners) = 84 dc, plus 4 corner ch-2 sps.
Per side, between corner ch-2 sps: 2 + 1 + 7 + 1 + 7 + 1 + 2 = 21 dc. The dc over the side-petal sc is the 11th, exactly in the middle.
Checkpoint: about 6 in (15.2 cm) across.
Round 5 (eyelet round):
You are at the middle (11th) dc of a side.
- Start (second half of the first side): Ch 3 (counts as dc). Dc in next 2 dc, ch 1, sk 1, dc in next 4 dc, ch 1, sk 1, dc in next 2 dc, (2 dc, ch 2, 2 dc) in corner ch-2 sp.
- Full sides (21 sts each): *Dc in next 2 dc, ch 1, sk 1, dc in next 4 dc, ch 1, sk 1, dc in next 5 dc, ch 1, sk 1, dc in next 4 dc, ch 1, sk 1, dc in next 2 dc, (2 dc, ch 2, 2 dc) in corner ch-2 sp; rep from * 2 more times.
- Finish (first half of the first side): Dc in next 2 dc, ch 1, sk 1, dc in next 4 dc, ch 1, sk 1, dc in next 2 dc. Sl st to top of ch-3. Fasten off.
Side pattern check: 2 + 1 + 4 + 1 + 5 + 1 + 4 + 1 + 2 = 21. The eyelets fall at positions 3, 8, 14 and 19, mirrored around the center dc.
Count: 84 sts worked one per existing st (68 dc + 16 ch-1 eyelets) + 16 new corner dc = 100 sts, plus 4 corner ch-2 sps. Per side, between corner ch-2 sps: 2 + 21 + 2 = 25 sts, counting each ch-1 as a stitch.
Checkpoint: 7 in (17.8 cm) square. At 3.5 sts per inch, 25 sts give just over 7 in (17.8 cm).
Border (Color A)
Border gauge: 16 sc = 4 in (10.2 cm). Three border rounds = 0.5 in (1.3 cm) deep.
Border Round 1: Join A in any corner ch-2 sp. Ch 1, 3 sc in corner sp, sc in each of next 25 sts (in each dc and in each ch-1 sp); rep from * 3 more times. Sl st to first sc. (112 sc)*
Per side, there are 25 sc between the corner groups. Counting from one corner center st to the next, both included: 1 + 1 + 25 + 1 + 1 = 29 sts per side. Total: 4 x 29 – 4 shared corner sts = 112.
Place a marker in each corner center sc.
Border Round 2: Ch 1, sc in each st around, working 3 sc in each marked corner center st. Move the markers to the new center sts. Sl st to first sc. (120 sc)
Per side, from corner center to corner center, both included: 31 sts. Total: 4 x 31 – 4 = 120.
Border Round 3: Ch 1, rev sc in each st around, with no corner increases. Sl st to first st. Fasten off. (120 rev sc)
Why the math works:
– One sc per stitch keeps each side the same length as Round 5, so the edges don’t ruffle or pull in.
– The 3-sc corners add 2 sts per corner per round, which is the growth a flat square needs.
– The rev sc round adds no stitches. It rolls the edge into a firm cord and softly rounds the corners.
– Three rounds add 0.5 in (1.3 cm) per side, turning the 7 in (17.8 cm) square into an 8 in (20.3 cm) square: 7 + 0.5 + 0.5 = 8 in.
Weave in all ends on the wrong side. Run each tail through stitches of the same color so nothing shows on the front.
Final Blocking
- Lay the square right side up on a blocking mat.
- Pin the four corners first, so that each side measures 8 in (20.3 cm).
- Pin the middle of each side. Then add pins every 1 in (2.5 cm) to keep the edges straight.
- Lift each petal gently and smooth it outward so all eight point evenly.
- Mist with water until damp, not soaked. For acrylic, hold a light steam above the fabric instead.
- Pat the petals so the center vein stands up and the tips lie flat.
- Let the square dry completely, at least 6 hours, before you unpin it.
Final Quality-Control Checklist
- Square measures 8 in x 8 in (20.3 cm x 20.3 cm).
- Both diagonals match within 0.25 in (0.6 cm).
- Eight evenly spaced petals, each with a raised sc vein and a pointed ch-2 tip.
- Side petals point to the side centers, and corner petals point to the corners.
- Four eyelets per side, mirrored around the center.
- Border Round 2 has 120 sts.
- Rev sc edge is even, with no gaps at the corners.
- All ends are woven in invisibly.
Troubleshooting
Petals curl or twist. Your stem chain is too tight. Chain more loosely, or use a 5.5 mm hook for the ch 9 only.
Petals look stubby. Check that the stem has 8 sc and that you skipped the loop under the tip sc on the second side.
Round 3 pulls the petals inward. Loosen the ch-7 loops. They need to span the gap without tension.
Square is wavy after Round 4. You probably added extra dc into the ch-7 sps. Recount: 7 per sp, 21 per side.
Eyelets are off-center. Make sure Round 5 begins on the middle (11th) dc of a side.
Border ruffles. Count Border Round 1: you need exactly 25 sc between corner groups.
Border cups. Loosen your tension on Border Round 3, or work the rev sc with a 5.5 mm hook.
Care
Hand wash in cool water with mild soap. Press the water out in a towel and dry flat, reshaping the petals while damp. Don’t wring it, because that can distort the petal tips.

Final Notes
The measurements build in a simple chain:
– 1 in (2.5 cm) center
– 5 in (12.7 cm) flower
– 6 in (15.2 cm) after Round 4
– 7 in (17.8 cm) square after Round 5
– 8 in (20.3 cm) square after the border
The stitch counts follow the same path: 16 sc, 8 petals, 84 dc, 100 sts, 112 sc, 120 sc. If you hit each checkpoint, your square will lie flat with a crisp, raised bloom.
Happy crocheting!