

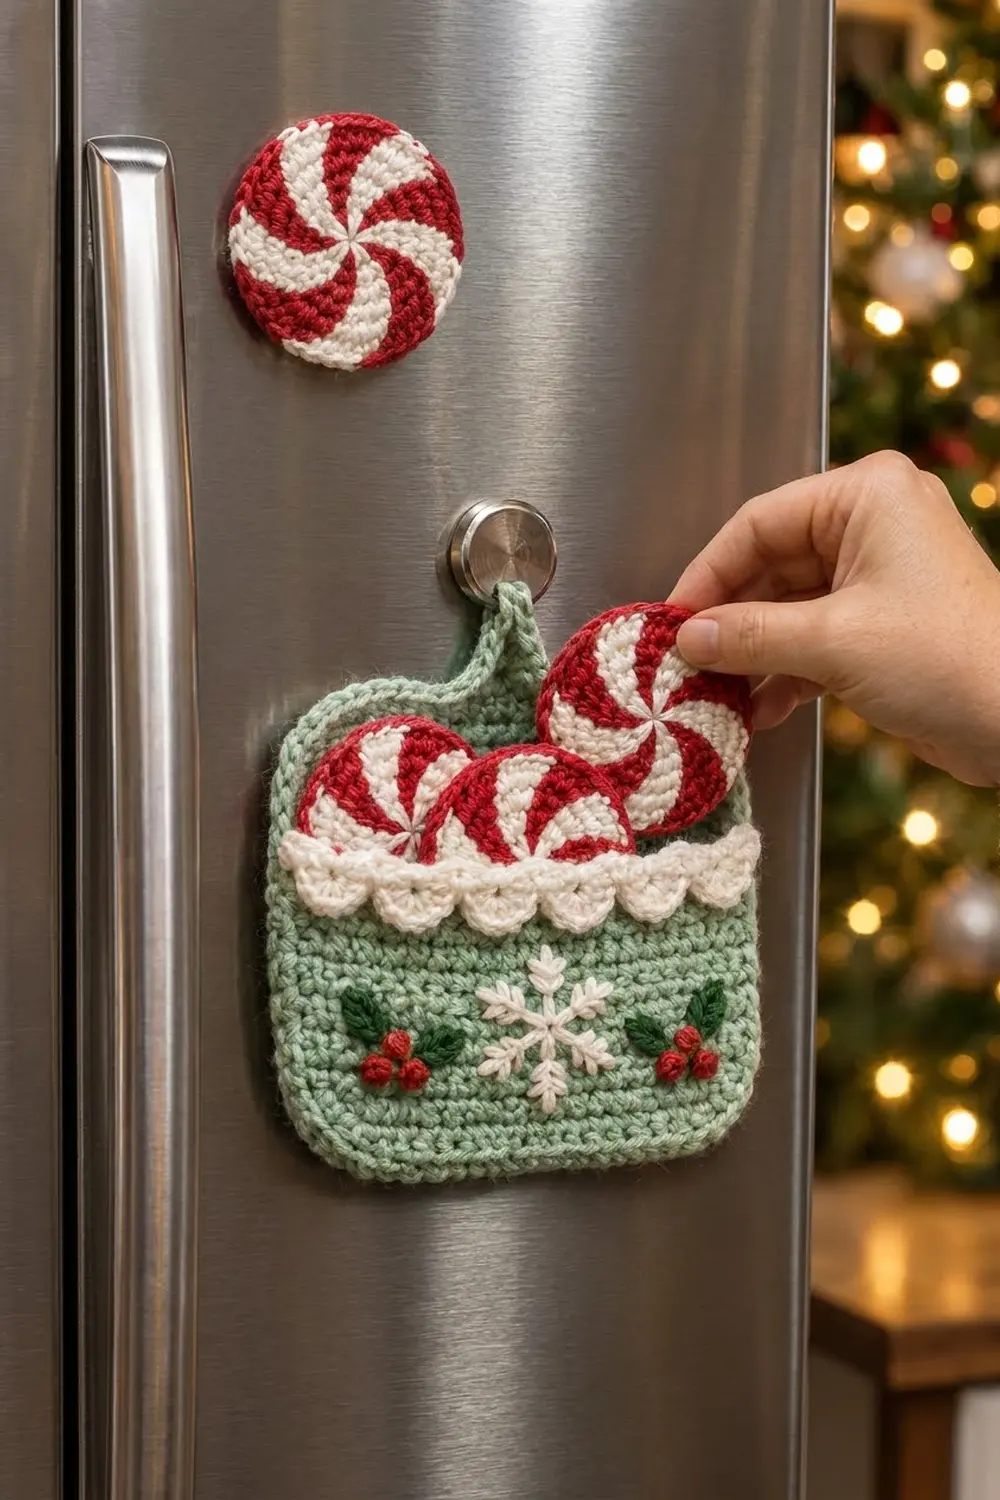
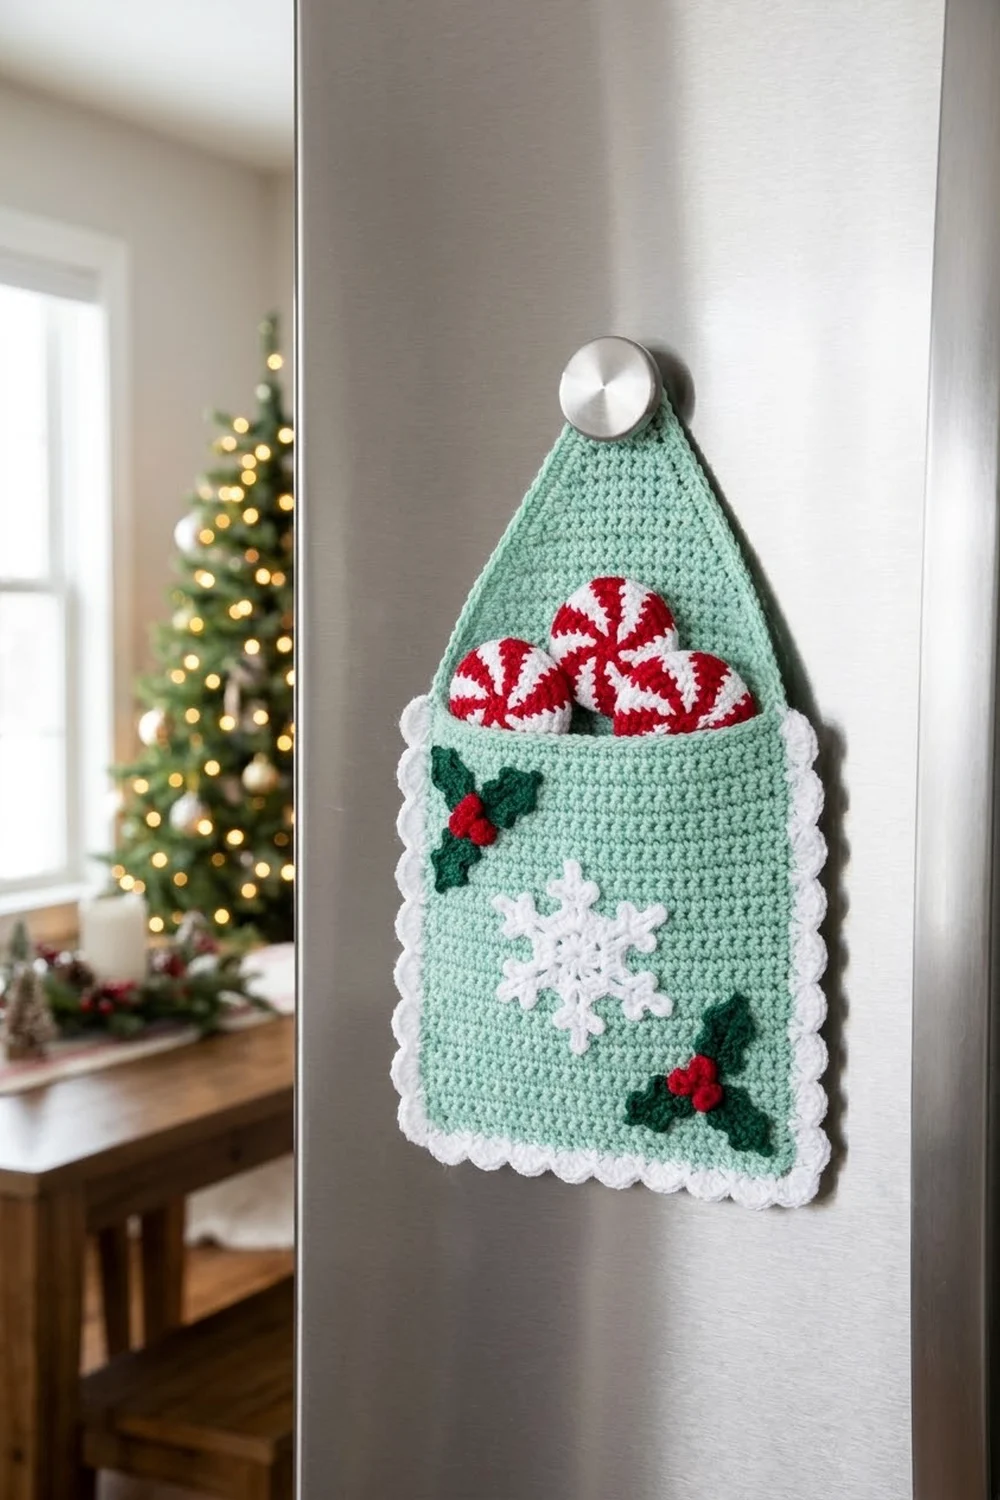
This set is one small mint-green pocket and three peppermint candy magnets that tuck inside it. The pocket hangs from a crocheted loop. Its front has a white scalloped top edge, an embroidered snowflake, and two holly sprigs with red berries. Each peppermint is a red-and-white swirl disc with a solid red rim and a magnet in the back.
The colors are soft mint, bright red, creamy white, and a touch of dark green, for a cozy vintage candy-shop look. Hang it on the fridge to hold notes, or use the peppermints on their own as magnets. All instructions use US crochet terms.
The finished pocket measures 5.5 x 4.5 in (14.0 x 11.4 cm), plus a 1.5 in (3.8 cm) hanging loop. Each peppermint is 2.75 in (7.0 cm) across.
The pocket has two flat single crochet panels: a back and a shorter front with scallop trim and embroidery. One mint border round joins the panels and forms the loop. Each peppermint has a tapestry-crochet swirl front that you whipstitch to a white ring back, with a magnet between the layers.
Finished Size and Construction
- Pocket size: 5.5 x 4.5 in (14.0 x 11.4 cm), plus 1.5 in (3.8 cm) loop
- Peppermint size: 2.75 in (7.0 cm) diameter
- Skill level: Easy-intermediate
- Terminology: US
- Yarn weight: Worsted (#4) cotton or cotton blend
- Hooks: 4.0 mm (G-6) for the pocket, 3.5 mm (E-4) for the peppermints
- Number of pieces: 8 (pocket back, pocket front, 3 peppermint fronts, 3 peppermint backs)
- Layout: Front panel layered over the lower part of the back panel. The peppermints sit loose inside.
- Back panel before border: 5 x 4 in (12.7 x 10.2 cm)
- Front panel before trim: 5 x 3 in (12.7 x 7.6 cm)
- Border depth: 0.25 in (0.6 cm), one round
Materials
Use a smooth worsted-weight cotton with about 180 m (197 yd) per 100 g. Cotton keeps the swirl crisp and the discs firm. Fuzzy yarns blur the color changes, so avoid them.
- Mint green: 25 g, about 45 m (pocket panels, border, loop)
- White: 15 g, about 27 m (swirls, peppermint backs, scallops, snowflake)
- Red: 12 g, about 22 m (swirls, rims, whipstitching, berries)
- Dark green: 2 g, about 4 m (holly leaves)
These quantities include a small margin for swatching and weaving in ends.
Tools: 4.0 mm and 3.5 mm hooks, 3 round magnets 1 in (2.5 cm) across, a tapestry needle, stitch markers, scissors, a blocking mat and pins, optional craft glue, and a magnetic hook to hang the pocket.
Abbreviations (US Terms)
- ch – chain
- sc – single crochet
- dc – double crochet
- sl st – slip stitch
- sk – skip
- st(s) – stitch(es)
- Rnd – round
- RS / WS – right side / wrong side
Shell: 5 dc in the same stitch.
Tapestry color change: Work the last yarn over of the stitch before the change with the new color. Carry the unused color along the top of the round and work over it.
Gauge and Checkpoints
Pocket gauge (4.0 mm hook): 16 sc x 16 rows = 4 in (10.2 cm). That is 4 sc and 4 rows per inch.
Peppermint gauge (3.5 mm hook): Rnds 1–3 measure 1.2 in (3.0 cm) across.
Make one peppermint front first. It tests both your tension and the rhythm of the color changes.
Checkpoints:
- Peppermint front after Rnd 3: 1.2 in (3.0 cm)
- Peppermint front after Rnd 6: 2.4 in (6.1 cm)
- Peppermint front after Rnd 7: 2.75 in (7.0 cm)
- Peppermint back after Rnd 4: 2.4 in (6.1 cm)
- Back panel after Row 16: 5 x 4 in (12.7 x 10.2 cm)
- Front panel after Row 12: 5 x 3 in (12.7 x 7.6 cm)
- Finished pocket: 5.5 x 4.5 in (14.0 x 11.4 cm)
Too big? Go down a hook size, or tighten the carried strand. Too small? Go up a hook size. Use the same hook for the peppermint fronts and backs so their sizes match.
Peppermint Front (make 3)
Use the 3.5 mm hook with red (R) and white (W). The front has 8 wedges that alternate W and R. In Rnd n, every wedge has n stitches.
Swirl rule (Rnd 3 on): Work the first stitch of each wedge in the opposite color, which is the previous wedge’s color. This moves every color boundary one stitch per round and twists the stripes into a spiral.
Rnd 1: Make a magic ring. Work 8 sc into the ring, alternating W and R. Sl st to the first sc. Do not turn. (8 sts)
Rnd 2: With W, 2 sc in next st; with R, 2 sc in next st. Repeat from * 3 more times. (16 sts: 8 wedges of 2)
Rnd 3: With the opposite color, sc in next st; with the wedge’s own color, 2 sc in next st. Repeat from * 7 more times. (24 sts: 8 wedges of 3)
Checkpoint: 1.2 in (3.0 cm) across.
Rnd 4: With the opposite color, sc in next st; with own color, sc in next st, 2 sc in next st. Repeat from * 7 more times. (32 sts: 8 wedges of 4)
Rnd 5: With the opposite color, sc in next st; with own color, sc in next 2 sts, 2 sc in next st. Repeat from * 7 more times. (40 sts: 8 wedges of 5)
Rnd 6: With the opposite color, sc in next st; with own color, sc in next 3 sts, 2 sc in next st. Repeat from * 7 more times. (48 sts: 8 wedges of 6)
Checkpoint: 2.4 in (6.1 cm) across. Each wedge is worked into one fewer stitch than it makes, which gives 8 increases per round.
Rnd 7 (red rim, trim round): Cut W. With R, sc in each st around: 48 worked 1 per stitch + 0 added. Sl st to the first sc. (48 sts)
This round has no increases, so the rim pulls in slightly and curls toward the WS, framing the back. Fasten off, leaving a 24 in (61.0 cm) red tail.
Peppermint Back (make 3)
Use the 3.5 mm hook and white. The back is a flat ring. The open center lets the magnet sit close to the fridge.
Foundation: Ch 12, then sl st to the first ch to form a ring about 0.75 in (1.9 cm) across.
Rnd 1: Ch 1, work 24 sc into the ring. Sl st to the first sc. (24 sts)
Rnd 2: Ch 1, sc in next 2 sts, 2 sc in next st. Repeat from * 7 more times. Sl st to the first sc. (32 sts)
Rnd 3: Ch 1, sc in next 3 sts, 2 sc in next st. Repeat from * 7 more times. Sl st to the first sc. (40 sts)
Rnd 4: Ch 1, sc in next 4 sts, 2 sc in next st. Repeat from * 7 more times. Sl st to the first sc. (48 sts)
Checkpoint: 2.4 in (6.1 cm) across, the same as the front after Rnd 6. Fasten off and weave in the ends.
Pocket Back Panel
Use the 4.0 mm hook and mint.
Row 1: Ch 21. Sc in the 2nd ch from the hook and in each ch across. (20 sts)
Rows 2–16: Ch 1, turn, sc in each st across. (20 sts)
Checkpoint: 5 x 4 in (12.7 x 10.2 cm). Fasten off.
Pocket Front Panel
Use the 4.0 mm hook and mint.
Row 1: Ch 21. Sc in the 2nd ch from the hook and in each ch across. (20 sts)
Rows 2–12: Ch 1, turn, sc in each st across. (20 sts)
Checkpoint: 5 x 3 in (12.7 x 7.6 cm). Change to white on the last st of Row 12, then cut mint.
Row 13 (trim row): Ch 1, turn. Sc in the first 19 sts, then 2 sc in the last st: 20 worked 1 per stitch + 1 added. (21 sts)
Row 14 (scallops): Ch 1, turn. Sc in the first st, sk 1, shell in next st, sk 1, sc in next st. Repeat from * 4 more times. (5 shells, 6 sc)
Five 4-stitch repeats plus the first sc use exactly 21 sts. Fasten off. The front is now about 3.75 in (9.5 cm) tall at the shell peaks.
Embroidery
Embroider the front panel before joining, while you can still reach the back of the work.
- Snowflake (white): Center it over Rows 4–10. Make three straight stitches 1.25 in (3.2 cm) long that cross in the middle, then add a small V at each of the 6 tips.
- Holly (dark green): About 0.75 in (1.9 cm) in from each side edge, around Rows 5–8, make two lazy-daisy leaves that angle apart. Each leaf is 0.5 in (1.3 cm) long.
- Berries (red): Make 3 French knots where each pair of leaves meets.
Make All Pieces
- Mint: 1 back panel, 1 front panel (Rows 1–12)
- White: front trim (Rows 13–14), 3 peppermint backs
- Red + white: 3 peppermint fronts
- Embroidery: 1 snowflake, 2 holly sprigs
Layout (front view):
              [ loop ]
+------------------------------------+
|       back panel, Rows 13–16       |
|  (peppermint)(peppermint)(peppermint)
|      ~~~~ white scallops ~~~~      |
|     holly    snowflake    holly    |
|       front panel, Rows 1–12       |
+------------------------------------+
Joining
Peppermint Magnets
Hold a front and a back with WS together, back facing you. Place a magnet behind the back’s center opening so it rests against the front’s WS. Add a dot of glue first if you like.
Using the red tail, whipstitch each of the 48 sts of the back’s Rnd 4 to the matching st of the front’s Rnd 7. Go through the back loop of the rim and the outer loop of the back. That is 48 to 48, one stitch to one stitch. The curled rim leaves a thin red ring around the white back.
Keep the stitches snug but not tight, or the disc will cup. Knot the yarn and bury the tail between the layers.
Pocket Panels
Lay the front on the back, both RS facing you, with the foundation edges lined up. Pin the sides. Front Rows 1–13 line up with back Rows 1–13, one row to one row. The scallop row stays free. The border round joins the layers.
Border
Border gauge: 4 sc per inch (2.5 cm), using the 4.0 mm hook and mint.
With RS facing, join mint in the first st of the back panel’s Row 16 at the top right corner.
Rnd 1:
- Corner: 3 sc in the first st.
- Top: Sc in the next 9 sts. To make the loop, ch 16, sl st in the last sc made, work 24 sc into the ch-16 loop, then sl st in the same sc. Sc in the next 9 sts. (18 sc, loop not counted)
- Corner: 3 sc in the last st.
- Side: Sc in the row ends of Rows 15 to 2. Work through the back only for Rows 15–14 and through both layers for Rows 13–2. (14 sc)
- Corner: 3 sc in the first foundation ch, through both layers.
- Bottom: Sc in the next 18 foundation chs, through both layers. (18 sc)
- Corner: 3 sc in the last foundation ch.
- Side: Sc in the row ends of Rows 2 to 15. Work through both layers for Rows 2–13 and through the back only for Rows 14–15. (14 sc)
- Sl st to the first sc. (76 sts, plus 24 loop sc)
Per-side counts: These include the center corner st at each end. The top and bottom each have 1 + 1 + 18 + 1 + 1 = 22 sts. Each side has 1 + 1 + 14 + 1 + 1 = 18 sts. 22 + 18 + 22 + 18 = 80, minus 4 corner sts counted twice = 76.
Why the math works:
- The corner groups use sts 1 and 20 of the top row and both end foundation chs. That leaves 18 sts on the top and on the bottom.
- The corners also cover the row ends of Rows 1 and 16, which leaves 14 row ends per side.
- At 4 sts per inch, 22 sts make the pocket 5.5 in (14.0 cm) wide.
- The 16 rows (4 in / 10.2 cm), plus one border sc at the top and bottom (0.25 in / 0.6 cm each), make it 4.5 in (11.4 cm) tall.
- The 3-sc corners lie flat and gently rounded.
Fasten off and weave in the ends.
Final Blocking
- Lightly mist the pocket and the peppermints with water.
- Pin the pocket to 5.5 x 4.5 in (14.0 x 11.4 cm), keeping the corners softly rounded.
- Space the 5 shells evenly and pin each peak.
- Lay each peppermint face up and pat it flat to 2.75 in (7.0 cm). Don’t pin near the magnet.
- Pin the loop upright.
- Let everything dry fully, about 6–8 hours.
Final Quality-Control Checklist
- [ ] Each peppermint has 8 wedges with a clear spiral
- [ ] Each red rim has 48 sts and measures 2.75 in (7.0 cm) across
- [ ] The magnets are centered and secure
- [ ] The border has 76 sts, with 3 sc in each corner
- [ ] The pocket measures 5.5 x 4.5 in (14.0 x 11.4 cm)
- [ ] The 5 shells are even
- [ ] The snowflake is centered and the holly sprigs mirror each other
- [ ] The loop is centered and firm
- [ ] All 3 peppermints fit in the pocket with their tops showing
Troubleshooting
- The swirl looks like straight spokes: From Rnd 3 on, start each wedge with 1 st in the opposite color.
- The peppermint ruffles: Use a smaller hook, or tighten the carried strand.
- The peppermint cups: Rework Rnd 7 more loosely.
- The carried color shows through: Keep it on top of the stitches and work fully over it.
- The back is smaller than the front: Check that the back has 48 sts in Rnd 4, and loosen your tension slightly.
- The pocket gapes at the sides: Make sure you worked through both layers for Rows 2–13.
- The scallops don’t fit: Row 13 must have 21 sts.
- The loop stretches: Pack more sc around the ch-16.
- The pocket tilts when hung: Check that the loop sits between the 9th and 10th top sts.
Care
Hand wash the pocket in cool water and lay it flat to dry. Spot clean the peppermints so the magnets stay dry.
Final Notes
The peppermint fronts grow by 8 sts per round to 48 sts and 2.75 in (7.0 cm). Each 48-st back joins to its front one stitch to one stitch. The pocket back panel starts at 5 x 4 in (12.7 x 10.2 cm), and one 76-st border brings it to 5.5 x 4.5 in (14.0 x 11.4 cm). If every checkpoint matches, the peppermints will fit the pocket.
Happy crocheting!