

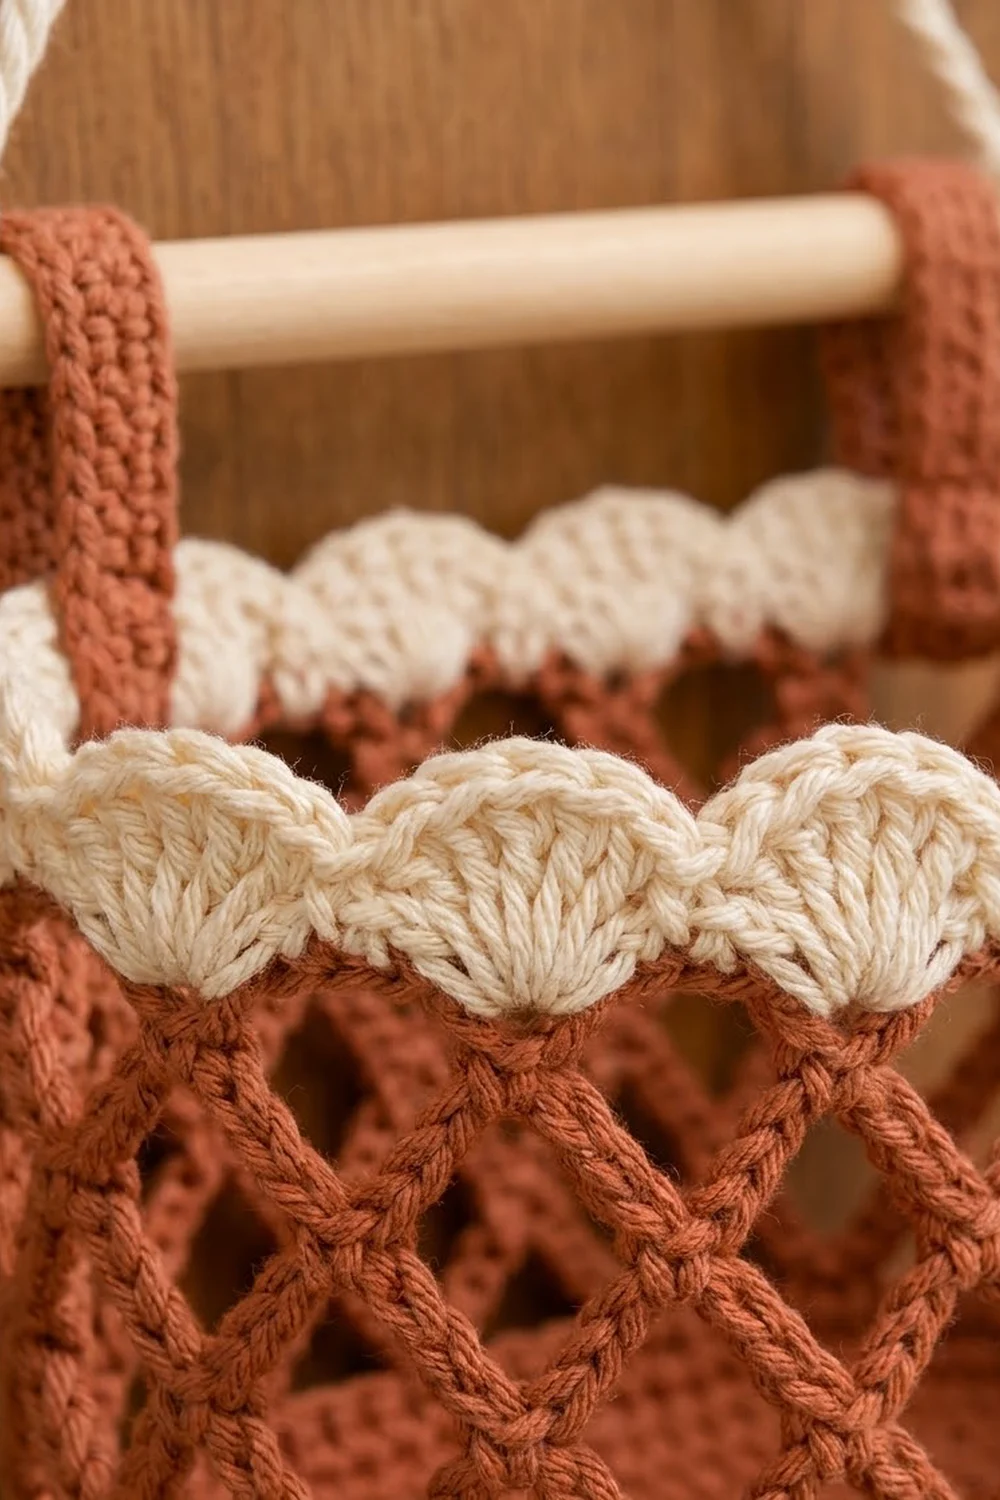
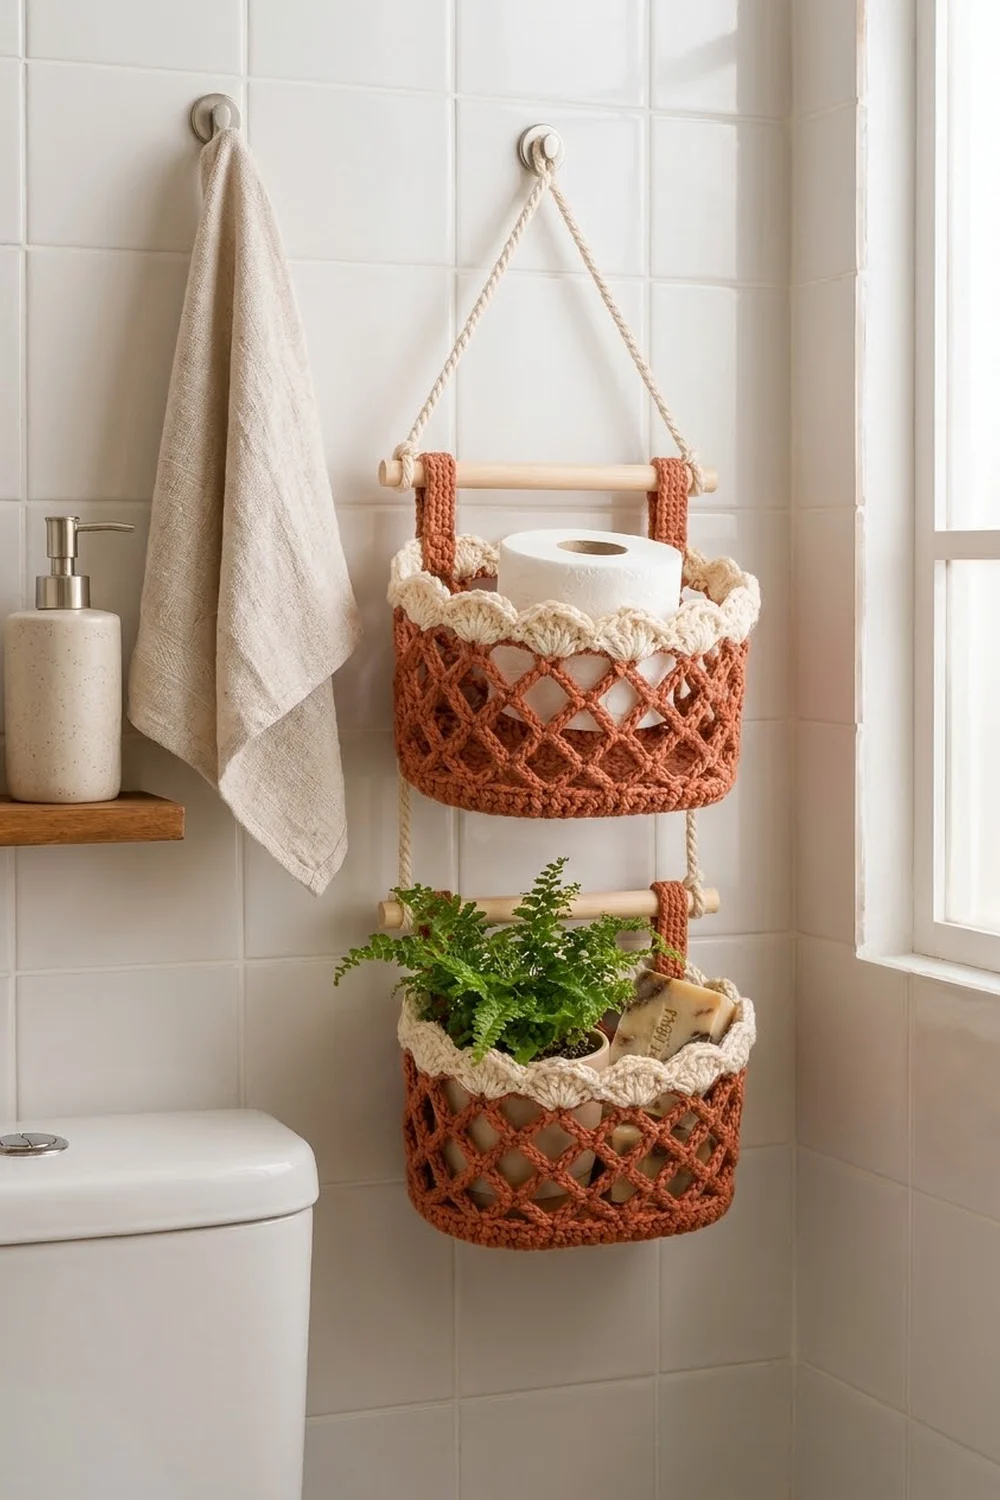
This two-tier hanging organizer pairs warm terracotta cotton with a soft cream scalloped rim. Each basket has an open diamond lattice that shows a little of what’s inside, plus a solid base and bottom band that keep it sturdy enough to hold toilet rolls, toiletries, or small craft supplies.
The look is rustic boho: earthy rust, natural cream, light wood dowels, and a twisted cotton cord. It fits a bathroom, entryway, or nursery, and it’s a satisfying stash project in worsted-weight cotton.
The pattern uses US crochet terms. Each finished basket measures 9 in (22.9 cm) long, 4.5 in (11.4 cm) deep and 5.5 in (14.0 cm) tall. Hung up, the whole organizer is about 23.5 in (59.7 cm) from hook to bottom basket.
Construction is simple. You work an oval base in single crochet rounds, then a separate wall tube with a lattice section and a shell edging. You join the wall to the base stitch-for-stitch, add two strap tabs, and hang both baskets from dowels on a cord.
Finished Size and Construction
- Finished basket size: 9 in x 4.5 in x 5.5 in tall (22.9 cm x 11.4 cm x 14.0 cm)
- Overall hanging length: about 23.5 in (59.7 cm)
- Skill level: Easy-Intermediate
- Terminology: US crochet terms
- Yarn weight: Worsted (#4) cotton
- Hook: 5.0 mm (H-8)
- Number of crocheted pieces: 8 (2 bases, 2 wall tubes, 4 strap tabs)
- Layout: 2 baskets stacked vertically, each hanging from its own dowel
- Base size: 9 in x 4.5 in (22.9 cm x 11.4 cm), with 96 stitches around
- Wall circumference: 24 in (61.0 cm), which is 12 in (30.5 cm) when flattened
- Wall height before edging: 4.75 in (12.1 cm)
- Shell edging depth: 0.75 in (1.9 cm)
Materials
Use a smooth, firm cotton or cotton blend. Cotton holds its shape better than acrylic, so the lattice stays crisp and the baskets don’t sag when loaded.
- Color A, Terracotta: about 100 g / 180 yd (165 m)
- Color B, Cream: about 25 g / 45 yd (41 m)
- 5.0 mm (H-8) crochet hook
- 2 wooden dowels, 3/8 in (1.0 cm) diameter, 11 in (27.9 cm) long
- 2.5 yd (2.3 m) of 4 mm cream cotton cord (twisted or braided)
- Tapestry needle
- 4 stitch markers
- Scissors and measuring tape
- 1 wall hook or nail
All quantities include a safety margin of about 25%.
Abbreviations (US Terms)
- ch – chain
- sl st – slip stitch
- sc – single crochet
- dc – double crochet
- sk – skip
- st(s) – stitch(es)
- RS / WS – right side / wrong side
Special stitch – Shell: work 5 dc in the same stitch.
Ch-5 loop: a chain of 5 used to build the lattice. In the next round you work into the loop itself (around the chain), not into individual chains.
Gauge and Checkpoints
Gauge: 16 sc and 18 rounds = 4 in (10.2 cm). In the lattice, one repeat (ch 5, sc) spans 4 stitches, which is 1 in (2.5 cm) wide. Two lattice rounds add about 1 in (2.5 cm) of height.
Make one complete base and check it before you start the wall. Every measurement in this pattern depends on 96 stitches equaling 24 in (61.0 cm).
Checkpoints:
- After Base Round 10: 9 in x 4.5 in (22.9 cm x 11.4 cm), lying flat.
- After Wall Round 3: 0.75 in (1.9 cm) tall.
- After Wall Round 10: 4.25 in (10.8 cm) tall.
- After Wall Round 12: 4.75 in (12.1 cm) tall.
- After Wall Round 13: 5.5 in (14.0 cm) tall.
If your base is too big, go down a hook size, to 4.5 mm. If it’s too small, go up to 5.5 mm. Don’t change the stitch counts, because the base and wall must both have 96 stitches.
Oval Base (Make 2)
Use Color A.
Foundation: Ch 21.
Round 1: Work 3 sc in the 2nd ch from the hook and sc in the next 18 ch. Work 3 sc in the last ch. Rotate to work along the other side of the foundation and sc in the next 18 ch. Join with a sl st to the first sc. (42 sts)
Place a marker in the center stitch of each 3-sc group. These two marked stitches are the turning points at the ends of the oval.
Round 2: Ch 1. Sc in each st to the stitch before the first marker. Work 2 sc in each of the next 3 sts, then sc in each st to the stitch before the second marker. Work 2 sc in each of the next 3 sts, then sc in the remaining sts. Join. (48 sts)
Move the markers up into the middle increase stitch at each end every round.
Round 3: Ch 1. At each end, work (sc in next st, 2 sc in next st) 3 times, centered on the marker. Sc in all other sts. Join. (54 sts)
Round 4: Ch 1. At each end, work (sc in next 2 sts, 2 sc in next st) 3 times. Sc in all other sts. Join. (60 sts)
Rounds 5–10: Continue the same way. Each round adds 6 stitches, 3 at each curved end. Work one more plain sc between increases each round, and stagger the increases so the ends stay round instead of pointed.
- Round 5: 66 sts
- Round 6: 72 sts
- Round 7: 78 sts
- Round 8: 84 sts
- Round 9: 90 sts
- Round 10: 96 sts
Fasten off and leave a short tail. The base should measure 9 in x 4.5 in (22.9 cm x 11.4 cm) and lie completely flat.
Wall Tube (Make 2)
The wall is worked in joined rounds with the RS facing. It is made separately so you can check the lattice before attaching it.
Foundation: With Color A, ch 96. Join with a sl st to the first ch to form a ring, taking care not to twist the chain.
Round 1: Ch 1, sc in each ch around, join. (96 sc)
Rounds 2–3: Ch 1, sc in each st around, join. (96 sc)
Checkpoint: the solid band is 0.75 in (1.9 cm) tall.
Lattice Section
Round 4: Ch 1 and sc in the first st. Work (ch 5, sk 3 sts, sc in next st) 23 times. To finish, ch 5, sk the last 3 sts and join with a sl st to the first sc. (24 sc and 24 ch-5 loops)
Round 5: Sl st in each of the next 3 ch to reach the center of the first loop. Ch 1, sc in the same loop, then work (ch 5, sc in next ch-5 loop) 23 times. Ch 5 and join with a sl st to the first sc. (24 sc and 24 ch-5 loops)
Rounds 6–10: Repeat Round 5. (24 sc and 24 ch-5 loops each round)
Each round’s sc sits in the center of a loop below it, so the loops offset into the diamond lattice. You will have 7 lattice rounds in total.
Checkpoint: the wall is 4.25 in (10.8 cm) tall.
Rim Transition
Round 11 (conversion round): Ch 1, sc in the same sc as the joining sl st. Work 3 sc in the next ch-5 loop. Then work (sc in next sc, 3 sc in next ch-5 loop) 23 times. Join. (24 sc worked into the existing sc + 72 sc added in the loops = 96 sc)
Fasten off Color A.
Round 12: Join Color B in any st. Ch 1, sc in each st around, join. (96 sc)
Checkpoint: the wall measures 4.75 in (12.1 cm) tall before the edging.
Don’t fasten off. Continue straight into the shell edging.
Strap Tabs (Make 4)
Use Color A.
Foundation: Ch 5.
Row 1: Sc in the 2nd ch from the hook and in the next 3 ch. Turn. (4 sc)
Rows 2–30: Ch 1, sc in each st across, turn. (4 sc)
Fasten off and leave a 12 in (30.5 cm) tail for sewing. Each tab measures 1 in x 6.7 in (2.5 cm x 17.0 cm).
Make All Pieces
Color A, Terracotta:
– 2 oval bases
– 2 wall tubes (Rounds 1–11)
– 4 strap tabs
Color B, Cream:
– Rim and shell edging on both wall tubes (Rounds 12–13)
Hanging layout (front view):
            [ hook ]
            /      \
           /  cord  \
  [=========== dowel 1 ===========]
     |tab|               |tab|
   (  Basket 1: lattice + shells  )
  |                               |
 cord                            cord
  |                               |
  [=========== dowel 2 ===========]
     |tab|               |tab|
   (  Basket 2: lattice + shells  )
Joining
Method: Join with an sc seam in Color A, working through both pieces at once.
- Turn the wall tube so its foundation edge is at the bottom.
- Hold the base and the wall’s foundation edge with WS together and the base facing you.
- Match the two marked end stitches of the base to points 48 stitches apart on the wall foundation.
- Join Color A at one straight side. Work 1 sc through each base stitch and its matching foundation chain, all the way around. (96 sc)
- Join with a sl st and fasten off.
Stitch-to-stitch logic: The base has 96 stitches and the wall foundation has 96 chains. That makes the join exactly 1:1 with no easing, so the wall stands straight up without flaring or pulling in.
Tension: Keep the seam stitches the same size as your base stitches. If the seam is tight, the base edge will cup upward. If it’s loose, the bottom edge will ripple.
The seam forms a neat raised ridge around the bottom of the basket.
Size checkpoint: The joined basket should measure 9 in x 4.5 in (22.9 cm x 11.4 cm) across the bottom. Its circumference should be 24 in (61.0 cm).
Border: Cream Shell Edging
The border is Round 13, worked on top of Round 12 with Color B.
Border gauge: One shell repeat (sc + 5-dc shell) uses 6 stitches, which is 1.5 in (3.8 cm). It adds 0.75 in (1.9 cm) of height.
Round 13: Ch 1, sc in the first st. Work sk 2 sts, 5 dc in next st, sk 2 sts, sc in next st. Repeat from * around until 5 sts remain. Then sk 2 sts, work 5 dc in the next st, sk 2 sts, and join with a sl st to the first sc. (16 shells and 16 sc = 96 sts)
Counts per side: Treat the basket as two halves, front and back, divided at the curved ends.
- Front: 48 sts = 8 shells
- Back: 48 sts = 8 shells
Why the math works: 96 ÷ 6 = 16, so the repeat divides evenly with no leftover stitches. Every shell sits evenly spaced and the scallops meet cleanly at the join.
Fasten off and weave in the ends.
Attaching the Strap Tabs
- Flatten the basket and mark the center back on Round 12.
- Count 12 sts to the left and 12 sts to the right of center and place a marker at each point. The tabs will sit 6 in (15.2 cm) apart, center to center.
- Fold a tab around a dowel. Center it on one marker so one leg hangs inside the basket and the other hangs outside.
- Let each leg overlap the rim by 1.25 in (3.2 cm), covering Rounds 11–13, and pin it in place.
- Whipstitch both legs through the solid rim rounds, sewing through all layers along both long edges. Repeat for the second tab.
With these measurements, the dowel sits 1.5 in (3.8 cm) above the rim. Make sure the dowel extends 1 in (2.5 cm) past each end of the basket.
Cord Assembly
- Hanger: Cut 30 in (76.2 cm) of cord. Tie each end around one end of the top dowel with an overhand knot, outside the tabs. This forms the triangle hanger.
- Connecting cords: Cut two 18 in (45.7 cm) pieces. Knot one to each end of the top dowel, next to the hanger knots.
- Lower basket: Knot each connecting cord to the matching end of the lower dowel, leaving 8 in (20.3 cm) between the dowels.
- Level check: Adjust the knots until both dowels hang level, then trim the tails.
Final Blocking
- Lightly mist each basket with water until it is damp but not soaked.
- Stuff the basket firmly with a folded towel to shape the oval and square up the walls.
- Pull the lattice diamonds gently into even shapes. Pin the shells so each one fans out evenly.
- Press the base flat on a towel.
- Let the baskets dry completely, for at least 24 hours, before removing the stuffing.
- Hang the organizer and check that both dowels are level.
Final Quality-Control Checklist
- Each base has 96 stitches and lies flat at 9 in x 4.5 in (22.9 cm x 11.4 cm).
- Each wall has 24 ch-5 loops in every lattice round.
- Round 11 has 96 sc on both baskets.
- There are 16 shells per basket, 8 on the front and 8 on the back.
- The base seam is even with no puckers.
- The tabs are sewn securely through all layers, 6 in (15.2 cm) apart.
- Both dowels hang level, 8 in (20.3 cm) apart.
- All yarn ends are woven in and the cord knots are tight.
Troubleshooting
- The base ruffles: You have too many increases or loose tension. Check that each round adds exactly 6 sts, or go down a hook size.
- The base cups upward: Tension is too tight or increases were missed. Recount the stitches against the round totals.
- The lattice leans or spirals: Make sure each sc goes into the center of a loop and that you join every round.
- The shells don’t come out even: Count Round 12. It must have exactly 96 sts.
- The basket sags when loaded: Use a firmer cotton, or add a cardboard oval cut to 8.5 in x 4 in (21.6 cm x 10.2 cm) inside the base.
- The dowels tilt: Re-tie the cord knots so both sides are the same length.
Care
Remove the baskets from the dowels and hand wash in cool water with mild soap. Reshape and dry flat over a stuffed towel.
Final Notes
Every measurement in this pattern links back to one number. The base reaches 96 stitches, or 24 in (61.0 cm), and the wall foundation matches it 1:1. The lattice keeps a steady 24 loops, and the conversion round restores 96 stitches. The shell edging divides those 96 stitches evenly into 16 scallops. If your base hits its checkpoint, the rest of the basket will follow.
Happy crocheting!