

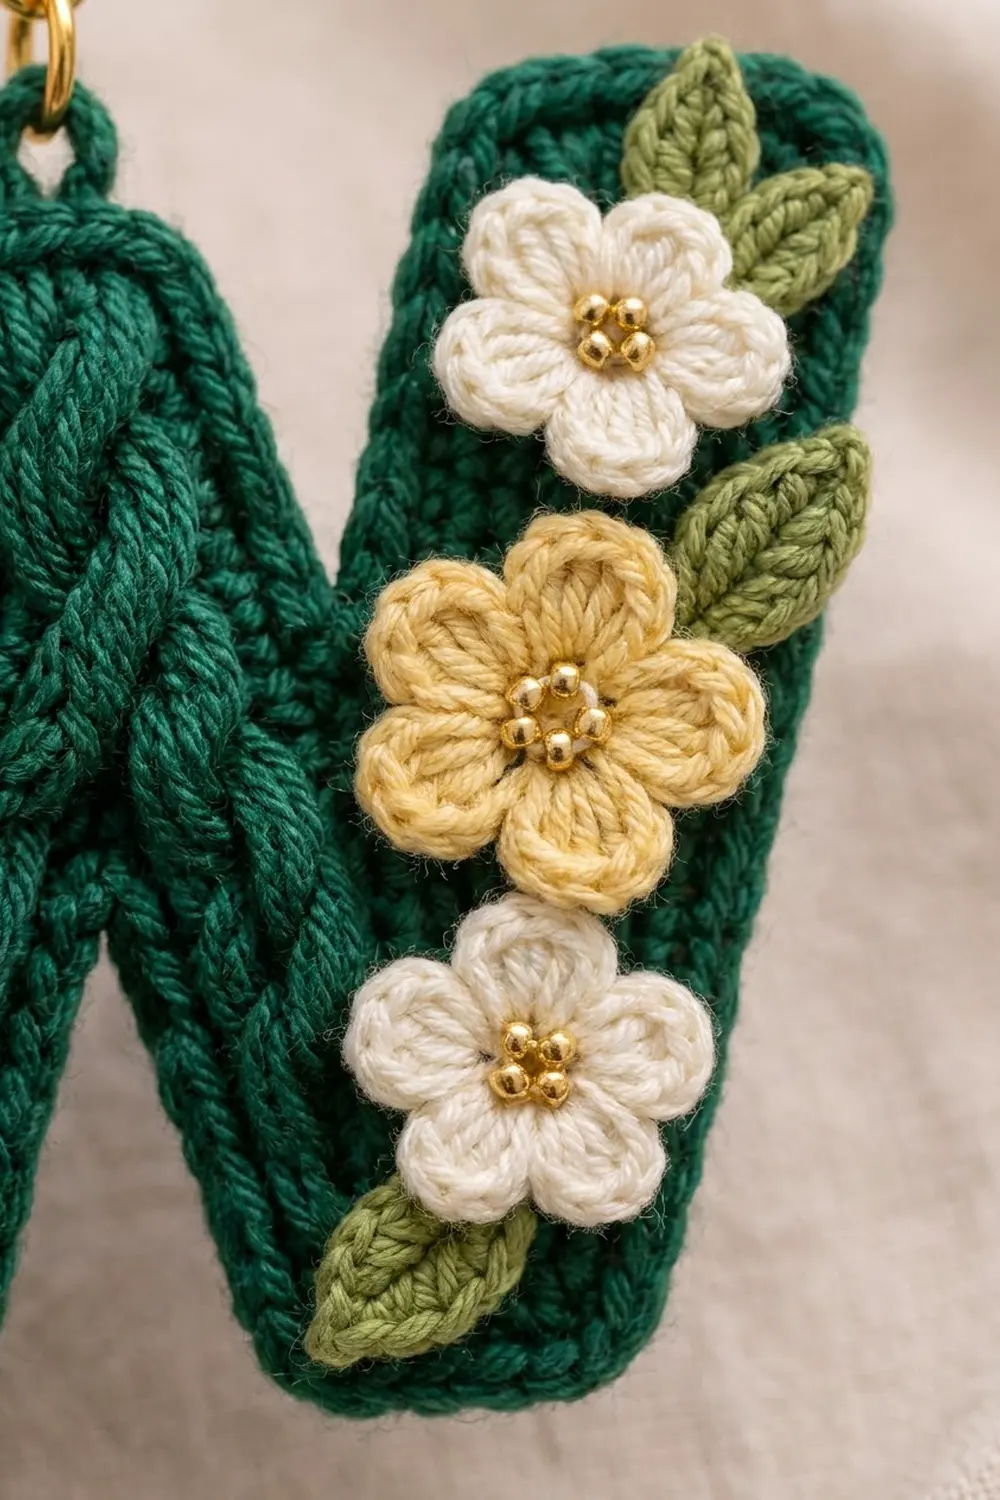
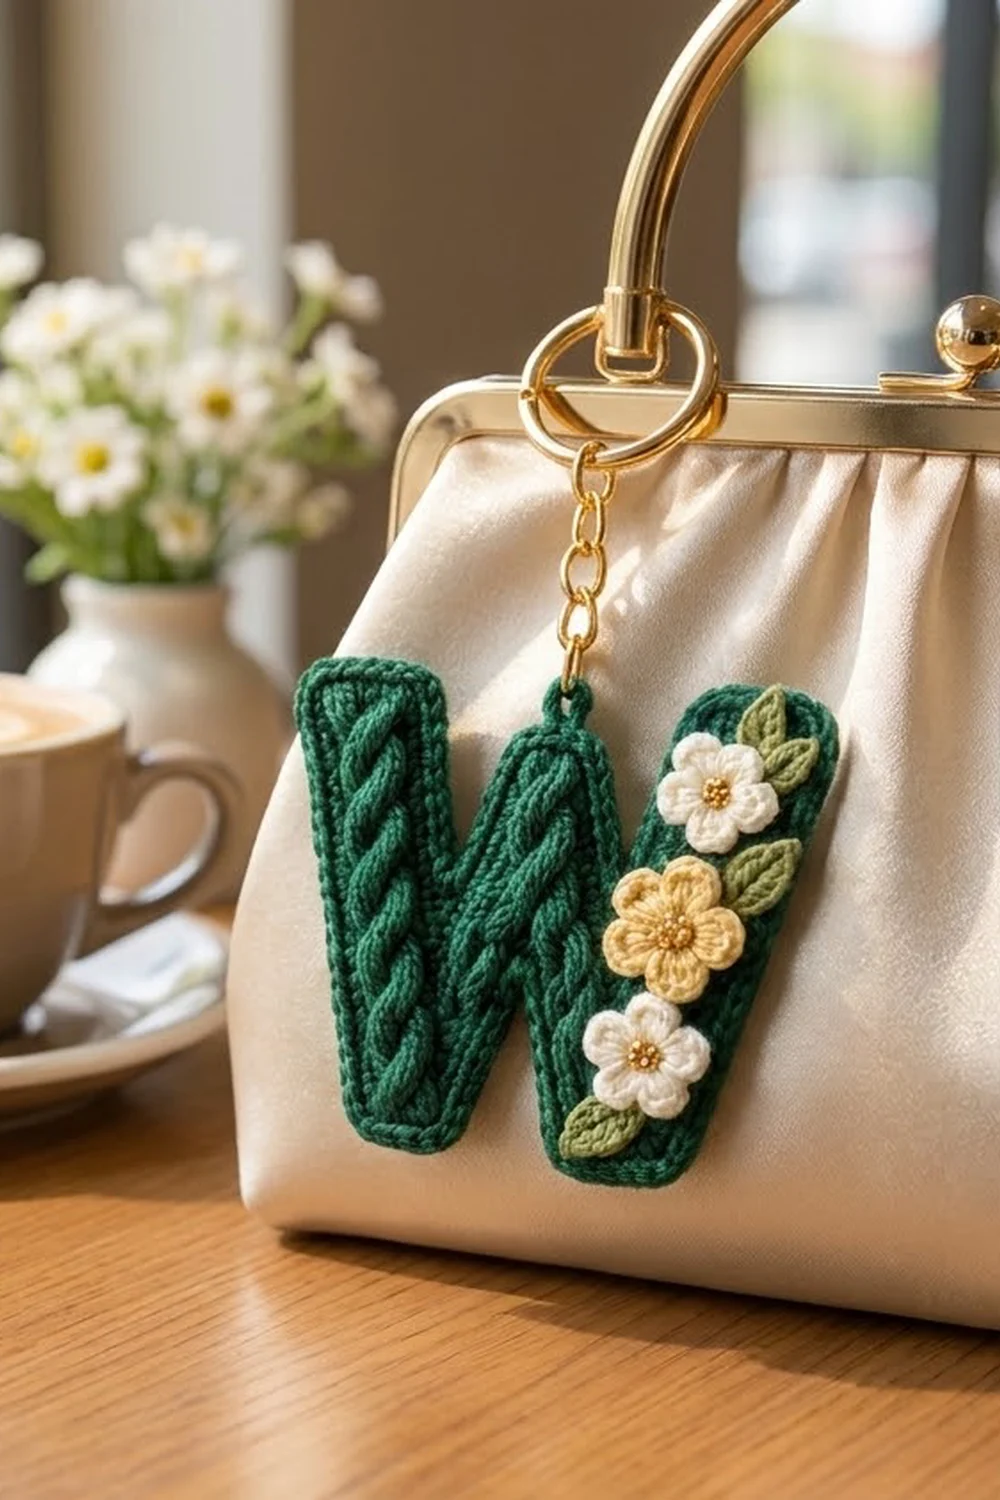
This little letter W makes a rich, textured bag charm. Each stroke of the letter carries a raised rope cable, and a neat rim of single crochet frames the whole shape. Three tiny five-petal flowers and three leaves trail down the right-hand stroke, and the charm hangs from a gold split ring on a short chain.
The main color is a deep emerald green. Two flowers are cream with gold bead centers, one is pale butter yellow, and the leaves are soft sage green. The look is classic and a little vintage.
This pattern uses US crochet terms. The finished W measures about 4.25 in (10.8 cm) wide at the top and 3.625 in (9.2 cm) tall, border included.
The letter is one piece, worked flat in rows from the bottom up. You make the left foot, then the right foot, then work the middle peak across both. A round of single crochet and a slip stitch rim go all the way around. The flowers and leaves are made separately and sewn on.
Finished Size and Construction
- Finished size: 4.25 in (10.8 cm) wide x 3.625 in (9.2 cm) tall
- Skill level: Intermediate (post stitches, cables, shaping in sections)
- Terminology: US
- Yarn weight: Super fine / fingering (#1) cotton
- Hook: 2.0 mm
- Number of pieces: 1 letter, plus 3 flowers and 3 leaves sewn on as appliqués
- Layout: Four cabled strokes. The outer strokes are 18 rows tall and the middle peak is 14 rows tall.
- Stroke width: 6 sts, 0.75 in (1.9 cm). The outer strokes widen to 7 sts, 0.875 in (2.2 cm).
- Size before border: 4.0 in (10.2 cm) x 3.375 in (8.6 cm)
- Border depth: 0.125 in (0.3 cm) on every edge
Materials
Choose a smooth, mercerized fingering-weight cotton. It shows the cables clearly and holds its shape on a charm that gets handled a lot. Avoid fuzzy or splitty yarn, because post stitches this small need clean strands.
- Color A, emerald green: 10 g (about 34 m)
- Color B, cream: 2 g (about 7 m)
- Color C, butter yellow: 2 g (about 7 m)
- Color D, sage green: 2 g (about 7 m)
These quantities include a comfortable margin for your gauge swatch and sewing tails.
Tools:
- 2.0 mm crochet hook
- Tapestry needle and a fine sewing needle
- Matching sewing thread
- 9 small gold seed beads (3 per flower)
- 1 gold split keyring, 1 in (2.5 cm)
- Gold chain, 1.5 in (3.8 cm)
- 2 gold jump rings, 0.25 in (0.6 cm)
- Flat-nose pliers
- Stitch markers, blocking board, rust-proof pins, spray bottle
Abbreviations (US Terms)
- ch: chain
- sl st: slip stitch
- sc: single crochet
- sc2tog: single crochet 2 together
- hdc: half double crochet
- dc: double crochet
- fhdc: foundation half double crochet
- FPdc: front post double crochet
- BPdc: back post double crochet
- FPtr: front post treble crochet
- st(s): stitch(es)
- RS / WS: right side / wrong side
Special stitch, C4 (4-stitch cable): Skip the next 2 sts. FPtr around each of the next 2 sts. Then, working in front of the sts you just made, FPtr around each of the 2 skipped sts. This uses 4 sts and makes 4 sts.
Turning chain: Ch 1 at the start of every row. It does not count as a stitch.
Stroke pattern (6 sts):
- RS rows: hdc, FPdc around the next 4 sts, hdc.
- WS rows: hdc, BPdc around the next 4 sts, hdc.
- Cross rows: Replace the 4 FPdc with C4. The cross rows are Rows 4, 8, 12 and 16.
Gauge and Checkpoints
Gauge: 24 sts and 16 rows make a 3 in (7.6 cm) square in stroke pattern. That works out to 8 sts and 5.33 rows per 1 in (2.5 cm).
Test swatch: Make 24 fhdc. Work 15 more rows in stroke pattern, with four 6-st strokes side by side and crosses on Rows 4, 8, 12 and 16. Measure without stretching. The swatch should be 3 in (7.6 cm) each way.
- Too big: Go down 0.25 mm in hook size.
- Too small: Go up 0.25 mm in hook size.
- Width correct but height off: Pull your hdc loops up a little higher or lower. Row height drives the border math.
Checkpoints:
- After Row 6 of each foot: 1.75 in (4.4 cm) wide and 1.125 in (2.9 cm) tall.
- Middle peak after Row 14: 1.75 in (4.4 cm) wide and 2.625 in (6.7 cm) tall from the bottom edge.
- Whole letter before border: 4.0 in (10.2 cm) wide at the top, 3.75 in (9.5 cm) wide across the feet, and 3.375 in (8.6 cm) tall.
- After border: 4.25 in (10.8 cm) x 3.625 in (9.2 cm).
Part 1: Left Foot and Left Outer Stroke
Use Color A. RS rows are worked right to left. The outer edge of this stroke is its left edge.
Row 1 (WS): 14 fhdc. Turn. (14 sts)
Row 2 (RS): Ch 1, hdc in first st, FPdc around next 4 sts, hdc in next 4 sts, FPdc around next 4 sts, hdc in last st. Turn. (14 sts)
The 4 middle hdc are 2 stroke-edge sts plus 2 link sts. Later, the link sts form the floor of the left top notch.
Row 3 (WS): Ch 1, hdc in first st, BPdc around next 4 sts, hdc in next 4 sts, BPdc around next 4 sts, hdc in last st. Turn. (14 sts)
Row 4 (RS, cross): Ch 1, hdc, C4, hdc in next 4 sts, C4, hdc. Turn. (14 sts)
Row 5: Repeat Row 3. (14 sts)
Row 6: Repeat Row 2. (14 sts)
Checkpoint: 1.75 in (4.4 cm) wide and 1.125 in (2.9 cm) tall.
Now work only the first 6 sts for the outer stroke.
Row 7 (WS): Ch 1, hdc, BPdc around next 4 sts, hdc. Turn, leaving the other 8 sts unworked. (6 sts)
Row 8 (RS, cross): Ch 1, hdc, C4, hdc. Turn. (6 sts)
Row 9: Repeat Row 7. (6 sts)
Row 10 (RS, increase): Ch 1, hdc, FPdc around next 4 sts, 2 hdc in last st. Turn. (7 sts)
The increase sits on the outer edge, so the stroke flares outward toward the top.
Row 11 (WS): Ch 1, hdc in first 2 sts, BPdc around next 4 sts, hdc. Turn. (7 sts)
Row 12 (RS, cross): Ch 1, hdc, C4, hdc in last 2 sts. Turn. (7 sts)
Rows 13, 15 and 17: Repeat Row 11. (7 sts)
Rows 14 and 18 (RS): Ch 1, hdc, FPdc around next 4 sts, hdc in last 2 sts. Turn. (7 sts)
Row 16 (RS, cross): Repeat Row 12. (7 sts)
Fasten off after Row 18. The stroke should measure 3.375 in (8.6 cm) from the foundation edge.
Left inner stroke: With the WS facing, skip the 2 link sts after the outer stroke. Join Color A in the 9th st of Row 6.
Row 7 (WS): Ch 1, hdc, BPdc around next 4 sts, hdc. Turn. (6 sts)
Row 8 (RS, cross): Ch 1, hdc, C4, hdc. (6 sts)
Don’t fasten off. Pull up a long loop and put it on a stitch marker. You will come back to it in Part 3.
Part 2: Right Foot and Right Outer Stroke
Rows 1–6: Work exactly as Rows 1–6 of the left foot. (14 sts)
Right inner stroke:
Row 7 (WS): Ch 1, hdc, BPdc around next 4 sts, hdc. Turn. (6 sts)
Row 8 (RS, cross): Ch 1, hdc, C4, hdc. (6 sts) Fasten off.
Right outer stroke: With the WS facing, skip the 2 link sts. Join Color A in the 9th st of Row 6. This stroke’s outer edge is its right edge, so the increase goes at the start of a RS row.
Row 7 (WS): Ch 1, hdc, BPdc around next 4 sts, hdc. Turn. (6 sts)
Row 8 (RS, cross): Ch 1, hdc, C4, hdc. Turn. (6 sts)
Row 9: Repeat Row 7. (6 sts)
Row 10 (RS, increase): Ch 1, 2 hdc in first st, FPdc around next 4 sts, hdc. Turn. (7 sts)
Row 11 (WS): Ch 1, hdc, BPdc around next 4 sts, hdc in last 2 sts. Turn. (7 sts)
Row 12 (RS, cross): Ch 1, hdc in first 2 sts, C4, hdc. Turn. (7 sts)
Rows 13, 15 and 17: Repeat Row 11. (7 sts)
Rows 14 and 18: Ch 1, hdc in first 2 sts, FPdc around next 4 sts, hdc. Turn. (7 sts)
Row 16: Repeat Row 12. (7 sts)
Fasten off.
Part 3: Middle Peak
Lay both halves WS up, side by side, so the left foot sits on the left when viewed from the RS. Put the held loop from the left inner stroke back on your hook.
Row 9 (WS, bridge): Ch 1. Across the left inner stroke, work hdc, BPdc around next 4 sts, hdc. Ch 2. Working into Row 8 of the right inner stroke, work hdc, BPdc around next 4 sts, hdc. Turn. (12 sts + 2 ch = 14 sts)
The ch-2 creates a slot exactly 2 sts wide between the feet. This matches the two 2-st notches at the top.
Row 10 (RS): Ch 1, hdc, FPdc around next 4 sts, hdc, hdc in each of the 2 ch, hdc, FPdc around next 4 sts, hdc. Turn. (14 sts)
Row 11 (WS): Ch 1, hdc, BPdc around next 4 sts, hdc in next 4 sts, BPdc around next 4 sts, hdc. Turn. (14 sts)
Row 12 (RS, cross): Ch 1, hdc, C4, hdc in next 4 sts, C4, hdc. Turn. (14 sts)
Row 13: Repeat Row 11. (14 sts)
Row 14: Repeat Row 10, working the 2 middle hdc into the hdc sts below. (14 sts)
Fasten off and weave in all ends on the WS.
Before-border check: The letter should measure 4.0 in (10.2 cm) across the top and 3.375 in (8.6 cm) tall.
Flowers and Leaves
Flower (make 2 in Color B and 1 in Color C):
Rnd 1: Make a magic ring, ch 1, 10 sc in the ring. Sl st to the first sc. (10 sts)
Rnd 2: (Hdc, 2 dc, hdc) in next st, sl st in next st; repeat 4 more times. (5 petals, 25 sts)
Each flower is about 0.75 in (1.9 cm) across. Sew 3 gold seed beads in a tight cluster at the center.
Leaf (make 3 in Color D): Ch 6. Starting in the 2nd ch from the hook, work sc, hdc, dc, hdc, sc. Ch 1 for the tip. Working along the other side of the chain, work sc, hdc, dc, hdc, sc. Sl st to the first sc. (10 sts plus the tip ch)
Each leaf is about 0.625 in (1.6 cm) long.
Border
Border gauge: 8 sc per 1 in (2.5 cm).
- Along stitch edges: Work 1 sc in each st.
- Along row-ends: Work 3 sc for every 2 row-ends, alternating 1 sc and 2 sc.
Here’s why that works: 2 rows measure 0.375 in (1.0 cm), and 3 sc at 8 per inch also measure 0.375 in (1.0 cm). The edges stay flat.
Rnd 1: With the RS facing and Color A, join in the top right corner of the right outer stroke. Work counterclockwise:
- Top of right outer stroke, 7 sts: 3 sc in first st, sc in next 5, 3 sc in last st. (11 sc)
- Inner edge of right outer stroke, 12 row-ends. (18 sc)
- Right notch floor, 2 link sts. (2 sc)
- Right edge of inner stroke and middle peak, 8 row-ends. (12 sc)
- Top of middle peak, 14 sts: 3 sc, 12 sc, 3 sc. (18 sc)
- Left edge of middle peak and inner stroke, 8 row-ends. (12 sc)
- Left notch floor. (2 sc)
- Inner edge of left outer stroke, 12 row-ends. (18 sc)
- Top of left outer stroke, 7 sts: 3 sc, 5 sc, 3 sc. (11 sc)
- Outer edge of left stroke, 18 row-ends. (27 sc)
- Left foot bottom, 14 sts: 3 sc, 12 sc, 3 sc. (18 sc)
- Left side of the slot, 8 row-ends. (12 sc)
- Underside of the bridge ch. (2 sc)
- Right side of the slot, 8 row-ends. (12 sc)
- Right foot bottom: 3 sc, 12 sc, 3 sc. (18 sc)
- Outer edge of right stroke, 18 row-ends. (27 sc)
Sl st to the first sc. (220 sc)
Each of the 8 outer corners gets 3 sc. The concave inner corners at the notch floors and the top of the slot get no extra stitches, so they lie neatly.
Rnd 2: Sl st loosely in each sc around. (220 sl sts) Fasten off.
This firm rim adds 0.125 in (0.3 cm) to every edge. That turns 4.0 in x 3.375 in (10.2 cm x 8.6 cm) into 4.25 in x 3.625 in (10.8 cm x 9.2 cm).
Hanging loop: Join Color A in the middle sc of the inner top corner of the left outer stroke. Ch 8, then sl st in the same st. Work 12 sc into the ch-8 space and sl st to join. The loop measures about 0.5 in (1.3 cm).
Final Blocking
- Lightly dampen the letter with the spray bottle.
- Pin it RS up to 4.25 in (10.8 cm) wide and 3.625 in (9.2 cm) tall.
- Pin each outer corner, each notch floor and the top of the slot.
- Shape the cables with your fingertips, but don’t press them flat.
- Let it dry completely before removing the pins.
- Spray-block the flowers and leaves flat on their own.
Attaching the Appliqués and Hardware
Flowers: Arrange them down the right outer stroke with cream at the top, yellow in the middle and cream at the bottom. Space the centers 0.75 in (1.9 cm) apart. The top flower’s center should sit 0.625 in (1.6 cm) below the top edge.
Leaves: Tuck one leaf at the upper right of the top flower. Place one on the outer edge between the top and middle flowers, and one at the lower left of the bottom flower.
Sewing: Tack each piece down with sewing thread, working through the back loops only.
Hardware: Open a jump ring and link the hanging loop to one end of the chain. Use the second jump ring to attach the split ring to the other end.
Final Quality-Control Checklist
- Each stroke shows a raised 4-st rope that crosses every 4 rows
- The outer strokes are 7 sts wide from Row 10 up
- The middle peak sits 4 rows below the outer tips
- Both top notches and the bottom slot are 2 sts wide
- Border Rnd 1 has exactly 220 sc
- The final size is 4.25 in x 3.625 in (10.8 cm x 9.2 cm)
- The appliqués are secure, with no thread showing on the front
- The jump rings are fully closed
Troubleshooting
- Cables look flat: Use FPtr for the crosses rather than FPdc, and keep working BPdc on WS rows.
- Piece curls: Your post stitches are too tight. Go up 0.25 mm in hook size for the cross rows only.
- Border ruffles: Your rows are short. Recheck your row gauge, or work hdc loops slightly taller.
- Border pulls in: Your sc are tight. Loosen your tension or go up 0.25 mm in hook size for the border only.
- Notch floors pucker: Work sc2tog across the inner corner.
- Feet look uneven: Count Row 6 on both feet. Each one must have 14 sts.
Care
Hand wash in cool water, press out the moisture in a towel, and dry flat. Re-pin the edges if the charm loses its shape.
Final Notes
Here is the full measurement chain:
- A gauge of 8 sts and 5.33 rows per inch gives 6-st strokes 0.75 in (1.9 cm) wide and 18 rows 3.375 in (8.6 cm) tall.
- Before the border, the letter measures 4.0 in x 3.375 in (10.2 cm x 8.6 cm).
- A 0.125 in (0.3 cm) rim of 220 sc brings it to 4.25 in x 3.625 in (10.8 cm x 9.2 cm).
Check each stage and your W will hang neatly from its gold ring.
Happy crocheting!