

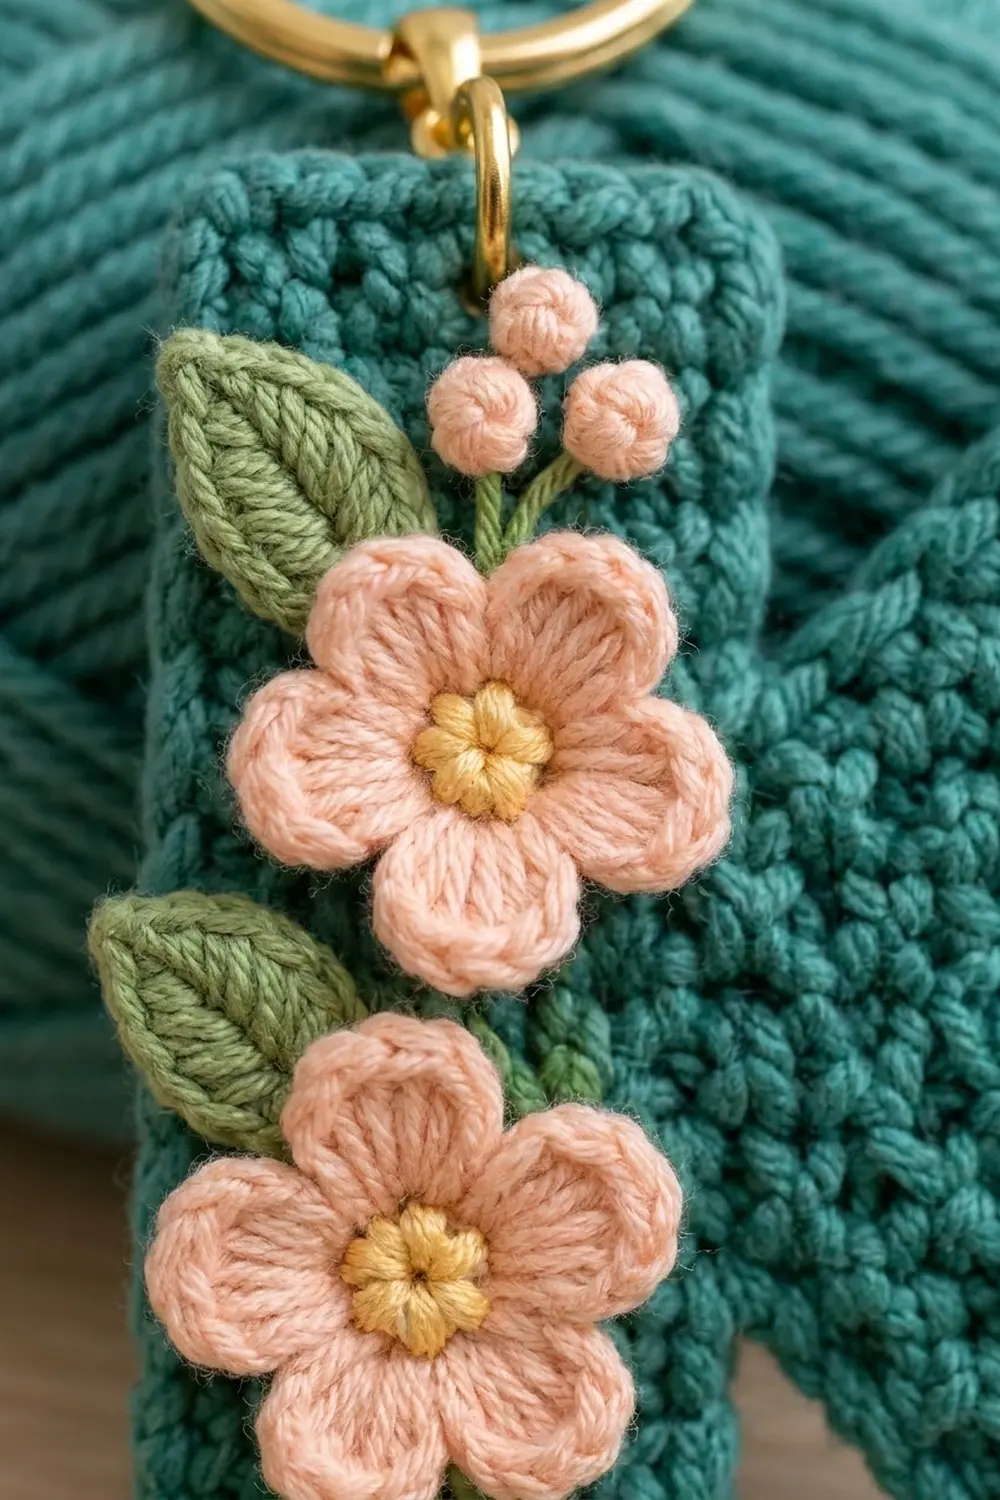
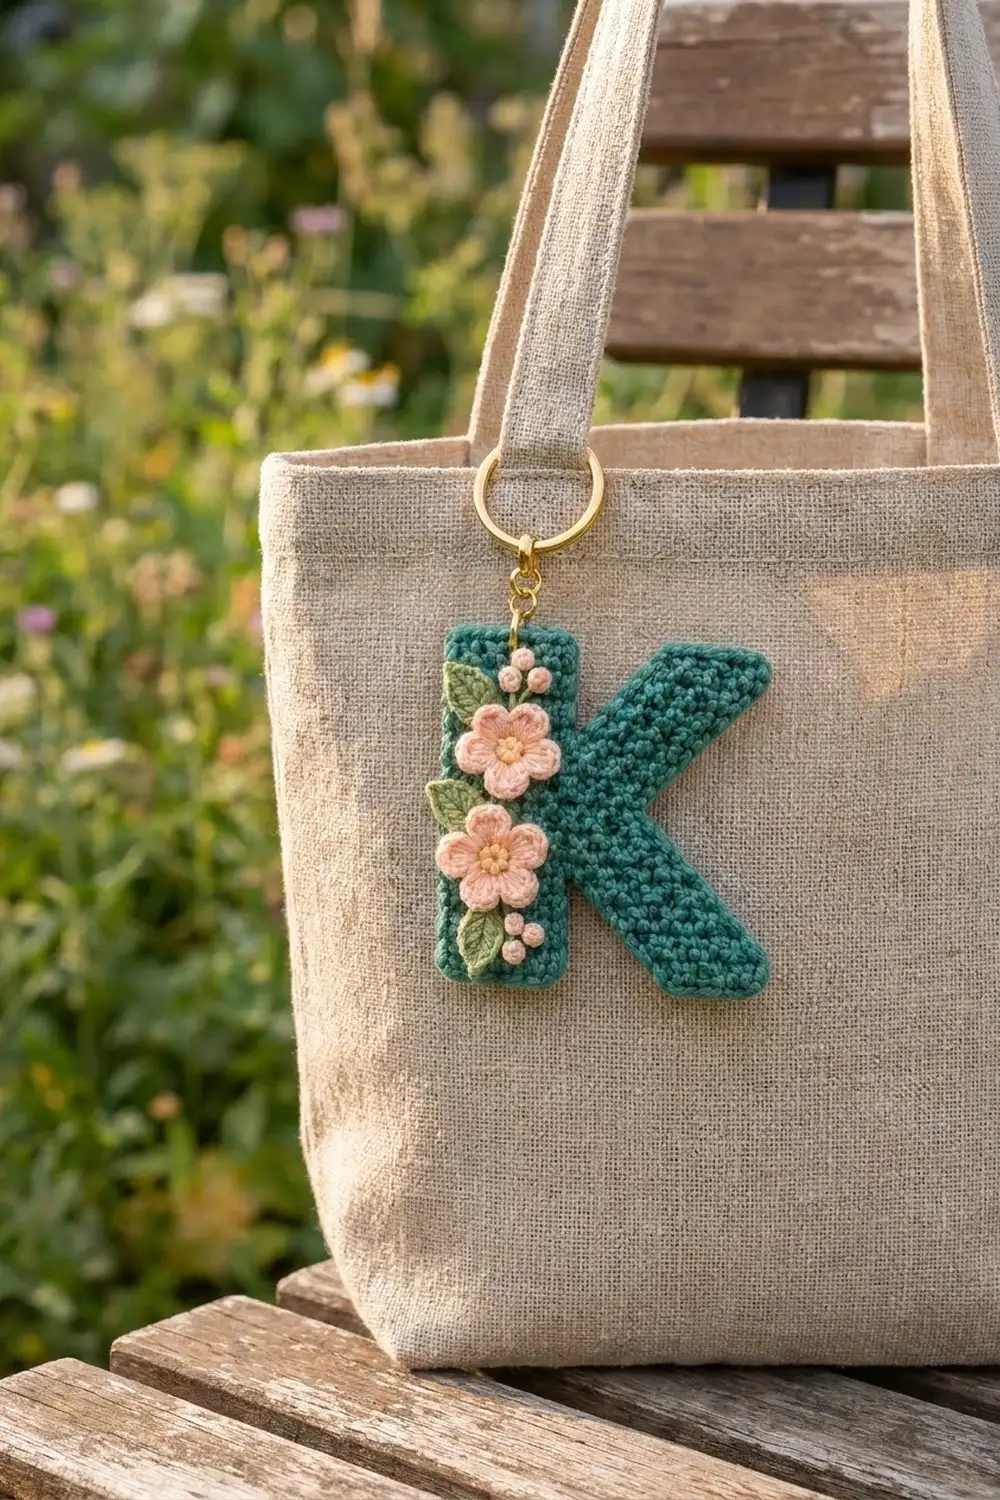
This little letter K keychain is a quick, personal gift. The body is worked in firm teal-green single crochet, and the stem carries a small garden of peach flowers, sage leaves, and tiny peach berries. A gold split ring finishes it, so it can ride on keys, a zipper pull, or a tote bag handle.
The colors are soft and fresh: teal for the letter, peach for the blossoms and berries, golden yellow for the flower centers, and sage green for the leaves. The style is tidy and slightly raised, with flat fabric underneath and small 3D appliqués on top.
This pattern uses US crochet terms. The finished keychain measures about 3.25 in (8.3 cm) tall and 2.9 in (7.4 cm) wide, not counting the hardware.
Construction is simple. You crochet a straight stem and a “<“-shaped arm strip in rows, sew them together where they meet, then work one round of single crochet around the whole letter. After blocking, you make two flowers, three leaves, and six berries, sew them onto the stem, and add the key ring.
Finished Size and Construction
- Finished size: about 3.25 in (8.3 cm) tall × 2.9 in (7.4 cm) wide
- Skill level: Easy to intermediate (shaped rows, small appliqués)
- Terminology: US crochet terms
- Yarn weight: DK / light (3) cotton
- Hooks: 3.25 mm (US D/3) for the letter, 2.75 mm (US C/2) for appliqués
- Number of pieces: one finished keychain (the letter body is made from 2 sewn sections, plus 11 small appliqués)
- Layout: stem on the left, arm strip on the right, appliqués stacked down the stem
- Stem size: 1 in (2.5 cm) wide × 3 in (7.6 cm) tall
- Size before edging: 3 in (7.6 cm) tall × 2.67 in (6.8 cm) wide
- Edging depth: about 1/8 in (0.3 cm) on every side
Materials
Choose a smooth mercerized or combed cotton in DK weight. Cotton holds the letter shape well, doesn’t fuzz much on a keychain, and gives the crisp stitch definition seen here. Avoid fluffy or very stretchy yarns.
- Teal green (letter body and edging): 10 g / 22 m
- Peach (flowers and berries): 5 g / 11 m
- Golden yellow (flower centers): 2 g / 4 m
- Sage green (leaves and berry stems): 3 g / 6 m
These amounts include extra yarn for a gauge check and sewing tails.
Tools:
- 3.25 mm (US D/3) crochet hook
- 2.75 mm (US C/2) crochet hook
- Tapestry needle with a fairly sharp tip
- 2 locking stitch markers
- Scissors
- Gold-tone split key ring, 1 in (2.5 cm) diameter
- Gold-tone jump ring, 8 mm
- Two pairs of flat-nose pliers
- Rustproof pins and a blocking board or foam mat
- Spray bottle with water
Abbreviations (US Terms)
- ch – chain
- sl st – slip stitch
- sc – single crochet
- hdc – half double crochet
- dc – double crochet
- sc2tog – single crochet 2 together
- MR – magic ring
- st(s) – stitch(es)
- RS – right side
Special stitch – shift row: 2 sc in first st, sc in next 3 sts, sc2tog over last 2 sts (6 sts). This moves the whole 6-st strip one stitch toward the edge where you started the row. You use it throughout the arm strip.
Gauge and Checkpoints
Gauge: 12 sc × 12 rows = 2 in (5.1 cm) with the 3.25 mm hook. That is 6 sc and 6 rows per 1 in (2.5 cm).
Make the stem first and use it as your gauge swatch. Measure it before you start the arm strip.
Checkpoints:
- Stem after Row 18: 1 in (2.5 cm) wide × 3 in (7.6 cm) tall
- Arm strip after Row 9: 1.5 in (3.8 cm) tall
- Arm strip after Row 18: 3 in (7.6 cm) tall, matching the stem
- Joined body before edging: 3 in (7.6 cm) × 2.67 in (6.8 cm)
- After edging: 3.25 in (8.3 cm) × 2.9 in (7.4 cm)
If your stem is too big (more than 1/8 in / 0.3 cm off), go down a hook size. If it is too small, go up a hook size. Row height matters as much as width here, because the arm angle depends on stitches and rows being nearly square.
Letter Body
Stem
With teal and the 3.25 mm hook, ch 7.
Row 1: Sc in 2nd ch from hook and in each ch across, turn. (6 sts)
Rows 2–18: Ch 1 (does not count as a st), sc in each st across, turn. (6 sts)
Fasten off and weave in the ends. Check the size: 1 in (2.5 cm) × 3 in (7.6 cm).
Lay the stem with your chosen RS up. Its right edge will hold the arm strip.
Arm Strip
You work this strip from the foot of the lower leg up to the tip of the upper arm. Every row has 6 sts. Shift rows slide the strip sideways to form the “<” shape.
With teal and the 3.25 mm hook, ch 7, leaving a 12 in (30.5 cm) tail.
Row 1: Sc in 2nd ch from hook and in each ch across, turn. (6 sts)
Row 1 ends at the starting-tail end. This is the inner edge, the edge that will face the stem. Place a marker there. From now on, even rows begin at the inner edge and odd rows begin at the outer edge.
Lower leg (moving toward the stem):
Row 2: Ch 1, shift row, turn. (6 sts)
Row 3: Ch 1, sc in each st across, turn. (6 sts)
Rows 4–9: Repeat Rows 2–3 three more times. (6 sts)
You have now worked 4 shift rows (Rows 2, 4, 6, 8), so the strip has moved 4 sts toward the inner edge. Measure: 1.5 in (3.8 cm) tall.
Vertex:
Row 10: Ch 1, sc in each st across, turn. (6 sts)
Rows 8, 9, and 10 sit closest to the stem. These are the rows you will sew to the stem.
Upper arm (moving away from the stem):
Row 11: Ch 1, shift row, turn. (6 sts)
Odd rows begin at the outer edge, so the increase now lands on the outer edge and the decrease on the inner edge. The strip moves outward.
Row 12: Ch 1, sc in each st across, turn. (6 sts)
Rows 13–18: Repeat Rows 11–12 three more times. (6 sts)
Fasten off. The four outward shifts (Rows 11, 13, 15, 17) balance the four inward shifts, so the foot and the arm tip both sit 4 sts out from the vertex. At its widest, the strip is 10 sts, or 1.67 in (4.2 cm), wide.
Joining the Body
Lay the stem and arm strip RS up, with the marked edge toward the stem and Row 1 of both pieces at the bottom. Rows 8–10 of the strip should touch Rows 8–10 of the stem.
Thread the strip’s long tail. Whip stitch the row ends of strip Rows 8–10 to the row ends of stem Rows 8–10, with 2 passes per row for a firm seam. Keep the bottoms level. Weave in the tail.
Measure the body: 3 in (7.6 cm) tall × 2.67 in (6.8 cm) wide. The width is 6 stem sts + 10 strip sts = 16 sts at 6 sts per inch.
Edging
Edging gauge: Work 1 sc per stitch along top and bottom edges, and 1 sc per row end along side edges. The gauge is 6 sc and 6 rows per inch, so both rules give 6 edging sts per inch (2.5 cm). Every edge gets the length it needs, so the edging doesn’t ruffle or cup.
Each outer corner takes 3 sc in the corner stitch. Each inside notch, where an arm meets the stem, takes one sc2tog to pull it closed.
With RS facing, the 3.25 mm hook, and teal, work clockwise from the stem’s top-left corner.
Round 1:
- Stem top (Row 18 sts): Standing sc in first st, 2 more sc in same st, sc in next 4 sts, 3 sc in last st. (10 sc)
- Stem right edge, Rows 17–12: 1 sc in each row end. (6 sc)
- Upper notch: Sc2tog over the stem’s Row 11 end and the arm’s Row 11 inner end. (1 st)
- Upper arm inner edge, Rows 12–17: 1 sc in each row end. (6 sc)
- Arm tip (Row 18 sts): 3 sc in first st, sc in next 4 sts, 3 sc in last st. (10 sc)
- Strip outer edge, Rows 17–2: 1 sc in each row end. (16 sc)
- Foot (opposite side of foundation ch): 3 sc in first ch, sc in next 4 ch, 3 sc in last ch. (10 sc)
- Lower leg inner edge, Rows 2–6: 1 sc in each row end. (5 sc)
- Lower notch: Sc2tog over the leg’s Row 7 inner end and the stem’s Row 7 end. (1 st)
- Stem right edge, Rows 6–2: 1 sc in each row end. (5 sc)
- Stem bottom (opposite side of foundation ch): 3 sc in first ch, sc in next 4 ch, 3 sc in last ch. (10 sc)
- Stem left edge, Rows 2–17: 1 sc in each row end. (16 sc)
Sl st to the first sc. Total: 96 sts. Fasten off and weave in.
Why the math works: Each 6-st top or bottom edge gets 6 sc plus 2 extra at each corner: 6 + 4 = 10. Each full side covers its rows minus the two corner rows: 18 − 2 = 16. The stem’s right edge splits around the seam: 6 rows above (Rows 12–17) and 5 rows below (Rows 2–6). Rows 8–10 are hidden in the seam, and Rows 7 and 11 are used by the notch decreases. Total: 10 + 6 + 1 + 6 + 10 + 16 + 10 + 5 + 1 + 5 + 10 + 16 = 96.
Measure: 3.25 in (8.3 cm) × 2.9 in (7.4 cm).
Appliqués
Use the 2.75 mm hook for all appliqués. Leave an 8 in (20.3 cm) tail on each piece for sewing.
Flowers (make 2)
Rnd 1: With yellow, MR, 5 sc in ring. Pull the ring tight, sl st to first sc. Fasten off yellow. (5 sts)
Rnd 2: Join peach in any st, ch 1, 2 sc in each st around, sl st to first sc. (10 sts)
Rnd 3: *Sl st in next st, (hdc, 3 dc, hdc) in next st; repeat from * 4 more times, sl st to first sl st. (5 petals; 30 sts: 5 sl sts + 25 petal sts)
Fasten off. Each flower is about 1 in (2.5 cm) across.
Leaves (make 3)
With sage green, ch 7.
Rnd 1: Sc in 2nd ch from hook, hdc in next ch, dc in next 2 ch, hdc in next ch, 3 sc in last ch. Working along the other side of the chain: hdc in next ch, dc in next 2 ch, hdc in next ch, sc in next ch. Ch 2, sl st in first sc to form the tip. (13 sts + ch-2 tip)
Fasten off. Using the tail, backstitch a center vein from base to tip. Each leaf is about 3/4 in (1.9 cm) long.
Berries (make 6)
With peach, MR, 6 sc in ring. Do not join. Cut a 6 in (15.2 cm) tail, weave it through the front loops of all 6 sts, and pull tight to form a ball. (6 sts)
Each berry is about 1/4 in (0.6 cm) across.
Placement
Pin everything before sewing. From top to bottom on the stem:
- Top cluster: 3 berries in a small triangle, 1/4 in (0.6 cm) below the top edging, just right of center.
- Upper leaf: on the left edge, tip pointing up-left.
- Upper flower: centered, just below the top cluster.
- Middle leaf: on the left edge, tip pointing left, tucked between the flowers.
- Lower flower: centered, its edges touching the upper flower.
- Bottom leaf: centered at the base, tip pointing down.
- Bottom cluster: 3 berries to the right of the bottom leaf.
Sew each piece with small stitches through its edges and center, catching only the front of the body. With sage green, work 2–3 straight stitches from each berry cluster toward the nearest flower for stems.
Hardware
Open the jump ring by twisting the ends sideways with two pliers. Pass it through the edging between the 5th and 6th sc of the stem top. Add the split ring, then close the jump ring so the ends sit flush.
Final Blocking
- Block the body before sewing on the appliqués if you can.
- Mist the letter evenly until damp, not soaked.
- Pin it RS up on the grid at 3.25 in (8.3 cm) × 2.9 in (7.4 cm).
- Pin each outer corner and both notches so the arms stay straight.
- Let it dry completely.
- After sewing on the appliqués, mist only the body around them. Shape the flowers gently with your fingers. Don’t flatten them.
- Let it dry again before adding the hardware.
Final Quality-Control Checklist
- Stem: 6 sts × 18 rows
- Arm strip: 6 sts every row, 4 inward and 4 outward shifts
- Seam firm across Rows 8–10
- Edging: exactly 96 sts, flat with no ruffles
- Finished size 3.25 in (8.3 cm) × 2.9 in (7.4 cm)
- 2 flowers, 3 leaves, 6 berries attached securely
- No stitches show through the back
- Jump ring fully closed
Troubleshooting
Arms look too flat or too steep: Your rows are taller or shorter than your stitches are wide. Change hook size or adjust your tension until 6 rows = 1 in (2.5 cm).
Strip count drifts from 6: Check that each shift row has exactly one 2-sc increase and one sc2tog.
Strip moves the wrong way: Check your marker. Even rows must start at the inner edge.
Gaps at the notches: Pull the sc2tog snug, or add one small whip stitch from behind.
Edging ruffles: You added extra sc along the side edges. Work exactly 1 sc per row end.
Edging cups: Loosen your tension, or check that you made 3 sc in every corner.
Flower petals curl: Steam-block them lightly and shape them with your fingers.
Care
Take the keychain off your keys, hand wash it in cool water with mild soap, and lay it flat to dry. Never machine dry.
Final Notes
Here is the measurement chain. The 6-st × 18-row stem gives 1 in (2.5 cm) × 3 in (7.6 cm). The 10-st-wide arm strip adds 1.67 in (4.2 cm), for a body of 3 in (7.6 cm) × 2.67 in (6.8 cm). One 96-st edging round adds 1/8 in (0.3 cm) per side, for a finished size of 3.25 in (8.3 cm) × 2.9 in (7.4 cm). Check each step and your letter will come out crisp and even.
Happy crocheting!