

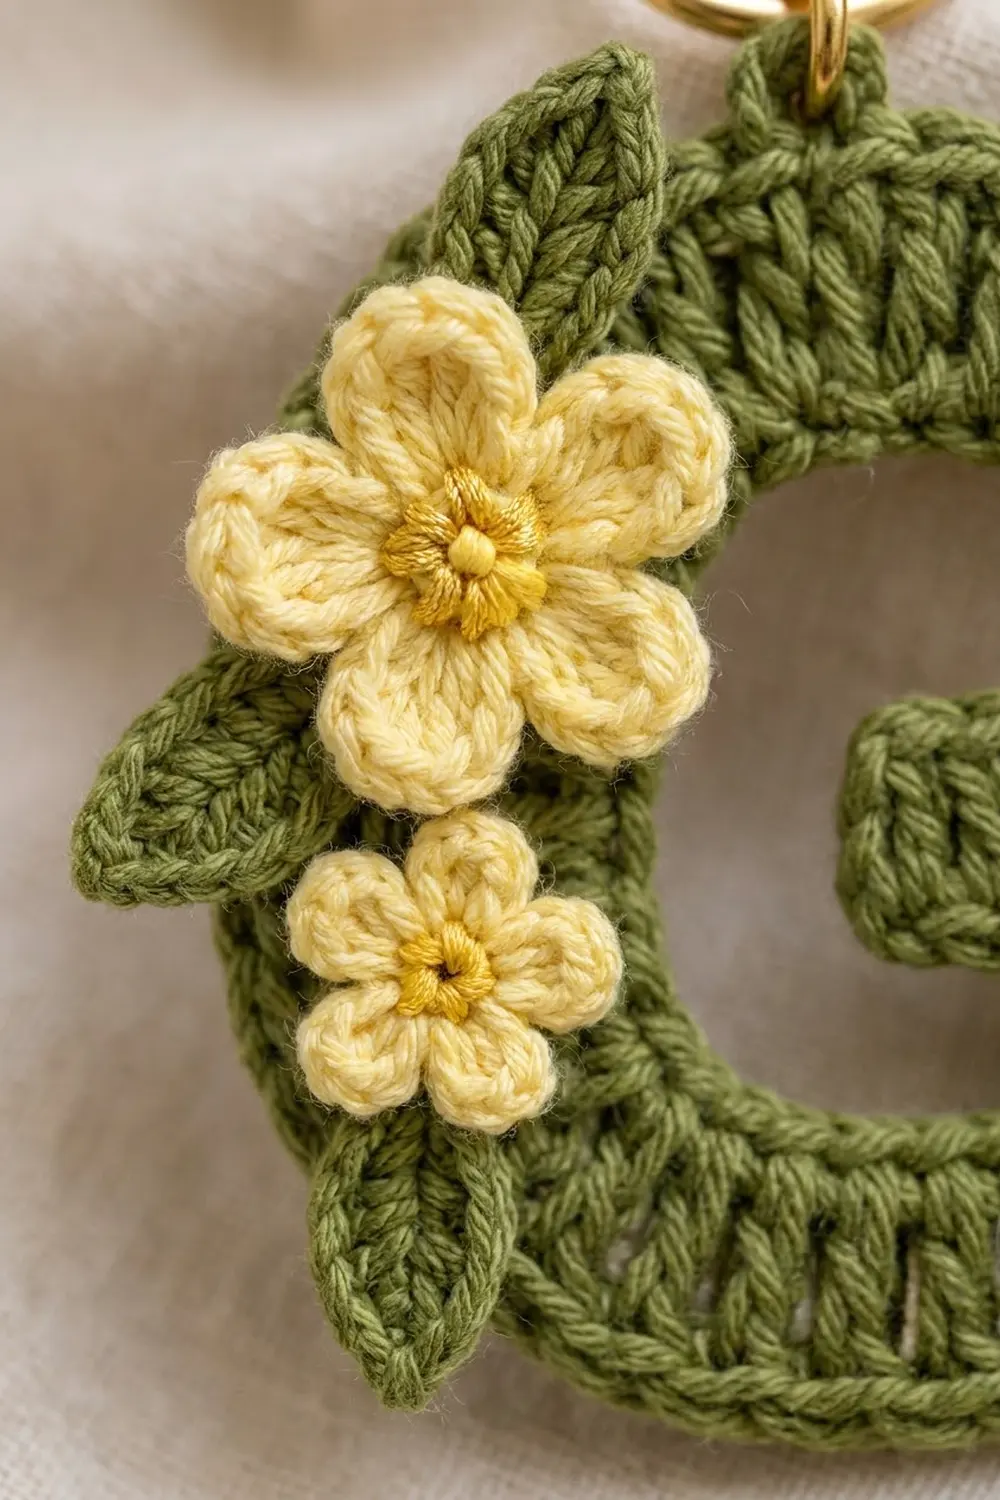
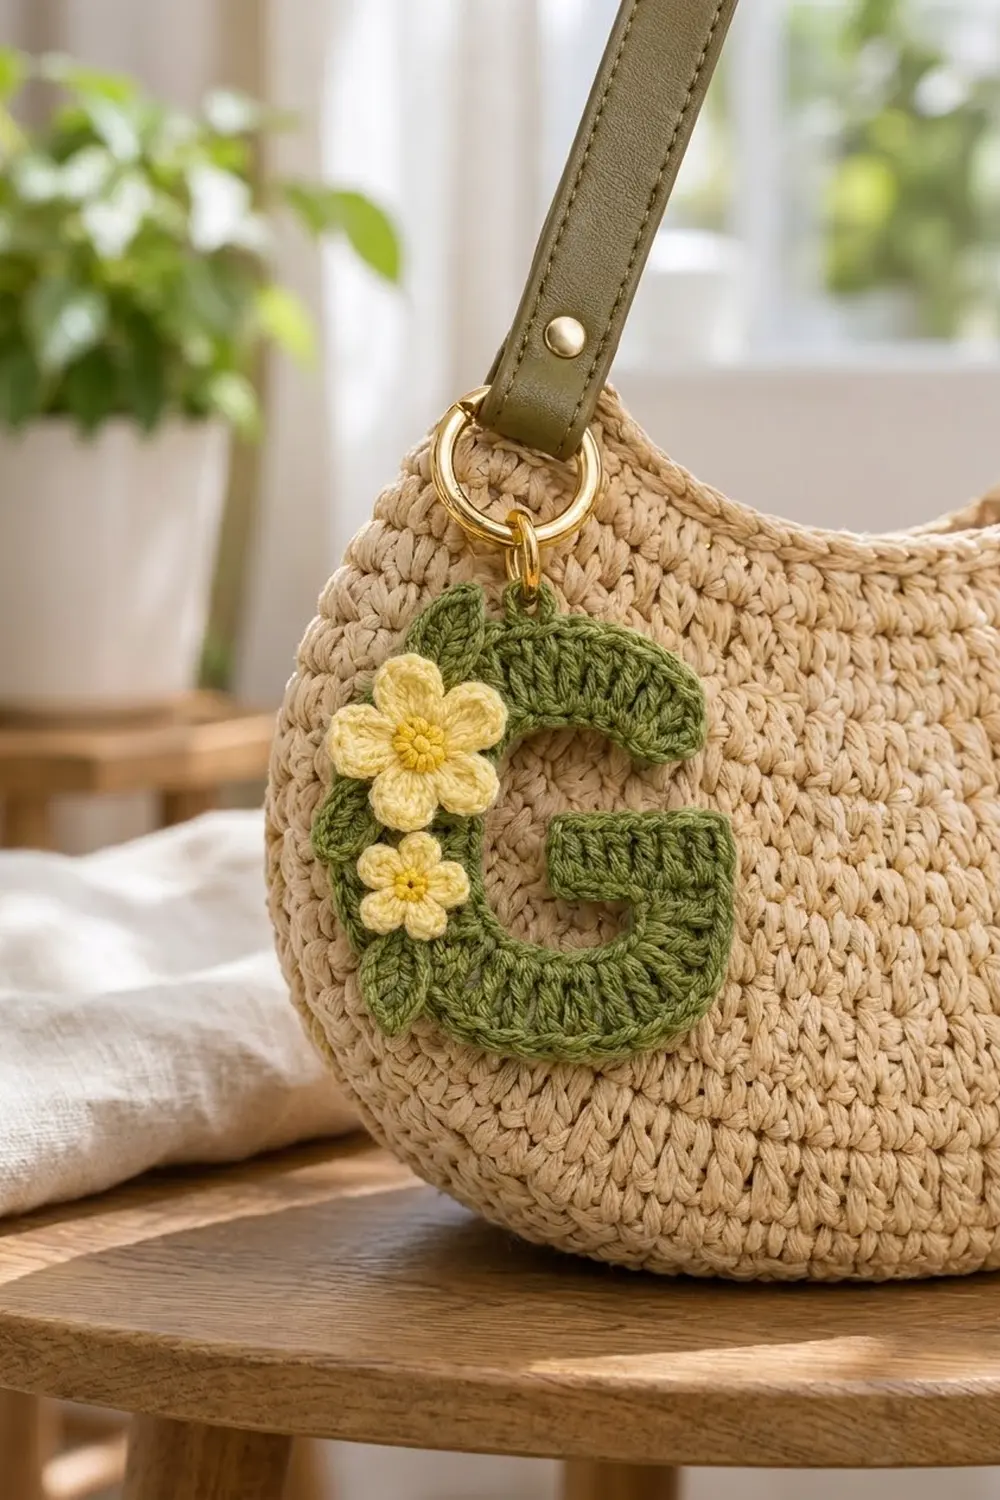
This little keychain is a crocheted capital G in soft olive green, trimmed with two buttery yellow flowers and three pointed leaves. It clips onto a bag, a pouch, or a set of keys, and it makes a quick personal gift.
The letter is a curved band of double crochet with a crisp single crochet outline. The band is worked lengthwise, so the dc posts fan out around the curve and give the G its ribbed, radiating texture. The flowers have pale yellow petals around golden centers, and the leaves match the letter.
This pattern uses US crochet terms. The finished letter measures about 3.5 in (8.9 cm) tall and 3.25 in (8.3 cm) wide, not counting the hanging loop and key ring.
Construction is simple. You crochet a short foundation chain and work two rows of dc that curve into a C. Then you build the crossbar directly onto the end of the band. One round of sc outlines everything and adds the hanging loop. Last, you make two flowers and three leaves and sew them onto the upper-left curve.
Finished Size and Construction
- Finished size: 3.5 in (8.9 cm) tall x 3.25 in (8.3 cm) wide
- Skill level: Easy / advanced beginner
- Terminology: US crochet terms
- Yarn weight: DK / light worsted (weight 3) cotton
- Hook: 3.5 mm (E-4)
- Number of pieces: 1 letter plus 5 small appliqués (2 flowers, 3 leaves), sewn on so it finishes as one piece
- Layout: one letter G with the appliqués clustered on the upper-left curve
- Band width before border: 0.8 in (2.0 cm)
- Letter size before border: 3.1 in (7.9 cm) tall x 2.85 in (7.2 cm) wide
- Border depth: 0.2 in (0.5 cm) on every edge, making the band 1.2 in (3.0 cm) wide
Materials
Choose a smooth mercerized or matte cotton in DK / light worsted weight. Cotton holds the letter’s shape well and won’t fuzz much with handling. Acrylic also works, but it will be softer and floppier.
- Color A, olive green: 8 g (about 19 m), for the letter and leaves
- Color B, pale buttercup yellow: 3 g (about 7 m), for the flower petals
- Color C, golden yellow: 1 g (about 3 m), for the flower centers
These amounts include a safety margin of about 30%, so you will have yarn left over.
Tools:
- 3.5 mm (E-4) crochet hook
- Tapestry needle
- Scissors
- Stitch marker
- Gold split key ring, about 1 in (2.5 cm) across
- Gold jump ring, 8 mm (0.3 in)
- Two pairs of flat-nose pliers (for the jump ring)
- Blocking mat and rust-proof pins
- Optional: fabric stiffener spray
Abbreviations (US Terms)
- ch – chain
- sl st – slip stitch
- sc – single crochet
- hdc – half double crochet
- dc – double crochet
- st(s) – stitch(es)
- sp – space
- MR – magic ring
- RS – right side
Special note, row-ends: “2 sc in the row-end” means working both sc around the post of the dc (or ch-3) at the end of that row. One dc row-end is as tall as 2 sc.
Beginning ch-3: throughout the letter, the ch-3 at the start of a row counts as 1 dc.
Gauge and Checkpoints
Gauge: 20 dc and 10 dc rows = 4 in (10.2 cm). That is 5 sts per inch, and each dc row is 0.4 in (1.0 cm) tall.
The letter is small, so Row 1 is your gauge test. Make it first and measure before you go on.
- After Row 1: the strip is 19 sts long and should measure 3.8 in (9.7 cm) long and 0.4 in (1.0 cm) tall.
- After Row 2: the band is 0.8 in (2.0 cm) wide and curls into a C shape.
- After the bar: the bar is 8 sts, or 1.6 in (4.1 cm), wide. The letter measures about 3.1 in (7.9 cm) x 2.85 in (7.2 cm).
- After the border: about 3.5 in (8.9 cm) x 3.25 in (8.3 cm).
If Row 1 is too long (over 4 in / 10.2 cm), go down to a 3.25 mm hook. If it is too short (under 3.6 in / 9.1 cm), go up to a 3.75 mm hook. Blocking can fix small differences.
Letter G
With Color A, leave a 6 in (15.2 cm) tail.
Foundation: Ch 21.
Row 1 (inner edge of the G): Dc in 4th ch from hook (the 3 skipped ch count as 1 dc) and in each ch across. (19 sts)
You worked 18 dc into the chain, plus the beginning ch-3. This row ends at the slip-knot end, which becomes the tip of the G’s top arm. The end where you started becomes the right leg.
Row 2 (outer edge, shaping row): Ch 3 (counts as dc), turn. Work these sections in order:
- Top arm: dc in next 2 sts. (3 sts)
- Big curve: 2 dc in each of next 10 sts. (20 sts)
- Bottom: dc in next 2 sts. (2 sts)
- Bottom-right corner: 2 dc in each of next 2 sts. (4 sts)
- Leg: dc in next st and in top of beginning ch-3. (2 sts)
Row 2 total: 31 sts. Check: 3 + 20 + 2 + 4 + 2 = 31. These sections use 3 + 10 + 2 + 2 + 2 = 19 sts of Row 1, so every stitch is accounted for.
The 12 increases lengthen only the outer edge. This makes the band curve into a C, with the top arm reaching right and the short leg rising at the lower right. Gently shape it with your fingers now.
Do not fasten off. Your loop is at the outer corner of the leg end.
Crossbar
The bar is built directly on top of the leg end, and a chain then carries it inward.
Bar Row 1: Ch 3 (counts as dc). Rotate the piece so the narrow leg end is on top. Work 1 dc around the post of the last dc of Row 2, then 2 dc around the post of the beginning ch-3 of Row 1. (4 sts)
That puts 2 sts in each dc row-end across the 0.8 in (2.0 cm) leg end, which matches gauge exactly.
Extension: Ch 6. This chain reaches inward, toward the inside of the G.
Bar Row 2: Dc in 4th ch from hook (the 3 skipped ch count as 1 dc) and in next 2 ch, then dc in each of the 4 sts of Bar Row 1. (8 sts)
Bar Row 3: Ch 3 (counts as dc), turn, dc in each of next 7 sts. (8 sts)
The bar is now 8 sts, or 1.6 in (4.1 cm), wide. Where it reaches into the G, it is 2 rows (0.8 in / 2.0 cm) tall. Do not fasten off. Your loop is at the top inner corner of the bar.
Border
Border gauge: 1 sc in each dc top (5 sc per inch along the edge) and 2 sc in each dc row-end (2 sc = 0.4 in / 1.0 cm, the height of one dc row).
Border Rnd (RS): Ch 1, do not turn. Work around the whole letter in this order:
- Bar inner short edge: 2 sc in the row-end of Bar Row 3, 2 sc in the row-end of Bar Row 2. (4 sc)
- Bar underside: 1 sc in the free loop of each of the 4 ch under the bar extension. (4 sc)
- Inner side of the leg: 2 sc in the inner row-end of Bar Row 1. (2 sc)
- Inner edge of the G: 1 sc in the free loop of each of the 18 foundation ch. (18 sc)
- Top-arm tip: 2 sc in the row-end of Row 1, 2 sc in the row-end of Row 2. (4 sc)
- Outer edge: sc in each of the first 6 sts of Row 2, ch 6 (hanging loop), sc in each of the remaining 25 sts. (31 sc, plus the ch-6 loop)
- Outer side of the leg and bar: 2 sc in the row-end of Bar Row 1, 2 sc in the row-end of Bar Row 2, 2 sc in the row-end of Bar Row 3. (6 sc)
- Bar top: sc in each of the 8 sts of Bar Row 3. (8 sc)
Sl st to the first sc. Total: 77 sc plus the ch-6 loop. Check: 4 + 4 + 2 + 18 + 4 + 31 + 6 + 8 = 77. Fasten off, leaving a 6 in (15.2 cm) tail.
Why the math works: each edge gets 1 sc per existing stitch and 2 sc per dc row-end, so every edge keeps its length and the outline lies flat. The ch-6 loop isn’t counted because it adds no stitches to the edge. The border adds 0.2 in (0.5 cm) all around, taking the letter from 3.1 x 2.85 in (7.9 x 7.2 cm) to 3.5 x 3.25 in (8.9 x 8.3 cm).
Flowers and Leaves
Large Flower (make 1)
Rnd 1: With Color C, make an MR. Ch 1, 10 sc in ring, sl st to first sc. (10 sc) Pull the ring closed and fasten off.
Rnd 2: Join Color B in any sc. Ch 1, [sc in same st, ch 3, skip next st, move to next st] 5 times, ending with sl st to first sc. (5 sc, 5 ch-3 sps)
Rnd 3: In each ch-3 sp work (sc, hdc, 3 dc, hdc, sc). Sl st to first sc. (5 petals of 7 sts each, 35 sts)
Fasten off, leaving a long tail for sewing. The flower measures about 1.25 in (3.2 cm) across.
Small Flower (make 1)
Rnd 1: With Color C, make an MR. Ch 1, 10 sc in ring, sl st to first sc. (10 sc) Fasten off.
Rnd 2: Join Color B in any sc. [Sl st in next st, (hdc, 2 dc, hdc) in next st] 5 times, sl st to the joining st. (5 petals of 4 sts each, plus 5 sl sts, 25 sts)
Fasten off, leaving a long tail. The flower measures about 0.9 in (2.3 cm) across.
Leaves (make 3)
With Color A, ch 8.
Side 1: Starting in 2nd ch from hook: sc, hdc, dc, dc, hdc, sc. (6 sts)
Stem end: 3 sc in the last ch. (3 sts)
Side 2: Rotate and work in the free loops on the other side of the chain: sc, hdc, dc, dc, hdc, sc. (6 sts)
Tip: Ch 2, sl st in the first sc of Side 1.
Total: 15 sts plus the ch-2 tip. Fasten off, leaving a long tail. Each leaf is about 1.1 in (2.8 cm) long and 0.5 in (1.3 cm) wide. Working both sides of the chain forms a natural center vein.
Final Blocking
- Weave in all ends on the letter. Leave the appliqué tails long for sewing.
- Dampen the letter lightly with water or a spray bottle until it is evenly damp.
- Lay it RS up on the blocking mat. Shape the C so the top arm and leg point right and the inner opening is round and open.
- Pin the outer corners and the bar so the letter measures 3.5 in (8.9 cm) tall and 3.25 in (8.3 cm) wide. Keep the band an even 1.2 in (3.0 cm) all the way around.
- Pin each flower flat with the petals spread evenly. Pin each leaf straight with a sharp tip.
- Optional: mist with fabric stiffener for a firmer keychain.
- Let everything dry completely, for at least 4 hours.
- Sew on the leaves first. Place one pointing up at the top left of the arch, one pointing out to the left at mid-height, and one pointing down at the lower left. Tack along the center vein so the tips stay free.
- Sew the large flower on the upper-left curve so it covers the bases of the top and middle leaves. Sew the small flower just below it, overlapping the base of the lower leaf. Use small hidden stitches around each golden center and between the petals.
- Open the jump ring with the two pliers, thread it through the ch-6 loop and the split key ring, and close it fully.
Final Quality-Control Checklist
- Row 1 has 19 sts and Row 2 has 31 sts.
- Bar Rows 2 and 3 each have 8 sts.
- The border has 77 sc plus the ch-6 loop.
- The letter measures 3.5 in (8.9 cm) x 3.25 in (8.3 cm).
- The band is an even 1.2 in (3.0 cm) wide.
- The large flower has 5 petals of 7 sts. The small flower has 5 petals of 4 sts.
- Each leaf has a pointed tip and a visible center vein.
- All appliqué stitches are hidden and secure on the back.
- The jump ring is fully closed with no gap.
Troubleshooting
The band ruffles instead of curving flat. Your Row 2 tension is loose. Redo Row 2 with slightly shorter dc, or block it firmly.
The G doesn’t curve enough. Make sure you worked 2 dc in each of the 10 big-curve sts, not in every other st.
The inner edge puckers. Work the 18 border sc into the foundation loosely, or go up a hook size for the border only.
There are gaps where the bar meets the leg. Work Bar Row 1 around the posts, not into the gaps between rows, and pull each dc snug.
The flower petals curl up. Block them flat and pin each petal before drying.
The jump ring slips out. Close it with a side-to-side twist until the ends meet flush.
Care
Hand wash in cool water with mild soap, then reshape the letter and lay it flat to dry. Don’t machine wash it, because the metal rings and sewn-on appliqués can snag.
Final Notes
Here is the measurement chain. Row 1 gives 19 sts at 3.8 in (9.7 cm). Row 2 adds 12 increases for 31 sts and a 0.8 in (2.0 cm) band. The 8-st bar is 1.6 in (4.1 cm) wide and brings the letter to 3.1 x 2.85 in (7.9 x 7.2 cm). The 77-st border adds 0.2 in (0.5 cm) all around, for a finished G of 3.5 x 3.25 in (8.9 x 8.3 cm). Check each stage and your keychain will come out the right size every time.
Happy crocheting!