
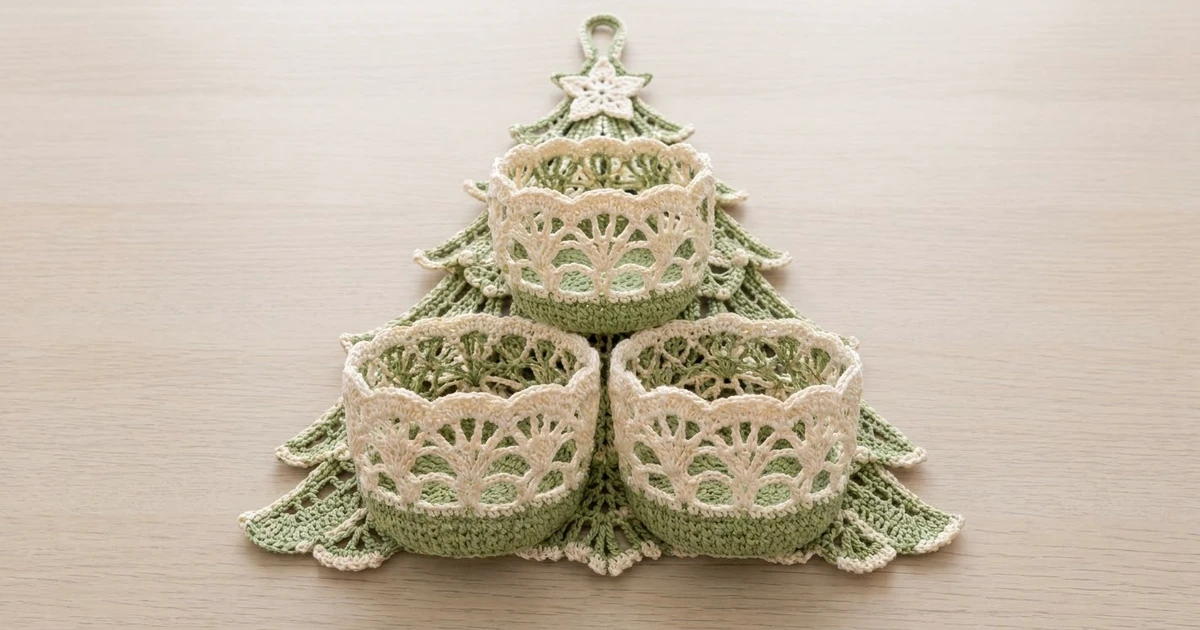
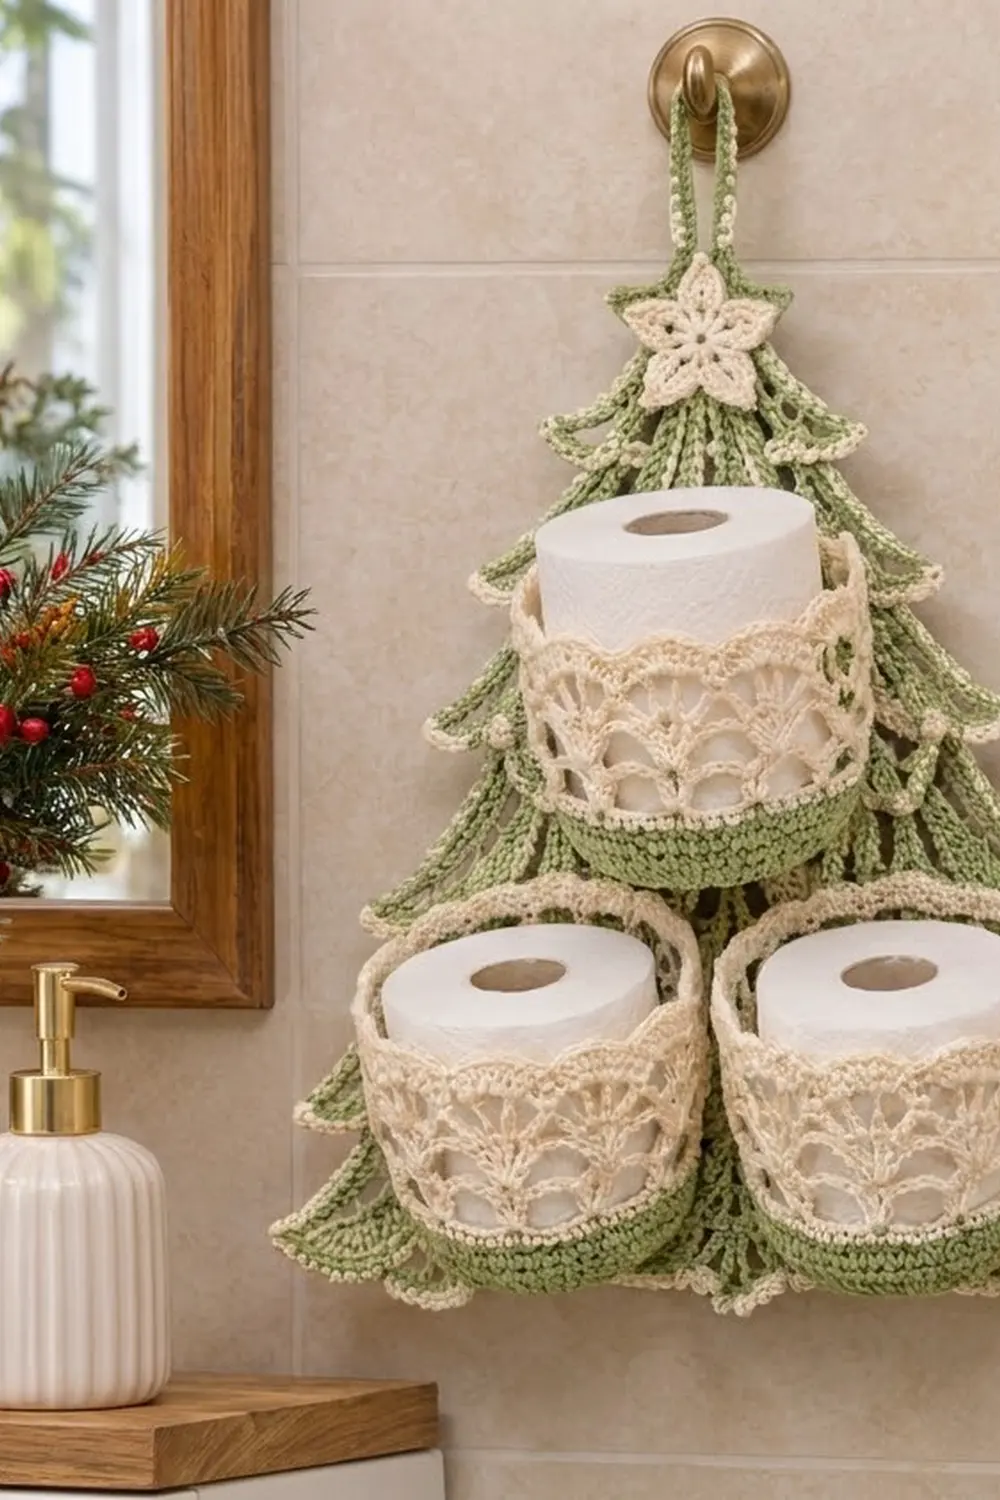
This hanging holder is festive but also practical for a holiday bathroom. Three layered sage-green tiers make the tree. Three cream lace baskets sit on the front, one at the top and two side by side below, and each one holds a standard toilet paper roll. A cream star and a green loop finish the top.
The colors are soft and calm. The tiers, basket bases and loop are sage green. The basket lace, tier edging and star are cream. The tiers alternate solid double-crochet rows with open mesh rows, and each lower edge ends in small pointed picot shells, so the tree looks like layered branches.
This pattern uses US crochet terms. The finished holder measures about 14.6 in (37.1 cm) wide and 18.2 in (46.2 cm) tall, or 20.2 in (51.3 cm) including the loop. Each basket is 5 in (12.7 cm) across and 3.75 in (9.5 cm) tall.
You will make three tiers in rows, three baskets in joined rounds and one star. First you stack and sew the tiers together. Then you work the edging along their free edges and sew on the baskets and star.
Finished Size and Construction
- Finished size: 14.6 in (37.1 cm) x 18.2 in (46.2 cm); 20.2 in (51.3 cm) with the loop
- Skill level: Intermediate
- Terminology: US
- Yarn weight: DK (3) cotton
- Hook: 3.5 mm (US E-4)
- Number of pieces: 7 (3 tiers, 3 baskets, 1 star), plus a loop worked onto Tier 1
- Layout: stacked tiers; 1 basket high and 2 baskets side by side low
- Piece sizes:
- Tier 1: 6.9 in (17.5 cm) x 6.7 in (17.0 cm)
- Tier 2: 10.9 in (27.7 cm) x 6.7 in (17.0 cm)
- Tier 3: 13.6 in (34.5 cm) x 7.6 in (19.3 cm)
- Basket: 5 in (12.7 cm) x 3.75 in (9.5 cm)
- Star: 2.25 in (5.7 cm)
- Size before border: 13.6 in (34.5 cm) x 17.4 in (44.2 cm)
- Border depth: 0.75 in (1.9 cm) at the hem points; 0.5 in (1.3 cm) along the sides
Materials
Use a smooth DK cotton. Cotton holds the basket shape better than acrylic and handles bathroom humidity well.
- Sage green: 150 g, about 330 m
- Cream: 100 g, about 220 m
- 3.5 mm (US E-4) hook
- Tapestry needle
- Locking stitch markers (12)
- Tape measure
- Blocking mats and rust-proof pins
- Spray bottle
The yarn amounts include about a 20% margin for swatching and differences in tension.
Abbreviations (US Terms)
- ch: chain
- sl st: slip stitch
- sc: single crochet
- hdc: half double crochet
- dc: double crochet
- tr: treble crochet
- BLO: back loop only
- MR: magic ring
- sk: skip
- sp(s): space(s)
- st(s): stitch(es)
- inc: 2 sc in the same st
Special stitches
- Picot: Ch 3, sl st in the 3rd ch from the hook.
- V-st: (Dc, ch 2, dc) in the same st.
- Pointed shell: (Hdc, dc, tr, picot, tr, dc, hdc) in the same st.
Gauge and Checkpoints
- Sc in the round: 18 sts x 20 rnds = 4 in (10.2 cm).
- Dc rows: 18 sts x 9 rows = 4 in (10.2 cm). That is 4.5 sts and 2.25 rows per inch.
Make one basket base and Tier 1 first. Together they test both gauges.
Checkpoints:
- Basket base, Rnd 6 (36 sts): 2.4 in (6.1 cm) across.
- Basket base, Rnd 12 (72 sts): 4.75 to 5 in (12.1 to 12.7 cm) across.
- Tier 1, Row 15 (31 sts): 6.9 in (17.5 cm) wide and 6.7 in (17.0 cm) tall.
- Tier 3, Row 17 (61 sts): 13.6 in (34.5 cm) wide.
If your pieces are too big, go down 0.25 mm. If they are too small, go up 0.25 mm. A basket base under 4.5 in (11.4 cm) will not fit a standard roll, so make sure the base is at least that wide.
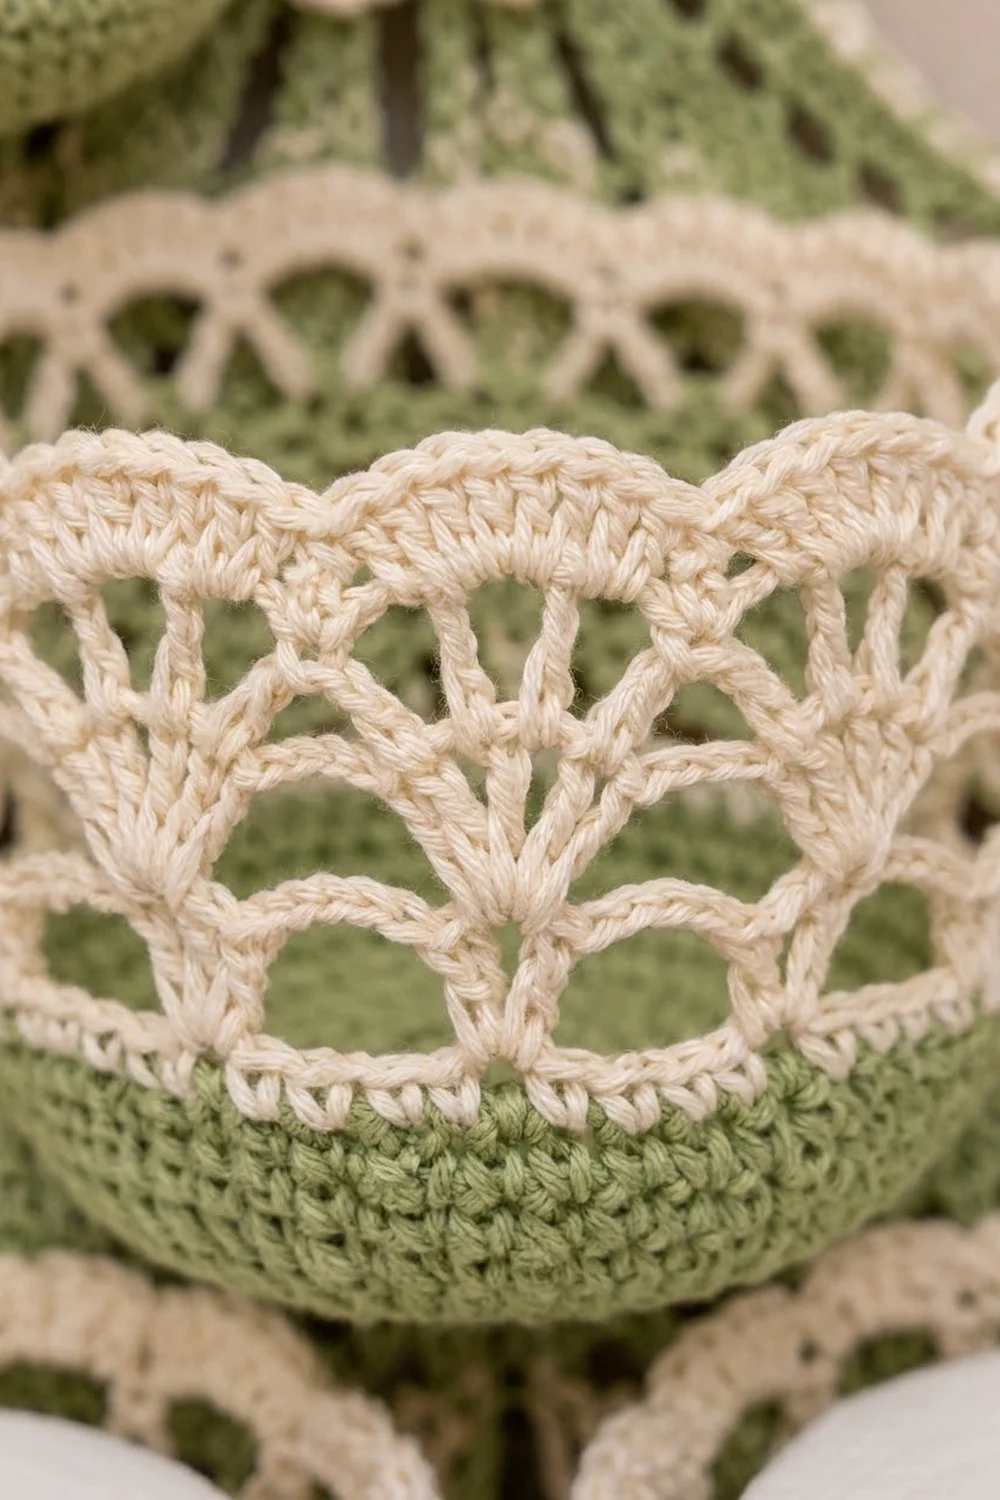
Basket (Make 3)
Work in joined rounds. Join each round with a sl st to the first st. The beginning ch 1 does not count as a st.
Base (Green)
Rnd 1: 6 sc in MR. (6)
Rnd 2: Inc in each st. (12)
Rnd 3: Sc in next st, inc 6 times. (18)
Rnds 4–12: Sc in each st up to the next increase point, inc 6 times. You work 1 more sc between increases in each round.
– Rnd 4: 24
– Rnd 5: 30
– Rnd 6: 36
– Rnd 7: 42
– Rnd 8: 48
– Rnd 9: 54
– Rnd 10: 60
– Rnd 11: 66
– Rnd 12: 72
Wall (Green)
Rnd 13: Sc in BLO of each st. (72) This makes the turning ridge where the wall starts.
Rnds 14–17: Sc in each st. (72)
Fasten off. The green band is 1 in (2.5 cm) tall.
Lace (Cream)
Rnd 18: Join cream. Sc in each st. (72)
Rnd 19: Ch 1, sc in first st, ch 2, sk 2, V-st in next st, ch 2, sk 2, sc in next st. Repeat around. On the last repeat, stop after “sk 2” and join. (12 V-sts, 12 sc; 6 sts per repeat)
Rnd 20 (fans): Sl st to the first V-st sp. Ch 3 (counts as dc), then (ch 1, dc) 4 times in the same sp. Ch 1, sc in next sc, ch 1. In the next V-st sp work (dc, ch 1) 4 times and then dc; ch 1, sc in next sc, ch 1. Repeat around and join. (12 fans of 5 dc, 12 sc)
Rnd 21: Sl st to the center (3rd) dc of the first fan. Ch 1, sc in the same dc, ch 4, dc in next sc, ch 4. Sc in center dc of next fan, ch 4, dc in next sc, ch 4. Repeat around and join. (24 ch-4 loops)
Rnd 22: Ch 1, 3 sc in each ch-4 loop. (72)
Rnd 23: Sc in each st. (72)
Rnd 24 (scallops): Ch 1, sc in first st, sk 2, (2 dc, picot, 2 dc) in next st, sk 2, sc in next st. Repeat around. On the last repeat, stop after “sk 2” and join. (12 scallops)
Fasten off. The finished basket is 3.75 in (9.5 cm) tall, and the rim flares slightly.
Tiers
Each tier is worked from the top down, and every row increases by 2 sts. Count each ch-1 sp as 1 st.
- Dc row: Ch 3 (counts as dc), turn. Dc in first st, dc in each dc and ch-1 sp across, 2 dc in top of turning ch.
- Mesh row: Ch 3 (counts as dc), turn. Dc in first st, ch 1, sk 1, dc in next st across, ending with a dc in the top of the turning ch, then 1 more dc in that same ch.
Every row has an odd number of sts, so the mesh repeat always ends evenly. Odd rows are dc rows and even rows are mesh rows.
Tier 1 (Top)
Row 1: With green, ch 5, dc in 4th ch from hook, dc in last ch. (3)
Rows 2–15: Alternate mesh rows and dc rows. Row r has 2r + 1 sts.
– Row 2: 5
– Row 9: 19
– Row 11: 23
– Row 13: 27
– Row 15: 31
Loop: Join green at the center st of Row 1. Ch 20, sl st in the same st, work 26 sc into the loop and join. The loop hangs about 2 in (5.1 cm).
Tier 2 (Middle)
Row 1: Ch 23, dc in 4th ch from hook and in each ch across. (21)
Rows 2–15: Alternate as for Tier 1.
– Row 5: 29
– Row 11: 41
– Row 15: 49
Tier 2 is 4.7 in (11.9 cm) at the top and 10.9 in (27.7 cm) at the bottom.
Tier 3 (Bottom)
Row 1: Ch 31, dc in 4th ch from hook and in each ch across. (29)
Rows 2–17: Alternate as for Tier 1.
– Row 9: 45
– Row 17: 61
Tier 3 is 6.4 in (16.3 cm) at the top and 13.6 in (34.5 cm) at the bottom.
Star (Make 1)
Rnd 1: With cream, ch 3 (counts as dc), then 14 dc into MR. Join. (15)
Rnd 2: Ch 5, sc in 2nd ch from hook, hdc in next ch, dc in next ch, tr in last ch, sk 2 sts, sl st in next st 5 times. (5 points)
Make All Pieces
- Green: Rnds 1–17 of all 3 baskets, Tiers 1–3, the loop and border Row 1 on each tier.
- Cream: Rnds 18–24 of all 3 baskets, the star and border Row 2 on each tier.
           [Star + Loop]
             [Tier 1]
            [Basket A]
             [Tier 2]
      [Basket B]  [Basket C]
             [Tier 3]
Joining
Stack the Tiers
- Lay Tier 1 face down and center Tier 2 face down on top of it. Line up Tier 2’s 21 foundation sts with the center 21 sts of Tier 1 Row 11, which has 23 sts. This leaves 1 st free on each side.
- Whipstitch the foundation to the back of Row 11 with green, 1 st to 1 st. Tier 2’s top edge now sits 4.9 in (12.4 cm) below the tree point.
- Repeat with Tier 3. Line up its 29 foundation sts with the center 29 sts of Tier 2 Row 11, which has 41 sts. This leaves 6 sts free on each side. Tier 3’s top edge sits 9.8 in (24.9 cm) below the point.
Sew with relaxed tension. The Tier 2 seam should measure 4.7 in (11.9 cm) and the Tier 3 seam 6.4 in (16.3 cm), with no puckering.
Checkpoint: The stacked panel measures 13.6 in (34.5 cm) x 17.4 in (44.2 cm).
Baskets and Star
Work the border (next section) before you sew on the baskets.
On each basket, mark 18 sts at the back of Rnd 13 and the 18 matching sts on Rnd 22. Both the basket and the panel are 4.5 sts per inch, so 18 sts make a 4 in (10.2 cm) seam, sewn 1 st to 1 st.
- Basket A: Center it so the Rnd 13 ridge sits 10.6 in (26.9 cm) below the tree point.
- Baskets B and C: Place their ridges 16.4 in (41.7 cm) below the point, 0.5 in (1.3 cm) apart. Each basket’s center is 2.75 in (7.0 cm) from the centerline.
Whipstitch the Rnd 13 line with green and the Rnd 22 line with cream, catching only the front layer of the panel. Sew the star over Rows 1–4 of Tier 1.
Border
Border gauge: 2 sc per dc row-end on the sides; 1 sc per st along the bottom.
Work the border on each tier, going down the left side, across the bottom and up the right side. Fold the upper tiers out of the way as you work. R is the tier’s row count and N is the stitch count of its last row.
Row 1 (green): Start at the top-left corner. Work 2 sc in each row-end down the side (2R sts). Work 3 sc in the first st of the last row, sc in the next N – 2 sts and 3 sc in the last st. Then work 2 sc in each row-end up the right side (2R sts). The total is 4R + N + 4.
– Tier 1: 30 per side + 35 across the bottom = 95
– Tier 2: 30 per side + 53 across the bottom = 113
– Tier 3: 34 per side + 65 across the bottom = 133
Row 2 (cream):
1. Down the left side, work sc in next 2 sts, picot.
2. At the corner, sc in the first corner sc, then (sc, picot, sc) in the center corner sc.
3. Sc in the third corner sc.
4. Across the bottom, work sk 2, pointed shell in next st, sk 2, sc in next st.
5. At the second corner, work (sc, picot, sc) in the center corner sc, then sc in the next sc.
6. Up the right side, work sc in next 2 sts, picot.
Picots and points per tier:
– Tier 1: 15 picots per side, 5 points
– Tier 2: 15 picots per side, 8 points
– Tier 3: 17 picots per side, 10 points
Why the math works: The bottom edge between the two corner-center stitches holds exactly N sts: 1 corner sc, the N – 2 middle sts and 1 more corner sc. After the opening sc, the 6-st repeats use N – 1 sts. For these tiers N – 1 is 30, 48 or 60, and all three divide evenly by 6. Each side has 2R sts, which is always even, so the 2-st picot repeat always fits.
Final Blocking
- Mist the holder until it is damp.
- Pin the panel face up to 14.6 in (37.1 cm) x 18.2 in (46.2 cm).
- Pin each hem point and side picot outward.
- Put a roll wrapped in a plastic bag inside each basket.
- Let everything dry completely, about 24 hours.
Final Quality-Control Checklist
- The tier edges are straight and symmetrical.
- The last rows have 31, 49 and 61 sts.
- Each basket has 72 sts and 12 scallops.
- The rolls slide in easily and stay put.
- Baskets B and C sit at the same height.
- Tails are woven in at least 2 in (5.1 cm).
- The loop holds the full weight without distorting the star.
Troubleshooting
- The base cups early: Your tension is too tight. Go up a hook size for the base.
- The basket wall flares: Work Rnds 14–17 more firmly.
- The tier sides wave: An increase is missing. Each row must grow by exactly 2.
- A mesh row ends on a ch: The previous row has an even count. Fix that row.
- The panel sags: Add a second line of stitching 1 in (2.5 cm) above each base seam.
Care
Hand wash in cool water. Lay it flat to dry and reshape the baskets over rolls.
Final Notes
Every measurement depends on gauge: 4.5 sts and 2.25 rows per inch. That gauge gives you a 72-st base of 4.75 to 5 in (12.1 to 12.7 cm) and tiers ending at 31, 49 and 61 sts. Sewing the tiers 1 st to 1 st onto Row 11 gives a panel of 17.4 in (44.2 cm). The border brings it to 14.6 in (37.1 cm) x 18.2 in (46.2 cm). Check each measurement as you go and the holder will hang straight.
Happy crocheting!